Microsoft have released a new exam for the Commerce functional consultant. I did take this exam in the beginning of July, and it can take a few weeks before the results come. But I’m pretty sure I will fail. The exam was quite hard and there was just too little time. I got 62 questions, but only managed to answer approx. 45 of them within the timeframe of 90 minutes. If you think MB-300 was difficult, then MB-340 is harder!
This blogpost is therefore my study notebook to retake the exam(if I fail😊). You will not find any of the exam questions or answers here, but if you follow this steps, I think you will be closer to achieving your goal of passing the MB-340 exam, and also to understand the topic better. The chapter and headlines are organized accoring to the skills measured list of MB-340.
Disclaimer: Some texts and pictures are copied from the Microsoft learn, docs. demo environments and other sites. In most cases you should find a hyperlink to the original source for a deeper study, and there are no guaranties that all here is right. You should always refer to the official Microsoft documentation and training.
Enjoy and god luck studying.
Configure Dynamics 365 Commerce Headquarters (25-30%)
Configure prerequisites and commerce parameters
Create employee and customer address books
Employee and customer address books are used to limit the personal to specific stores/POS or what information the employee should be see in HQ. How to create an address book is documented here. One nice feature here is that the address book is the basis for the extensible data security (XDS) policy, that limits what stores and transactions a HQ user can access. To make the XDS to work, remember to assign the correct Retail* roles to the users. This will ensure that the address book filtering is working as expected.
What I normally recommend is to have one address book per store, one for the region, one global address book and one address book for customers. If there are multiple brands, I also have customer address book for this. Keep in mind that you can select multiple address books towards stores, employees, and customers. I also like to think of address books as a hierarchy, and this allows for ensuring that regional managers can see their information and transactions across stores, while a store clerk only see information relevant to his job.
Configure and manage retail workers
Retail workers are setup using features from the HR features, but the workers table is accessible from the retail menu. Commerce lets you perform the following employee management functions:
- Create entities for jobs, positions, and workers
- Assign workers to more than one store
- Configure different language settings for each user and user-based POS screen layouts
- Limit the list of allowed operations
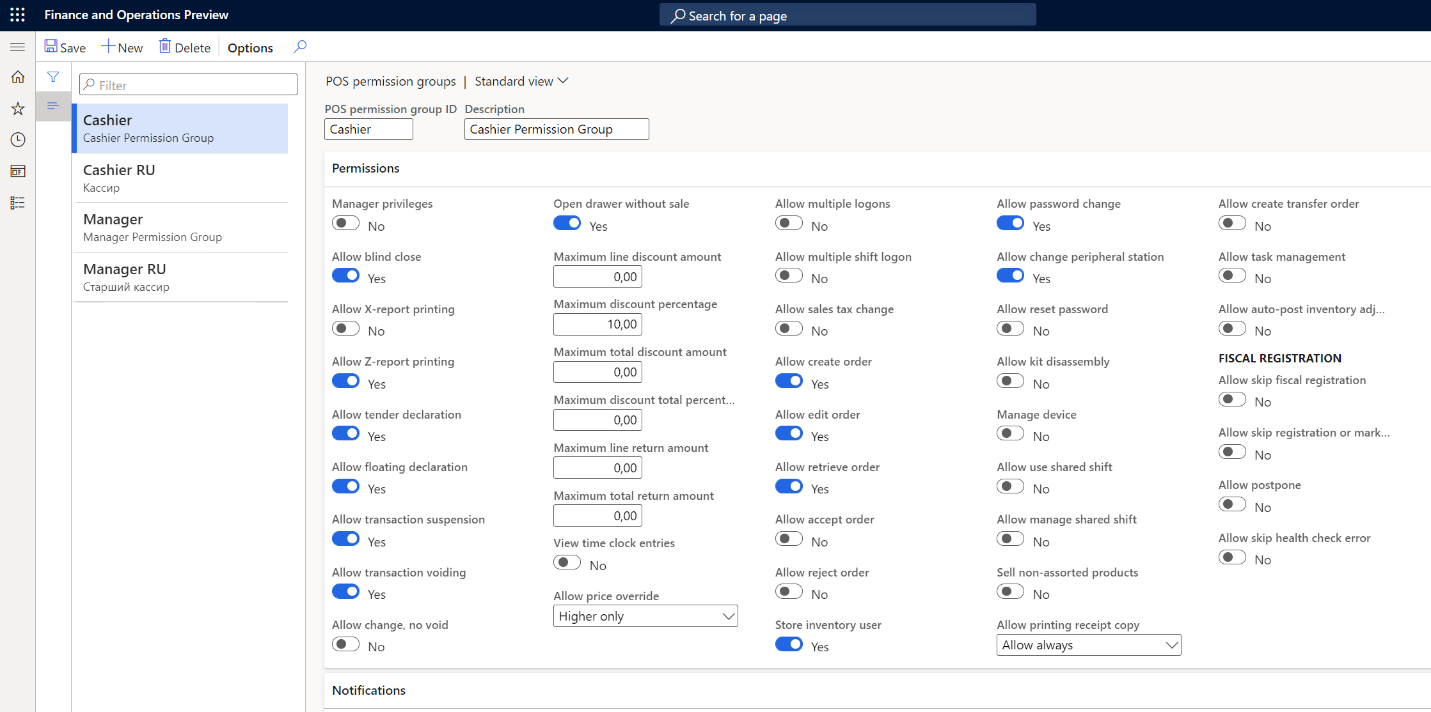
Additionally, you can configure the POS permission groups to associate different employees with different roles. The task management feature offers productivity enhancements for employees at the stores, where task lists can be assigned by the system.

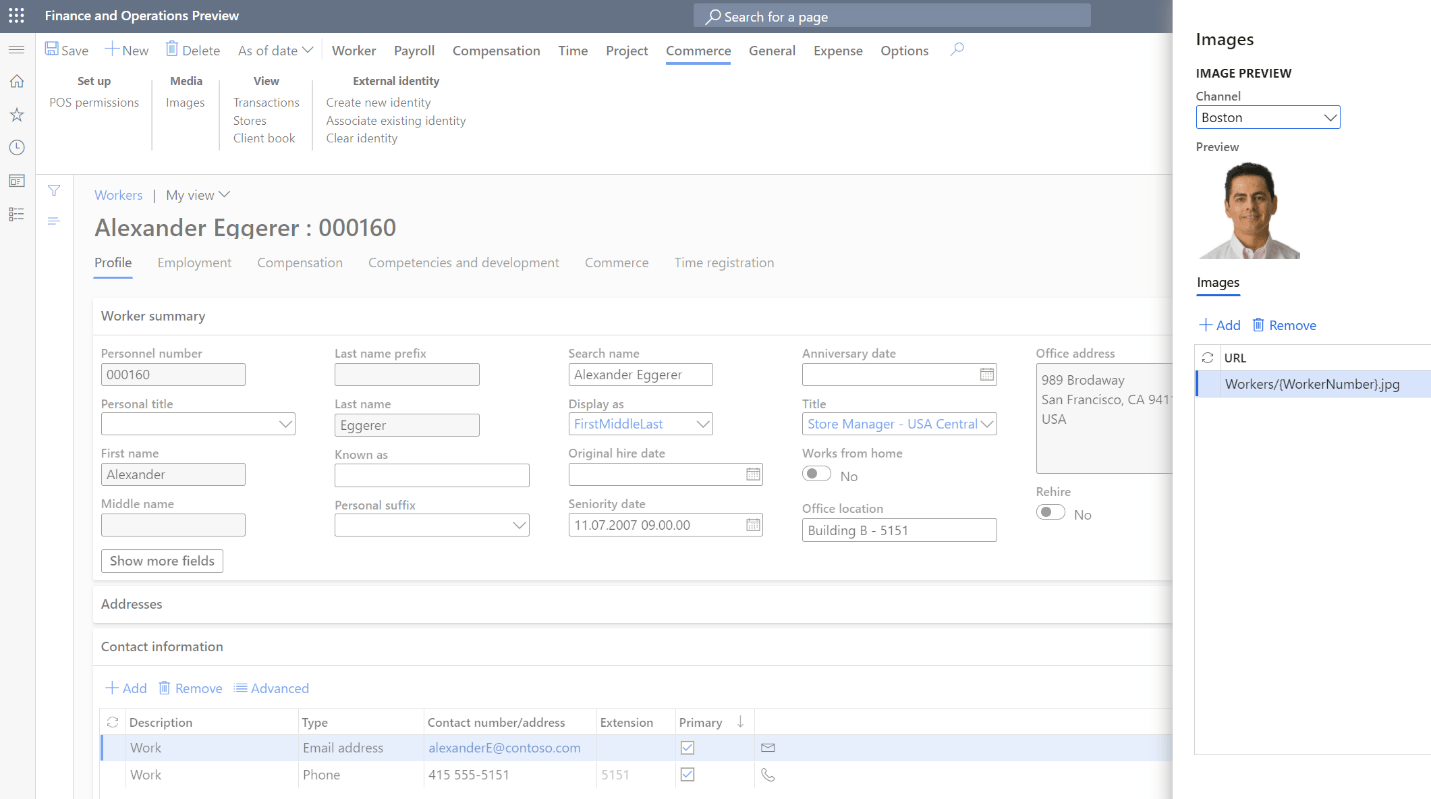
Setting up the structure of the workers and responsibilities is an important task, and by doing it the right way this can save you form a lot of work. The use of positions and jobs can ensure that the users get the correct level of access. Let’s say we have the following retail organization shown in the next figure.

Here we have 2 stores, and it is relevant to ensure that the employees in one store only access the store they are working in. We could model this hierarchy by assigning multiple address books to workers, customers and stores.
The workers can be connected to a position like “Store manager Bergen”. The position is then connected to a Job like “Store manager”. The job store manager can then be connected to a POS permission group. Then you don’t need to individual POS permissions, but it is the position that decides what is allowed.

Please spend time on this HR part, because it gives a lot of benefits when done properly. And please add pictures of the employee. It gives a more personal touch to the user😊
The permission group assigned to as job (or overridden on the worker) is the feature that is controlling what the worker is allowed to do in the POS. The fields are mostly self-explaining, but unfortunately not very well documented.
Here are some additional blogs on the subject.
Assign address books to customers, channels, and workers
Assigning address books to these records is easy. Find the address book field, click on the lookup button and select the address books that the record should be a part of.

A small tip. You cannot just copy/paste the address book values if you are marking the record with multiple address books. You need to actually click on the lookup, and then select each of them.
Create email templates and email notification profiles
The email templates is located at Organization administration –> Setup –> Organization email templates. The email template is can be defined per language.
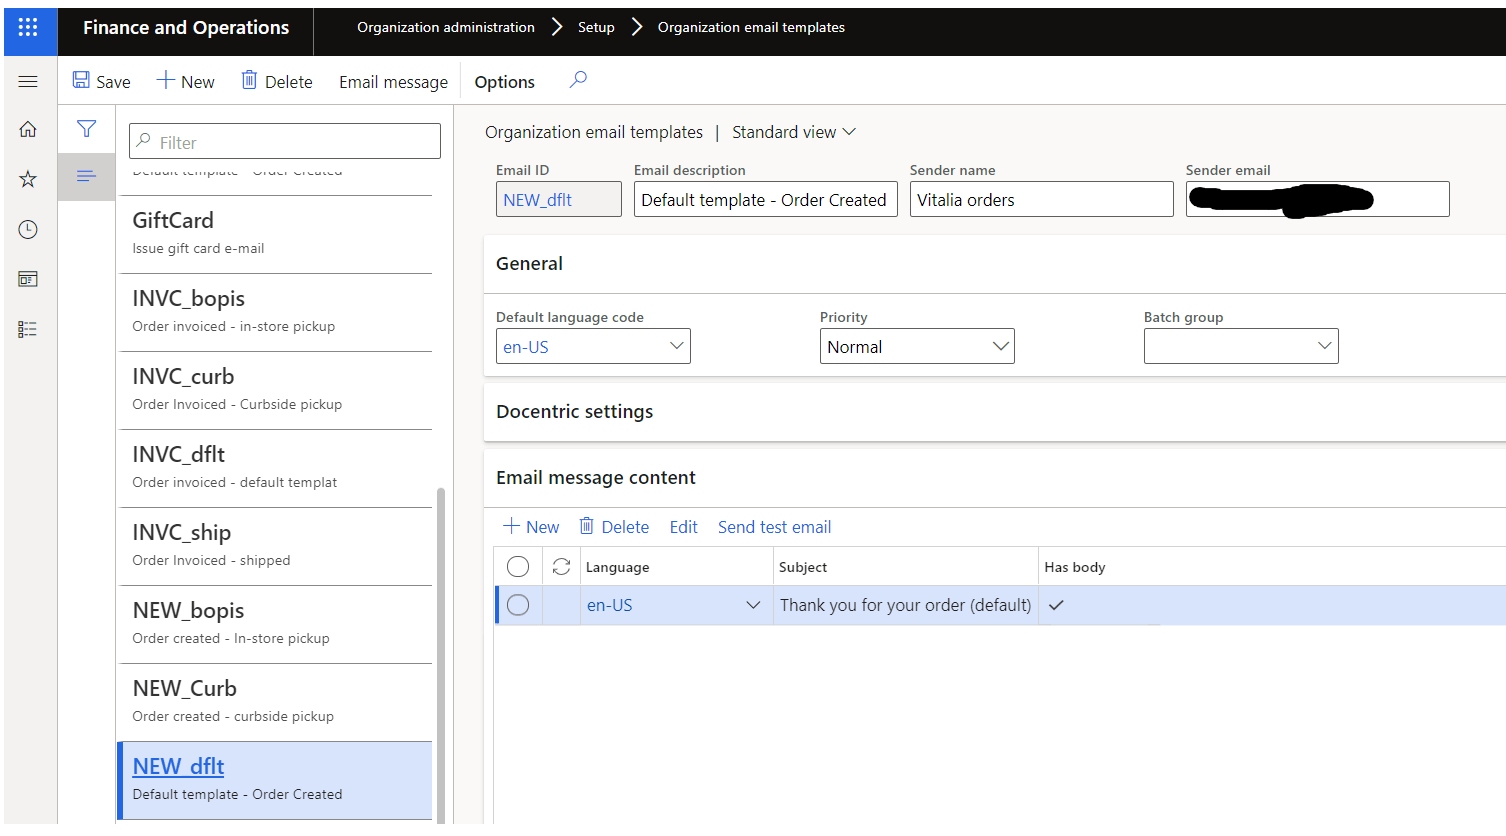
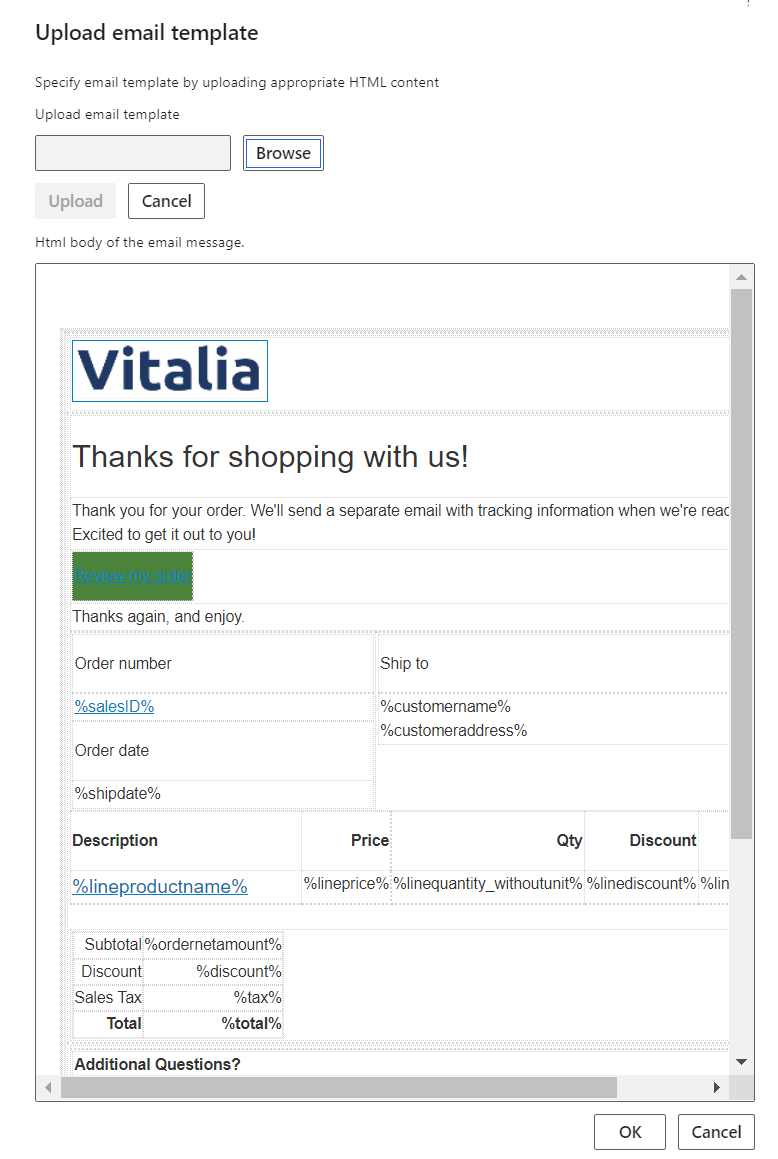
If you click on the “edit” button there is an upload capability in the screen. You also see a list of placeholders, where the system will fill in the specific information. The exact placeholders available can be found here.
Here is a small, but valuable tip from me, that makes it easy to manually transfer your templates between installations. Add the column “email”


Then a field with all the HTML is available for copy/paste. Press CTRL-A to mark all contents, and then you can paste it into any HTML editor. This is great if you want to just copy email templates from the Contoso demo data, and make some minor adjustments.

In a typical retail installation you would create quite a few email templates, and in the Contoso demo environment you can see a set that is relevant, and linked towards a commerce email notification profile. As you see here, there are emails for new order, confirmation, shipping, etc. You can also create separate emails per modes of delivery.

For configure the email batch, then the following docs is relevant to read.
Configure organizational hierarchies and hierarchy purposes
Organizational hierarchies are a powerful way of grouping a set of stores and then view and report from various perspectives. I often make hierarchies based on reporting purposes and often mimic the hierarchy of the address books. But you may also have geographical elements into the hierarchy. Keep in mind that the levels in the hierarchy corresponds internal organizations of the party entity, and that the retail channel most often is the lowest level. Therefore think through this setup carefully to ensure a correct structure. Also take a look at the following video by André Arnaud de Calavon for more a valuable walkthrough of the feature. Remember that when you publish a hierarchy you select a data, and it is not allowed to make changes prior to this date. I therefore recommend, that you publish the hierarchy on an earlier date, so that you have the possibility to make any corrections.

The organizational hierarchies can be used a few places. Like on the assortments where you can select what organizational entities should have a specific assortment. You also use it for financial and transactional statement processing. One that are relevant is the on the sales reporting, where the reporting is grouped according to the organizational hierarchy.

With some minor extensions it is possible to add additional levels, like region, franchisee etc, can be added by creating additional types of internal organizations. I have done dis at a few customers with success 😊
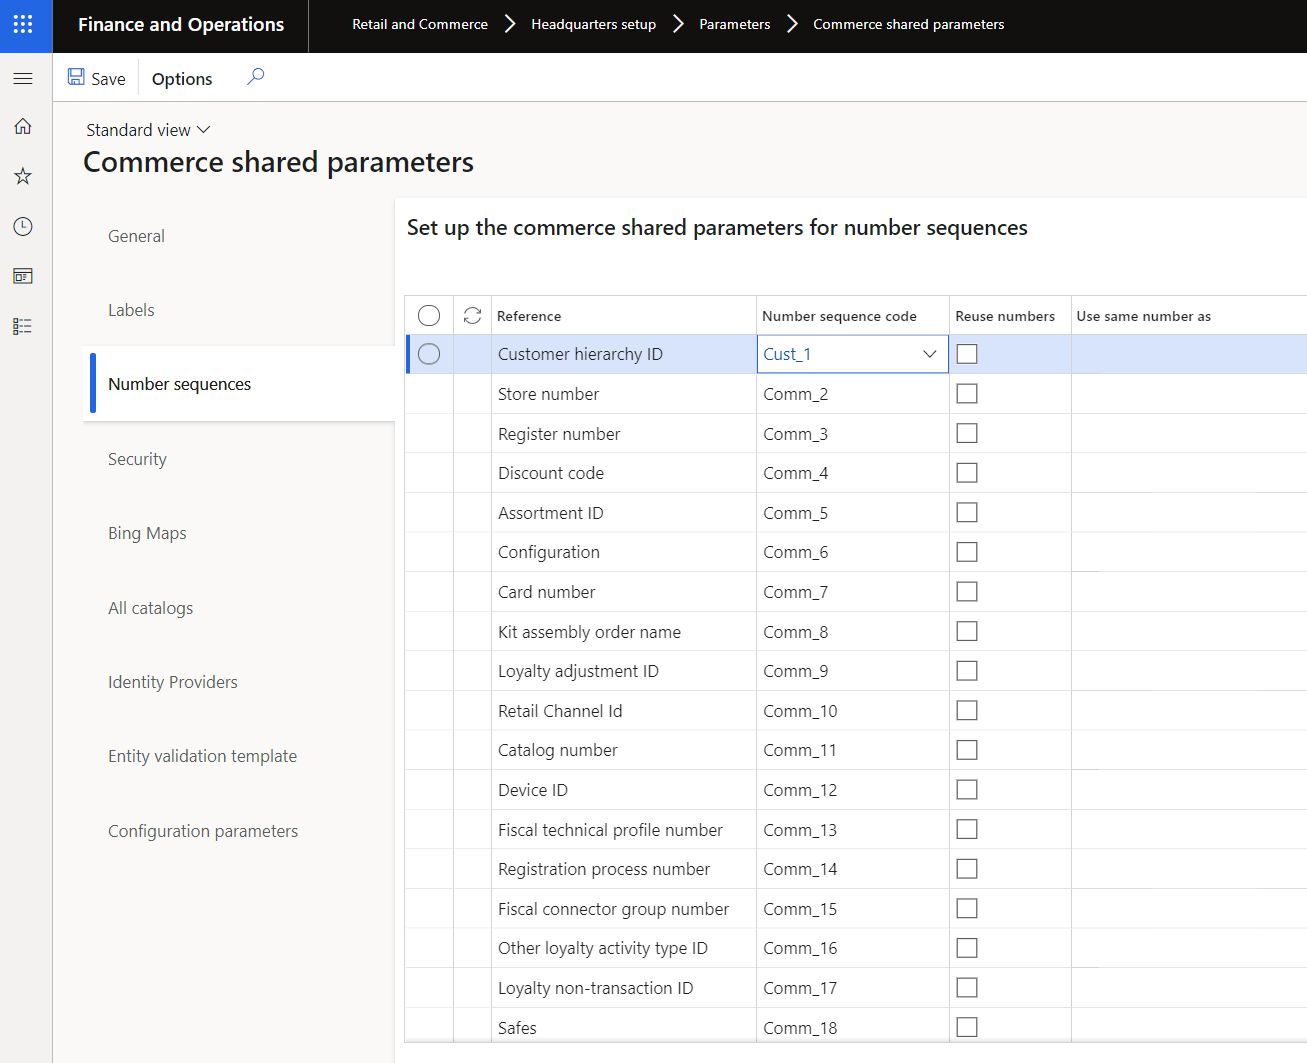
Configure Commerce shared parameters
The shared parameters are common to all legal entities. And the most important setup here, is the number sequences and Identity providers.
Configure company-specific Commerce parameters
The commerce parameters are per legal entity, and contains the more specific setup and number sequences. One important element is the “initialize” that creates the default configuration data.

Microsoft often have a set of configuration parameters for enabling features, like the “ProductSearch.UseAzureSearch”, that is essential when setting up the eCommerce.

The parameters here is actually not very well documented, and if often take some time “googling” or asking the community to find answers to each of the parameters. But most of them should be self-explaining if you have been working with Dynamics 365 for a while.
Describe and configure additional functionality
Create and configure channel and sales order attributes
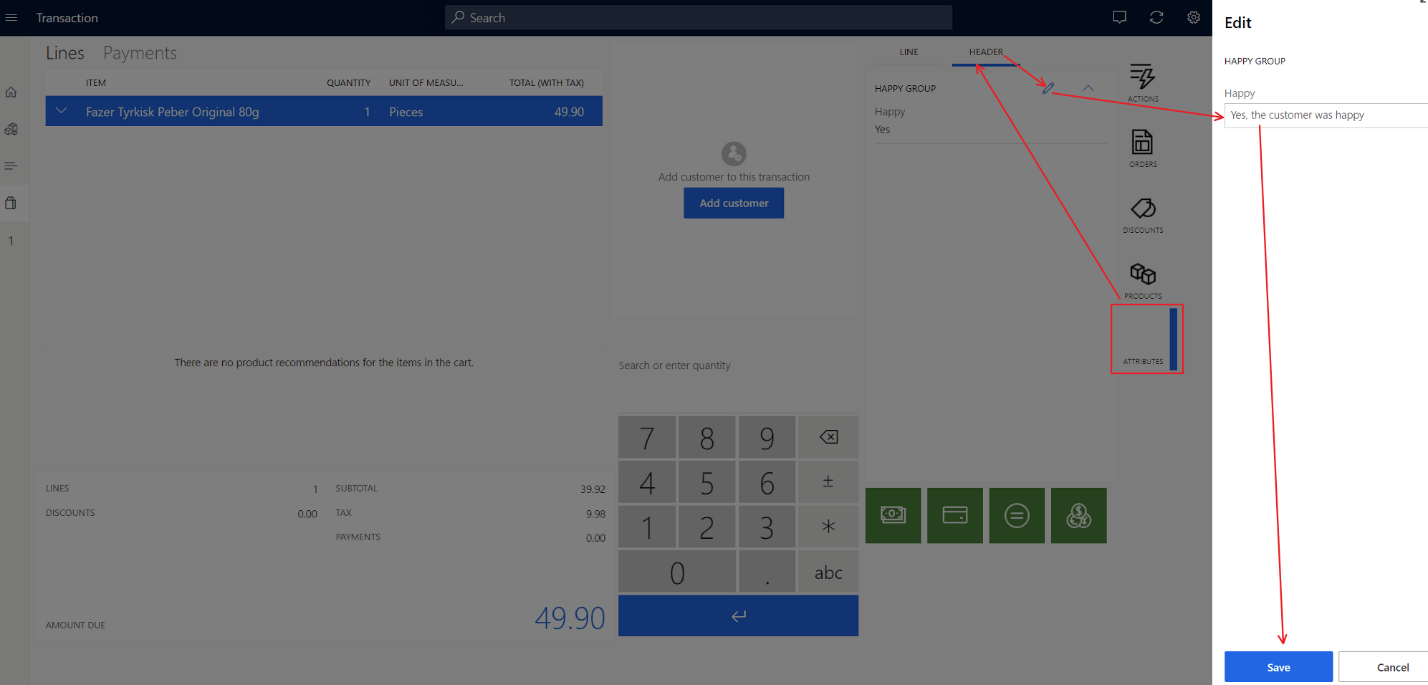
Attributes are documented here. Channel attributes are attributes that are captured on the transactions that originates from the channel/store. These attributes can then again be used for information and reporting purposes. Lets say we want to record if the customer was happy when performing a purchase. The first we need to do, is to create an attribute type:

Then we create an attribute based on this attribute type.

I would then place the attribute into an attribute group, as I will probably later add more attributes I would like to record per sales order.

On the store/channel, I will add the happy group, and state that I would like to record this on the order header.

This will allow me record if the customer was happy when we performed the transaction. (Remember to run distribution job 1070 first)
When we then have performed a transaction, and run the P-job for importing the transactions to HQ, we can see the recorded attribute on the transaction.

As seen here, the attributes opens for many possibilities for recording information happening at your sales channel. Keep also in mind that when using call center, then the attributes also comes into play, and you can record attributes when creating the sales order.

Currently only simple strings are supported, but more types will be available in later releases.
I hope you can see that the attributes in D365 is very flexible, and allows for a lot of scenarios. I also see that the feature is underused in implementations, and hope that by using attributes we can avoid a lot of extensions related to data recording.
Using attributes in power BI is also great for more depth analytics.
Configure commissions and sales representatives
Sales commission can be a nice way to reward hardworking employees, that manages to close the right deals. The documentation is available here, and also take a look at the following blog for how to setup commission groups. The way this works, is that when performing a sale, the sales order will be stamped with a sales representative, and on the sales group each sales representative can have a commission share.

I can then setup a commission calculation where I in this case give a commission of 2% on the revenue.

This will be posted to ledger according to the commission posting.

The process of paying out commissions to the sales representatives is not very well documented. So, I guess the process is a bit manual, and solved by looking at breakdown on a sales order, click the invoice tab on the specified sales order and then select Invoice Journals, which will open a new form. In that new form, select Commission and click Commission transactions.

If you wat a list of all commission transactions, you may add the following to your D365 URL : “&mi=CommissionTrans” and this will then list up commissions per sales representative.
If you cannot see the menu item, it is because you have enabled the project operations integration at “Global project management and accounting parameters”. It seams that there is a “collision” between the commission feature and the new project operations integration feature. I have no clue of why Microsoft have done this.
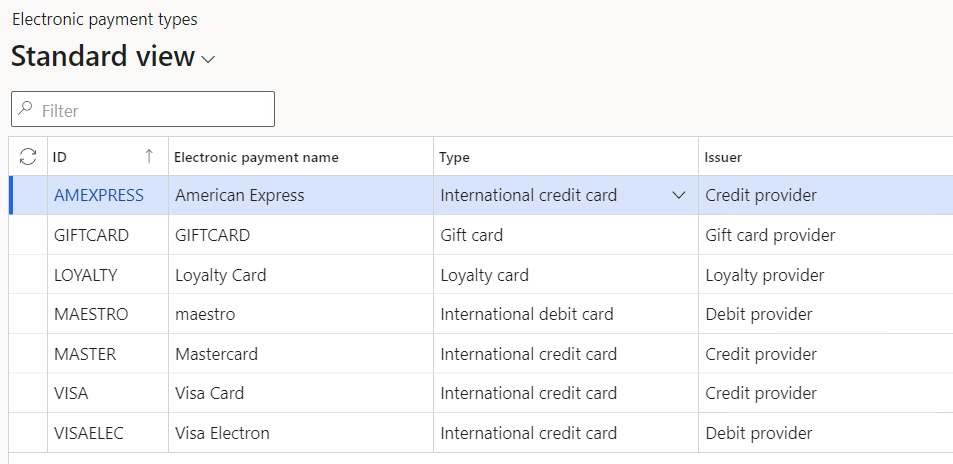
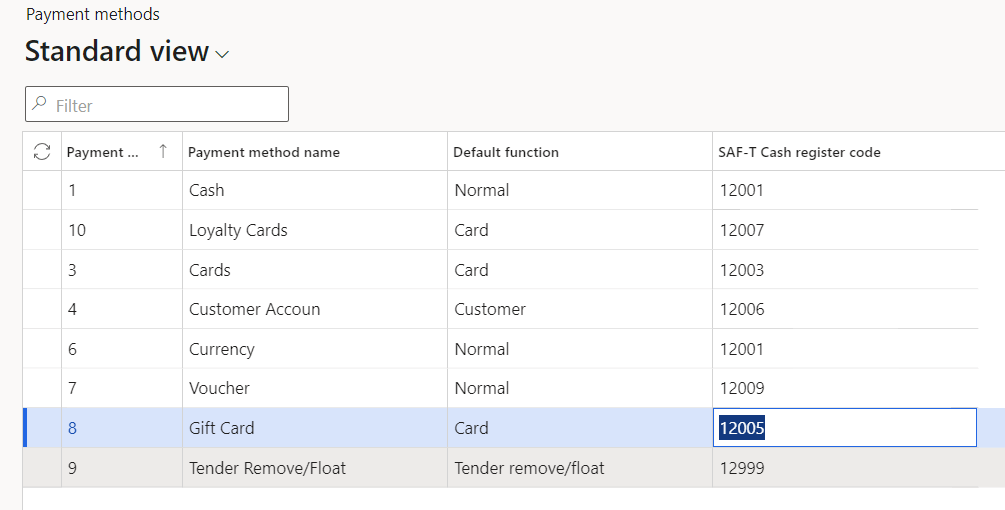
Configure payment methods and card types
The menu item for these are located at Retail and commerce à Channel setup à Payment methods.

Your start with defining the card types:
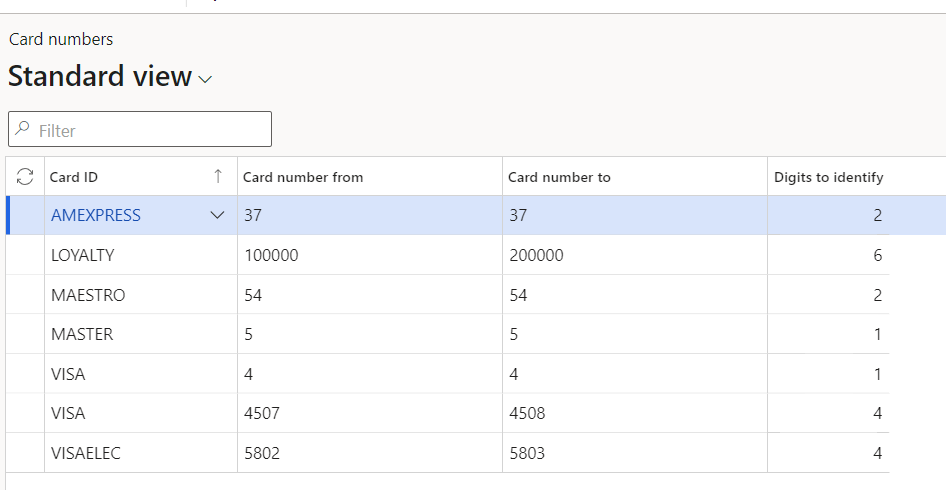
The next step is to define the card numbers, that is used to identify the card type based on the card number.
Payment methods lists up the acceptable payment methods. If you are looking for the Norwegian SAF-T cash register code you can find them here.
Configure payment methods and card types
The menu item for these are located at Retail and commerce –> Channel setup –> Payment methods.
Configure and manage gift cards
The menu items for gift cards is the following. In addition you have to define a service product that will be used when adding amounts to a card.
Configure and manage gift cards
The menu items for gift cards is the following. In addition you have to define a service product that will be used when adding amounts to a card.

The gift card is a number, balance
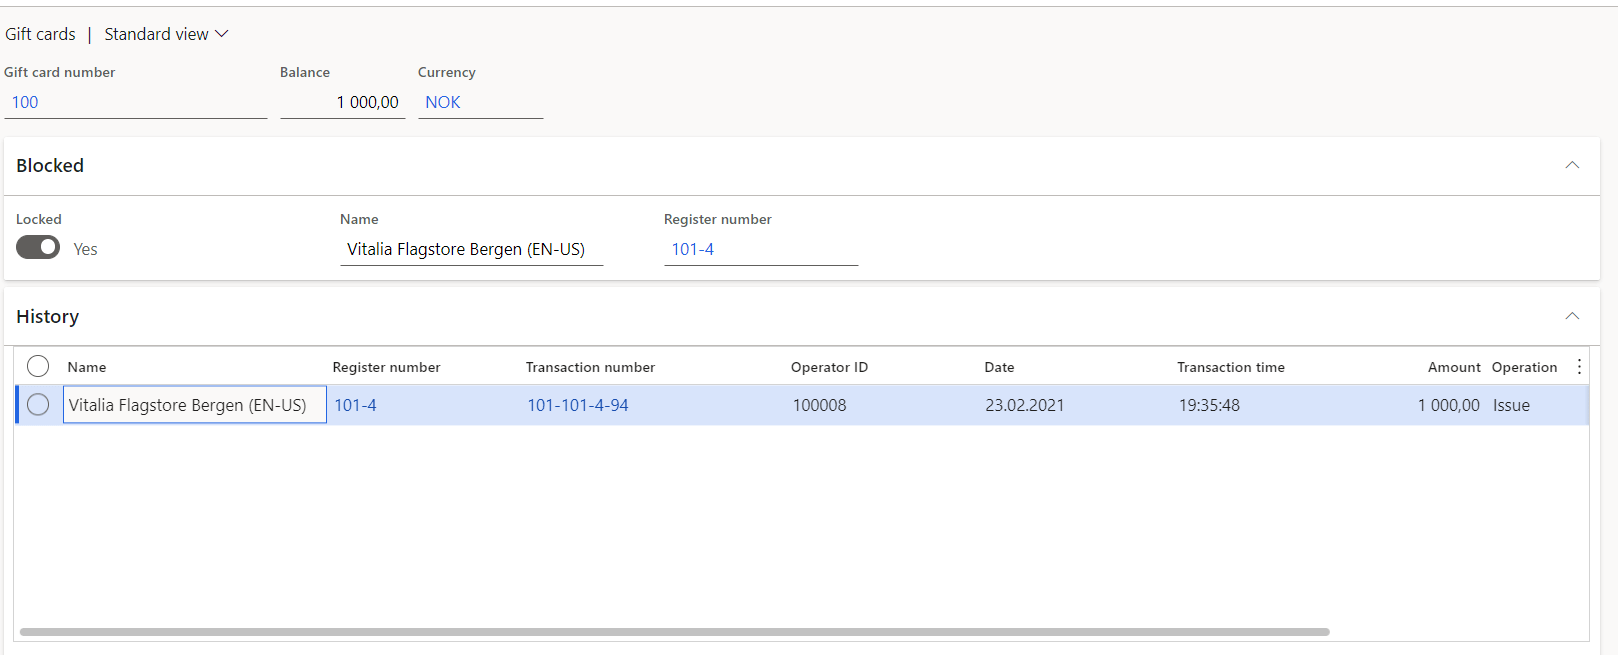
For gift cards, the following documentation gives some insight, especially if you need to integrate to an external gift card. If a retailer’s operations are run entirely in D365, internal gift cards are the best solution. For complex retailers that span multiple countries or regions, and multiple point of sale (POS) systems, it’s often best to use a third party to manage gift card balances and enable gift cards to be used across those systems. The out-of-box payment connector for Adyen supports external gift cards through SVS and Givex in POS, the call center, and the e-commerce storefront.
Describe Omni-channel capabilities including payments, orders, and returns
BOPIS a term for buy online, pickup in store. The following omni-channel payment scenarios are supported:
- Buy online, pick up in store
- Buy in call center, pick up in store
- Buy in store A, pick up in store B
- Buy in store A, ship to customer
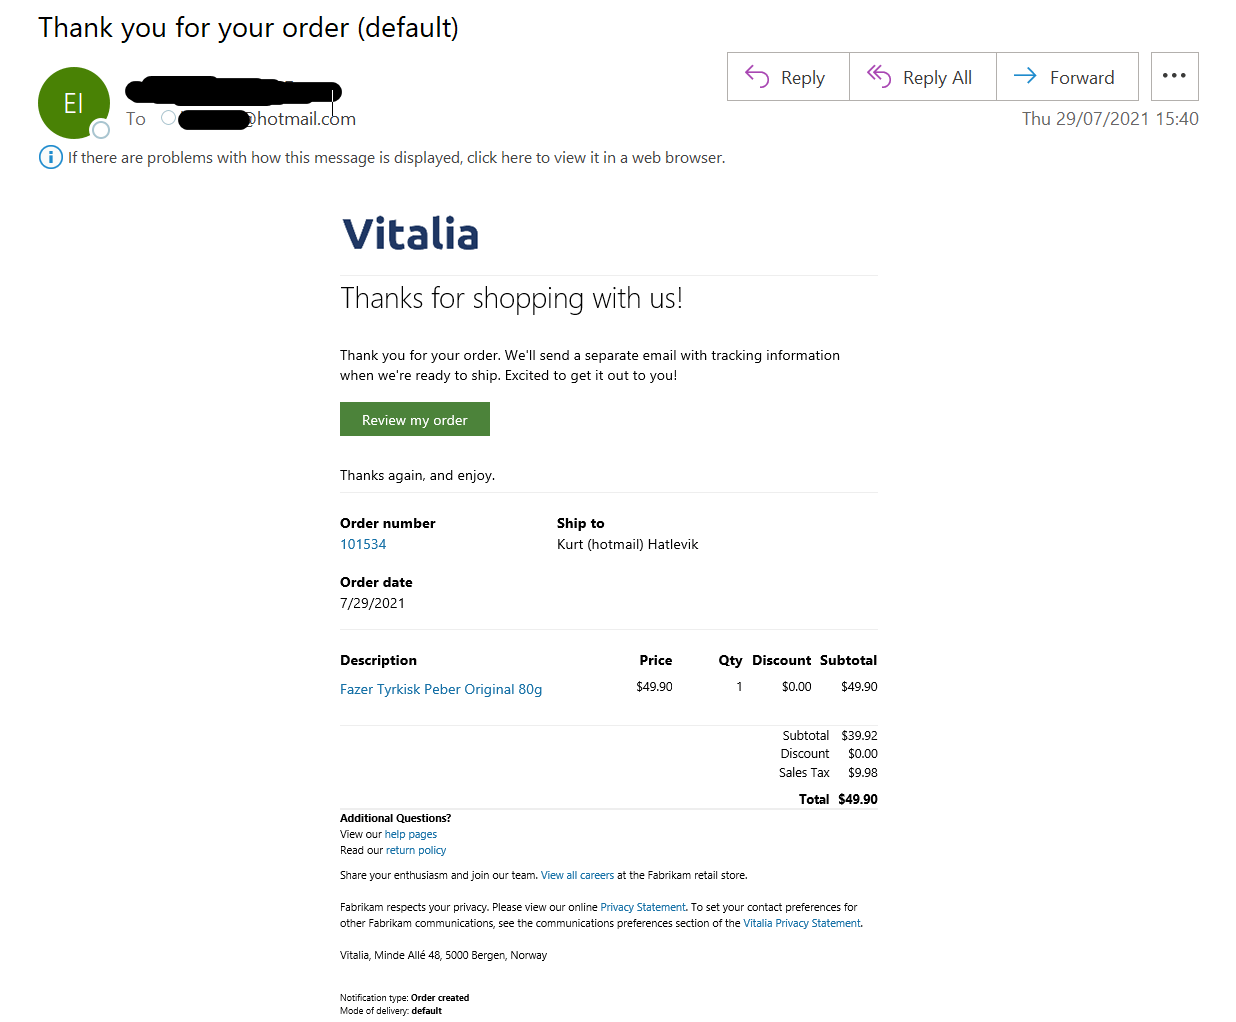
There is a lot to write about this, but lets show an example where we buy some snacks online, and pick it up in the store. Here is my Vitalia site, where I have a snack.
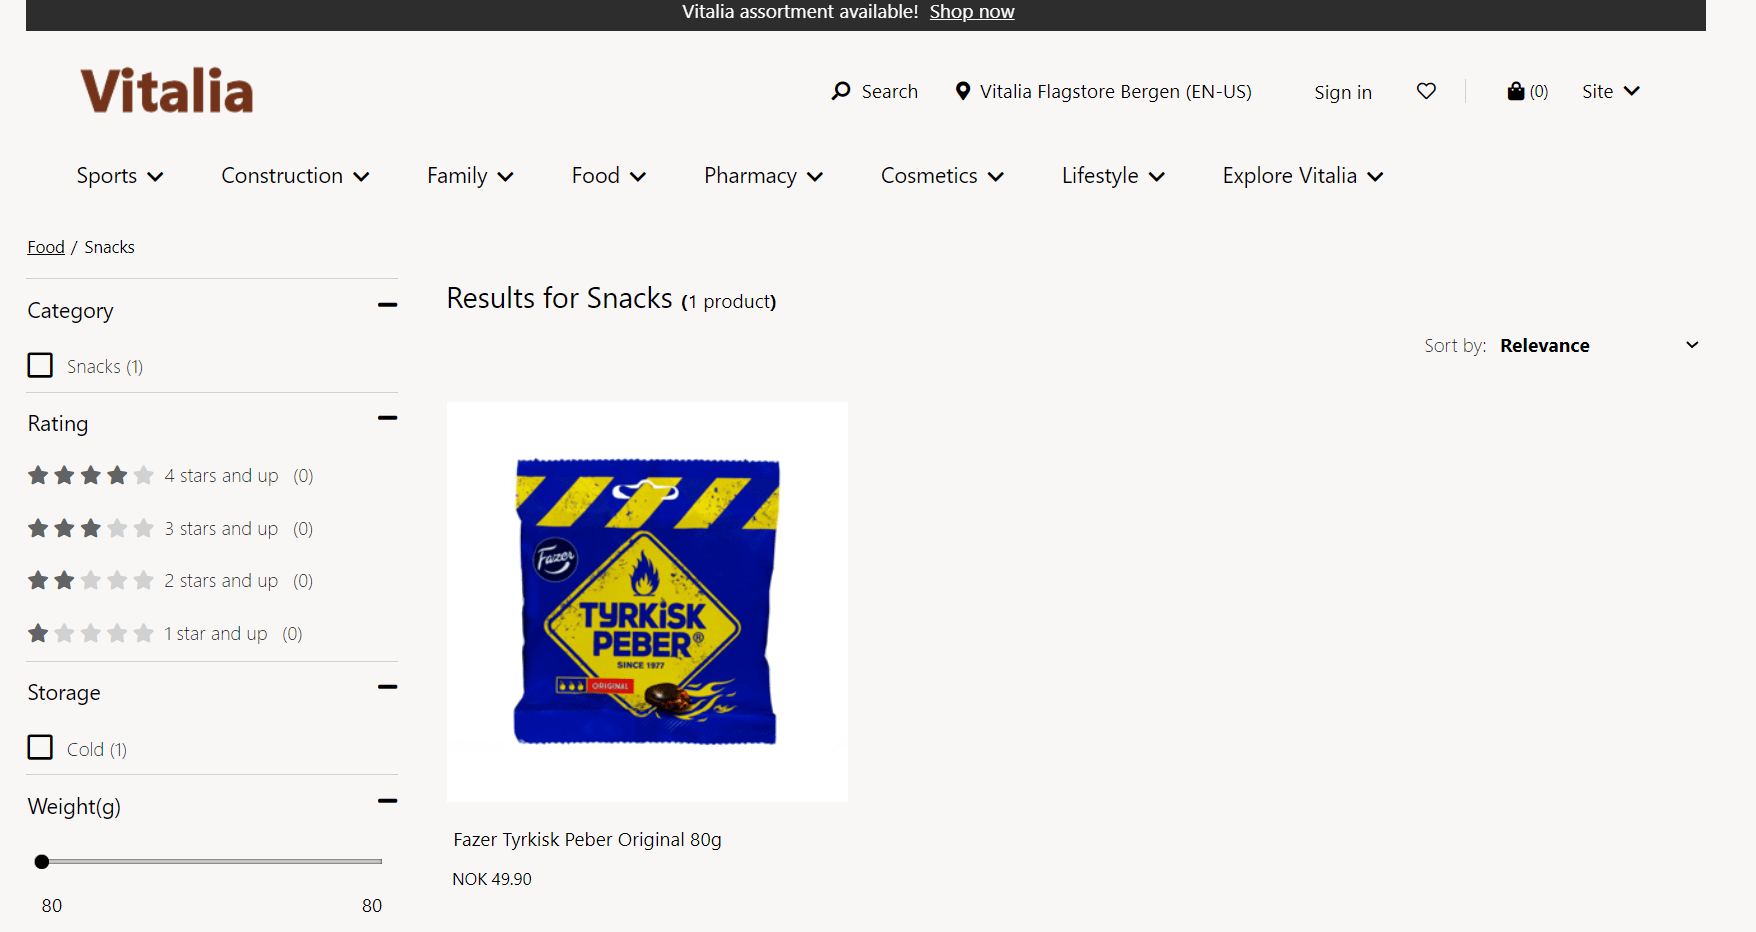
When I click on this, I see that this item is available for pickup in store.


I select to pickup the item in the Bergen flagstore. Then I checkout


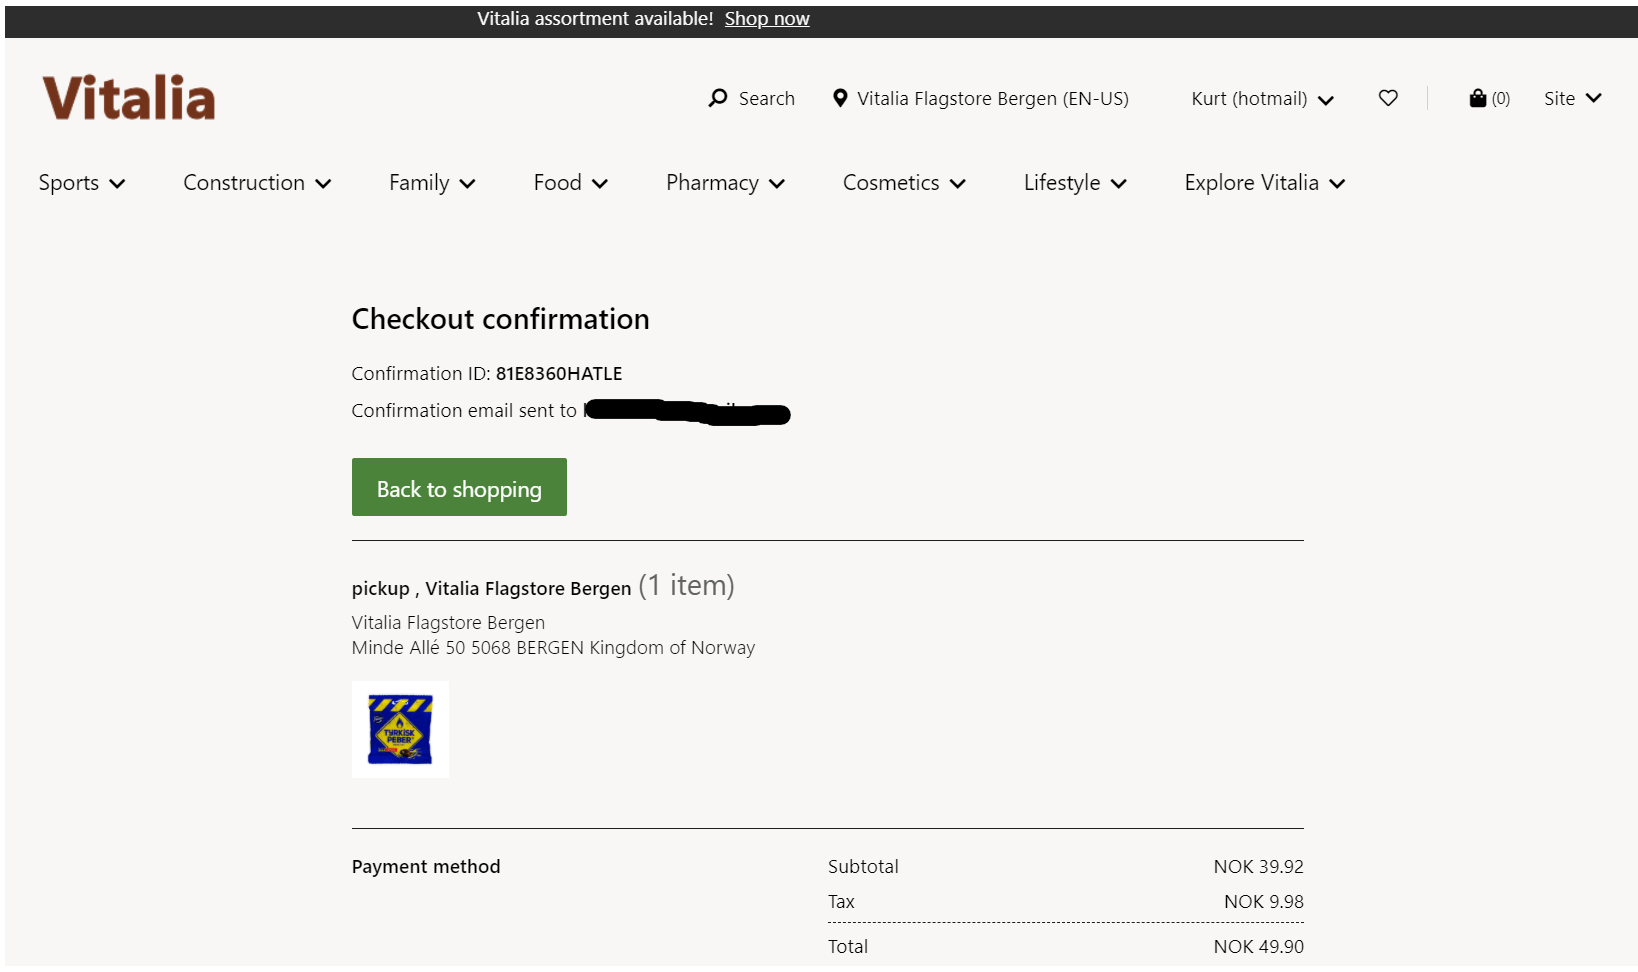
Then I can pickup this order in my CPOS:


I can then choose payment method, and the transaction is complete. I even got some nice confirmation messages on email
Also checkout the omni-channel payments overview and Payments FAQ for additional information on payment options in a omni-channel scenario. Pay specially attention to Tokens that represent payment card numbers, payment authorizations, and previous payment captures. Tokens are important because they help keep sensitive data out of the point of sale (POS) system.
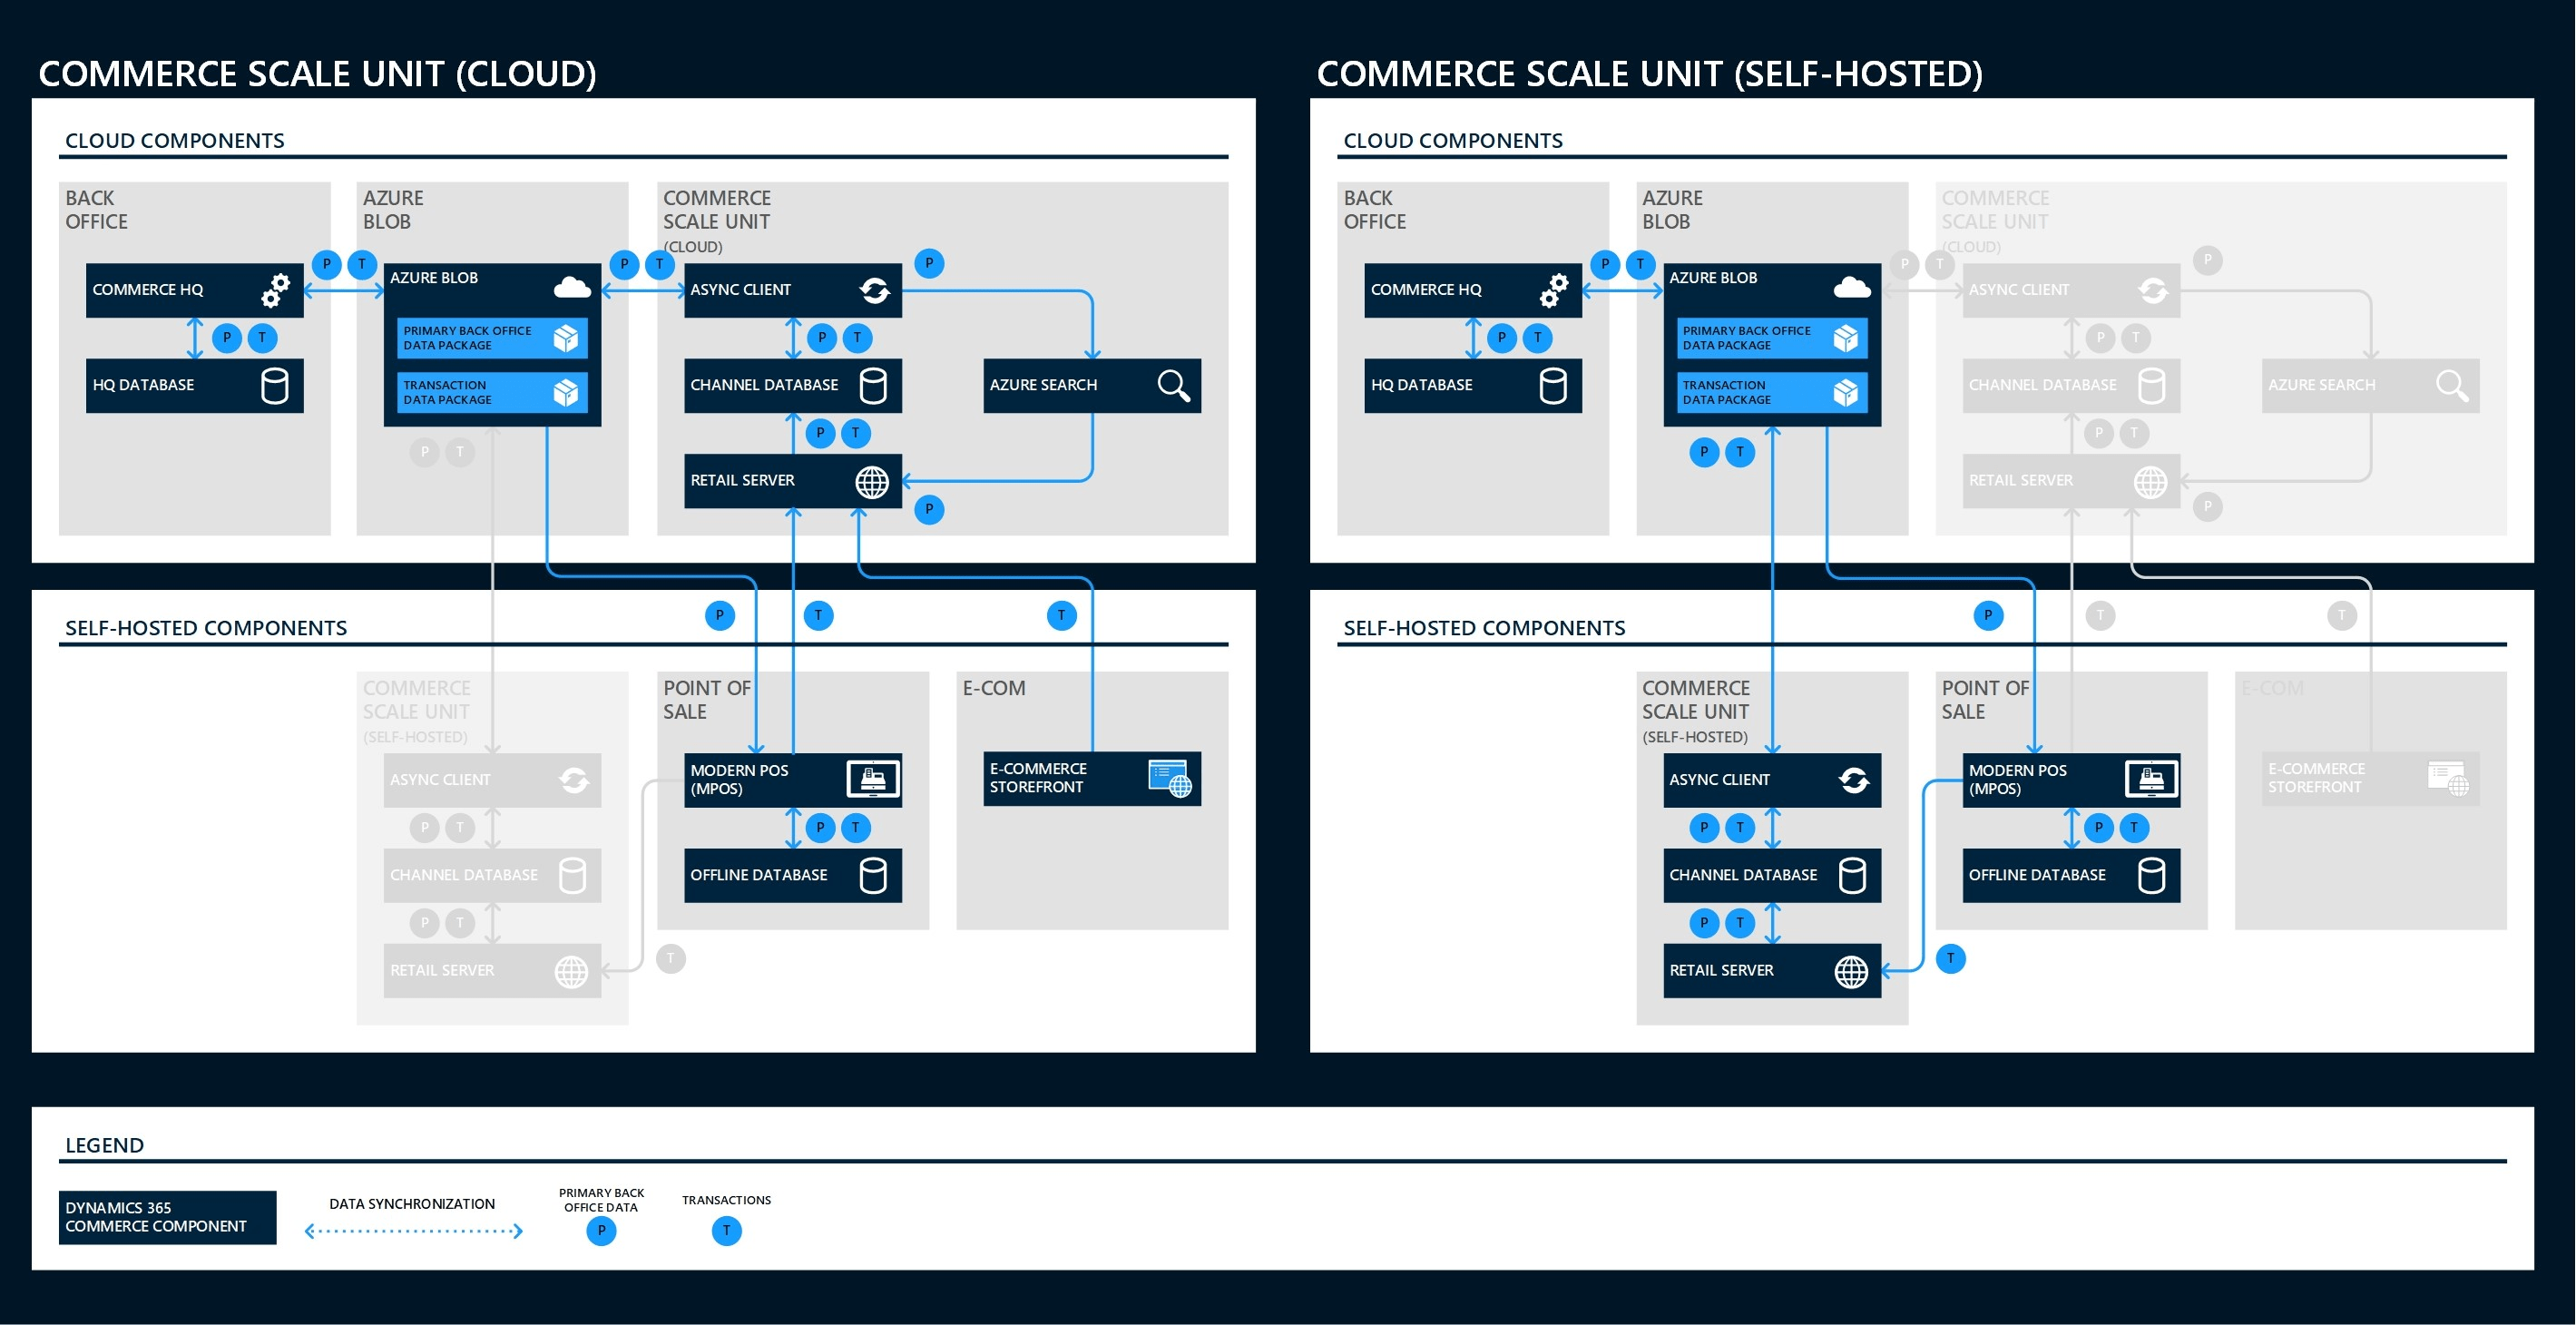
Configure data distribution
The database that stores data for a channel is separate from the Commerce database. The channel database holds only the data that is required for transactions. For example, master data is set up in Headquarters and then distributed to channels; on the other side of the transaction, transactional data is created in the point of sale (POS) or the online store and then uploaded to Headquarters. Microsoft have created an updated Commerce Data Exchange best practices that is quite new (15/7/2021), and discusses some nice topics worth exploring. The following figure shows the flow of the distributions.
There is a set of data that require real-time direct access:
- Issuing and redeeming gift cards
- Redeeming loyalty points
- Issuing and redeeming credit memos
- Creating and updating customer records
- Creating, updating, and completing sales orders
- Receiving inventory against a purchase order or transfer order
- Performing inventory counts
- Retrieving sales transactions across stores and completing return transactions
Create info codes, sub-codes, and info code groups
Info codes are used to capture additional information behind actions that occur in the POS and call center Commerce channel. Depending on the input type, users can assign various limitations and restrictions for certain info code types. Some info codes can require input, only trigger once for each transaction (regardless of products), link multiple info codes together, and more.

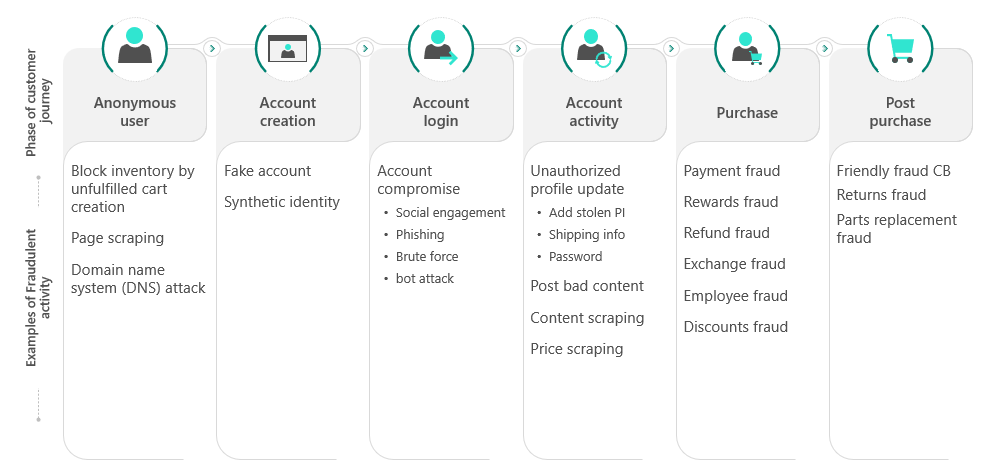
Describe Dynamics 365 Fraud Protection purchase protection, loss prevention, and account protection
The following image shows several examples of what type of fraud can occur at different phases in the customer journey.
Fraud Protection offers three capabilities that can be integrated together or used individually, which provides merchants with the option to use the capability that best suits their business needs. Here is a picture of how the application looks like.

Purchase Protection – Helps merchants preserve genuine purchases and decrease fraud. It helps protect online revenue by improving the acceptance rates of commerce transactions with insights and tools that help balance revenue opportunity versus fraud loss and checkout friction.
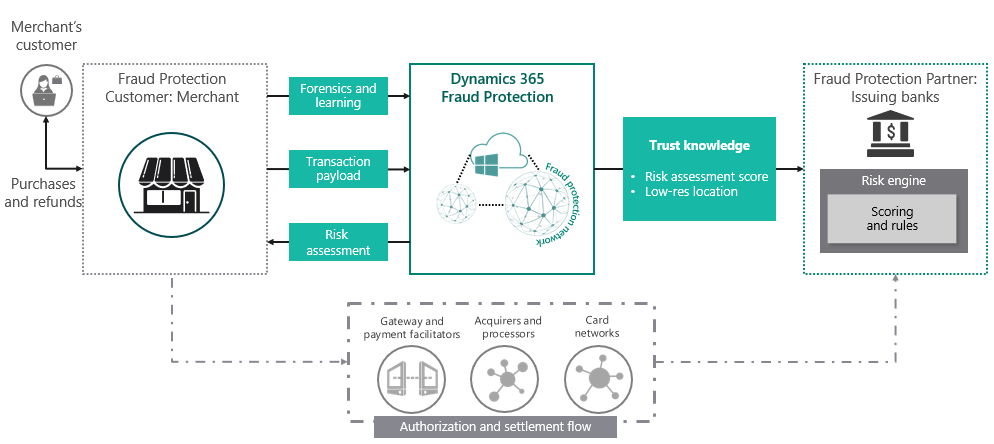
Account Protection – Helps merchants combat account creation and account takeover fraud. It helps improve customer experience at critical steps of the account life cycle by enabling merchants to block fraudulent activities and protect their customers’ accounts.

Loss Prevention – Helps protect revenue by identifying anomalies and potential fraud that are affecting returns and discounts that arise from omnichannel purchases, enabling store managers and loss prevention officers to quickly take action to mitigate losses.

Manage statements
Describe advantages of using trickle feed-based posting
With trickle feed-based order creation, transactions are processed throughout the day, and only the financial reconciliation of tenders and other cash management transactions are processed at the end of the day. This functionality splits the load of creating sales orders, invoices, and payments throughout the day, providing better perceived performance and the ability to recognize revenue and payments in the books in near real-time.

See also the following blog-post.
Validate retail transactions by using the transaction consistency checker
When a statement is posted, posting can fail due to inconsistent data in the commerce transaction tables. The data issue may be caused by unforeseen issues in the point of sale (POS) application, or if transactions were incorrectly imported from third-party POS systems. Examples of how these inconsistencies may appear include:
- The transaction total on the header table does not match the transaction total on the lines.
- The line count on the header table does not match with the number of lines in the transaction table.
- Taxes on the header table do not match the tax amount on the lines.
Transactions that fail the validation check and transactions that have not yet been validated will not be pulled into statements. During the “Calculate statement” process, users will be notified if there are transactions that could have been included in the statement but weren’t. If a validation error is found, there is a capability so that users can fix the records that failed through the user interface. Logging and auditing capabilities will also be made available to trace the history of the modifications.
Configure and manage retail statement calculations and posting
The statement posting process uses the distribution schedule to pull a set of POS transactions into the headquarters (HQ) client. The following illustration shows the statement posting process. In this process, transactions that are recorded in the POS are transmitted to the client by using the Commerce scheduler. After the client receives the transactions, you can create, calculate, and post the transaction statement for the store.

When I set up these I normally schedule them as batch jobs

Troubleshoot statement posting issues
When posting retail statements, there is a lot of checks to ensure that the transactions are correctly posted. In addition to the retail transaction consistency check, we often see issues that is common with invoice updating a sales order. This involves that the inventory posting is setup correctly, currency rounding, financial dimensions etc. I have also several times encountered issues related to the fact that the inventory is closed when the transactions are imported. Most of them can be fixed from within the D365 application. The posting error should in most cases look like this:

A quite common error is that the cash declaration is wrong. In such cases it means that there either are too much or too little cash in the EOD statement. Then you need to figure out why there are missing cash. This can be faulty cash handling or even fraud. When the reason have been found, then correct the statement, and manually create a journal/voucher that settles the differences. If it becomes too complicated then a Microsoft Support ticket may be required.
Configure Distributed Order Management (DOM)
DOM is a quite new feature, and if I should boil it down to a single sentence I would say that the end result will select what warehouse the sales order lines should we delivered from, and also being able to pickup the order in POS to ship from POS. The concept is to have DOM process the orders through a set of profiles and then create a fulfilment plan.

I have not myself performed any implementations on DOM yet, and I also see that parts of the functionality soon will be integrated with the Dynamics 365 Intelligent Order Management order orchestration capabilities. Here are some videos on the topic on youtube : https://www.youtube.com/watch?v=CTAYXXj5Cak and https://www.youtube.com/watch?v=-0PvV3-7wZs
Configure fulfillment profiles
The fulfillment profiles are the main area, where you can control what store or fulfillment center should deliver the order. In the picture under, I have created a very simplified rule stating that I don’t want to have more than 100 open orders per store.

Then add the rule to a fulfillment profile to balance the order volume across my physical stores to pick up and deliver, and ensure that no stores will be assigned more than 100 open sales orders in their que per day.

As seen in the documentation 7 rules that you can apply in combinations.

Configure cost components including shipping, handling, and packaging costs
The cost configuration feature lets retailers define and configure additional cost components that will be calculated and factored in to determine the optimal location to fulfill order lines from. Here is a cost factor of having 3$ per order line.

And I can add this to the fulfillment profile.

The idea here is to have multiple profiles, so the optimalization engine can select the best possible outcome based on the rules/restrictions and cost factors. So you should create multiple fulfillment groups that the engine can select among. Typical one for DC(Distribution Centers) and one/more for other fulfillment centers or stores. I have been creating several order processing engines in the past (AX2009 and AX2012), and the DOM seams to be touching the basis of these requirements. But I still feel that the solution have a potential of having a lot more rules covering ATP, Wait/hold, parallelization, smart reservation, optimal order mix etc. But I guess much of this can be created as extensions.
Configure management rules and parameters
The parameters for DOM includes two calculation types; Production solver and Simplified Solver. The Production Solver requires the special license key that, by default, is licensed and deployed in production environments. For non-production environments, this license key must be manually deployed. The Production Solver improves performance (such as the number of orders and order lines that can be handled in a run) and convergence of results (since a batch of orders might not yield the best result in some scenarios). Some rules like the Partial orders rule and the Maximum number of locations rule require Production Solver.
Monitor fulfillment plans and order exceptions
The DOM have a workspace where the current fulfillment can be monitored. What is relevant to keep an eye on is the exception lines, because they show lines that are failing the fulfillment processing.
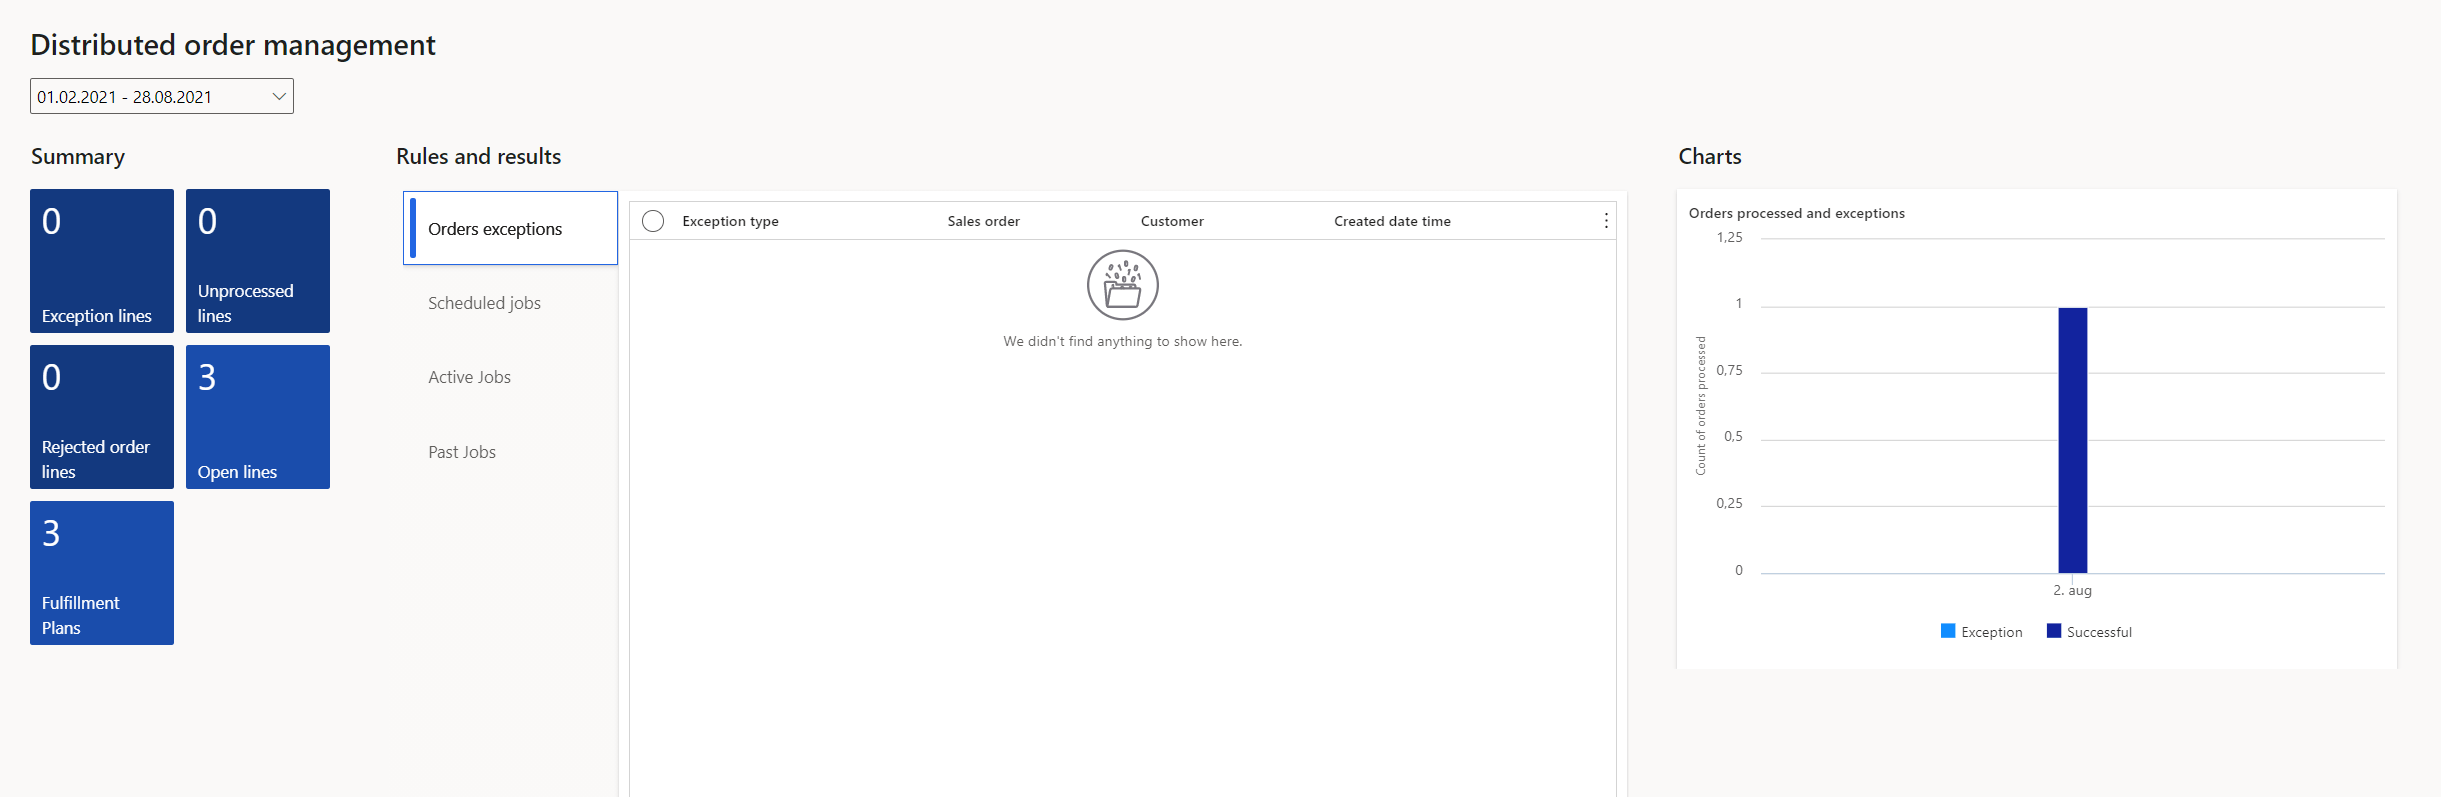
The result of the fulfillment plan shows how the order is fulfilled and where the fulfillment should happen from.
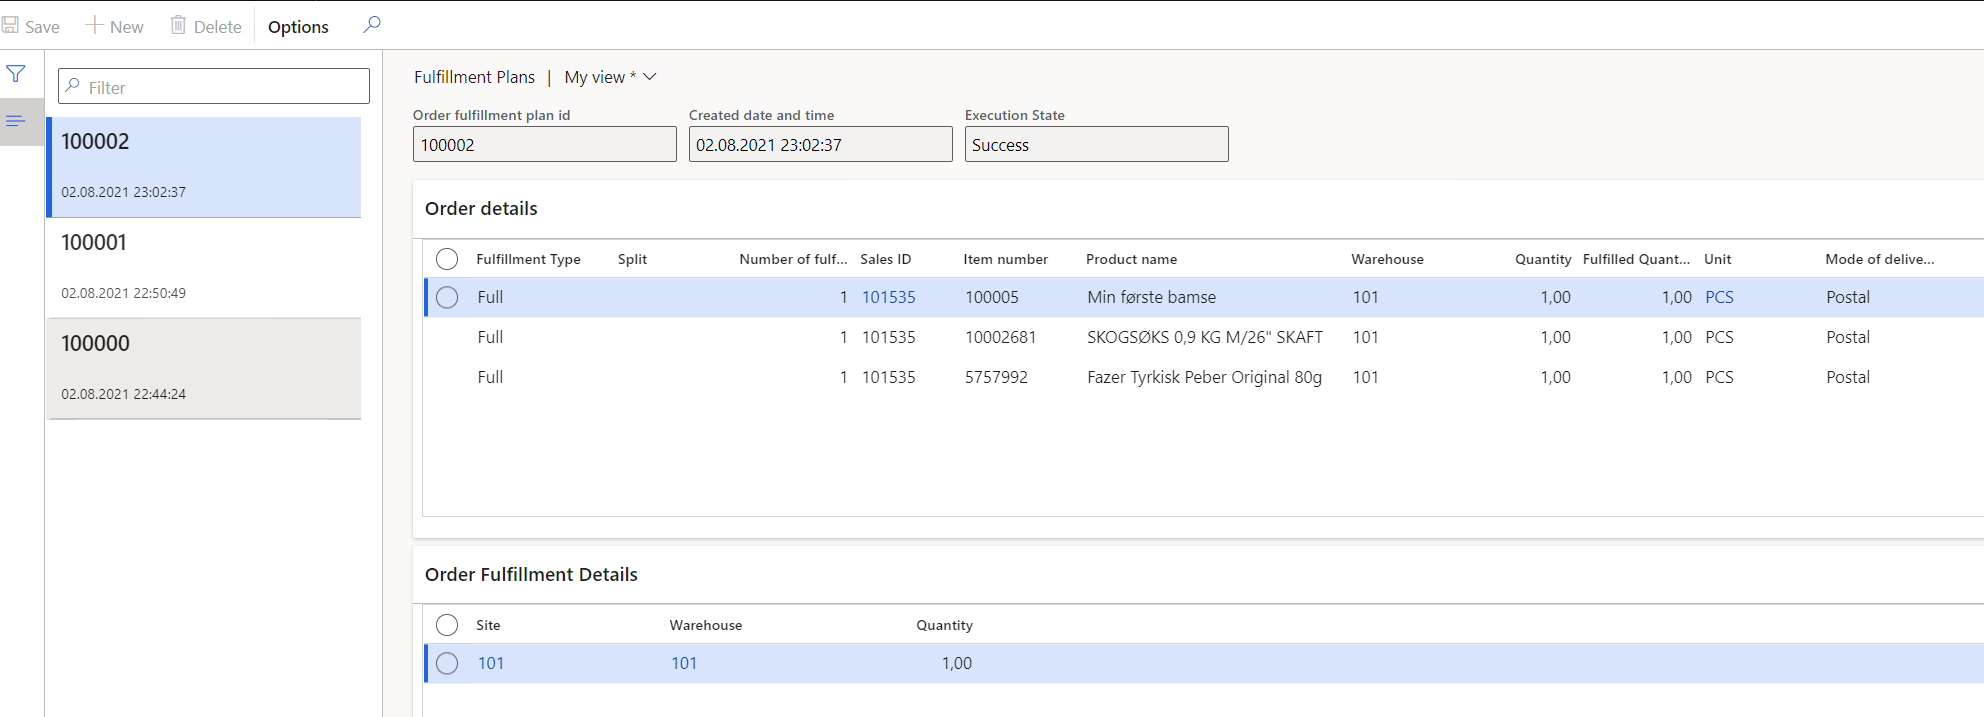
It is important to understand that DOM looks only at orders that are created from commerce channels(Call-center, POS and eCommerce). Sales orders are identified as sales orders when the Commerce sale option is set to Yes, and also keep in mind that DOM hasn’t been thoroughly tested with advanced warehouse management features.
Configure order fulfillment
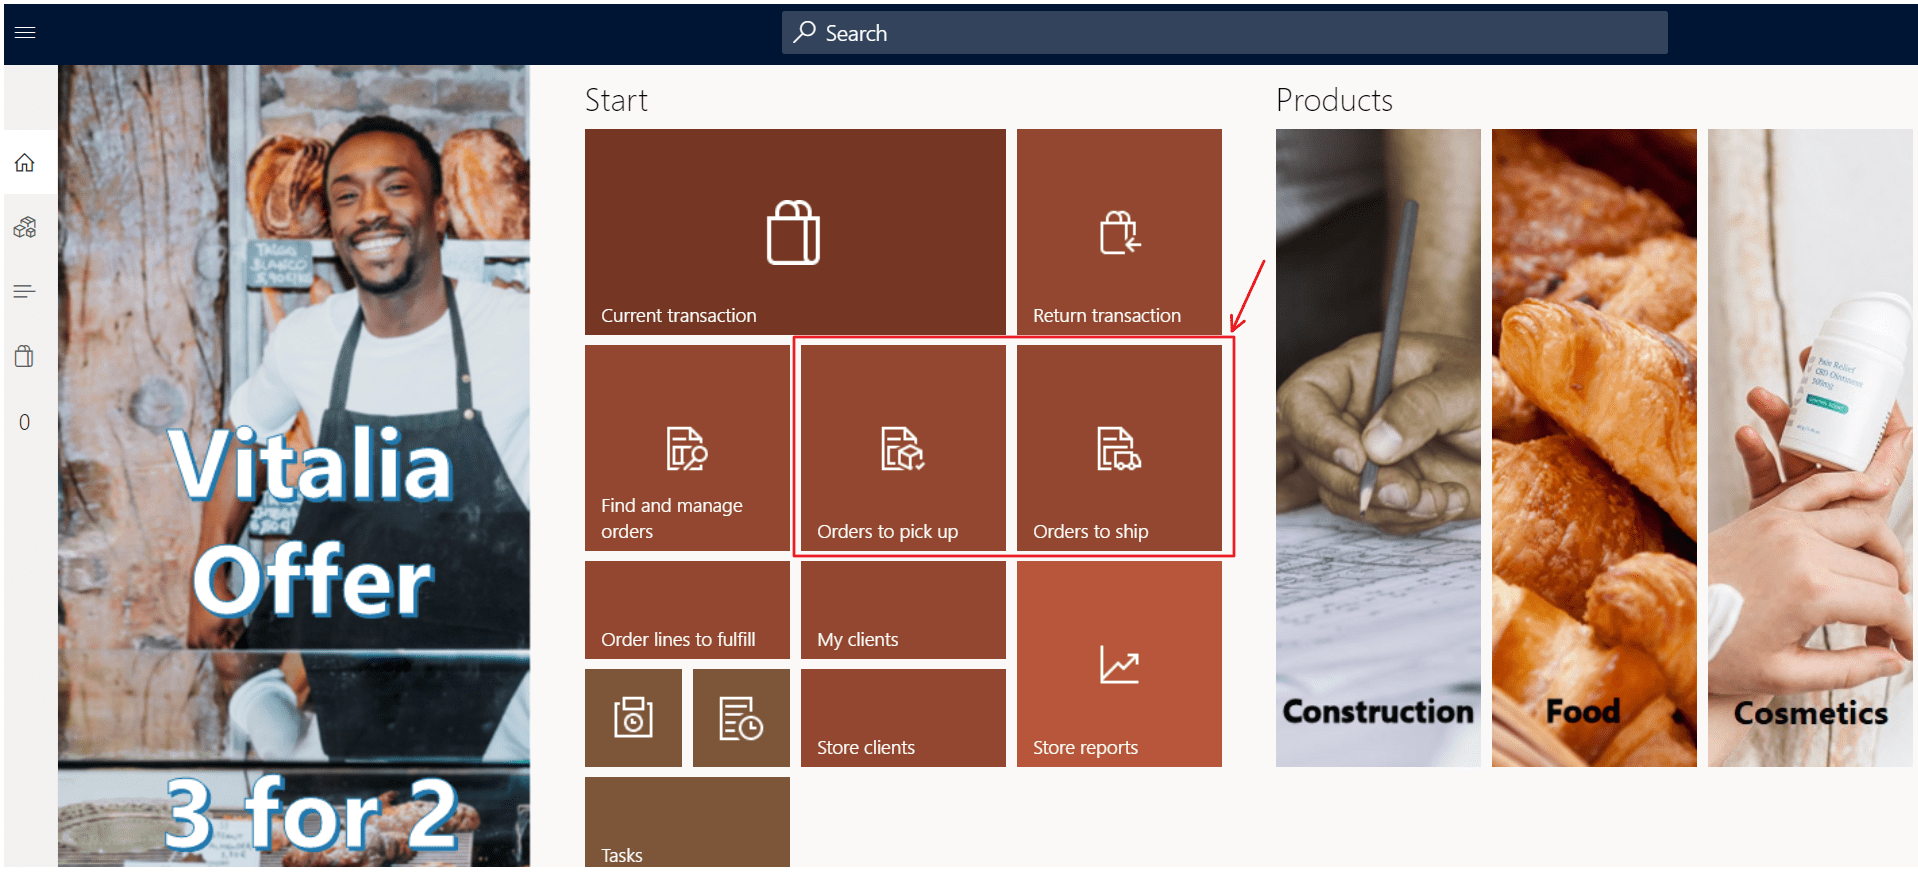
Dynamics 365 have the capability to fulfill and deliver sales orders from both stores and distribution centers(DC). This is one of the elements to create a true omnichannel experience. Buy-online-pickup-in-store are one of these scenarios. But also the capability of transferring goods to other stores or back to the DC to ease with overstock scenarios. The result of the fulfillment can be seen in the POS in the menu items “Orders to pick up and Orders to ship”. I also suggest reading the following article, than explains the fulfillment statuses you get on the sales order lines.
In POS the sales orders will show up like this, and you may start the process of clicking on the fulfill button.
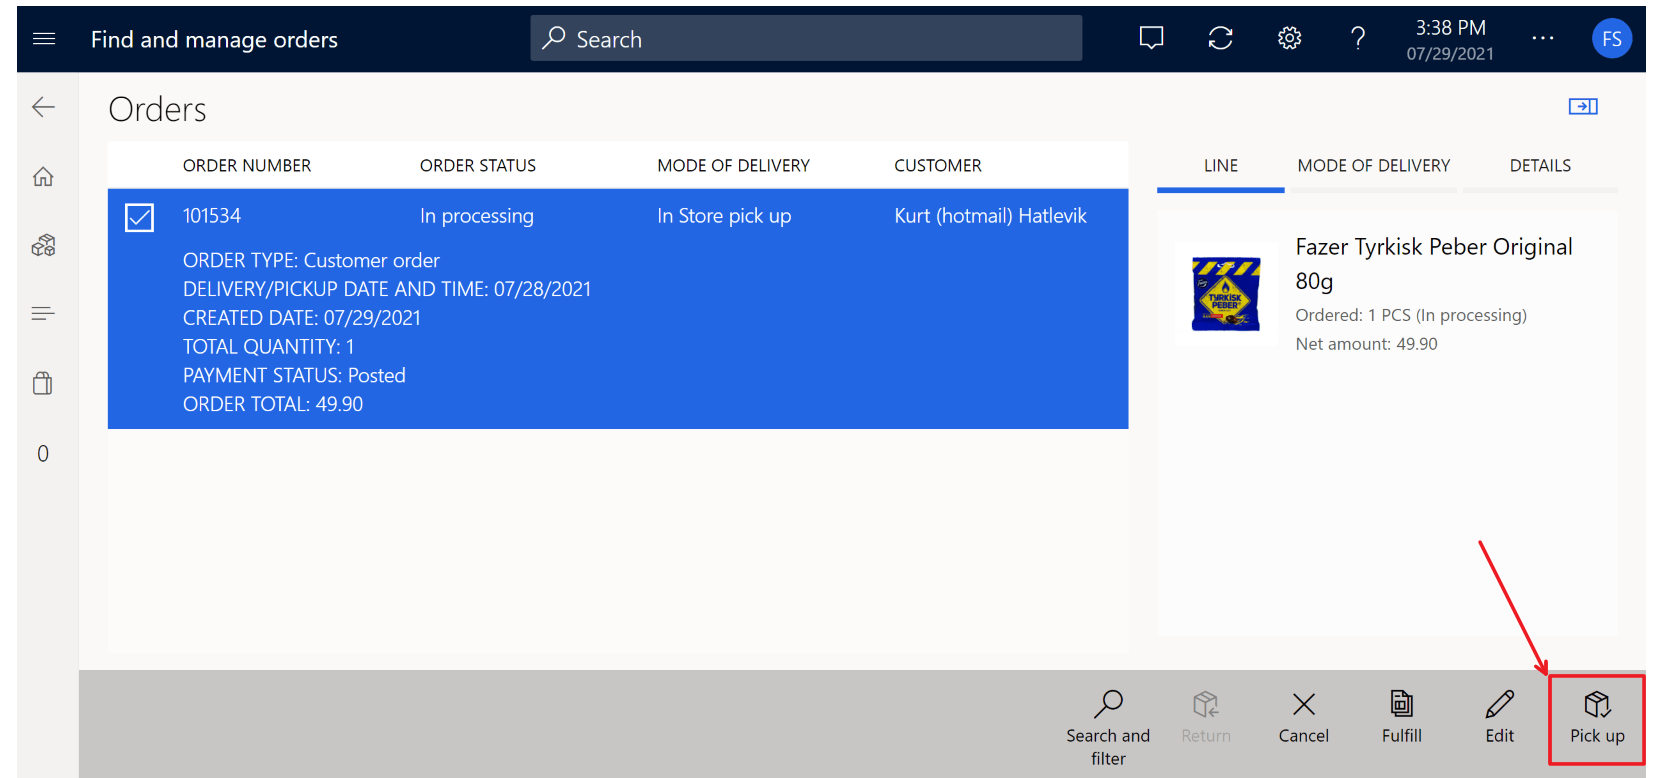
Then the lines show up, and you can accept all or some of the lines.
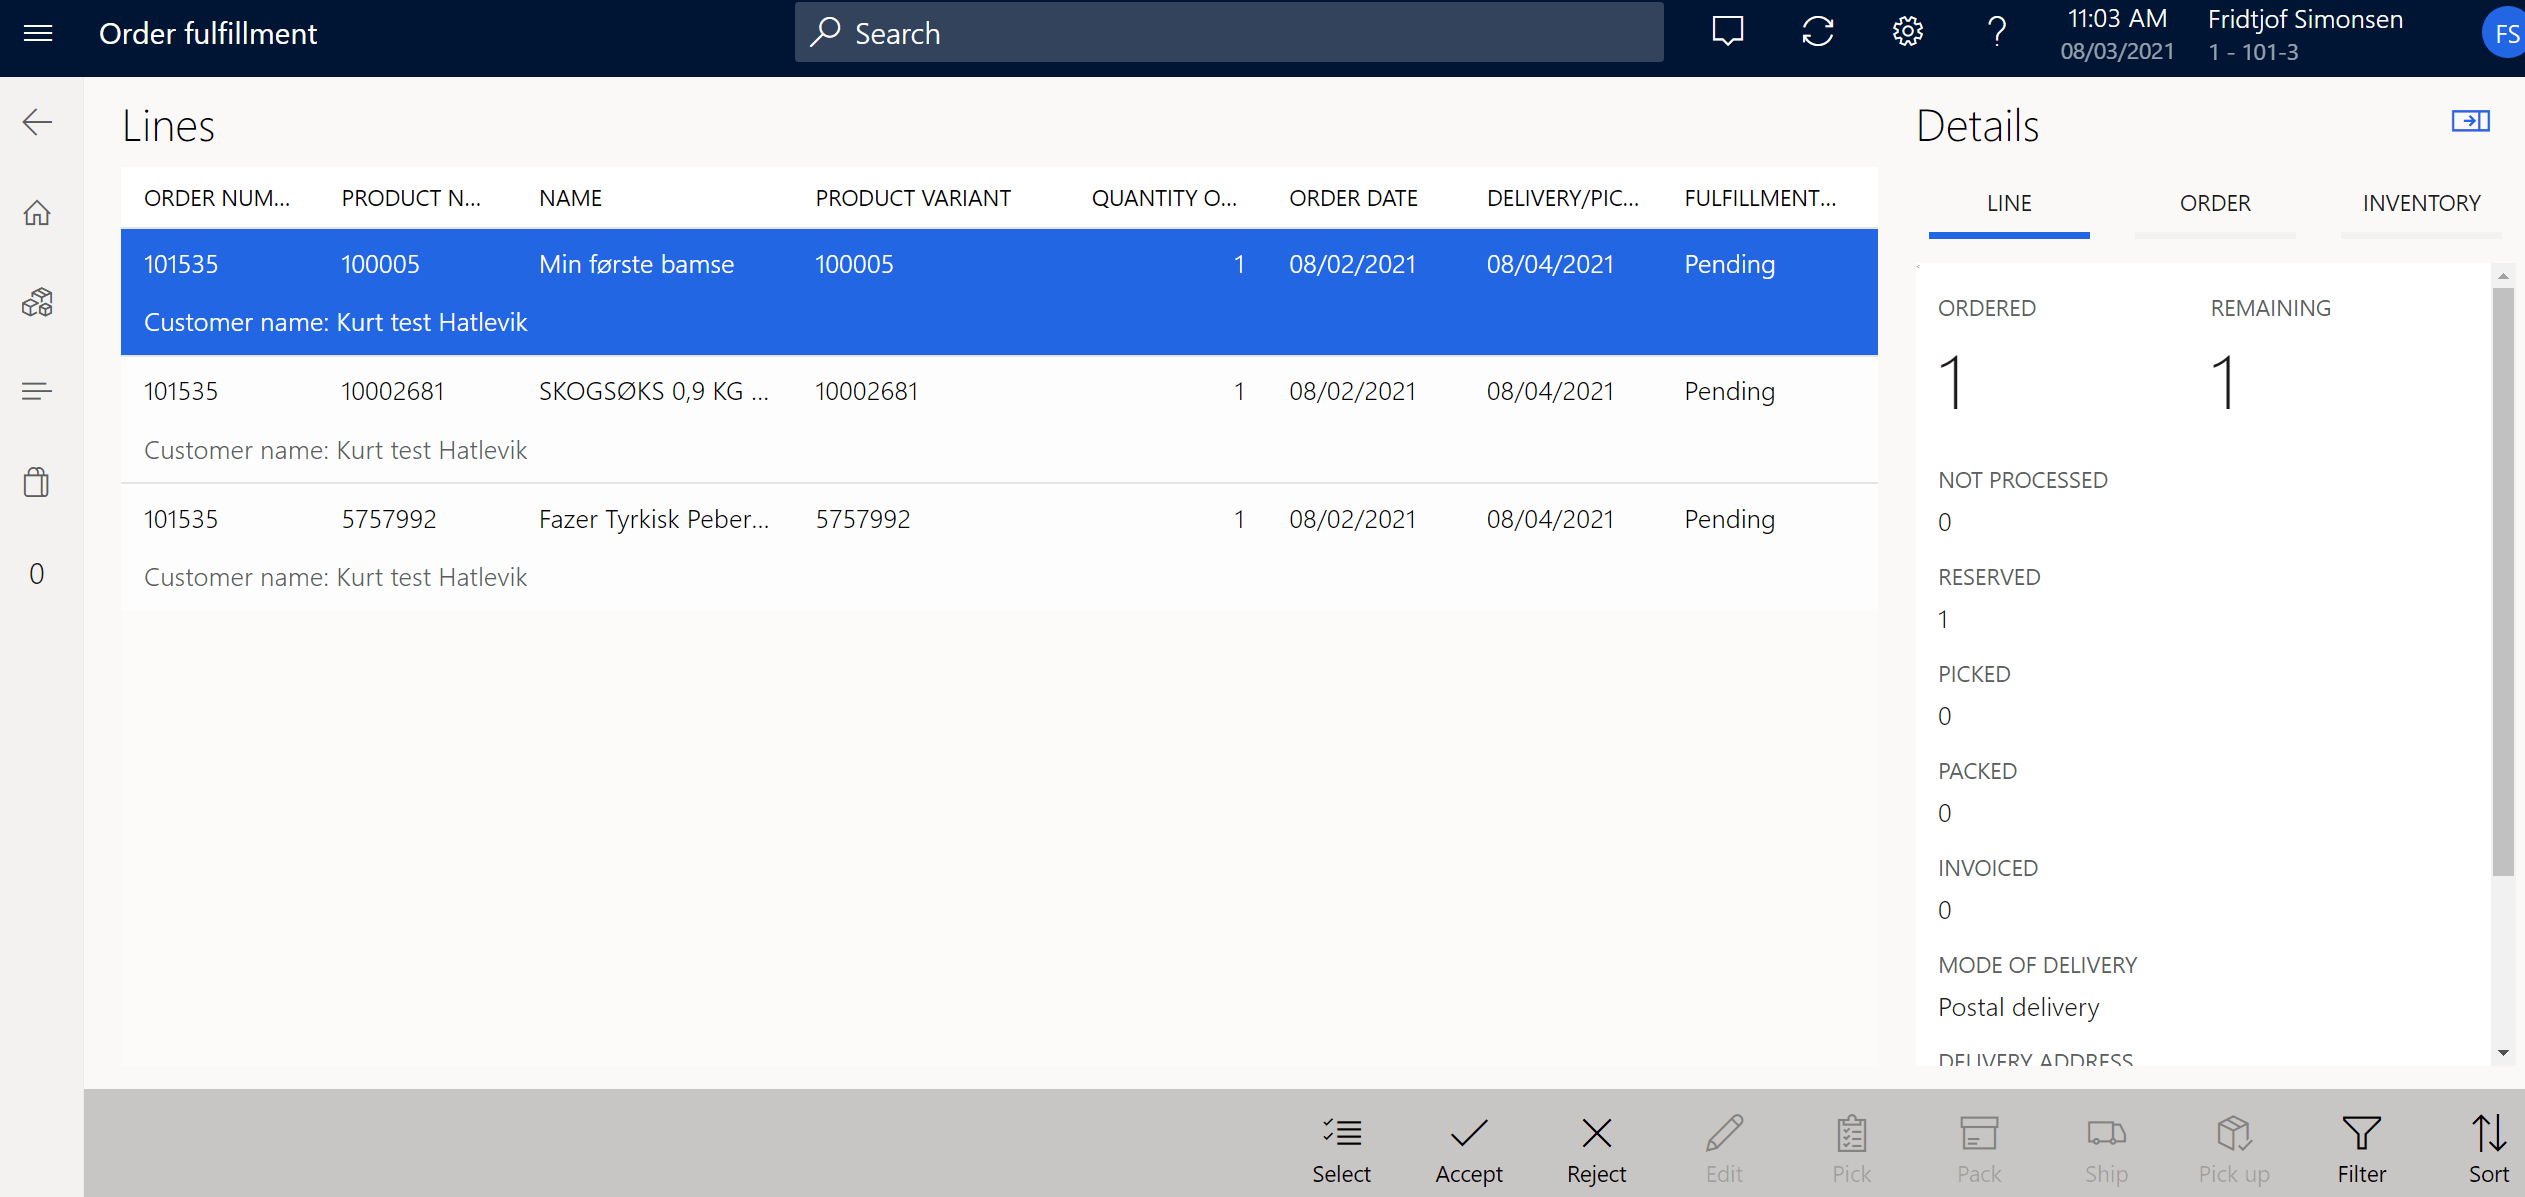
After you have accepted the lines, you may Pick, Pack and Ship the order.

As you more through the pick, pack and ship steps, you will see the sales order fulfillment status being updated in real-time in the sales order screen. Packingslip and invoice updated just like handling a HQ sales order.

Configure modes of delivery including shipments, pick up, and carry out
In the modes of delivery you may specify what modes of delivery is applicable to what retail channel, products and address. You may also add a transport delivery.

On each store/channel you may specify what modes of delivery is applicable to this store.

In the commerce parameters you may specify which modes of delivery is made for pickup modes, meaning that the customer comes into the store to pickup the goods ordered online or by calling in.

Configure curbside customer order pickup
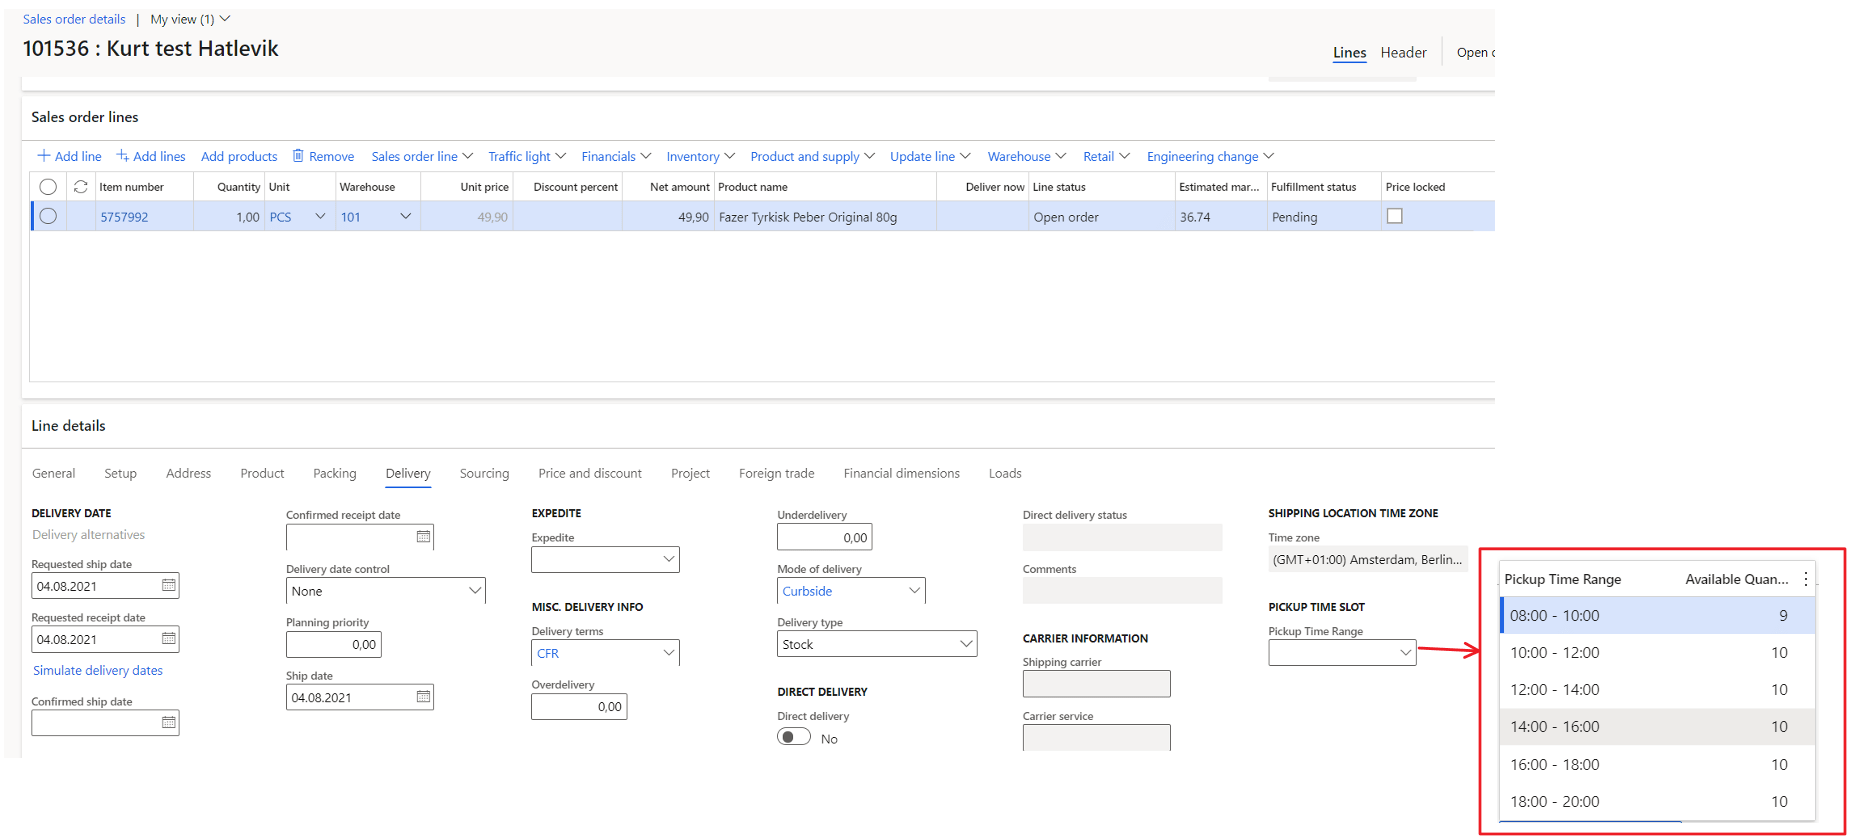
You have to turn on the Support for multiple pickup delivery modes feature. Keep in mind that DOM ignores any sales lines that are marked for store pickup. Also check out the order pickup Time Slot Management to ensure that customers can select the timeslot that is the most convenient for them, and to ensure that the store does not become overcrowded. There are elements in the roadmap that is worth taking a look at on this matter. Also checkout how you can setup customer check-in notifications in POS, where a check-in confirmation task is created in POS.

If you create the sales order using the call center, you will see that you per line can select the pickup time range, and also see how may available slots there are.
In POS this order will show up under the order fulfillment with the curbside pickup date/time.

Also take a look at the commerce teams integration that allows for POS tasks to be published to appear in teams. This means that tasks like curbside pickups will appear in the users teams app, and the tasks will also be available for the Microsoft Planner.

Configure charge codes, charge groups, and automatic charges
Charges are often used for add freight charges and handling fees to customer order or sales transaction created in the POS, call center, or e-Commerce channels. If you use the Use advanced auto-charges parameter, the behavior can be automated. Take a look at the documentation for more examples and how to use best setup automatic calculation of charges.

One thing that I feel is missing, is the ability to define the changes based on product weight. Most often the freight is calculated based on weight, volume, and distance. I think there is room for improvements in this area. Let’s hope the Microsoft Commerce product team have this on their radar for future releases
Configure and assign order fulfillment groups
Fulfilment groups are used in DOM, but also in POS to define whether the warehouse or warehouse and store combinations that are defined in fulfillment groups can be used for shipping, for pickup, or for both shipping and pickup. This allows for added flexibility for the business to determine which warehouses can be selected when creating a customer order for items to ship vs. which stores can be selected when creating a customer order for items to pick up.
To use these configuration options, turn on the Ability to specify locations as “Shipping” or “Pickup” enabled within Fulfillment group from feature management. If a warehouse that’s linked to a fulfillment group isn’t a store, it can be configured only as a shipping location. It can’t be used when orders for pickup are configured in POS.

Configure products, prices, discounts, loyalty, and affiliations (25-30%)
Product information is the backbone of supply chain and commerce applications across all industries. It’s crucial that shared product definitions, documentation, attributes, and identifiers be used correctly. Do not take this process too easy, and it is essential that quality is put into these processes. I have seen many projects struggling, because they think just integrating a 3’rd part PIM solution solves all problems. You need to understand and correctly setup the structure and architecture of products to get the best possible outcome. It is my experience that D365 product management is more than sufficient to describe products and prices.
Configure products and merchandising
Before you can offer products for resale in your commerce channels, you must create and configure the products. Commerce creates organization-wide products in the product master. You can create the products, define the product properties and attributes, and assign the products to commerce category hierarchies. To make the products available to your channels and add them to an active assortment, you must release the products to the legal entities where they are available. The documentation from Microsoft describes the steps quite well
Configure product category hierarchies
For product hierarchy there are 3 essential types that should be setup:
| Product hierarchy | Use this hierarchy type to define the overall product hierarchy for your organization. You can use this hierarchy type for merchandising, pricing and promotions, reporting, and assortment planning. Only one product hierarchy can be assigned this hierarchy type. |
| Supplemental hierarchy | Use this hierarchy type for any additional category hierarchies that you want to create. For example, in the spring, you have a promotion for swimwear. Therefore, you include your swimwear products in a separate category hierarchy and apply the promotional pricing to the various product categories. |
| Navigation hierarchy | Use this hierarchy type to group and organize products into categories so that the products can be browsed online or in POS. |
When I’m implementing Commerce, I use to create quite a few supplemental hierarchies. I often also mix in elements like a brand hierarchy, product-vendor hierarchy, season and campaign hierarchy. This makes it simpler and easier to navigate through products or to group them in Power BI. The great thing is that hierarchies allows you to create strong relations into commerce price and discounts.
Configure product attributes and attribute groups
Product attributes describes the product, and is visible in HQ, POS and eCommerce. Here is some examples on how it looks on the different channels:
POS:
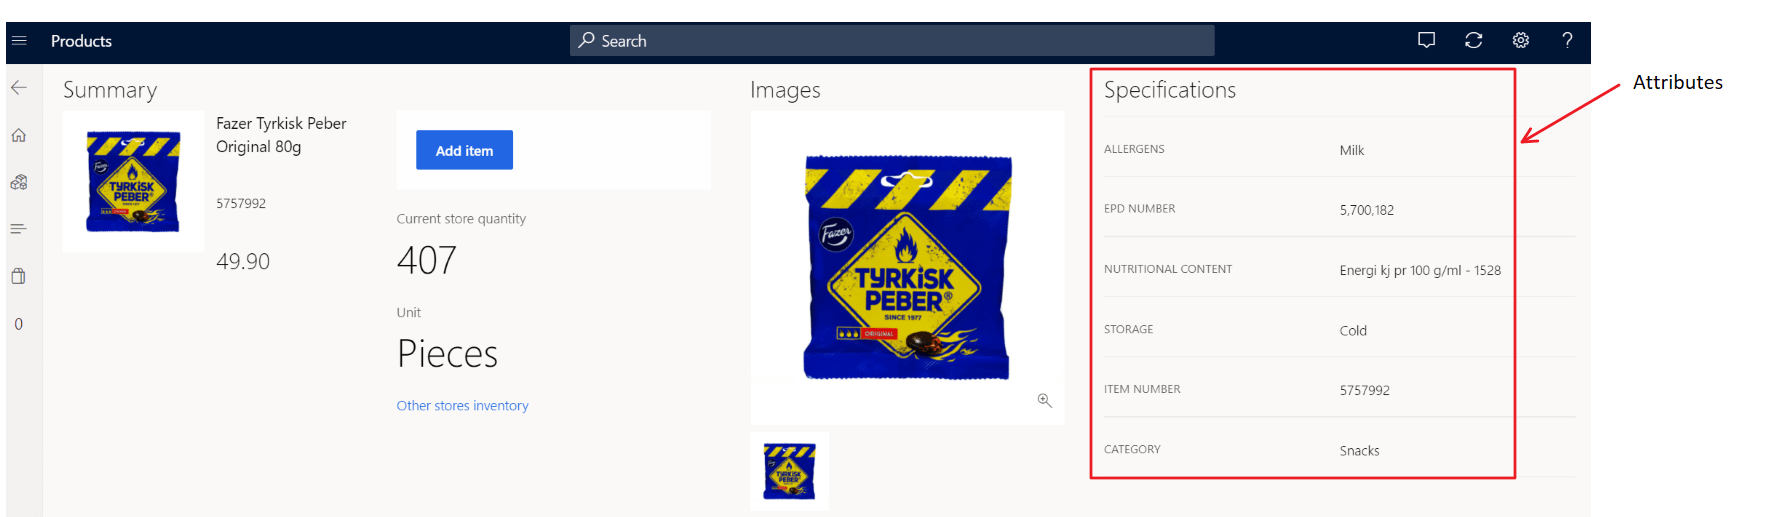
eCommerce:
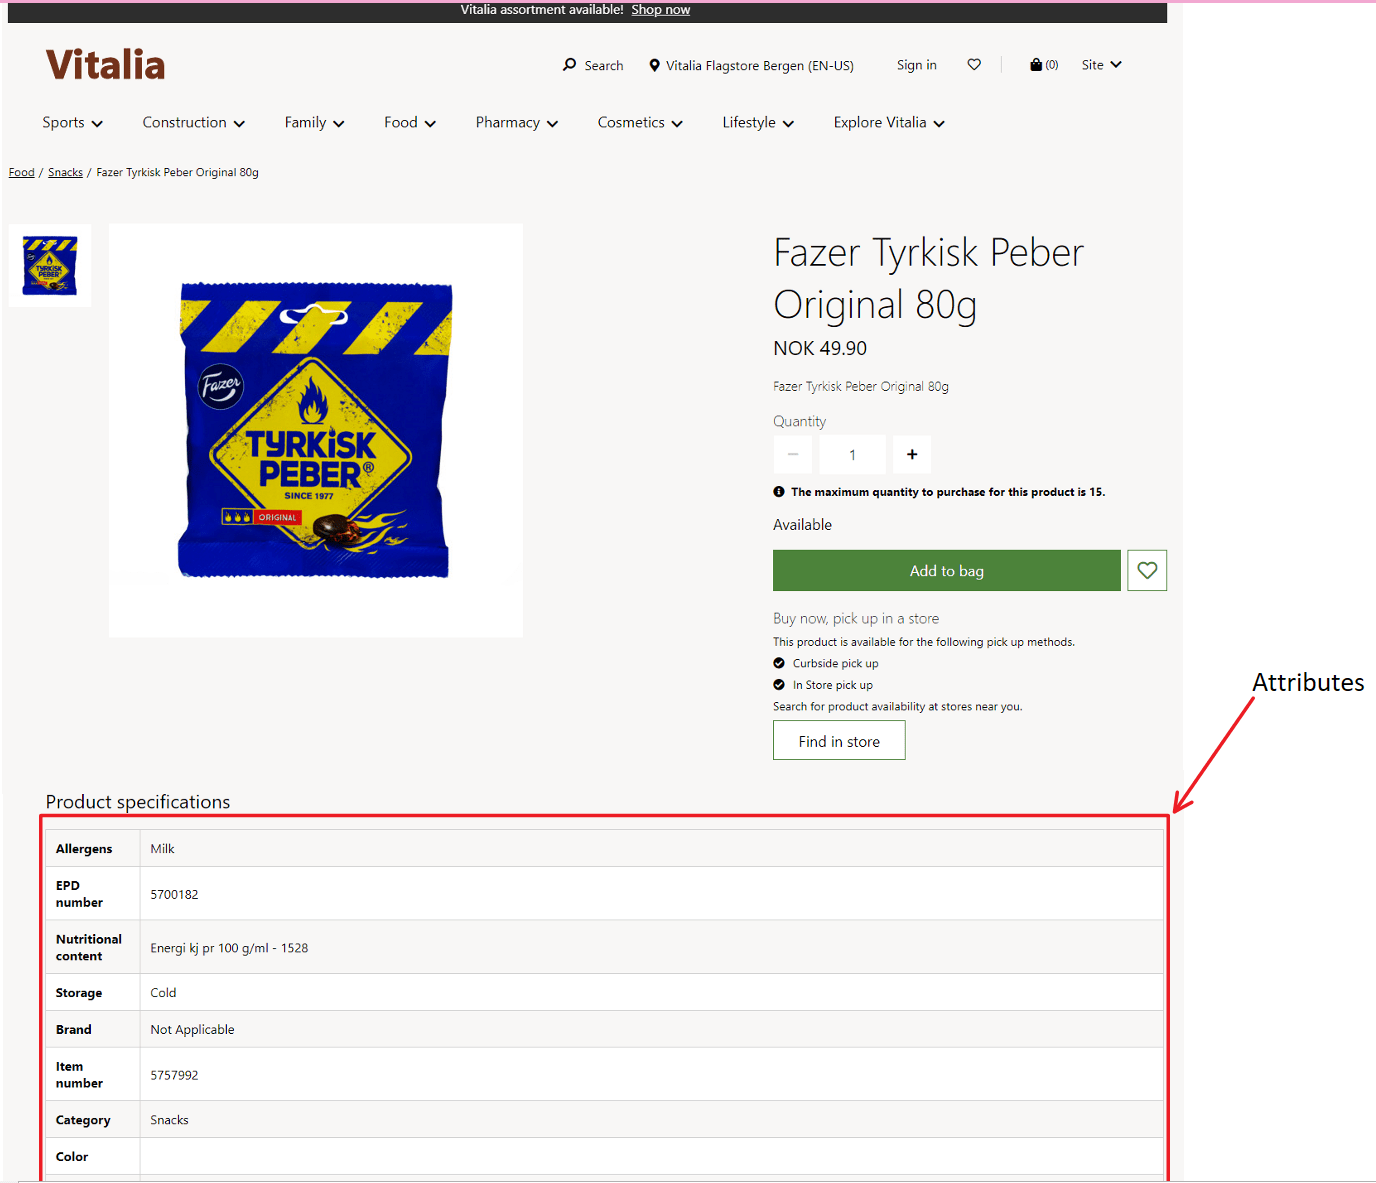
Dynamics 365 HQ (Several forms available, but here I show the channel categories and attributes screen to show that attributes actually can be defined per retail channel or organizational hierarchy)

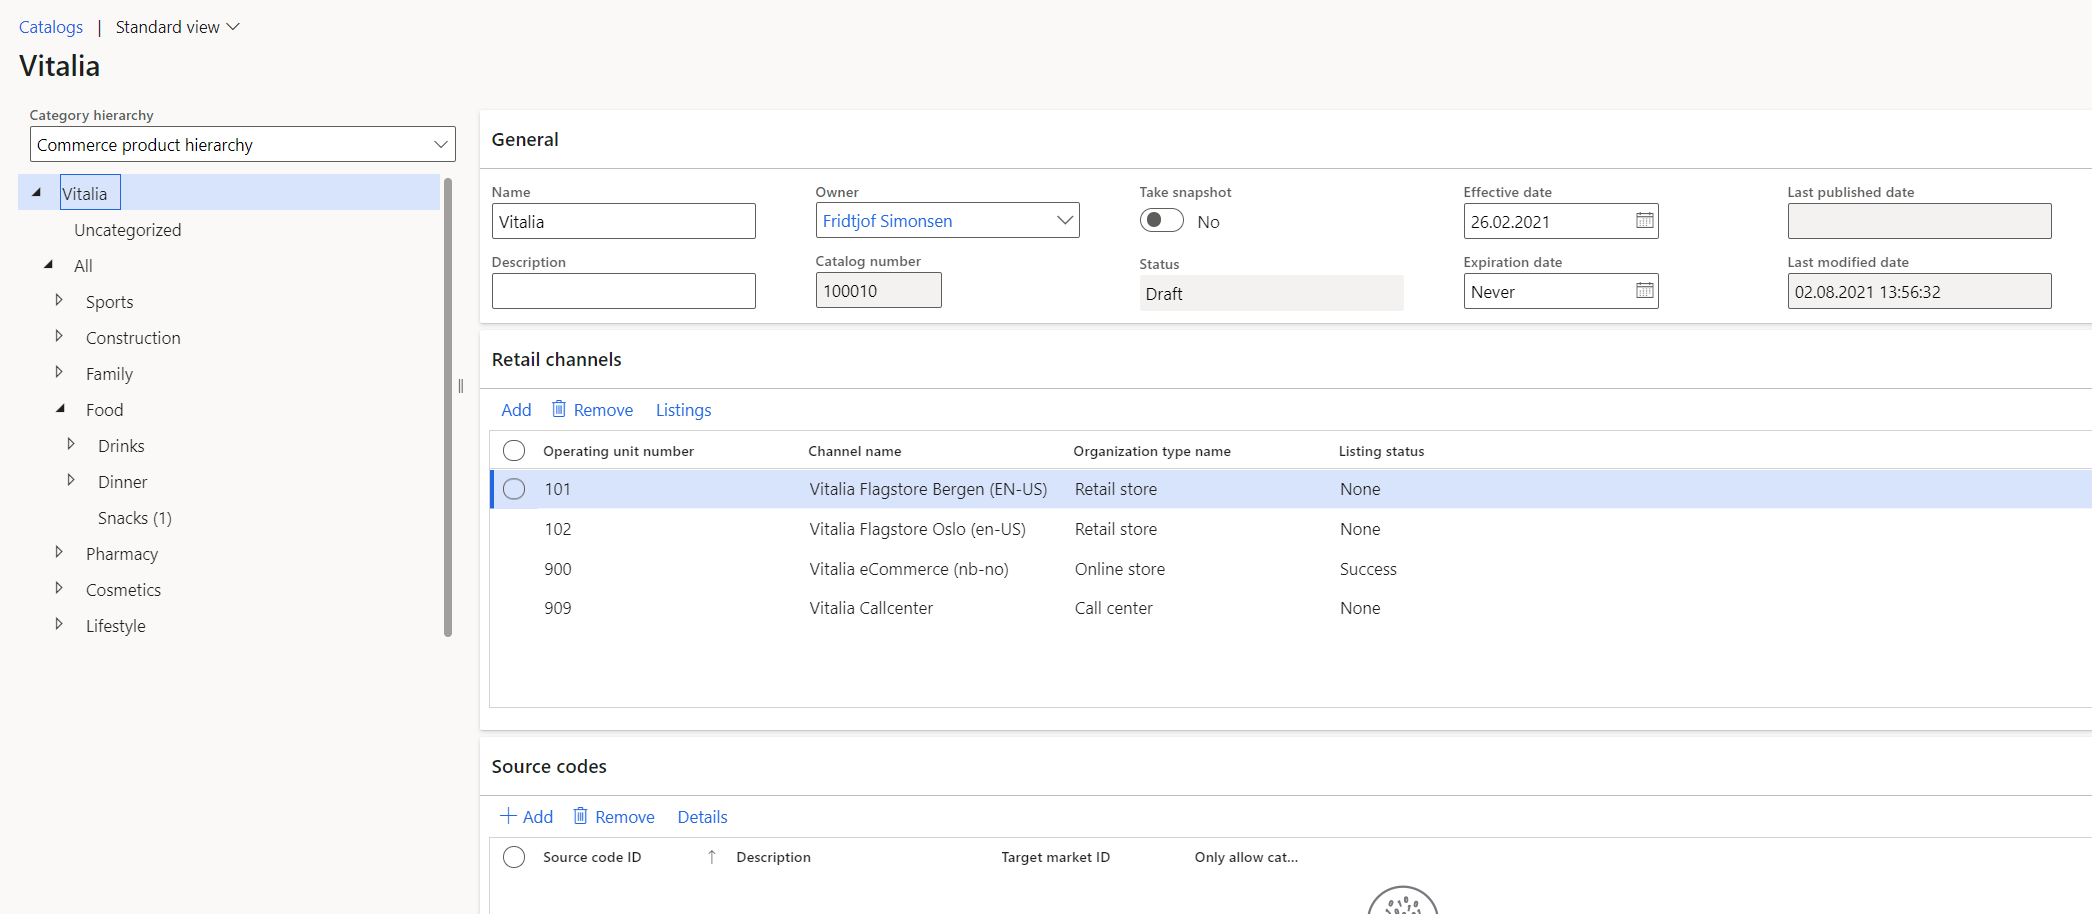
Configure assortments and product catalogs
Assortments let’s you manage product availability across channels. Keep in bind that organizational hierarchies and category hierarchy can be used to create more dynamic product assignments to stores.

Catalogs are currently more used in call center. Initially the catalog features were created to support third-party e-Commerce integrations. I think in future releases catalogs will come back to ensure that you can create B2B based catalog, and use this for restricting products towards different customers.
The following capabilities are planned as part of future releases:
- Associate a default catalog to the e-commerce website.
- Associate one or multiple catalogs to the customer hierarchies associated with a business partner organization and set a default catalog.
- Associate a default catalog to the customers in the customer hierarchy.
- Render the e-commerce site with products as per the catalog associated with the customer that’s logged in.
- Provide capability for a customer to change the default catalog to another valid catalog on the e-commerce site.
Manage product labels and shelf labels
Shelf and product labels are not a proud solution. Its is a dinosaur that I think needs some additional investments. If you start on this path, expect to do some extensions. What I have been waiting for is a BarTender integration that allows for a much smoother design and printout of product and shelf labels.
Describe uses cases for recommendation types including product, personalized, Shop
Product recommendations are available the following scenarios:
| On any store page for browsing or landing page in e-Commerce | If customers or store associates visit a store page, the recommendation engine can suggest products in the New, Best Selling, and Trending lists. |
| On the Product details page | If customers or store associates visit a Product details page, the recommendation engine suggests additional items that are also likely to be purchased. These items appear in the People also like list. |
| On the Transaction page or the checkout page | The recommendation engine suggests items, based on the whole list of items in the basket. These items appear in the Frequently bought together list. |
| Personalized recommendations | Merchandisers can provide signed-in customers a personalized picks for you list, in addition to new functionality that allows for existing list scenarios to be personalized based on that customer. To learn more, see Enable personalized recommendations |
What is important to understand is that certain parts of the recommendation solution are NOT included with the Commerce licenses, and have to be purchased as a separate SKU from Microsoft. Only the algorithmic models are included. Here is a list of the current available product recommendations.
| New | Algorithmic | This module shows a list of the newest products that have been recently assorted to channels and catalogs. |
| Best selling | Algorithmic | This module shows a list of products that are ranked by the highest number of sales. |
| Trending | Algorithmic | This module shows a list of the highest-performing products for a given period, ranked by highest number of sales. |
| Frequently bought together | AI-ML | This module recommends a list of products that are commonly purchased together with the contents of the consumers current cart. |
| People also like | AI-ML | This module recommends products for a given seed product based on consumer purchase patterns. |
| Picks for you | AI-ML | This module recommends a personalized list of products based on purchase patterns of the signed-in user. For a guest user, this list will be collapsed. |
You can manually seed the product recommendations manually by creating curated lists
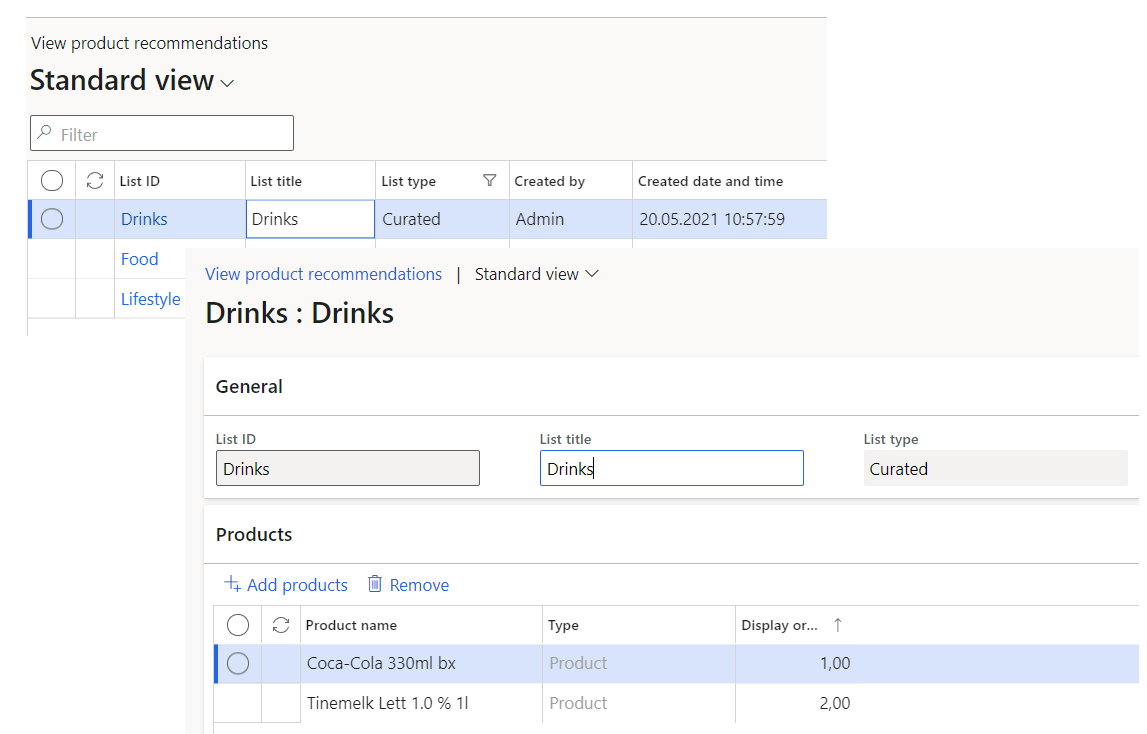
These curated lists can be added to eCommerce or POS :

Similar looks, and Shop similar descriptions recommendations
I have actually not managed to get this working with the AI based product recommentation. It could be that a separate SKU is required for making this work.
Configure recommendations
Before any AI-ML recommendation starts being effective, you could manually configure the recommendations. I have seen documentation that AI-ML do require a substantial amount of transactions before it becomes effective.

Configure warranty settings
The extended warranties are actually set up as a product that can be sold to customers. At the POS, sales associates are prompted to add an extended warranty when a related product is added to a customer’s cart. Therefore, an upsell or cross-sell opportunity is presented to sales associates as part of the sales flow. Here is an important note; A warranty is a service that is provided for a specific, unique product. In Dynamics 365, a product can be uniquely identified only by a serial number.
Configure inventory buffers and inventory levels
Inventory buffers and inventory levels that determine the messaging about inventory availability on Microsoft Dynamics 365 Commerce sites. Instead of showing actual inventory values in e-Commerce storefronts, many retailers prefer just to show messaging about inventory availability status (for example, “Available” or “Out of stock”) to inform customers whether an item is available for purchase or potentially out of stock. For this approach, inventory buffers and inventory levels that determine the inventory availability messaging must be made available and configured.
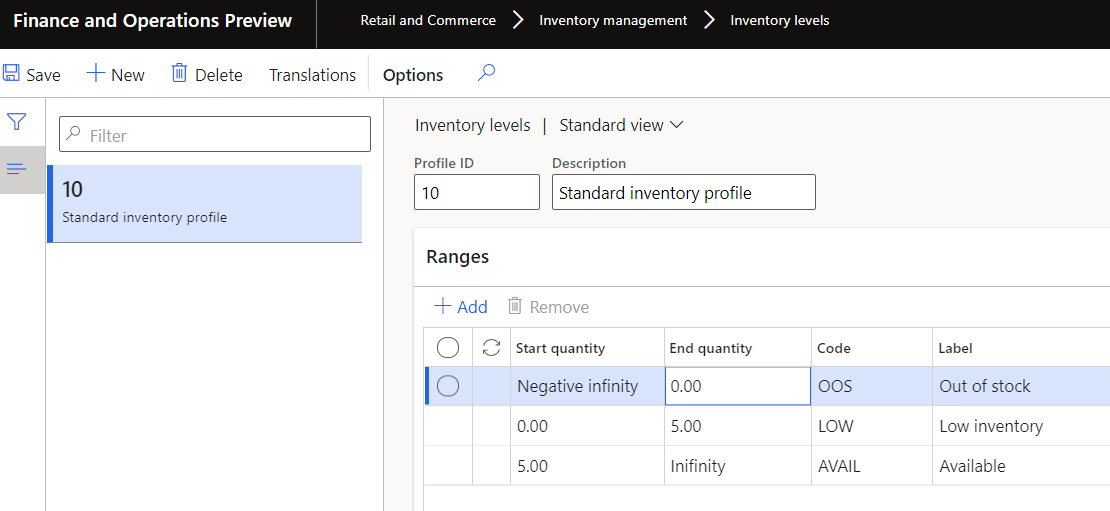
The inventory profile can be defined on the product as shown here:

The calculation of product availability can be executed on an hourly basis. The default cache is set to 60 seconds. After users post transactions in POS, they should wait 60 seconds before they verify that the on-hand inventory has been reduced. If your business scenario requires a smaller cache time you should create a support request.
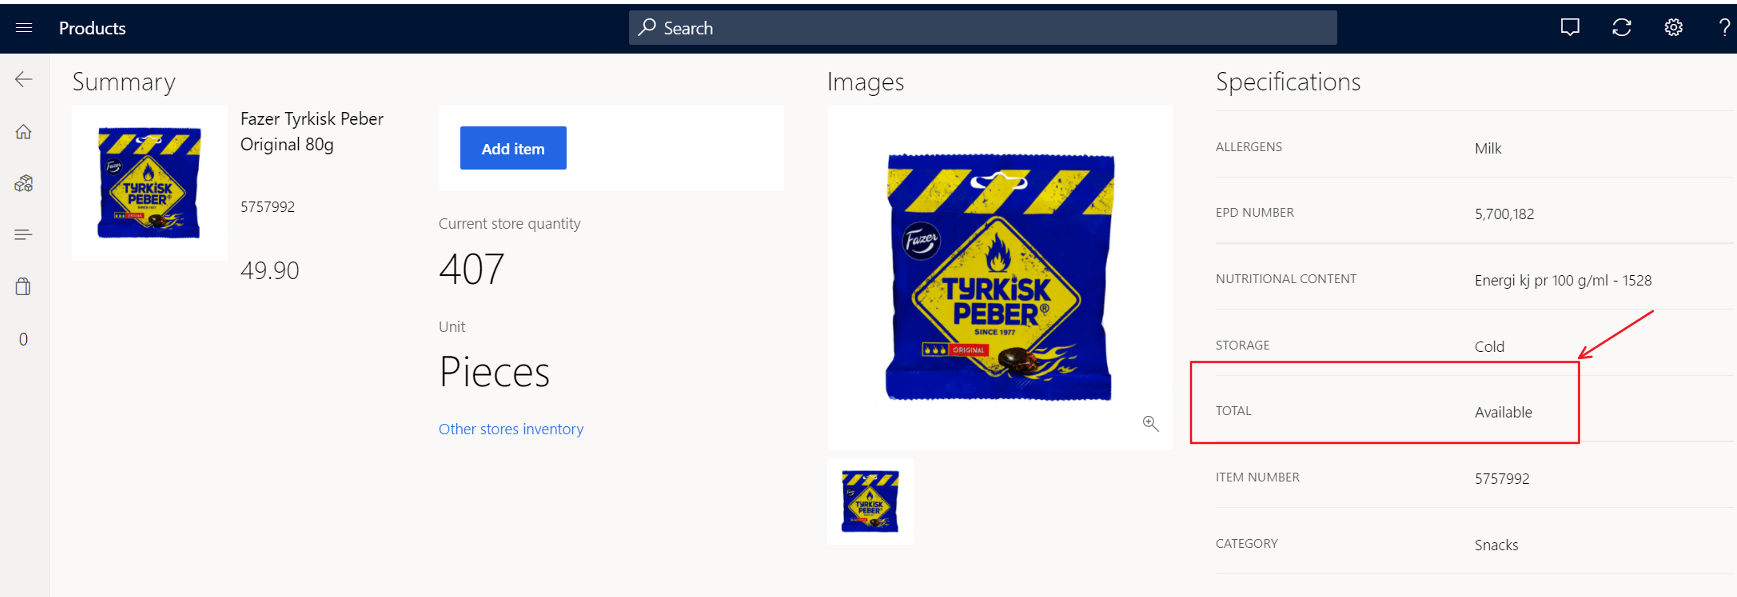
There is a batch job named Populate product attributes with inventory level, where the inventory level is then being added to the products as a product attribute.

If I then take a look at the product attributes, I then get a new attribute containing the on-hand as an attribute.

This attribute can now also be shown directly on the POS or on the eCommerce
Configure products and variants including configuring barcodes
Barcodes can be created per released item and per variant/product dimension.
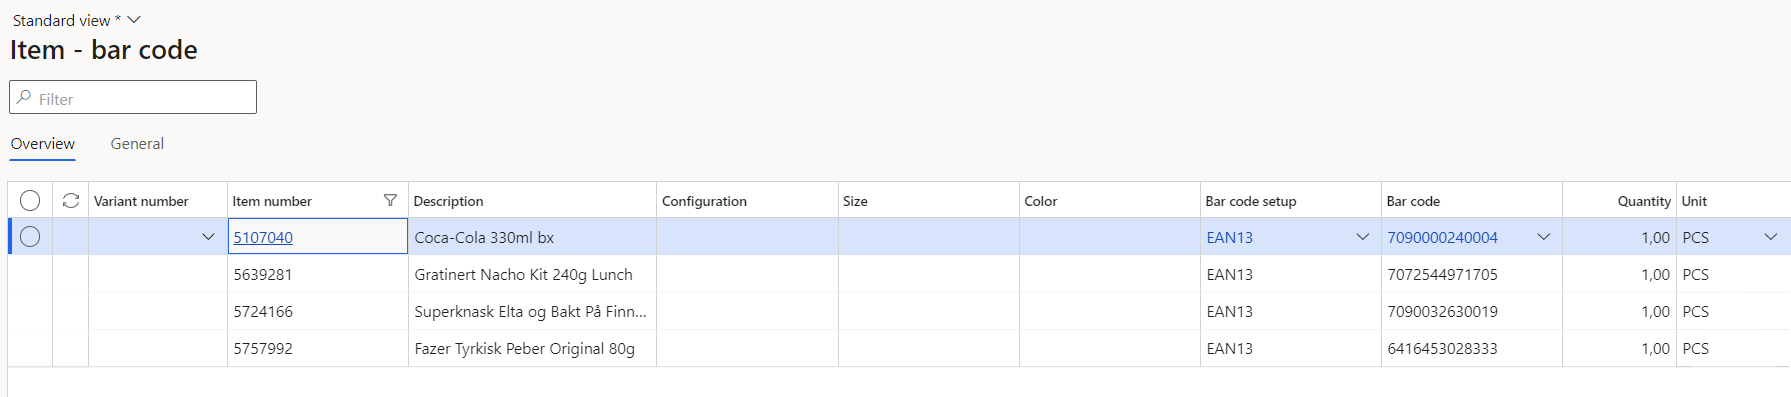
One thing I have always found annoying is that the barcodes are legal entity specific and towards released product. I often see a requirement where barcodes are the same across legal entities. For the warehouse management app Microsoft have in 10.0.21 made it possible to Scan using GS1 format standards. It would be great if this feature also was made possible in commerce/CRT.
Manage pricing
Pricing is a huge topic, and is also very well documented. I have blogged extensively on this topic before, and a lot have changed and improved in newer releases.
You can set the price of a product in three places:
- Directly on the product (base price)
- In a sales price trade agreement (A trade agreement price is always used before the base price.)
- In a price adjustment
Design and create price groups
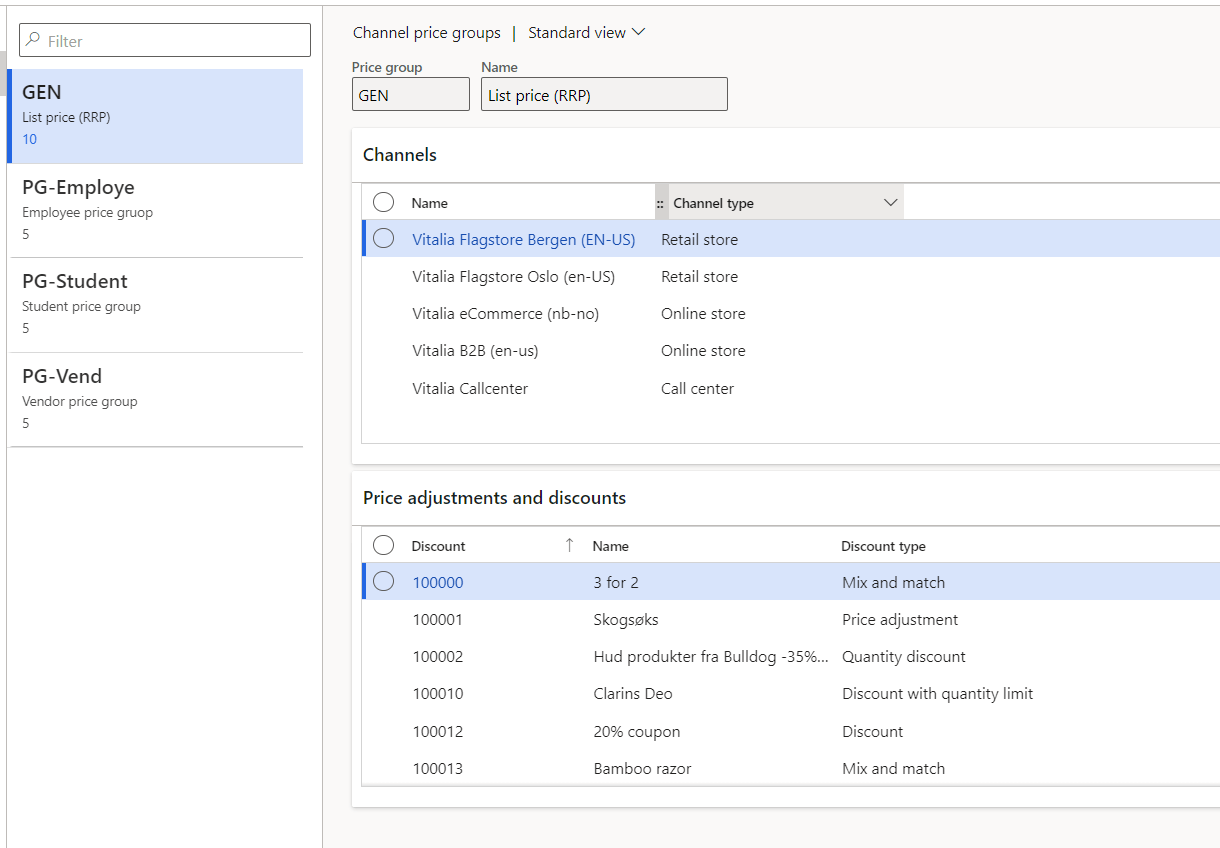
Price groups are at the heart of price and discount management in Commerce. Price groups are used to assign prices and discounts to Commerce entities (that is, channels, catalogs, affiliations, and loyalty programs). Because price groups are used for all pricing and discounts, it’s very important that you plan how you will use them before you start. By itself, a price group is just a name, a description, and, optionally, a pricing priority.

The main point to remember about price groups is that they are used to manage the many-to-many relationships that discounts and prices have with Commerce entities.

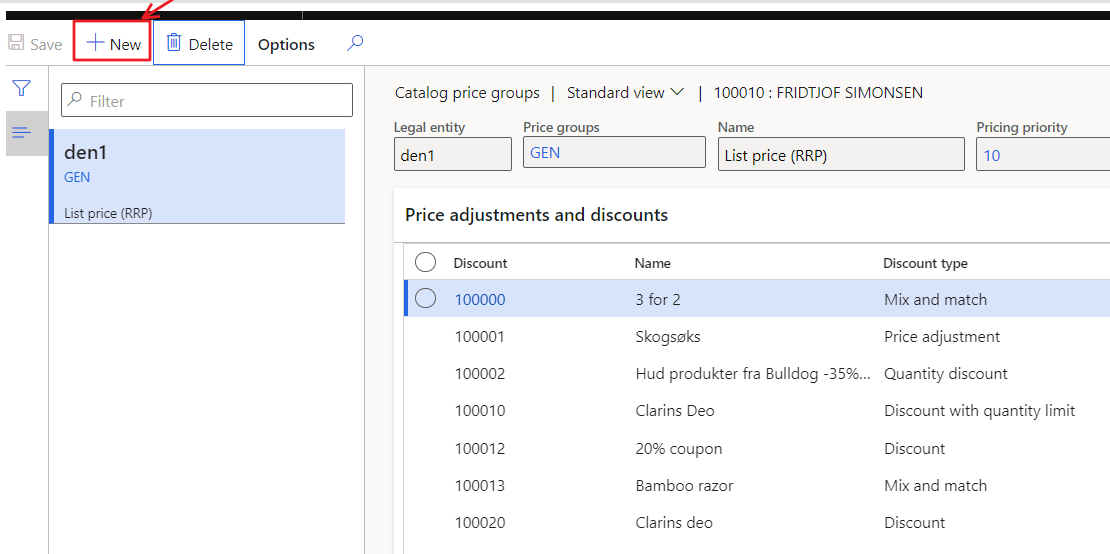
There is a form named channel price groups that shows the relationship between the channels and discounts, that makes it easier to understand the relationships.
Configure pricing priorities
By itself, a pricing priority is just a number and a description. Pricing priorities can be applied to price groups, or they can be applied directly to discounts. When pricing priorities are used, they let a retailer override the principle of the best price by controlling the order in which prices and discounts are applied to products. A larger pricing priority number is evaluated before a lower pricing priority number. Additionally, if a price or discount is found at any priority number, all prices or discounts that have lower priority numbers are ignored.
The price and a discount can come from two different pricing priorities, because pricing priorities apply to prices and discounts independently.
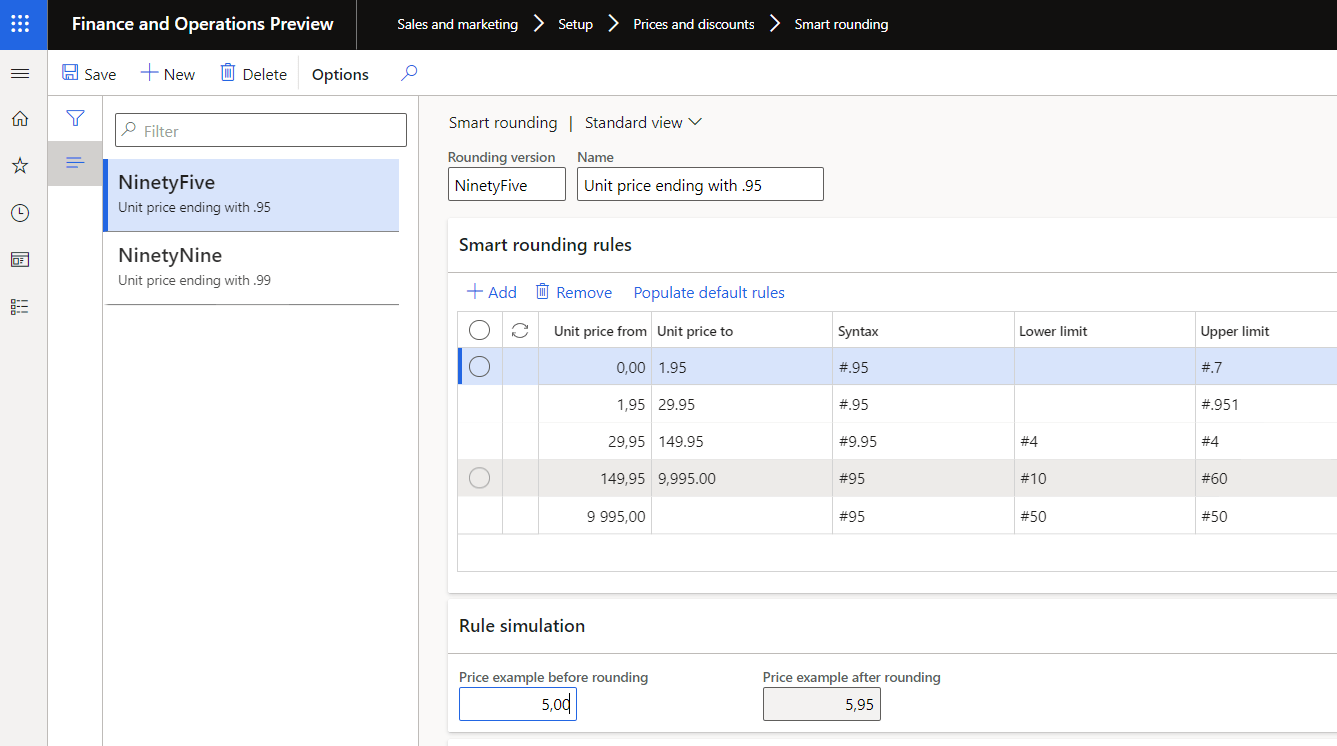
Configure product pricing including smart rounding
Smart rounding can be used when generating prices to be posted to the trade agreements. It ensures that we get consumer “interesting” prices typically ending with .99 or .95. When using the category price rules or working on trade agreements you can apply smart rounding.
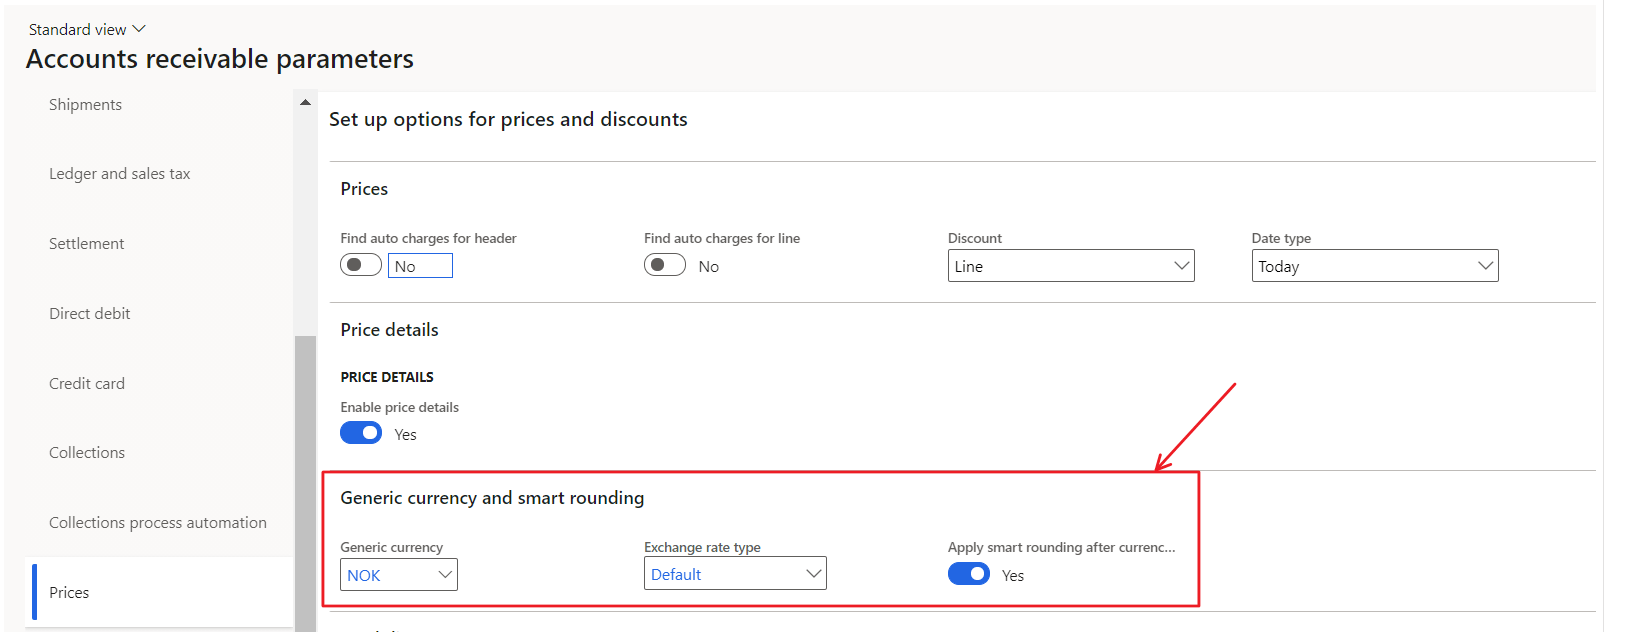
In the Accounts receivable parameters you can also see that when using generic currency the smart rounding kicks in. I have not tested how the generic currency works together with commerce.
Configure catalog pricing
Catalog pricing are using the same architecture for pricing as stores where you assign products and price groups to a catalog.

In the catalog you can click on the price groups to assign the pricegroups that is assigned to the catalog.
And if you click on the price list, you get the prices per product.

PS! If you do this from the store channel (same feature) you can generate a nice excel based pricelist that is made available in the print archive.(at least in my 10.0.21 box)

Configure affiliation pricing
The definition of an affiliation is a link to or association with a group. In Commerce, affiliations are groups of customers. Affiliations are a much more flexible tool for customer pricing and discounts than the core concept of customer groups and discount groups. First, an affiliation can be used for both prices and discounts, whereas non-retail pricing has a different group for each type of discount and price. Next, a customer can belong to multiple affiliations but can belong to only one non-retail pricing group of each type. Finally, although affiliations can be set up so that they are linked to a customer, they don’t have to be. An ad-hoc affiliation can be used for anonymous customers at the POS. A typical example of an anonymous affiliation discount is a senior or student discount, where a customer can receive a discount just by showing a group membership card.
Although affiliations are most often associated with discounts, you can also use them to set differential pricing. For example, when a retailer sells to an employee, it might want to change the selling price instead of applying a discount on top of the regular price. As another example, a retailer that sells to both consumer customers and business customers might offer business customers better prices, based on their purchasing volume. Affiliations enable both these scenarios.
Affiliations is just a list, and can be connected to price groups


On the customer, you can add multiple affiliations to this customer.

If you want to apply customer-specific prices, we recommend that you not set price groups directly on the customer. Instead, you should use affiliations.
Configure category pricing rules
The category price rules feature in Commerce gives you an easy way to create new trade agreements for all the products in a category. This feature also lets you automatically find existing trade agreements for the products in the category and expire them.

It creates trade agreement journal lines that can be posted.

Manage discounts and promotions
There are many types of discounts:
- Simple discount – A single percentage or amount.
- Quantity discount – A discount that is applied when two or more products are purchased.
- Mix and match discount – A discount that is applied when a specific combination of products is purchased.
- Threshold discount – A discount that is applied when the transaction total is more than a specified amount.
- Tender-based discount – A discount that is applied when the transaction total is more than a specified amount and a specific payment type (for example, cash, credit, or debit card) is used for payment.
- Shipping discount – A discount that is applied when the transaction total is more than a specified amount and a specific mode of delivery (for example, two day shipping or overnight shipping) is used on the order.
When you set up a price adjustment or a discount, be sure to confirm that price groups are assigned to the correct channels, catalogs, affiliations, or loyalty programs that you want the discount to apply to.
Configure discount parameters
Calculating prices and discounts can be extremely heavy from a computational aspect. Especially if you have many items in a sales basket and many promotions and discounts. The following parameters allows for the right setting to you needs.

Microsoft have also hade the following flow schema available that explains some of the complexity involved to the sales basket pricing happening in CRT.

Configure channel or customer-specific discounts
Channel and customer specific prices are defined with price group. At mentioned earlier I recommend using affiliation to create customer specific discounts, and then apply the affiliation to the respective price groups.
Configure quantity, shipping, tender-based, and threshold-based discounts
Quantity discounts
A quantity discount is a discount that is given to customers when they purchase a particular quantity of a product. For example, you can set up a 5 percent discount for the purchase of two products of a particular category or brand.
Buy 5 items get 20%, Buy 10 items get 40%

Free or discounted shipping is one of the highly influencing factors driving the customers’ online purchase decisions. Many retailers also leverage the free shipping benefit to motivate the customers to increase their basket size, thus increasing the revenue per transaction. With the 10.0 release of Retail, retailers can use “Retail shipping threshold discount” to define the thresholds, which once met, will qualify the customers for discounted or free shipping. For example, spend $50 or more to get free ‘Overnight shipping’ or sign up for the loyalty program and get free ‘Two-day shipping’.
This feature leverages the advanced auto charges capability that was available in the call center and e-Commerce modules but has now been made available in POS.


Unlike product discounts, the shipping discount does not create discount lines. Instead, the shipping discount edits the shipping charge directly and appends the name of the discount to the charge description.
Configure discount concurrency rules
When you have multiple discounts, pricing algorithm loops through the discounts across various priorities. The discount concurrency control model setting affects how all discounts compete and compound together.
On a discount you will find the discount concurrency mode.

When the value is Exclusive or Best price, only one discount can be applied to a transaction line. The only difference between Exclusive and Best price is the order that the discounts are considered and applied in. Exclusive discounts are always evaluated and applied before Best price and Compound discounts, if all other settings are the same. Therefore, Exclusive and Best price discount never compete for the best price. Two or more Exclusive discounts will compete for the best price, as will two or more Best price discounts.
When the value is Compound, the discount can be compounded with any other discount that is also set to Compound. Therefore, two or more Compound discounts will all be applied to a transaction line. When multiple Compound discounts are applied to a transaction line, they are applied in the following order:
- Discount price discounts
- Amount-off discounts
- Percentage-off discounts
Compound discounts compete with Best price discounts when both types apply to a transaction line. Therefore, the Compound setting is used to determine which discounts are combined. Depending on the discount concurrency control mode used, two or more Compound discounts can be combined and compete with the Best price discounts that apply to the same products. The discount or discounts that have the largest total discount amount are applied.

Manage coupons
Coupons are codes and bar codes that are used to add discounts to transactions. Each coupon can have multiple codes, and each code can have its own effective dates. Each coupon is related to one discount. The price groups that are associated with the discount define the customers that can use a coupon or the channels where a coupon is valid.
In the following example I have a coupon number, that give 20% discount. Each coupon may have multiple coupon code id’s to ensure that they are only used once. I have also created a code-39 barcode that will trigger the coupon in the POS, and I may distribute coupon code to customers as a QR-code if needed.

Manage customers, loyalty, and affiliations
The documentation in the link above is quite updated and to the point, and covers how customers are handled from a commerce perspective. Customers can be created in D365 HQ, POS and in the eCommerce solution. What is important to also consider is that customers are one of the area where there are a good Dynamics 365 sales synchronization though the DataVerse, enabling a very good understanding of customers through Dynamics 365 Customer insights.
Configure client books
Building a long-term relationship with your customers can ensure long-lasting loyalty. If you know what the customers preferences, purchase history and other relevant information it is easier to target activities and promotions towards the right buying customers. Client books is a customer card that where the preferences and activity log of the customer is shown. Through the client book, each sales associate can have a list of “their” customers that they follow up. This is most relevant for scenario’s where you have specialty retailing and close customer relationship.

Clicking on the client card, opens the customer card, where timeline, recent purchases etc are available.

Configure customer attributes
The client book includes customer cards that show contact information for each customer, together with three more properties that are defined by the retailer and configured in Headquarters.

Configure customer affiliations
Customer affiliation have been discussed earlier in this document. See Configure affiliation pricing.
Configure loyalty programs, loyalty schemes, and reward points
The documentation on this is quite detailed, but the main process of setting up loyalty can be presented like this flow. What is very nice, is that the loyalty features are a true omni-channel and is working on all channels. One aspect is that loyalty card, levels and points can be integrated with D365 Customer Service.

Manage loyalty tier calculations and processing
The calculation of loyalty tier can be processed in a set of batch-jobs.

Manage Point of Sale (POS) in Dynamics 365 Commerce (15-20%)
Configure retail stores
Create a retail store
A retail store requires a one-to-one (1:1) relationship with a warehouse and operating unit. The warehouse must be configured before the store is created. The operating unit is created automatically when the store record is created. If you have specific requirement on what the retail channel ID and operating unit number should be, then you have the option to set the number sequences to manual, and then manually create them.

Each store has some important store configurations to consider:
- Legal entity – The legal entity where the store’s transactions will post.
- Time zone – The time zone in which the store operates.
- Language – The language that is used for the store data.
- Currency – The default currency for the store.
- Warehouse – The warehouse that is used for the store inventory. The POS can only sell out of a single warehouse location.
- Functionality profile – Contains configurations for how the registers should operate.
- Profile configurations – Configurations that are used to define technical architecture details, such as retail server and Cloud POS URLs, offline database schema, and more.
- Sales tax configurations – A grouping of configurations that is used to determine sales tax configurations, such as the store’s tax group, and whether the store should use destination or customer-based taxes.
- Default customer ID – Assigned for transactions where no customers are specified. All transactions will be aggregated in a sales order by using this default customer ID.
- Screen layout ID – The default screen layout ID that is used for all registers and users, unless it is overridden.
- Post as business day – Offsets the end-of-day time. For example, a store might close after midnight and wants transactions that happen until 2:00 AM to be posted as the previous day’s sales.
Configure POS registers and devices
Commerce supports two types of POS deployments:
- Modern POS (MPOS) – Locally installed deployment on a Windows OS, iOS, or Android device and supports offline mode.
- Cloud POS (CPOS) – A web application with nothing installed locally.
Microsoft is now also working on a third option called Store commerce that provides the benefits of both Modern Point of Sale (MPOS) and Cloud Point of Sale (CPOS). Benefits of Store Commerce
- Simplified Application lifecycle management (ALM) using Microsoft Store.
- Extension or ISV code developed for MPOS or CPOS can be reused in Store Commerce.
- Store Commerce provides the benefits of both MPOS and CPOS.
- Better performance with the use of Microsoft Edge WebView2
- Easier POS and extension upgrades.
- Support for dedicated hardware station (HWS).
- Support for offline, in the future.
Registers contains the information of profiles etc.

The device contains information on the activation.

Configure retail profiles
Functionality profile differs from register and device configurations in that it specifies functionalities that aren’t tied to hardware or devices. In most cases, both devices can and should operate in the same way for a consistent experience for customers and employees across the entire store. The functionality profiles are defined at the store level, and you assign the profile to the store.

A visual profile will define the overall branding and theme for a register. For example, the sign-in background for a large monitor would require a different sign-in or lock screen than a phone or tablet would require. The theme might also be important. If it’s a customer-facing monitor, it might require more branding than one that is employee-facing only. The visual profile can help account for these requirements.

A receipt profile is a group of form layouts that can be assigned to point of sale (POS) printers via a hardware profile. A receipt profile provides a set of receipt templates for the printers at your registers. After you set up the receipt profiles, you must assign them to the hardware profile, so that the POS register can print the receipts.

The hardware profile is where you define the peripherals as printers, scanners etc.

Screen layout define different setup on how the POS screen should look like with buttons and different layouts based on screen sizes. In the following example I have 2 layouts; One for using POS as a mobile device, and one with larger screen.

Configure sales tax overrides
Sales tax groups can be used to override taxes for specific items that belong to the group. For example, food items are typically taxed differently from hard goods, and would likely have their own sales tax group. Sales tax groups are groups of taxes that are applicable to a particular channel. For example, if a channel sells both retail and business-to-business, different items sales tax groups may be used. All the applicable taxes would be mapped to the sales tax group.

Tax overrides will can be seen in POS as override buttons, and in this example I’m choosing if there is a high or medium tax on the line.

For tax in general related to D365 commerce, I recommend the following documentation.
Configure Task Management lists and parameters
In a retail environment, it’s always difficult to make sure that tasks are performed by the right person at the right time. Retailers must be able to notify workers about upcoming tasks and provide related business context, so that the tasks can be completed correctly and on time.
Task management is a productivity feature in Dynamics 365 Commerce that lets managers and workers create task lists, manage assignment criteria, track task status, and integrate these operations between Commerce back office and point of sale (POS) applications.

In D365 you will find the following menues:

The task management process allows you to see all active tasks, in this case a holiday season preparation wanted to be done in all stores.

And you can define additional tasks in the administration:

In the POS, the tasks will appear like this.

Define cash management processes
Cash management from a physical store perspective covers complete traceability and accountability of cash and its movement across the different registers and cashiers in a store. They must be able to reconcile any differences and determine accountability. On the functionality profile you will find 2 settings that is managing this:

By enabling cash traceability, introduces the Safe entity and you will have safe transactions where you can reconcile and approve cash management transactions. If there are exceptions you can tag the transaction with a reason code.
Cash reconciliation is always for a ‘Shift’. It is not for a Terminal / Register / Safe. With ‘shared shift’, a shift can be across multiple Registers. The Safe entity can be managed with a regular register or it can also be managed with a dedicated register.
‘Cash traceability’ feature by itself has not introduced any new GL postings and as such – like all safe transactions to post to the general ledger when money moves in or out of the safe – are not supported. Please do keep in mind that this parameter only supports GL postings for Safe drop transaction. Statement posting is the only way to get financial transactions for retail transactions created/posted in the store
The flow of cash can happen between the Safe to Register and then back from Register to the Safe With that:
1. At the end of any given day or shift, with Tender declaration we are closing the Register and before that the cashier performs the Safe drop operation which takes the cash from the Register and moves it to the Safe .This transaction does create a GL entry which increases the balance in the GL account linked to the Safe drop transaction. It may be common to have some money in Safe which they use every day to move to Register – e.g. from Safe to Register operation is happening every morning and not move money from Safe to Bank every day. This is like money circulating inside the store. And this move is not posted to GL. Posting entries to GL only happen with the use of Bank drop operation.
2. When the balance in the Safe (Shift) goes above a particular limit by which it is no longer a good practice to keep that much cash in the Safe, retailers typically transfers the cash from the safe to the bank and in the system they perform a Bank drop operation for the same. This also creates a GL posting where in the balance in the GL account linked to the Safe is reduced and the balance in the GL account linked to the Bank is increased. (essentially cash is deposited in the bank account).
The following steps are an example of how this works, and by having a exclusive shift for safe management:

To reconcile the cash transactions within a shift or across shifts, select the shift to reconcile, and then select Reconcile.

The view that is opened shows the list of reconciled and unreconciled transactions on separate tabs. From this view, users can either select unreconciled transactions and reconcile them, or select previously reconciled transactions and unreconcile them.
During reconciliation, if the selected transaction doesn’t balance, the user must enter a description of the reason for the unbalanced reconciliation. Users can select a single transaction and reconcile it with the relevant reason description as they require.
Users can continue to reconcile and unreconcile transactions until the shift is closed. After a shift is closed, the transactions can’t be unreconciled.
When a user chooses to close a shift, Commerce validates that there are no unreconciled cash management transactions in the shift. Users can’t close a shift if there are unreconciled transactions.
For safes that are defined in a store, users can manage operations such as declaring the start amount, doing a float entry, doing a tender removal, and making a bank drop.
Define shifts and shift management processes
The term shift describes the collection of POS transactional data and activities between two points in time. For each shift, the amount of money that is expected is compared against the amount that was counted and declared.
Typically, shifts are opened at the start of the business day. At that point, a user declares the starting amount that the cash drawer contains. Sales transactions are then performed throughout the day. Finally, at the end of the day, the drawer is counted, and the closing amounts are declared. The shift is closed, and a Z report is generated. The Z report indicates whether there is an overage or shortage.
In the posted statements form you have the record of the statement, declarations, transactions.

You can also print out the statement and use for booking if you have a manual external financial booking system (And I hope you don’t have this!)

Configure channel return policies
The channel return policy enables retailers to set enforcements on which payment tenders can be allowed for processing a return on a point of sale (POS) device. The scope of the policy is currently limited to setting the payment tenders that can be allowed for a channel. The “allowed” list is based on the payment methods used to make the purchase. For example:
- If a purchase was made using a gift card, the store policy is to process refunds only to a new gift card or to give store credit.
- If a sale is made using cash, the options allowed for refund are cash, gift card, and customer account, but not credit card.

Describe offline capabilities and limitations
There is a set of data that require real-time direct access:
- Issuing and redeeming gift cards
- Redeeming loyalty points
- Issuing and redeeming credit memos
- Creating and updating customer records
- Creating, updating, and completing sales orders
- Receiving inventory against a purchase order or transfer order
- Performing inventory counts
- Retrieving sales transactions across stores and completing return transactions
To be more precise, here are the operations that is NOT available in offline scenarios:
| ID | Operation | Description |
| 707 | Activate device | Activate the current device by allowing an authenticated user to provide connection information and assign a device and register ID. |
| 134 | Add affiliation | Add a preselected affiliation to a transaction. Select the affiliation on the Button properties page. |
| 135 | Add affiliation from list | Add an affiliation to a transaction by selecting it in a list. |
| 137 | Add affiliation to customer | Add an affiliation to a customer on the Customer details page. |
| 138 | Remove affiliation from customer | Remove an affiliation on the Customer details page. |
| 643 | Add coupon code | Add a coupon by entering its code in the POS. |
| 141 | Add header charges | Add a misc charge to the order header. |
| 141 | Add line charges | Add a misc charge to a selected sales line. |
| 117 | Add loyalty card | Prompt the user to enter a loyalty card number that will be added to the current transaction. |
| 136 | Add serial number | This operation lets the user specify a serial number for the currently selected product. |
| 1214 | Add shipping address | This operation isn’t supported. |
| 519 | Add to gift card | Add money to the specified gift card. |
| 6000 | Allow skip fiscal registration | This operation isn’t supported. |
| 1212 | Bank drop | Record the amount of money that is sent to the bank and other information, such as the number of the bank bag. |
| 923 | Bank totals verification | This operation isn’t supported. |
| 915 | Blank operation | This operation represents a customizable button that a software developer can programmatically change for any specialized operation that the business requires. |
| 1053 | Blind close shift | Set the current shift to blind closed, and sign the user out. A blind-closed shift is closed to additional transactions but is still open to drawer operations, such as tender removal and tender declaration. |
| 310 | Calculate total | When discount calculation is delayed, this operation initiates the calculation for the current transaction. |
| 642 | Carry Out All Products | Set the mode of delivery for all lines to Carryout. |
| 641 | Carry Out Selected Products | Set the mode of delivery for the selected lines to Carryout. |
| 647 | Change mode of delivery | Change mode of delivery for preconfigured shipping sales lines. |
| 1215 | Change password | This operation lets the POS user change their password. |
| 123 | Change unit of measure | Change the unit of measure for the selected line item. |
| 639 | Clear default sales representative on transaction | Remove the commission sales group (sales rep) from the transaction. |
| 106 | Clear quantity | Reset the quantity on the currently selected line to 1. |
| 640 | Clear sales representative on line | Remove the commission sales group (sale rep) from the currently selected line. |
| 121 | Clear salesperson | This operation isn’t supported. |
| 1055 | Close shift | Close the current shift, print a Z report, and sign the user out of the system. |
| 139 | Conclude transaction | Prompts user to select payment method |
| 620 | Create customer order | Convert the POS transaction to a customer order. |
| 925 | Copy the bank check | This operation isn’t supported. |
| 620 | Create customer order | Convert the POS transaction to a customer order. |
| 621 | Create quotation | Convert the POS transaction to a sales quotation. |
| 636 | Create retail transaction | This operation lets the user create a standard sales transaction when the default POS behavior is to create customer orders. |
| 600 | Customer | Add the specified customer to the transaction. |
| 1100 | Customer account deposit | Make a payment to a customer’s account. |
| 612 | Customer add | This operation lets the user create a new customer record. |
| 603 | Customer clear | Remove the customer from the current transaction. |
| 602 | Customer search | This operation lets the user search for a customer record by navigating to the customer search page in the POS. |
| 609 | Customer transactions | This operation isn’t supported. |
| 917 | Database connection status | This operation lets the user view the current connection settings, and switch between online and offline modes. |
| 1200 | Declare start amount | Declare the amount that is in the cash drawer when the day or shift starts. |
| 132 | Deposit override | Override the default deposit for customer orders. |
| 913 | Design mode disable | This operation isn’t supported. |
| 912 | Design mode enable | This operation isn’t supported. |
| 1217 | Disassemble kits | Disassemble a kit into its component products. |
| 624 | Display refund amounts | This operation isn’t supported. |
| 513 | Display total | Show the balance of the transaction on the customer display. |
| 623 | Edit customer | Edit the current customer’s details. |
| 614 | Edit customer order | Recall the selected order so that it can be modified in the POS. |
| 615 | Edit quotation | Recall the selected quotation so that it can be modified in the POS. |
| 518 | Expense accounts | Record money that is removed from the cash drawer for occasional expenses. |
| 919 | Extended log on | Assign or remove permission to sign in by scanning a bar code or swiping a card. |
| 1201 | Float entry | This operation lets the user add additional money to the current drawer or shift. |
| 1218 | Force unlock peripheral | The system uses this operation internally to unlock POS peripherals. |
| 520 | Gift card balance | Show the balance of a gift card. |
| 708 | Inactivate device | Inactivate the current device, so that it can’t be used as a POS register. |
| 804 | Inbound operation | Access the features of inbound store inventory management. |
| 517 | Income accounts | Record money that is put into the cash drawer for a reason other than a sale. |
| 801 | Inventory lookup | Look up available, on order, and available-to-promise (ATP) quantities for the current store and other available locations. |
| 122 | Invoice comment | This operation lets the user enter a comment about the current transaction. |
| 511 | Issue credit memo | Issue a credit memo to provide a voucher instead of a refund. |
| 512 | Issue gift card | Issue a new gift card for the specified amount. |
| 625 | Issue loyalty card | Issue a loyalty card to a customer, so that the customer can participate in the store’s loyalty program. |
| 300 | Line discount amount | Enter a discount amount for a line item in the transaction. This operation is used only for discountable items and only within specified discount limits. |
| 301 | Line discount percent | Enter a discount percentage for a line item in the transaction. This operation is used only for discountable items and only within specified discount limits. |
| 703 | Lock register | Lock the current register, so that it can’t be used, but don’t sign the current user out. |
| 701 | Log off | Sign the current user out of the register. |
| 521 | Loyalty card points balance | Show the balance of points for the specified loyalty card. |
| 142 | Manage charges | View and manage misc charges applied to transaction. |
| 918 | Manage shifts | Show a list of active, suspended, and blind closed shifts. |
| 914 | Minimize POS window | This operation isn’t supported. |
| 1000 | Open drawer | Perform a “no sale” operation, and open the currently selected cash drawer. |
| 928 | Order fulfillment | This operation allows users to pick, pack, ship, or recall orders for store picked up. |
| 805 | Outbound operation | Access features for managing shipments of outbound transfer orders. |
| 129 | Override line product tax | Override the tax on the selected line item, and use a different specified tax. |
| 130 | Override line product tax from list | Override the tax on the selected line item, and use the tax that the user selects in a list. |
| 127 | Override transaction tax | Override the tax on the transaction, and use a different specified tax. |
| 128 | Override transaction tax from list | Override the tax on the transaction, and use the tax that the user selects in a list. |
| 131 | Packing slip | Create a packing slip for the selected order. |
| 710 | Pair hardware station | This operation isn’t supported. |
| 201 | Pay card | Accept a card such as a credit card or a debit card as payment. |
| 200 | Pay cash | Accept cash as payment. |
| 206 | Pay cash quick | Complete the transaction in one touch, and accept the amount that is due in cash (exact change). |
| 204 | Pay check | Accept a check as payment. |
| 213 | Pay credit memo | Accept a credit memo (voucher) that the store issued. |
| 203 | Pay currency | Accept payment in various currencies. |
| 202 | Pay customer account | Charge the transaction to the customer’s account. This payment method isn’t valid for customer order deposits. |
| 214 | Pay gift card | Accept a gift card that the store issued. |
| 207 | Pay loyalty | Accept a loyalty card for payment, and redeem points toward qualified products. |
| 634 | Payments history | Show the customer’s payment history for the current customer order. |
| 803 | Picking and receiving | Open the Picking and receiving page, where you can select orders to pick or receive in the store. |
| 632 | Pickup all products | Set the fulfillment method to Store pickup for all lines. |
| 631 | Pickup selected products | Set the fulfillment method to Store pickup for selected lines. |
| 400 | Popup menu | This operation isn’t supported. |
| 101 | Price check | This operation lets the user look up the price for a specified product. |
| 104 | Price override | Override the price of a product, if the product has been set up to allow for price overrides. |
| 1058 | Print fiscal X | This operation isn’t supported. |
| 1059 | Print fiscal Z | This operation isn’t supported. |
| 927 | Print item label | This operation isn’t supported. |
| 926 | Print shelf label | This operation isn’t supported. |
| 1056 | Print X | Print and X report for the current shift. |
| 103 | Product comment | Add a comment to the selected line item in the transaction. |
| 100 | Product sale | Add a specified product to the transaction. |
| 108 | Product search | This operation lets the user search for a product by navigating to the product search page in the POS. |
| 633 | Quote expiration date | This operation lets the user view or modify the expiration date on a sales quotation. |
| 627 | Recalculate | Recalculate all customer order lines and taxes, based on the current configuration. |
| 143 | Recalculate charges | Recalculate the auto-charges applied to the order. |
| 515 | Recall order | This operation lets the user search for and recall customer orders and sales quotations. |
| 504 | Recall transaction | This operation lets the user recall a previously suspended transaction from the current store. |
| 305 | Redeem loyalty points | This operation isn’t supported. |
| 635 | Refund shipping charges | This operation lets the user refund shipping charges on a canceled order. |
| 644 | Remove coupon code | Prompt the user to remove coupons by selecting them in a list of coupons that are currently associated with the transaction. |
| 1057 | Reprint Z | Reprint the Z report for the previous shift or a selected shift. |
| 1216 | Reset password | This operation lets a user who has the password-reset permission reset another employee’s password by using a temporary password. |
| 1219 | Open URL in POS | This operation lets a user to open an admin configured URL in POS. |
| 109 | Return product | Perform a return of individual products. The next scanned product is shown as a returned product that has a negative quantity and price. |
| 114 | Return transaction | Recall a previous transaction by its receipt number to return some or all of the products. |
| 1211 | Safe drop | Perform a safe drop to move money from the register to a safe. |
| 516 | Sales invoice | This operation lets the customer make payments toward the selected sales invoice. |
| 502 | Salesperson | This operation lets the user set the Sales taker value on a sales order for customer orders in the POS. |
| 2000 | Schedule management | This operation is not yet supported. |
| 2001 | Schedule requests | This operation is not yet supported. |
| 622 | Search | This operation lets users preconfigure POS buttons to perform searches by item, customer, or category. |
| 1213 | Search shipping address | This operation isn’t supported. |
| 709 | Select hardware station | This operation lets the user select a hardware station in a list of available hardware stations. |
| 637 | Set default sales representative on transaction | This operation lets the user select one of the eligible commission sales groups (sale reps) as the default sales rep for lines that are added later. |
| 105 | Set quantity | Change the quantity of a line item in the transaction. |
| 638 | Set sales representative on line | This operation lets the user select one of the eligible commission sales groups (sale reps) for the currently selected line. |
| 630 | Ship all products | Set the fulfillment mode to Shipping for all line items. |
| 629 | Ship selected products | Set the fulfillment mode to Shipping for the selected lines. |
| 115 | Show journal | Show the store’s journal. You can view transactions, reprint receipts and gift receipts, and recall for return. |
| 802 | Stock count | This operation lets the user create or modify stock counting journals for physical inventory or cycle counts. |
| 401 | Sub menu | This operation takes the user to another linked button grid. |
| 1054 | Suspend shift | Suspend the current shift, so that a new or different shift can be activated on the current register. |
| 503 | Suspend transaction | Suspend the current sales transaction, so that it can be recalled later in the store. |
| 1004 | Task recorder | Open Task recorder to record procedural steps in the POS. |
| 1052 | Tender declaration | This operation lets the user specify the amount of money in the drawer for each counted payment method. |
| 1210 | Tender removal | This operation lets the user remove money from the current drawer or shift. |
| 920 | Time clock | This operation lets users punch in and punch out of work shifts and breaks. |
| 302 | Total discount amount | Enter a discount amount for the transaction. This operation applies only to discountable items and only within specified discount limits. |
| 303 | Total discount percent | Enter a discount percentage for the transaction. This operation applies only to discountable items and only within specified discount limits. |
| 501 | Transaction comment | Add a comment to the current transaction. |
| 922 | View product details | Open the product details page for the currently selected line item. |
| 1003 | View reports | Show the reports that have been configured for the current user. |
| 921 | View time clock entries | Show the time clock entries for all workers at the store. |
| 211 | Void payment | Void the currently selected payment line from the transaction. |
| 102 | Void product | Void the currently selected line item from the transaction. |
| 500 | Void transaction | Void the current transaction. |
| 916 | Windows workflow foundation | This operation isn’t supported. |
| 924 | X report for bank cards | This operation isn’t supported. |
| 311 | Remove system discounts from transactions | Remove all the system applied discounts, including coupon based discounts, from the transaction. This does not remove manual discounts. |
| 312 | Reapply system discounts | Reapply system discounts on the transaction if they were removed using the Remove system discounts from transaction operation. |
Manage store inventory
The POS provides functionality to manage store inventory, including store inventory replenishment capabilities, inbound and outbound store inventory operations, store stock counts, and store inventory lookup capabilities. The following Microsoft learn course gives a good overview, and touches on cross docking, buyer’s purch, Receive store inventory from POS and other inbound operations.
I really like the simplicity process of requesting goods from central warehouse or from other store. It’s fast and easy to use. The following screen shows how it looks when requesting goods from another store. Scan barcode and specify quantity.

Configure availability calculations for products
It is important to understand that in a commerce architecture you have both the HQ database and the channel database. This is done for performance and latency reasons, and data is often synchronized back and forth in an asynchrony way. This can affect how the on-hand and availability calculations are being handled. Channel-side inventory calculation is a mechanism that takes the last-known channel inventory data in Commerce headquarters as a baseline, and then factors in additional inventory changes that occurred on the channel side that aren’t included in that baseline to calculate a near-real-time estimated on-hand inventory. The following post is important to understand and how to use the presented on-hand calculations. If you are using product variations, like color and size , the onhand can be presented as a grid in POS.
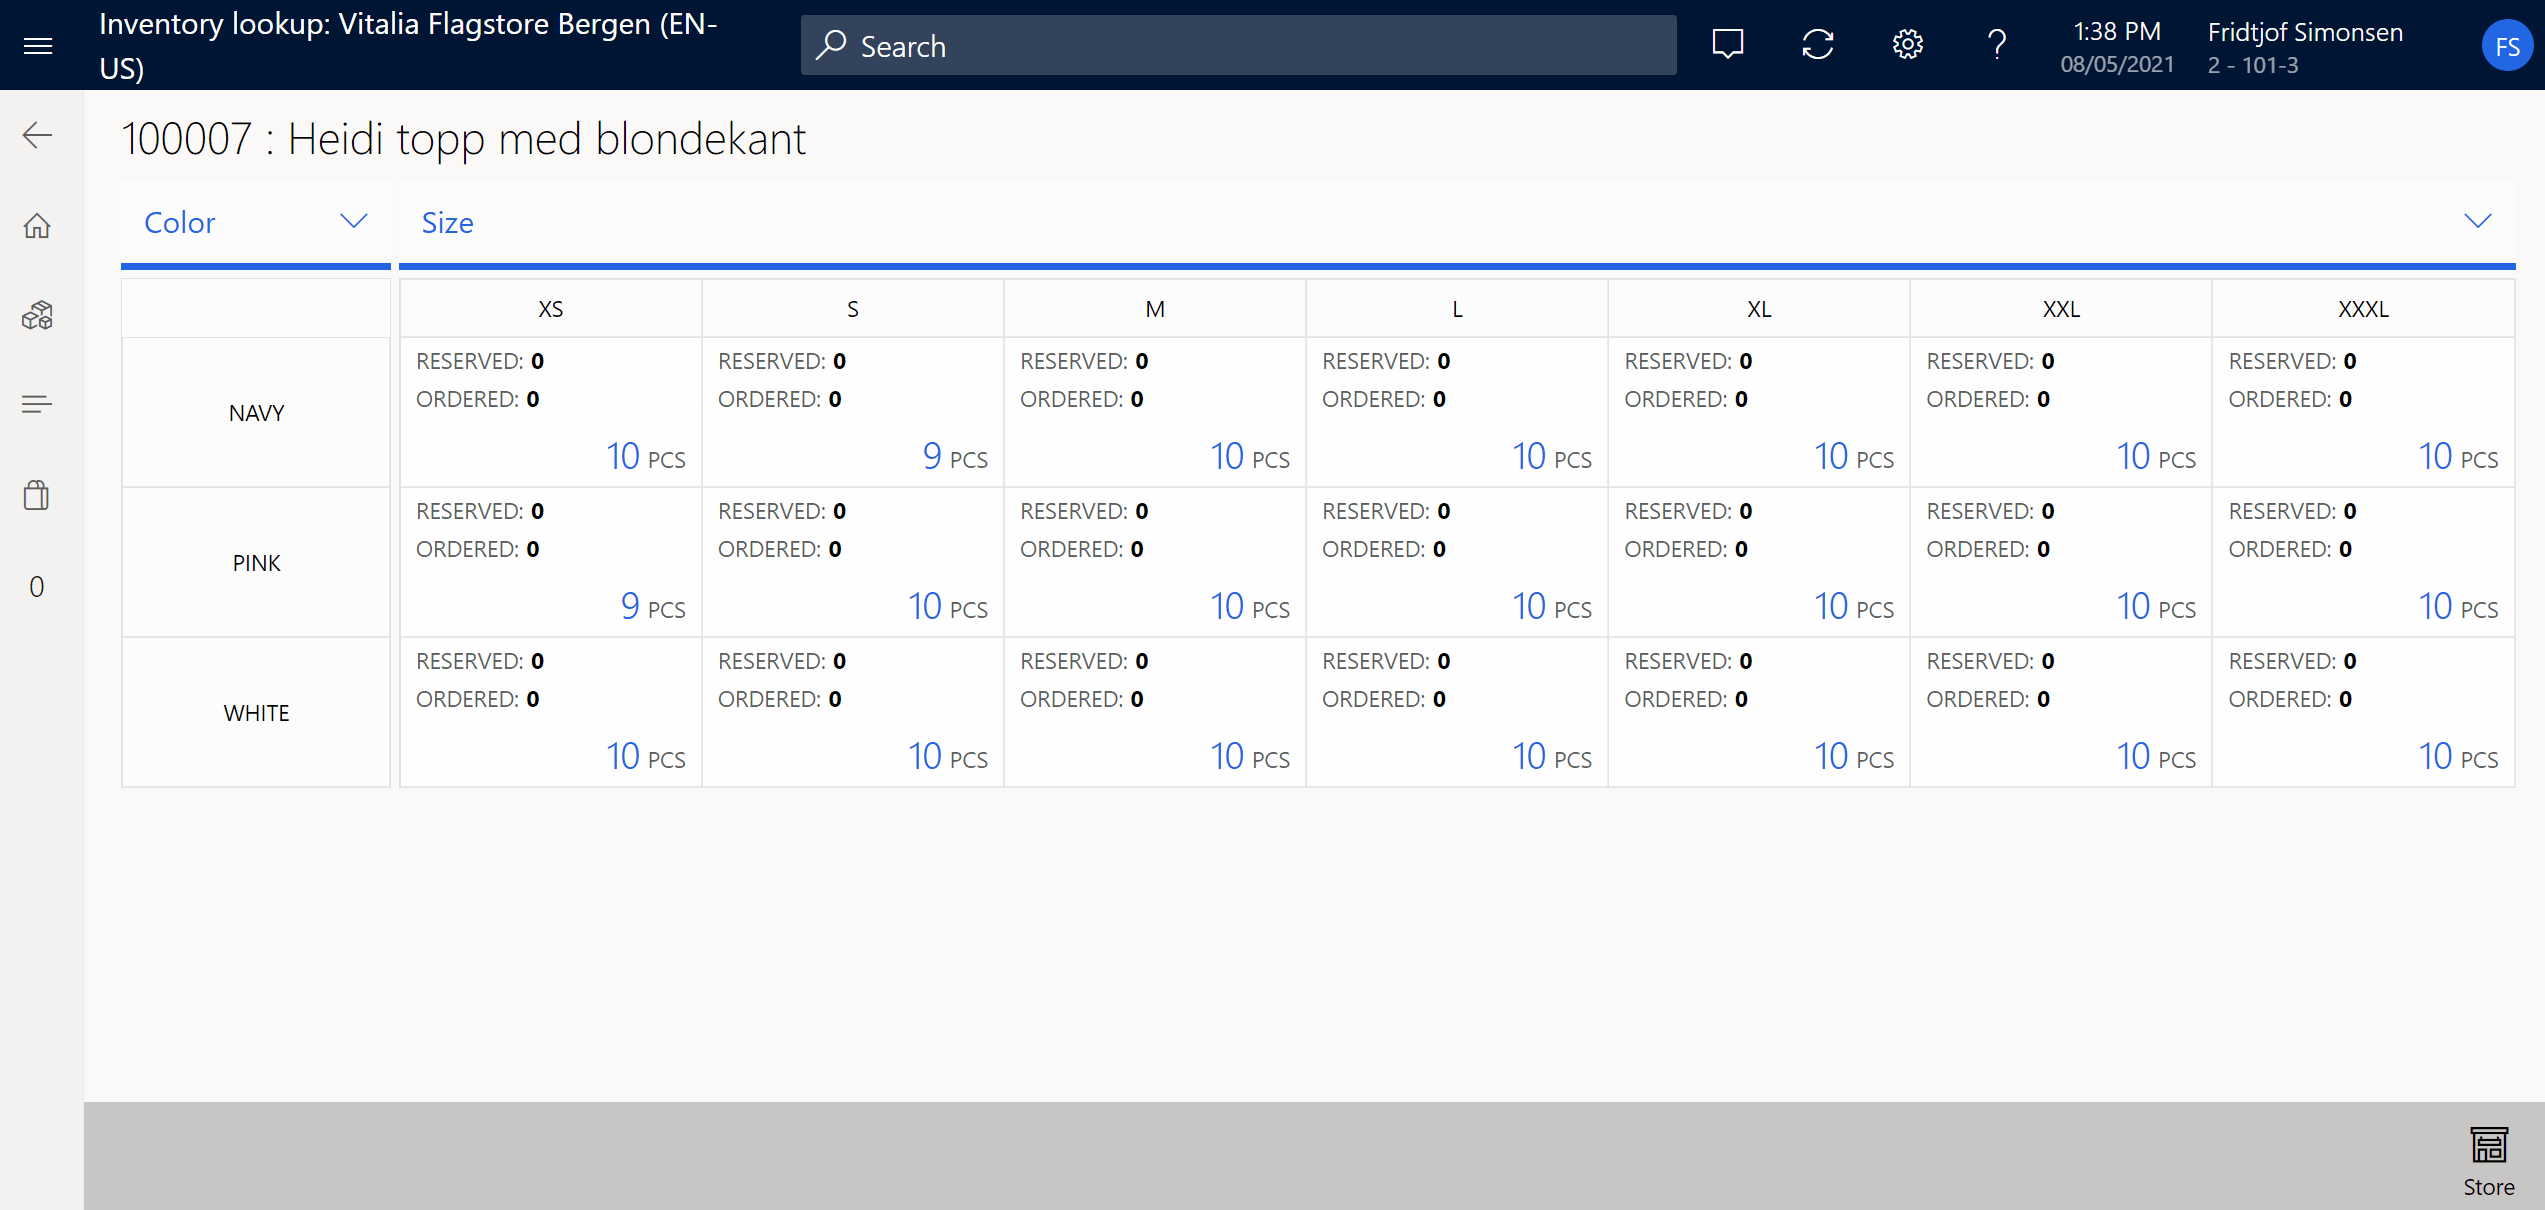
When clicking on a variant or For pure SKU based products without variants, you will see the inventory on other sites in the fulfillment group, and also on the central warehouse.

Manage inbound and outbound inventory operations
Store employees might want to transfer some of their store inventory out of their store and then send it to another warehouse (either a distribution center or another store). This transfer might be necessary in scenarios where the store contains overstock that another location can use. Store employees can initiate this process by first creating the transfer order through the Outbound inventory operation in POS.
Process customer pick-up and shipment orders
Customer orders can be used to capture sales where shoppers want to pick up products on a later date, pick up products from a different location, or have items shipped to them. I recommend to read the following docs. An important element if you want to demonstrate the process of a customer going into the store, buying some products(with cash) and then want them sent home is to follow the following process. Pay especially attention to the red line, as this is the process when you want to demo with the order capture and the fulfillment/shipment of the order from the same POS.
- On the POS transaction screen, add a customer to the transaction.
- Add products to the cart.
- Select Ship selected or Ship all to ship the products to an address on the customer account.
- Select the option to create a customer order.
- Confirm or change the “ship from” location, confirm or change the shipping address, and select a shipping method.
- Enter the customer’s desired order shipment date.
- Use the payment functions to pay for any calculated amounts that are due, or use the Deposit override operation to change the amounts that are due, and then apply payment.
- If the full order total wasn’t paid, enter a credit card that will be captured for the balance that is due on the order when it’s invoiced.

This allows you to get through the process of picking, packing and shipping directly from the POS.

What I can think of here, is that it would be great to have extensions for printing delivery labels and even ensure that ASN is being sent to the freight forwarder. Let’s hope some ISV picks this up.
Manage inventory processes including stock counts
Count journals are used to update and adjust physical inventory counts for a specific item within a specific warehouse. While the Commerce inventory logic is constantly tracking inventory that comes into and out of the warehouse, situations will occur where the physical inventory count that is being tracked by the application no longer matches the physical count of inventory on the shelf. This scenario can occur for a variety of situations, such as receipt of inventory was accidentally not processed, theft or breakage or other loss was not previously adjusted, and so on.

One quite new feature is the ability to perform stock adjustments, as this allows for adjusting up/down an exact quantity. Let’s say when something was hungry and had to eat 😊. I can then adjust out one tyrkisk peber.

Then this becomes available as an inventory adjustment journal.

Even the notes becomes available as notes to the transaction.

Look up product inventory
I think this have been covered earlier in this blogpost.
Process serialized items
Many retailers sell products that need to be serialized. These products are called serialized items. For inventory tracking purposes, some retailers may want to keep serial numbers in store or warehouse inventory. For service and warranty purposes, other retailers may want to capture serial numbers during the sales process.
Perform POS operations
Perform sales and order processes
Cash and carry transactions are the most common POS transactions where items are scanned. A customer might, or might not, be identified on the order, and all products are paid in full. When tendering out of the transaction, a customer leaves with the products. There are also more advanced processes of creating orders from POS, and then pick it up or ship the products to the customer. The order is then created and sent to Commerce Headquarters (HQ) for processing. The creation of the customer order to HQ typically occurs through an async process between the Commerce engine and HQ. You can also configure it to be created in real time, if preferred.
Perform end of day processes
Much of the end-of-day processes are related to closing the shift (If you are using shifts). The process often starts with performing safe and bank drops of cash. Then you would perform a tender declaration to specify the total amount of money that is currently in the cash drawer. Users most often perform this operation before they close a shift. The specified amount is compared against the expected shift amount to calculate the overage/shortage amount. The last ting is to close the shift. This operation calculates shift totals and overage/shortage amounts, and then finalizes an active or blind-closed shift. Depending on the user’s permissions, a Z report is also printed for the shift. Closed shifts can’t be resumed or modified.
Blind-close can be used to free up a register for a new user or shift without first having to fully count, reconcile, and close the shift, and then later reopen the shift to perform closure.
The way that shifts and cash drawer reconciliation are used in the POS differs from the way that transaction data is summarized during statement calculation. It’s important to understand this difference. Depending on your configuration and your business processes, the shift data in the POS (the Z report) and a calculated statement in the back office can give you different results. This difference doesn’t necessarily mean that either the shift data or the calculated statement is incorrect, or that there is a problem with the data. It just means that the parameters that are provided might be including additional transaction or fewer transactions, or that the transactions have been summarized differently.
Although every retailer has different business requirements, it is recommend that you set up your system in the following way to avoid situations where differences of this type occur. The best way to have your statements is by shifts. Period! This setup helps guarantee that back-office statements include the same transactions as shifts in the POS, and that the data is summarized by that shift.
Reconcile store cash
This have been covered earlier
Monitor store productivity by using task management and reporting features
Task management have been discussed before in this blog, but related to the reporting capabilities in POS there are some standard reporting ask shown here:
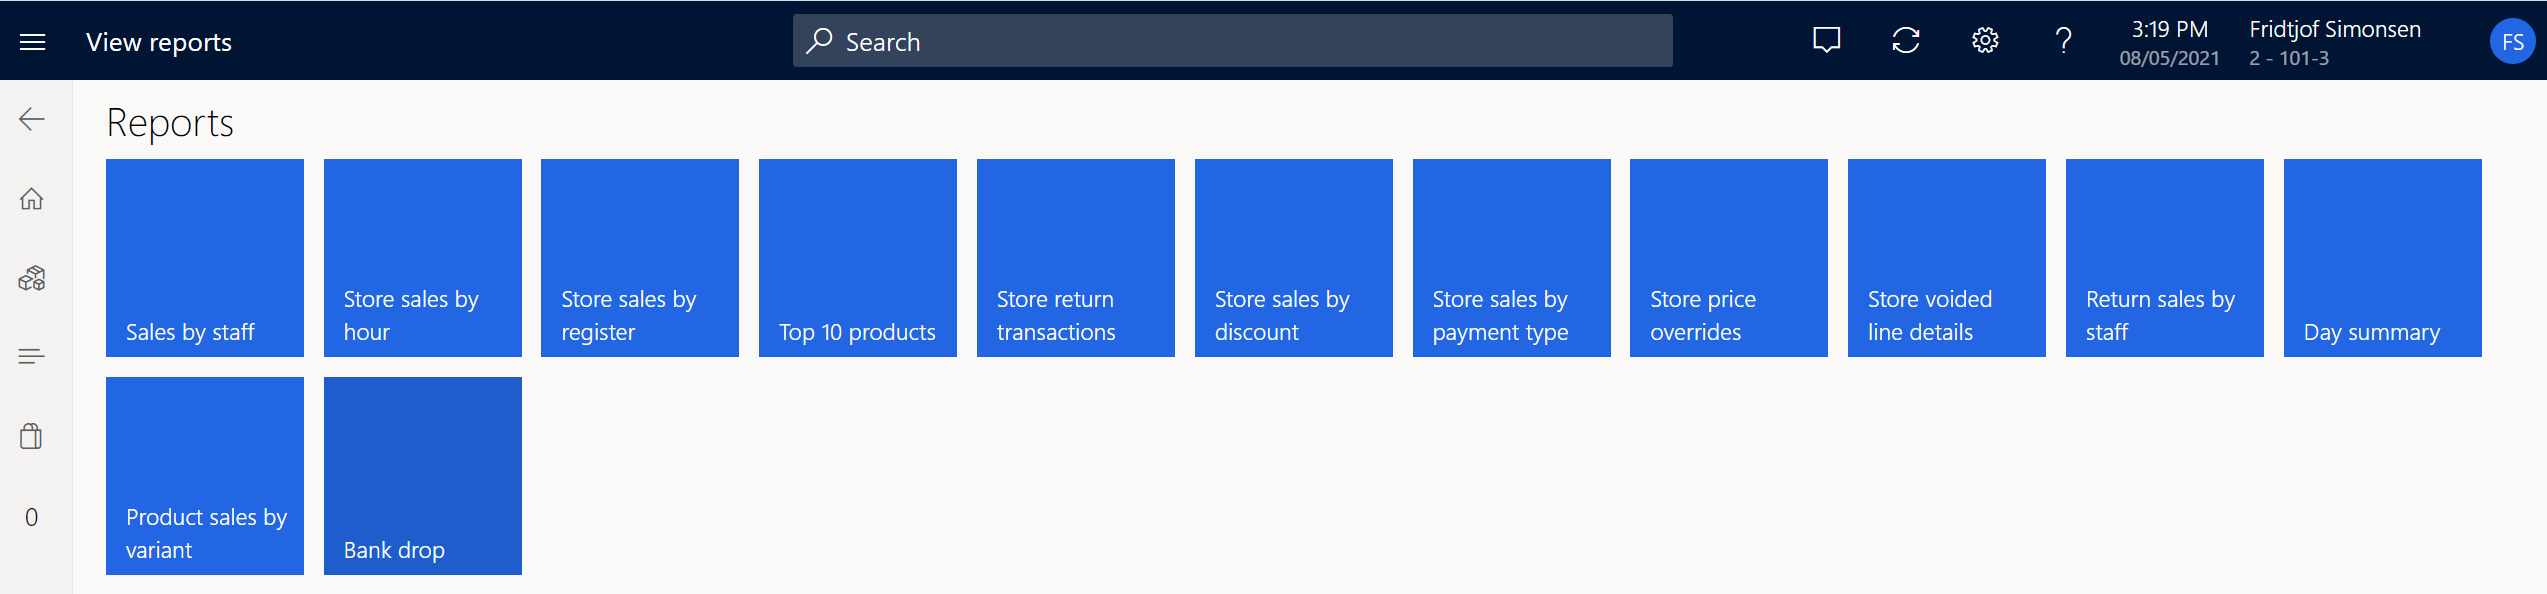
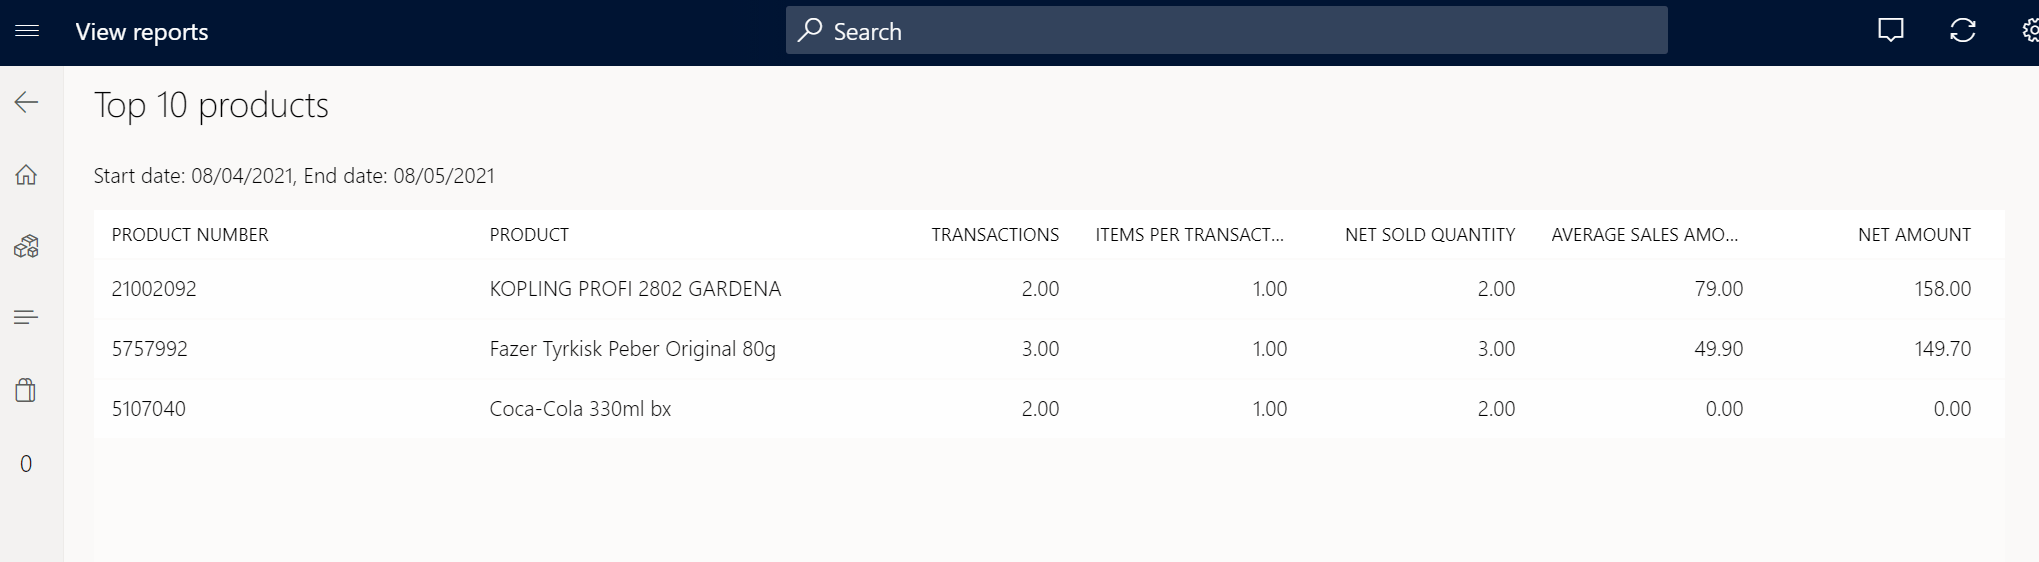
But my general recommendation is to invest in a power bi solution. Combined with the P-job and recurring tickle-feed feature channel transactions are being imported quite frequently. Then use the Azure data Lake integration to feed you power BI report with updated and refreshed data. Take a small look at the following presentation I did in 2018 about how to manually structure a cube for power BI based on existing data entities.
Configure and Manage Dynamics 365 Commerce call centers (10-15%)
The first time I took the exam, I felt that the call center functionality was over represented in the questions. SO I guess to this exam, it requires that we need to take this topic more to the depth. Orders that are created in a call center channel can take advantage of specific Commerce capabilities such as payment processing and retail pricing and promotions. Defining a call center channel also allows the organization to define specific order processing settings and data defaults to the sales orders that were created by call center users. Som of the features include.
- Full payment processing capabilities (Also with credit cards)
- Use of catalog source code IDs to track marketing efforts
- Ability for upsell/cross-sell prompts as sales lines are created
- Ability to create and manage subscription orders by using continuity program features
- Use of Commerce pricing and promotion configurations
A user can be linked to only one call center channel at a time and if you don’t associate the user to a call center, it will not trigger the Commerce-related features.
Sales orders that are created in the call center are also part of all Commerce omnichannel capabilities and can be used by the point of sale (POS) application to support cross-channel order fulfillment scenarios. This feature allows a call center user to create an order that can be picked up by the customer at a store location. Additionally, a customer order that is created in the POS or e-Commerce application can be further reviewed, edited, or managed by a call center user in Commerce HQ.
Configure call centers
During the configuration of a call center, three processing options have a great impact on the features that are available for call center orders based on whether these processing options are enabled on the call center channel or not:
- Enable order completion – enforces a set of validation rules that the order must go through before it can be successfully submitted to processing.
- Enable direct selling – upsell and cross-sell functionality
- Enable order price control – enables call center users to change the price of an item on a sales order if that item has been configured to allow price adjustment. A specific commerce sales line workflow must also be created in Commerce Workflows to enable the price override approval process.
Create a call center
Configuration of a call center follows much of the same steps as creating a store channel. You have to setup delivery modes, payment methods. One thing that differs from the traditional sales orders is the introduction of order completion that can be enabled. When the Enable order completion setting is turned on for the call center channel, if line items are entered on a sales order and the channel user tries to close or navigate away from the sales order form without first selecting Complete, the system enforces the order completion process by opening the sales order recap page and requiring that the user correctly submit the order. If the order can’t be correctly submitted together with payment, the user can use the order holds functionality to put the order on hold. If the user is trying to cancel the order, he or she must correctly cancel it by using either the Cancel function or the Delete function, depending on the function that the user’s security allows. After a call center channel has been created, users must be linked to that call center to take advantage of additional order processing features that are exclusively available for call center order processing. Here is a screenshot of the “complete” feature mixed with a script asking if the customer did now there where a discount on teddy bears now 😊

Another important aspect is the customer service form where the call center sales process often starts. Here it is easy to have a quick overview off all customers and orders.

Configure and publish product catalogs
Product catalog have been discussed earlier in the blog post. Personally I think that catalogs are out, and there are very few that actually still use this. It all has changed towards online.
Create product catalog scripts
Not much to say, rather than you can assign script towards the catalog or towards the products are in the catalog.

Configure fraud conditions, rules, and variables to trigger order holds
To use the call center order hold features, you must first define hold codes. To create a set of user-defined hold codes, based on your business requirements, go to Sales and marketing > Setup > Sales orders > Order hold codes

This hold codes can then be assigned to the order.

There are settings and rules that allow for validating and checking. Here I have created a condition to put the order on-hold, if the quantity on the sales line is above 10.

I can then add the condition to a rule:

In the call center parameters page I can then setup the score of when the order should be flagged as fraud.

When the rules starts to kick in I get the “Order is on hold” message:

I can also see all order holds and them check out if it turns out that everything is OK:

In the sales order overview I also get some visual indicators/color coding of the salesorders that is marked as suspicious or fraud:

The last thing here, is that you can also build up a static fraud data containing variables that is known to be used in call-center fraud.

Configure fraud alerts
I covered this in the previous chapter
Configure continuity orders and installment billing
In a continuity program, also known as a recurring order program, customers receive regular product shipments according to a predefined schedule. Continuity programs provide the ability to create continuity schedules that will have a scheduled shipment and payment.
Set up continuity programs and parameters

To create a continuity program you specify details such as the payment schedule, the timing of the shipments, and whether billing is up front. You must also add a list of products that are included in the continuity program. Each product receives an event ID number that is assigned sequentially, beginning with 1. The event IDs determine the order that products are sent in. If customers receive a different product in each shipment, the products are sent in sequential order, based on their event IDs and beginning with the current event. If customers receive the same product in each shipment, the list contains only one product that has one event ID. The same event occurs repeatedly. You can specify how many times each event is repeated. Create a parent product that represents the continuity program that you created. If you add this product to a sales order, the Continuity page opens. You can then use that page to create the actual continuity order. The parent product doesn’t specify the individual products that the customer receives in each shipment.

Here I have a continuity order containing two lines.

On the release product you specify the Continuity schedule ID:

When creating the sales order, the continuity form pops up, where I can make adjustments to quantity, price, dates etc

Configure continuity order batch jobs
After setting up a continuity program as described above, you can create a continuity order for a customer. You might also have to perform the following additional maintenance tasks.
- Update the current continuity event period – Set up a batch job that tells the system what the current event period is.
- Create continuity child orders – Create child orders from the parent continuity order.
- Process continuity payments – Process billing and notifications for payments that are associated with continuity sales orders.
- Extend continuity lines (if required) – Extend the number of times that a continuity event can be repeated. The repetition of shipments can then extend beyond the limit that was set in the Continuity repeat threshold field in the call center parameters.
- Perform a continuity update (if required) – Synchronize changes between the continuity program and the continuity parent sales orders.
- Close continuity parent lines and orders – Close continuity orders.
The end result is that child sales orders are created and will then be processed in the normal fashion.

Manage continuity child orders
To manage continuity orders there is a form under Retail and Commerce à Inquiries and reports à Continuity orders that lists up all sales order lines that is a parent continuity line.

In the Summary tab, you will see all child continuity lines, as they are being generated.
Manage call centers
Create, modify, and process sales orders
I think this area have been covered well earlier in the blogpost.
Process call center payments
In D365 Commerce, the configuration of the call center channel includes a setting that is named Enable order completion. This setting helps guarantee that all orders that users of the channel create are released to order processing only if they have a prepaid or pre-authorized payment that is within approved tolerances. If the Enable order completion setting is turned on, call center users can enter payments against sales orders for customers by using the payment processing features of Call center. If the setting is turned off, call center users can’t use the Call center payment processing features, but they can still apply prepayments to sales orders by using standard Accounts receivable functionality.
On the call center you can specify the payment methods that can be used. Here you can also specify that cards are allowed:

Remember also to evaluate if the electronic payment setup is to specify that expiration date and pin is required.

When I then go through the complete and payment process and add the payment method card, the following happens:


An iframe from Adyen pops up in this case(missing setup on Adyen), and you can perform a “card not present” payment flow. Even VIPPS is available here.
Manage order holds
During order entry, but before order submission and confirmation, call center users might want to manually put an order on hold to prevent it from being released to the warehouse for further processing. For example, the customer who is placing the order might not be ready to commit to it, or critical data that is required in order to process the order might be missing. The older hold form and color coding have been have discussed earlier in the post.
Create return merchandise authorizations (RMAs)
Process returns, exchanges, and replacements
When a return order is issued, the Replacement order function can be used to generate a new sales order for the customer. This approach can be used in exchange scenarios. The Replacement order function creates another sales order for the new items that must be sent, but a cross-reference link on the RMA/Return tab of the Call center parameters page links the replacement order, the RMA, and the returned sales order.
The process can be described with the following flow:

The actual return order screen looks like this. Also check out the following docs’s page for more information:

Manage e-commerce (15-20%)
Finally we have come to the “latest and greatest” part of this very long post. E-commerce is actually an additional SKU you have to purchase, and is not included with the traditional D365 commerce SKU. So you have to pay extra. There are even additional SKU that you can select, as AI/ML recommendations, Rate&Review and solutions for fraud. The following learn site also gives a good overview. A lot of very good tech-talk video’s have been also released, and here are some links to them. I have also made available a list of known eCommerce sites running, so you may actually try it out, and even purchase 😊
Configure an e-commerce channel
To create an online store in Commerce, you must first create an online channel. Before you create a new online channel, ensure that you have completed the Channel set up prerequisites. Apart from what already have been discussed on other channels, you need to setup the online functionality profile.

Create an online store
To configure a functioning online store, you need to set up multiple components so that transactions can be successfully processed for that online store. When you have configured the online store and its components, you can link the channel to one or multiple Commerce sites or any other solution for a storefront that is compatible with Commerce. To finalize the online channel configuration and ensure that the products are discoverable in the e-Commerce store, you should also create a channel navigation hierarchy and sync the data to the online store database. Each channel can have a unique channel hierarchy.

If you wonder where you can define the category hierarchy for stores, then here it is : Retail and Commerce –> Channel setup –> Channel categories and product attributes:

Configure an e-commerce site
Much of the configuration of the e-commerce site is performed in the site builder. This is a tool deployed and available from LCS, if you have purchased the e-commerce SKU.
The site builder have a set of site settings:

Configure channel assignments for an e-commerce site
To establish a new site and associate an online store with it, in LCS, select the link for the site authoring environment. Then, on the page for the site authoring environment, select New site. In the New site dialog box, you must provide some basic information about your site. Here are some additional details of the information you need to fill in.

Configure ratings and reviews
Also check out the topic on Microsoft learn. The ratings and reviews solution in Dynamics 365 Commerce uses Azure Cognitive Services to offer automatic moderation of profane words in 40 languages. Because human approval isn’t required, moderation costs are reduced. The system also offers moderator tools that can be used to respond to customer concerns, feedback, and take-down requests, and to address data requests from users. But keep in mind that rating and review is an additional SKU from Microsoft.

Here is the moderation screen where moderators can respond and take input. There is also a export to power BI for deeper analysis.

The rating and reviews can also be synced into the HQ and to the POS. See the following article.
Manage e-commerce content
Building and maintaining content will be an ongoing process. You therefore should invest in having dedicated content builders to create the best possible presentation and experience for the online users.
Configure URLs and aliases
When creating new pages, you won’t be required to specify a page URL. If you leave the URL field blank, the page is created in an unlinked state. In this case, customers won’t be able to access the page, even if it’s published. To make the page accessible, you must manually create the URL and link it to the page.

Configure product detail pages and category pages
The product details if a very central page, and can be customized for specific products.

The category page is the page that most often is used for browsing through the products.

Manage site themes, page fragments, templates, layouts, and pages
There is a lot of setup required when setting up the content. We are using a DevOps template where we have all the elements defined and in place, and here is a view of some elements of setting this up.

And each of the setup of each element is documented in devops

Upload and manage digital assets including videos and images
The media library is where you store your pictures and video’s. The naming convention of your files is very important to make sure you are linking the pictures with the right products.

Set focal points and attribute values for media assets
When an image is uploaded to the Commerce site builder Media Library, the system attempts to determine the focal point of the image. For example, if the image has a person on it, the system will set the focal point to the face of the person by default. In most cases the automatically set focal point works well for all viewports, but sometimes you may want to adjust the focal point to ensure that a specific part of the image is always visible. In the picture below, you see that I have a focal point on the head.

I can also change the view by module to only show parts of the image in certain settings.

Configure publish groups
E-Commerce websites are constantly updated with new content throughout the year. Updates are often published in batches around busy e-Commerce events such as holidays, seasonal marketing campaigns, or promotional launches. These updates often require that groups of website content (for examples, pages, images, fragments, and templates) be staged, validated, and published concurrently in a single action.
So you can setup publishing groups that changes the ecommerce site on a specific date.

Operate an e-commerce channel
Create e-commerce orders
The Microsoft documentation here is excellent and superb. The shopping experience is fast and intuitive. Just what is expected from an eCommerce site.

Synchronize e-commerce orders
To view the transaction in Commerce Headquarters (HQ), run the P-0001 job and Synchronize Orders to pull in the orders from the Commerce scale units.
Moderate ratings and reviews
This is covered earlier. But check out the following learn session.
Configure business-to-business (B2B) e-commerce
Business-to-business (B2B) e-commerce sites provide some key capabilities that optimize the workflow for a B2B user.
Describe differences between B2B and business-to-consumer (B2C) solutions
It is possible to implement both a B2C and a B2B scenario’s. The main capabilities that is relevant for B2B scenarios is the ability to purchase on account, and that you have tools to improve B2B account relations and partner management tools. The capabilities available for B2B scenarios are:
- Business partner onboarding
- Order templates
- Quantity thresholds (minimum, maximum, multiple)
- On account payment method
- Salesperson for business partner
- Handling of customer deposits
- Account statement and invoice printing
- Payment of sales invoice
- Quick order entry
- Dynamics 365 Sales integration
- Return order and return merchandise authorization (RMA)
- Order cancellation
- Matrix control for order entry
Allowing B2B customers to pay on the account is crucial for the B2B e-commerce solution. D365 Commerce will enable customers to buy within their pre-set credit limits. Invoices generate after the order is placed, and the customer can pay those directly from the eCommerce site with a credit card. Order templates allow users who may buy many of the same items during each order to have preconfigured lists of items they want to add to their cart. They can also access a quick order entry screen to make adjustments to quantities and SKUs they’re purchasing.
Describe use cases for organizational modeling hierarchies
Two new customer records are created in the system: a Type Organization customer record for the business partner organization and a Type Person customer record for the requestor (that is, the business partner user who submitted the request).

Manage business partners and business partner users
B2B e-commerce websites require that organizations register to become business partners. After an organization submits registration details to a B2B e-commerce website, it goes through a qualification process. If the organization is successfully qualified, it’s onboarded as a business partner. New business partners signing up will show up as prospects. On the next two screen, you see the signup form in ecommerce, and a screen of the all prospects where they end up:


Configure product quantity limits
Most products have a unit of measure that defines their grouping. The grouping affects how the products can be sold. Some products might have an additional grouping for quantities. This grouping determines whether the products can be sold as individual units or multiples, and whether there is a minimum or maximum order quantity limit that must be followed.
The quantity limiting feature ensures that the minimum, maximum, multiple, and standard quantities that are configured in Microsoft Dynamics 365 Commerce (in the default order settings or the Commerce site builder site settings) are applied to customer orders that are placed on an e-commerce site. Product quantity limits aren’t currently supported for the point of sale (POS) and call centers. On each product you may specify
- Multiple – The quantity that the product can be bought in multiples of.
- Minimum Order Quantity – The minimum number of products that must be purchased.
- Maximum Order Quantity – The maximum number of products that can be purchased.
- Standard Order Quantity – The default quantity that is automatically entered when the product is selected.
In the site builder à extensions, you can define for which type of customers this setting should affect.

Great guide. I have read this blog for 2 days. Covered all potential information of how to handle and manage customer in all-in-one solution. Thanks for writing.
Thanks for a wonderful post Kurt! Long but totally worth the time I spent reading as it gave me a good overview of end to end functionality.
I took the exam in July as well, and as you, I was under time pressure. I actually believed I was finished, with 15 min review time left, and then was presented with an additional Case section… No clue if I have passed. But you did a really great job outlining the content and providing links to learning materials. Thanks!!
Thanks Mr Kurt! I am planning on taking this next week so this is very timely for me! Good to know about that 90min limit. Much shorter it seems than other tests. Really appreciate you compiling this and posting. Thanks again!
Reblogged this on Dynamics 365 FinOps.