I wanted my customers to experience the search powers of Dynamics AX 2012 and Microsoft SQL, and decided to create a very small generic tool for finding items and products.
Suppose a user wishes to find an item, and it does not know its item number but knows few word of description and also has a small information about class, default supplier, location etc……
He can enter this info and at very next moment he would see the list displaying all the items having the various values similar to information he just entered and then he can select the required item out of it easily.
In standard AX 2012 the item lookup looks like this:
When installing the new item lookup (from my kitting solution), the lookup changes to this:
Since the lookup is attached to the itemId extended data types, this works everywhere you have items.
In the lookup form the user can fill inn filter criteria, like item name, colors, barcode, vendors/groups etc. I can even use the product categories like this :
I see here in the top, that selecting category Accessories, and selected to only show those where I have on-hand, results in 27 records.
If I then click on the tab “search results”, I see the items (With on-hand values)
And just to “show of” I have sorted the list with the Physical quantity descending , because it is a outer-joined database view.
All filters work “side-by-side” and together. So I can ask for products like “Find a green phone we have on stock at warehouse 22”.
The way I do this, is to build up the query in the form, based on the selected filter criteria.
And then just execute the query in the form. (There are off-cause much more to it, but we can take this in private sessions)
With this very small tool the searching for products will be much easier for our customers. Remembering item numbers is so 90’s.
At a customer implementing my PDA and BarTender add-ons, are currently doing a lot of testing. The following picture shows how one of the implementation consultants are testing this out in “real-life” :
All is barcoded and the barcodes is available in Dynamics AX.
In standard AX 2012 it is not possible to have negative discounts.
But it is a very small change to actually make it work. Just change the extended data type DiscPct.
But why would any allow negative discounts ?
In many industries they have specialized on full ballet/box delivery. If a customer needs less than a pallet/box, then a extra charge should be put on the invoice. Then it is possible to create a line discount that increases the line amount.
But there are some aspects that you should evaluate before we start using this approach:
1. It is normally much better to use charges, but auto charges is dependent on items or quantity, so then this must be a customization. Misc charges also have the effect to better control the ledger posting.
2. When using negative discounts, then ordinary discounts will override this. So you are then suddenly stuck, because the real line discount is lower than the negative discount. But this can be compensated by making sure that the real discount only kicks in in a specified quantity range.
My recommendation is to rather extend/customize the auto charge functionality in AX 2012, and make it possible to be dependable on customer, item AND quantity :
At as Dynamics AX consultant I get the chance to work with many customers, and see good idea’s in action. At one particular customer in Norway, that are implementing Dynamics AX 2012 we have been asked to replicate some functionality from their old system.
A normal response from a Dynamics AX consultant would be that with Dynamics AX we do things differently. We use role-centers, fact boxes, fast-tabs, buttons, go-to-main table, and Excel to give a complete picture.
But this customer was persistent, and still ordered a customization. The task felt on my shoulders, and the more I do the development, the more I really see the benefits. It saves time, and gives a much easier 360 degree view.
I wanted to share these ideas with you,; this called product inquiries, and I have used the “copy with pride” technique from other std. Dynamics AX forms J So the “footprint” in standard AX is Zero.
It all starts with the following screen:
By typing in an item, the user will get some key information, like name description etc. But also some information like on-hand, vendor, external item ID, most common locations and picture
In the tab-grid part, you see some of the information, where you normally would have to click on buttons or filter on. The tab-page here shows trade-agreements with vendors, prices, lead time etc.
On the tab purchase lines we see ONLY the open purchase lines, marking, and confirmed delivery dates.
The Sales lines shows open sales lines:
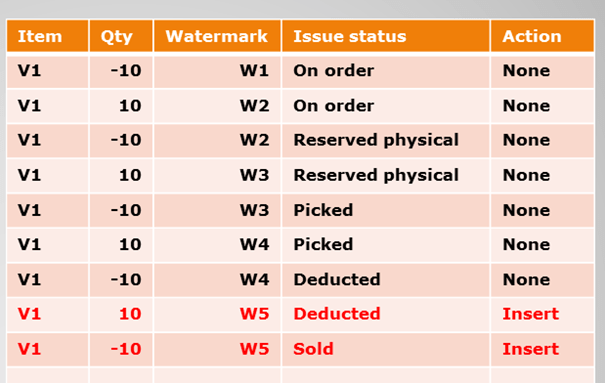
The inventory transactions, shows ONLY transactions that has affected the physical on hand. Meaning Sold, deduced, picked, purchased, received and registered transactions:
Customer invoice lines, will show all commercial transactions, related to the item:
The Posted vendor invoice lines, shows the following:
The statistics, will show statistics per month:
If wanted, the user can them self also key in the start and end date to get statistics on other intervals. The turnover ratio is also calculated.
For BOM/Kits we also have the following:
In the coming days, also price calculations per customer will be available, and then it can also be used for finding out if a specific customer should get a discount or not J
It is not revolutionary to make such screens, but I think I managed to get it working with a good performance. The number of datasources involved is large. So I have used several techniques, like caching, maps etc to get the acceptable performance.
And on the op, I have “stolen” many of the same buttons as the released products form, so these are also working.
I have also used the “Grid view” to get a very fast overview:
The conclusion is therefore to actually listen to our customers. They very often have ton’s of experience and are willing to share their knowledge. And we as Dynamics AX consultant can help our customers to become more successful.
In Dynamics AX 2012(and 2009) it is possible to have delivery addresses on both the sales order header, and on the sales order line. But it is also possible to disable the use of delivery addresses per sales order line, by disable the configuration key, like this:
If you disable this, then you will not have delivery addresses per delivery sales line.
But is you do this, and you also do do consolidated delivery/picking, then there is another issue that will appear. The picking routes will miss a delivery address.
In std. AX 2012 you will also see that the customer name is missing from a consolidated picking route. I understand why, and the reason is that each picking route is unique per delivery address.
But most companies implementing AX 2012 still wants to have a picking route with customer name and delivery address, and with a few lines of code it is actually possible to get this. For those of you that like X++, here is the needed code to get delivery address and customer name on a consolidated picking route:
When working with output orders I see some customer struggling with deleting open output orders.
They typically have open output like this:
When deleting it, they get the following error:
The reason for this, it that deleting a output order will also trigger a delete on the inventory order transaction (WMSOrderTrans). And this delete will again try to delete the original output order(WMSOrder).
To avoid this error is to disable the OCC (Optimistic Concurrency Control) for the WMSOrder, like this :
The issue is reported to Microsoft and is expected to be available in AX 6.2 (AX 2012 R2) or the AX 7.0.
Changing from a paper process to input on a PDA with automatic wireless transmission to the main computer can dramatically boost worker productivity. Any process that involves collecting data using paper documents is potentially a candidate for a mobile solution to reduce data entry errors and speed up the reporting process.
In my crusade to simplify and PDA enable AX 2012 functionallity I have taken a look into production, and created some easy to use PDA forms.
Most manufactured items move through the production process sequentially. The sequence starts when a production order is created and ends when the product is ready for shipment. In Microsoft Dynamics AX, each sequential step is associated with a specific status. The status reflects where the item is in the production life cycle.
You can monitor the activities in each step of the production and move the production to the next status when you are ready. If you omit intervening steps when you change the status, the system automatically runs the necessary missed steps for you.
· Create – Status of the production order when it is created. · Estimate – Status of the production order after you run a material and cost estimation. · Scheduled – Status after you run operation or job scheduling. · Release – Status when the production order is scheduled and has been released to production. · Start – Status of the production order when production starts. · Report as finished – Status of the production order when production is finished and ready for final action. · End – Status of the production order after final costs have been applied, the item is complete, and the order is no longer active.
The PDA production covers the basic tasks for a production order centered on material and hour consumption. The PDA program will make it easier to register these transactions in environments where ordinary PC cannot operate.
The idea of the PDA production is to simplify the entry of consumption, and to report statuses. The main functionality is therefore centered on the following functions. Start production Start the production. This will also create the picking journal that will be used in production picking. Often the reservation of BOM-line is done when starting the production. Report BOM Lines Report material consumption according to the BOM picking journal. Report Hours Report hours on jobs and operations. Report as Finished Report finished goods as finished into a put-away location. End production End the production, and perform costing. Normally this is done in back-office.
The PDA production do not have any “create production”, because creating productions, BOM, delivery date and soon, is regarded as a back office function, and it requires more detailed information about sourcing to be sure that this is done correctly.
So the PDA production focuses on what is actually taken place on the production floor.
After a production order is started, you can post costs against the order. The system can be configured to estimate material and route costs that are allocated to the order when the order is started. This allocation is known as pre-flushing or auto consumption. You can manually allocate material to the order by creating picking list journals. You can also manually allocate labor and other route costs to the order. If you are using operations scheduling, you can allocate these costs by creating a route card journal. If you are using job scheduling, you can allocate these costs by creating a job card journal. The start production will therefore let you perform this step. Barcode: Accepts item barcodes or EAN128 codes. Lookup is filtered to only show item barcodes that has an open production order associated. View details will open the item information form. If only one production is found on the specific barcode, then the production will be auto-filled in. Production: This field accepts production numbers as input. Lookup is filtered to only show productions that is an open. View details will open a list view that shows the BOM-lines associated to the production. Start: Specify how many that should be started. This affects the creation of production picking lists and route/job cards. In the right field, show the remaining quantity to be started (scheduled quantity – started quantity) From – To: If only a subset of operations should be started, then specify the From-To operations here. Post route card now: Select the check box to automatically post the created route journal. Post picking list now: Select the check box to automatically post item consumption when the production is started. The program posts transactions in the picking list journal to the ledger. This pre-flushed the BOM consumption. Print labels: The print labels, will print item labels, when starting the production. This can be a good thing, especially, because the barcodes in on the labels can be placed on the product as they are being produced. The labels that will be used are labels associated with the production table in the Columbus BTI/Bartender module.
When done, press the start button to start the production order.
Report item consumption is picking material to the production order. It is normally used to pick from the warehouse at the specified locations. The first screen is where the production is identified. If labels where printed in the start production form, it is simply to just scan the production number. The production field also accepts scanning Item barcodes IF there are only one single open production order on the item barcode.
If there are only one open picking journal, then the PDA will fetch that picking journal identifier. The item number is just the item number of the produced item.
The rest of the fields are information fields showing item name, delivery reminder of the production, delivery date, start date and current status.
The next screen will show all the locations that should be visited to pick the picking journal lines. The PDA operator scans the location (Or push the “pick” checkmark) to pick the specified line. Then the third screen will appear where the operator can confirm the item barcode and even change inventory dimensions like location, serial, batch etc.
When the user clicks on “apply” the line is picked from the inventory, and consumed in the production order.
The last step is to finish the picking that will post the production picking journal. The finish of the production picking journal will change the status of the picked items to “Deduced”.
The Columbus PDA can be used to report hour consumption in the production. Use of the PDA report resources is the same as using a route journal, and will report process and setup hours per operation.
The PDA screens consists of 3 screens, but if Job-ID scanning is used, than only 2 PDA screens is required. In the first screen the user can identify what production order that we works on. The user can here also enter the operation ID, if this is known. The user can also scan the Job identifier directly to report hours. Dynamics AX 2012 do have out-of-the-box support for printing barcodes directly on the job card, as shown here: If the user do not specify any operation or job-id, then the select operation screen will show when pressing start.
In the select operation, only the remaining operations will be shown, and the user can either enter the operation number, or click on the “pick” field.
In the third screen, the user can enter process hours, setup hours. The user can also report number of good and error units on this operation. If an operation is reported with error, then the error cause can be entered. If the operation is complete, then it is also possible to checkmark this. This will have an effect on resource reservations, and also the progress reporting. In the top, the user can also select another worker, if several workers uses the same PDA.
The registration screen is have a column showing the remaining hours/quantity in the gray fields, as shown here. When posting the hours, a production route journal will be created and posted. In this way, the reported hours are close to real time. To correct any wrong postings, just create a journal manually, and reverse the transactions.
The PDA resource reporting is using exactly the same validations as the production journal.
As the production progresses, items are finished. Then the PDA operator can perform a report as finished. The report as finished is therefore a put-away process. It is possible to also use the PDA arrival functionality, but the process shown here is optimized for production. First the PDA operator identifies the production either by scanning the item barcode or production id. The item barcode field accepts production numbers. Then the operator enters the number of units to report as finished. The PDA will then ask for additional inventory dimensions, like location, pallet batch etc, depending on what is mandatory of the item to specify. The PDA will also suggest a put-away location.
Confirm the put away by clicking “apply”, and the items are then “registered” into the location.
The user can also report number of errors/failed products. And even limit the “from-to” operations, to just report as finished selected operation. The end job, means that all remaining jobs should be marked as ended.
The operator can also print labels here that can be useful if tracking dimensions like batch or serial numbers are used in the production process.
The end production is the final step in the production process, and changes the receipt and issue transactions to “purchased/sold”. The costing details must still be fetched from the rich AX 2012 production form, but the actual ending can be done with the PDA. The Production end form on the PDA is very simple. It contains two input fields, and some quantity status fields.
If the user scans the item barcode, then the available productions order lookup will be filtered based on this. The lookup is also filtered on the current warehouse.
If there only exists one “reported as finished” production order, then this will automatically be select.
To end the production, just click post, and the production is ended.
Conclusion
With the Columbus PDA, it is possible to PDA enable your production, and take benefit of the realtime production process. A lot of readers of this blog has asked if this PDA solution is available, and the answer to this is yes, but only for AX 2012 RTM and Feature pack. Just contact us
My next PDA project will be …….. project . Here is a silent preview:
In my previous post I wrote about compressing standard location, movement and counting into a single process in Dynamics AX 2012. Today I wanted to show that the my PDA solution also can save time in purchase and sales scenario’s. If there is one thing we all like so save, it is time. So to save time, some PDA features has been implemented to speed up processes, but still maintaining on hands accurately. So this post is about making life easier for those companies, that don’t need or want to have more advanced WMS capabilities and features.
1. Create a sales order, and pick it in the same operation. This scenario is typically used in a retail scenario, where a store employee walks together with the customer, and creating sales order AND pick it while they are collecting the items. Then the last step is just to invoice the order. In this scenario, it means that the locations are updated in real-time.
2. Create a purchase order, and register it in the same operation. This scenario is more common than you think. People is ordering goods, but they don’t create a purchase order. Not exactly best practice, but is surely happens. Here the receiver can build up and receive the goods in one single operation. Scan item barcode, specify location and quantity, and the purchase order is created, and placed into the warehouse.
In the solution there are off course the possibilities for other scenario’s, as can be seen in the Sales and Purchase menus.
Happy Daxing, and my next post will cover the new features for production on PDA. Here is a silent preview:
Kinder Surprise, (or Kinder Egg’s that is also called) is something that most kids loves. Why ? It contains 3 positive elements, and that are (normally) a surprise, chocolate and a toy.
I wanted to create a Kinder Egg function on the PDA, that simplifies 3 tasks into one task. The tasks of my choice was:
1. Set the default issue/receipt warehouse location for an item,
2. Move all on hand of this item into the new location.
3. Adjust/count the new location.
So I created the following PDA screen:
Here the PDA asks for an item barcode, and then the user can scan the new default location, and select if the system should move ALL on-hand to the new location. After the movement has been done, then the PDA will adjust the final quantity in this location. In the background the PDA used standard AX journals.
For smaller companies this truly save time. Just imagine the time you would have to spend to do this using the item warehouse setup, transfer journal and counting journal.
When receiving products from purchase, production or any other receipt, then most companies wants the system to present a location where the items should be placed.
Dynamics AX 2012 have the capability to find a available location in the warehouse, but this algorithm is based on that the receipt do have a pallet.
If you want to examine the standard X++ code for this, then take a look at Table\WMSPallet.findFreeLocation(..), and just move forward in the code.
But we who have been working with logistics for many years, know that it is just a fraction of our customers, that are using pallets. Most just have pure SKU’s that they want to store in their warehouse.
So in the PDA, I implemented a way to suggest put-away locations to the warehouse operator, that works without pallets.
The algorithm is simpler than the standard DAX2012 search for pallet location, but the response I get from my customers, it that it is more practical. So what the code basically do is :
1. If the item/warehouse have a default receipt location, then use this.
2. If the item have a default picking location, then suggest this.
3. Search for a existsing buffer location with onhand, and then suggest this.
4. Seach for a buffer location where the item has been before, but now is empty, then suggest this.
5. Search for any empty and available buffer location.
Here is the code available for the Dynamcis AX community. (it’s not perfect, but ment as an inspiration for all DAX developers that every day is creating value for our customers)
WMSLocationId suggestedWmsLocationId(ItemId _itemId, InventDimId _inventDimId)
{
    InventItemLocation inventItemLocation;
    WMSStoreZoneArea   WMSStoreZoneArea;
    InventDim          parmInventdim = InventDim::find(_inventDimId);
    InventDim          inventDim;
    InventDim          inventDimCriteria;
    InventDimParm      inventDimParm;
    InventSum          inventSum;

    InventSum          inventSum2;
    InventDim          inventDim2;
    WMSLocation        wmsLocation;


    if (parmInventdim.wmsLocation() )
         return parmInventdim.wmsLocationId;

    inventItemLocation = InventItemLocation::findFixedWarehouse(_itemId, _inventDimId);
    if (inventItemLocation)
    {
        //1. use default receipt location on item
        if (inventItemLocation.wmsLocationIdDefaultReceipt)
            return inventItemLocation.wmsLocationIdDefaultReceipt;

        //2. use picking location on item
        if (inventItemLocation.wmsPickingLocation)
            return inventItemLocation.wmsPickingLocation;
    }

    //3. Search for existing buffer locations with item onhand
    inventDimCriteria = parmInventdim;
    inventDimParm.initFromInventDim(inventDimCriteria);
    inventDimParm.wmsLocationIdFlag = false;
    inventDimParm.wmsPalletIdFlag = false;
    inventDimParm.InventBatchIdFlag = false;
    inventDimParm.InventSerialIdFlag = false;

    while select firstonly sum(PhysicalInvent) from inventSum
            group by InventDimId
            where   inventSum.ItemId == _itemId
                &&  inventSum.PhysicalInvent > 0
            #InventDimExistsJoin(InventSum.inventdimid,inventdim,inventDimCriteria, InventDimParm)
            exists join wmsLocation
                where   wmsLocation.InventLocationId        == inventDim.InventLocationId
                    &&  wmsLocation.wmsLocationId           == inventDim.wmsLocationId
                    &&  !wmsLocation.InputBlockingCauseId
                    && (wmsLocation.LocationType            == WMSLocationType::Buffer ||
                        wmsLocation.LocationType            == WMSLocationType::Pick)
    {
        if (inventItemLocation.wMSStoreZoneId)
            {
                select firstonly WMSStoreZoneArea
                    where   WMSStoreZoneArea.storeZoneId == inventItemLocation.wMSStoreZoneId
                        &&  WMSStoreZoneArea.storeAreaId == inventSum.inventDim().wmsLocation().storeAreaId;

                if (WMSStoreZoneArea)
                    return wmsLocation.wMSLocationId;
            }
        else
            return inventSum.inventDim().wmsLocationId;
    }
    //4. Search for existing buffer locations where the item has been before, is zero, and no other items
    while select firstonly sum(PhysicalInvent) from inventSum
            group by InventDimId
            where   inventSum.ItemId == _itemId
                &&  inventSum.PhysicalInvent == 0
            #InventDimExistsJoin(InventSum.inventdimid,inventdim,inventDimCriteria, InventDimParm)
            exists join wmsLocation
                where   wmsLocation.InventLocationId        == inventDim.InventLocationId
                    &&  wmsLocation.wmsLocationId           == inventDim.wmsLocationId
                    &&  !wmsLocation.InputBlockingCauseId
                    && (wmsLocation.LocationType            == WMSLocationType::Buffer ||
                        wmsLocation.LocationType            == WMSLocationType::Pick)
    {
        select firstonly sum(PhysicalInvent) from inventSum2
            where   inventSum2.ItemId != _itemId
                &&  inventSum2.PhysicalInvent > 0
                exists join inventDim2
                    where   inventDim2.InventLocationId  == inventSum.inventDim().InventLocationId
                        &&  inventDim2.wmsLocationId     == inventSum.inventDim().wmsLocationId;

        if (inventSum2.PhysicalInvent == 0)
        {
            if (inventItemLocation.wMSStoreZoneId)
            {
                select firstonly WMSStoreZoneArea
                    where   WMSStoreZoneArea.storeZoneId == inventItemLocation.wMSStoreZoneId
                        &&  WMSStoreZoneArea.storeAreaId == inventSum.inventDim().wmsLocation().storeAreaId;

                if (WMSStoreZoneArea)
                    return wmsLocation.wMSLocationId;
            }
            else
                return inventSum.inventDim().wMSLocationId;
        }
    }
    //5. Search for empty and available location in buffer
    while select wmsLocation order by SortCode, wmsLocationId
        where   wmsLocation.InventLocationId == parmInventdim.InventLocationId
            &&  !wmsLocation.InputBlockingCauseId
            && (wmsLocation.LocationType           == WMSLocationType::Buffer ||
                wmsLocation.LocationType           == WMSLocationType::Pick)
        exists join inventDim
            where   inventDim.InventLocationId  == wmsLocation.InventLocationId
                &&  inventDim.wmsLocationId     == wmsLocation.wmsLocationId
        exists join inventSum
            where   inventSum.InventDimId    == inventDim.InventDimId
                &&  inventSum.PhysicalInvent == 0
                &&  inventSum.Ordered        == 0
    {
        select firstonly sum(PhysicalInvent) from inventSum2
            where   inventSum2.ItemId != _itemId
                &&  inventSum2.PhysicalInvent > 0
                exists join inventDim2
                    where   inventDim2.InventLocationId  == wmsLocation.InventLocationId
                        &&  inventDim2.wmsLocationId     == wmsLocation.wmsLocationId;

        if (inventSum2.PhysicalInvent == 0)
        {
            if (inventItemLocation.wMSStoreZoneId)
            {
                select firstonly WMSStoreZoneArea
                    where   WMSStoreZoneArea.storeZoneId == inventItemLocation.wMSStoreZoneId
                        &&  WMSStoreZoneArea.storeAreaId == wmsLocation.storeAreaId;

                if (WMSStoreZoneArea)
                    return wmsLocation.wMSLocationId;
            }
            else
                return wmsLocation.wmsLocationId;
        }
    }
    return ''; //No locations was found 😦
}
The warehouse menu covers ordinary tasks like counting, moving, inquiry etc.
Count from Journal: This program will do a controlled count, based on a counting journal that has been generated. This is typical for cycle counting or when doing aisle counting.
Real-time count: This program can be used when doing ad-hoc counting of locations.
Transfer from Journal: This program will perform internal transfers between dimensions. Typical when moving from a location to another, but based on a transfer journal.
Real-time transfer: This program will perform ad-hoc internal transfers between dimensions. Typical when moving from a location to another.
Inquire item barcode: Inquire information on an item barcode, and to see where the item is located.
Journal counting is the most common way of counting in Dynamics AX. It used a counting journal to confirm the counting. The process therefore starts by creating a counting journal in Dynamics AX. The PDA journal counting cannot add new items to the journal. It can just count the lines that already exist in the journal. Several workers are allowed to work on the same journal.
The count from journal PDA form will change in the process.
Warehouse: Enter or scan the warehouse. Normally this will be automatically filled on based on usage data.
Journal: Select or enter the journal number. The lookup will show open journals, that is not blocked and that do have counting lines. The magnifier button will show the lines on the journal. When the journal has been filled in, then the grid will show all locations that needs to be visited.
Location: Select or scan the location, that exists in the journal/list.
When the location has been entered, the form will change, and instead of showing next location, it will show the item barcodes available on the location.
Barcode: Select or enter the barcode that should be counted. The lookup button will only show barcodes available on the journal. The magnifier button will show barcode details, like item name, picture and current on hand values.
Counted: When the barcode is scanned, the cursor will jump to the corresponding line, where the worker can fill in the counted quantity. There exists more items with different tracking dimensions, then look at the dimension view in the bottom screen.
Grid line coloring: When a line has been counted the line will “jump” to the bottom of the grid, and it will change color. White means that the line has not been counted. Green means that it has been counted with a positive value. Red means that the quantity has been counted away.
Post: When all lines have been counted, the command button “post” will be visible, and the journal can be posted.
Real time counting is quite similar to journal counting, but the worker does not have a journal.
Warehouse: Enter or scan the warehouse. Normally this will be automatically filled on based on usage data.
Location: Select or scan the location. When the location has been entered, it will show the item barcodes available on the location.
Bar code: Select or enter the barcode that should be counted. The lookup button will show all barcodes available. The magnifier button will show barcode details, like item name, picture and current on and values.
Counted: When the worker has scanned in a barcode, the cursor will jump down to the lines, where the worker can specify the counted quantity.
If more mandatory dimensions must be specified, then the item dimension specification form will pop up. In the picture to the left, the PDA requires that both pallet ID and Serial must be specified.
Grid color/icon coding To visualize progress in counting, each line have been added with a small counting symbol.
Grey – The existing line has not been counted Green – The existing line has been counted Blue – New line has been counted in Red – The line has been counted out.
Post: To commit the counting, the user must click on the post button. It the user just returns without clicking post, the counting will not be posted. All posting in the real-time counting will be posted using a counting journal. The journal is created and posted within the same transaction. The journal lines will also be marked with the worker ID, and posted date/time.
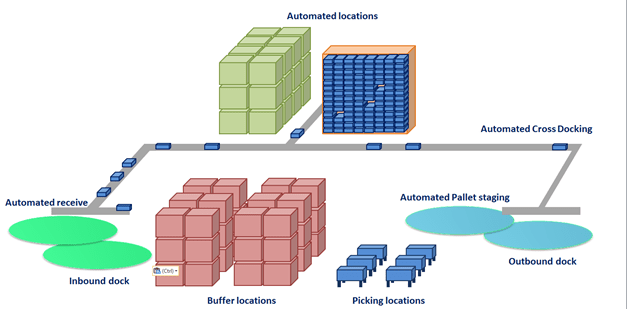
The outbound menu is related to a consolidated delivery. Processes here is related to what happens after the items have been picked is covered.
Merge pick pallets:
Merge pick pallets will combine two pallets into one pallet. This is often done for consolidated deliveries, and typical if the pick pallets actually are boxes or pick baskets.
Stage pick pallets:
Staging is the process of aligning up the delivery pallets at an outbound dock. Also to sort and organize the sequence of how the pallets should be placed in the truck
Load pick pallets:
Loading is done, when placing a pallet into the truck/carrier.
Send shipment: Sending a shipment corresponds to the send shipment on the standard Dynamics AX form. Here the worker and also specify if packing slip and bill of lading should be printed.
Merging of pallets should be done to simplify the staging and loading processes, and to keep a better overview of the contents of the outbound dock.
From Pallet: Specify the from pallet. When filled in the delivery name and address will be displayed. The lookup will show all pallets on the current warehouse. The magnifier button will show all items that is currently on the pick pallet.
To Pallet: Specify the destination pallet. All items and picking lines will be moved into the pallet. The lookup will show all pallet at the current warehouse. The magnifier will show all items that currently exists on the destination pallet.
There are a validation of what ”to pallet” that can be used. This is the same validation as standard AX is using, checking that you cannot combine two pallets destined for different shipments, addresses and customers.
To stage a pallet just means that the status of the picking line changes to status “staged”. It is common to stage the pallet several time to different outbound docks. If the truck/carrier is planning to drive into another outbound dock, than all pallets can be “re-staged” to the new outbound dock.
Pallet: Specify the staging pallet. When filled in the delivery name and address will be displayed. The lookup will show all pallets on the current warehouse. The magnifier button will show all items that is currently on the pick pallet
To location: Specify the staging location. Normally this is a outbound dock. The lookup will show outbound docks at the current warehouse. The magnifier button will show all items that is currently on the outbound dock.
Pallet loading should be performed to make sure that all pallets have been correctly loaded into the truck/carrier. To reverse a loading, just stage the pallet again.
Pallet ID Specify the pallet to load. When filled in the delivery name and address will be displayed. The lookup will show all pallets on the current warehouse that is ready to be loaded. The magnifier button will show all items that is currently on the pick pallet.In addition the working instructions will show the expected shipment that the pallet should be loaded into.
Shipment Scan or enter the shipment where the pallet is loaded into. The lookup button will show all shipments that is not shipped at the current warehouse. The magnifier button will show all items that is currently loaded into the shipment.
Send shipment is the last task needed to close the shipment and to generate packing slip and bill-of-lading documents. The task corresponds to doing a ”send shipment” in standard Dynamics AX 2012.
Shipment Scan or enter the shipment where the pallet is loaded into. The lookup button will show all shipments that is not shipped at the current warehouse. The magnifier button will show all items that is currently loaded into the shipment.
Status: Display the expedition status of the shipment
Name: Display the name of the shipment
Loaded pallets: Display the number of pallets that have been loaded into the shipment
Not loaded: Displays number of pallets that have not been loaded into the shipment. If this number is larger than zero, then there are pallets that have not been loaded into the shipment yet, and the operator show wait with sending the shipment.
Print BOL: Print Bill-of-Lading document based on what has been loaded into the shipment.The print management setup for packing slip will be used as the printer.
Packing slip: Post and print the packing slip. This is only valid for sales orders and transfer orders.
Send: The send button will send the shipment, and corresponds to the following standard AX function.
The picking menu supports more advanced picking features, and is regarded as advanced WMS features.
Start picking Route: This menu will start the picking route, and also start the picking process of a route.
Create Pick Pallet: In a consolidated delivery scenario, the worker can pick goods into pallets or pick baskets. This menu will allow the user to mass generate pick pallets.
Print pallet Label: When picking is done, then a pallet label many wanted to be reprinted. The Pallet label will contain deliver addresses, and a pallet contents label. Printing will use the BarTender label printout when this is available.
Post picking Route: When the picking is finished, or the worker must short ship, then the post picking route can be used. This menu will also allow the worker to generate a packing slip for the picked items.
Picking lines that have not been picked, will be cancelled, and can be repacked on the next picking route.
Cancel picking route: If the picking route must be canceled, ten use this menu. It will cancel the picking route, and it can also unpick any picked lines.
The start picking route will look differently depending on if it is a order picking, or if it is a consolidated picking. The main difference is that use of pick pallets. These two scenario’s will be covered separately.
The first scenario is order picking without pick pallets.
Picking route: The process starts with that the worker enters or scans the picking route ID. The system confirms back with reference and delivery information and address.
The worker then starts the picking process by clicking start.
The next screen that the worker will see is a list of all the locations that he needs to pick goods from.
The worker confirms that he as arrived to a location, by scanning one of the locations specified in the list.
If the locations do not have bar codes, the worker can also click in the “pick” column in the grid.
In the bottom, the worker can se a small picture of the product, item number and other dimensions. The item text will also be visible.
When the worker confirms the location, the followig confirmation screen will pop up.
Here the worker must confirm the item barcode, bu scanning this, and also fill inn any additional dimensions, if this is missing. Like pallet, batch or serial number.
The requested quantity is on the right of the quantity field
When the quantity is filled on, the item quantity dialog will close, and the worker can start on the next picking line.
The last step in the picking process is to post a picking route. This will also generate the packing slip.
The consolidated pick, is using output orders and shipments to control the process. The Sales order generate output orders, and they are collected in a shipment. It is important to understand the main process of consolidated picking to make sure that the steps are followed. The main thing is the use of pick pallets that must be in place to cover the following process.
The process starts with the picking process, that is quite simular to the order picking, but where the worker places the picket items on to a pick pallet. The next step is to stage the pallet at a outbound dock. Here the pallets will be placed until they are loaded into a truck or a carrier. The last step is to send the shipment, that will be the final delivery to the customer/warehouse. For more information on using output orders and shipments, please refer to standard AX 2012 documentation.
If a consolidated picking route has been generated, then the start picking route screen will change to include pick pallet. In this form a pre-created pick pallet can be selected, or the worker can create a new pick pallet, by clicking on the “new” button”. The select location screen will also have pick pallet as a criteria, where the worker can decide on whish pick pallet the goods should be collected on.
When done, the PDA will return to the ”start picking route”, ready for the next picking route.
In a consolidated pick scenario, it is often needed to generate a lot of pick pallets. Often the creation of pick pallets will also produce a label, that the pallet/pick basket can be marked with. Free pallet can look like this, if generated using Columbus BarTender integration.
The PDA used for generating pick pallets have the following fields :
Type: Enter the pallet type. This is a property on the pallet, that controls size and volume. It also controls if this is a pick basket.
Warehouse:Enter a warehouse where the pick pallet is stored.
Location:Enter a location where the pallet is located. Normally this will be a ”empty pallet” location. The default value is fetched from the empty pallet location defined on the warehouse record.
Print:Specify if the label should be printed. If Columbus BarTender integration is installed than this printer will be used.
Quantity:Enter number of pallets that should be generated.
Normally each pallet is marked with an anonymous pallet label. Often it is wanted to print a new pallet label, that do contain delivery name and addresses. Sometimes a pallet contents label is printed, and placed on the physical pallet after it is wrapped. This makes it easier in the staging are to know what pallet belongs to what shipment/customer etc.
Picking route: The field picking route is not a mandatory field, and is just used for simplifying the lookup of the pallet ID. If filled in, then only pallets belonging to the specified picking route will appear. The magnifier button will show the lines on the picking route.
Pallet: Specify pallet ID
Num labels: Specify number of label(copies) that is wanted.
Post picking route only have a function in when the picking route is order based and NOT consolidated. The post picking route will complete the picking route, and post the packing slip for the picked lines.
Picking route: Spesify the picking route that is going to be posted, and packing slip updated.
The lookup will only show picking routes that have the expeditionstatus registered to loaded at current warehouse.
The cancel picking route is a PDA program for cancelling a picking route. All lines will be returned to the original status, and a new picking route must be generated before they can be picked again.
Picking route: Spesify the picking route that is going to be cancelled. The lookup will only show picking routes that have the expedition status registered to loaded at current warehouse. The magnifier button will show the lines on the picking route.
Unpick: If this selection is set, then any picked lines will be unpicked, and the items will be return to the original location.
The PDA sales menu is created for doing express picking and for creating sales order journals.
Express Pick: This program will pick sales order lines when picking routes are NOT used. The program expects that the sales order has already been created and are confirmed. The user then scans the item barcodes, and picks, until the sales order is finished.
Create Sales Order: This program will create a sales journal, andadd sales order lines.
Add Sales Lines: This functionality of this program is similar to the create sales order, but the user can upfront select the sales order. The program can also add lines to ordinary sales orders.
Packing slip update:
The packing slip updatewill post a packing slip for the picked lines.
The express pick form, expects that there already exists a created sales order, that is NOT a journal. Then the user can scan the items, and PICK the lines. When all lines are done, then the sales order can be packing slip updated.
Sales: Scan or fill in the sales number. The lookup will show all sales orders that has the sales status “backorder”, and will even be filtered on item barcode, if this already have been filled in.
If the sales order do not have any lines to pick, then the sales order will not be accepted.
The magnifier button will show “remaining lines” on the sales order. When all lines have been picked, then the list will not show any lines.
Bar code: Accepts item barcodes or EAN128 codes. Lookup is filtered to only show item barcodes that exists on the sales order. View details will open the released products form. The magnifier button will open the items details for this item/barcode.
Dimensions: The express pick do not support batch and serial numbers.
Quantity: As soon as the quantity has been filled in, the quantity will be picked. The quantity field accepts EAN128. If a negative quantity is entered, then the picked quantity will be returned.
Packing slip: The last step is to packing slip update the picked items. This option is only allowed if all lines have been picked. The packing slip will be printed according to the print management setup.
The create sales order program will create a sales order journal. The scenario for this program, is that a warehouse worker can go around in the warehouse, and create a sales order, by scanning the products. When done, the worker can return back to a normal AX client, and make the necessary adjustments on price delivery date etc, and send a confirmation to the customer.
The Create Sales order will not pick the goods !
Customer: Fill inn or select the customer. The lookup will not show customers that are blocked. When customer is filled in, the customer name will be visible on the name field.
Bar Code: Accepts item barcodes or EAN128 codes. Lookup is not filtered. View details will open the released products form. The magnifier button will open the items details for this item/barcode. When “Bar code” is filled in, then the item name will be visible in the name field.
Dimensions: The create Sales Order can only be specified with warehouse and location. Other dimensions like pallet, batch and serial must be specified in the picking process, or on a full AX client.
Quantity: The quantity field accepts EAN128.
Create/Add: If there already exists an open sales order journal, the sales line will be added. If not, then a new sales order journal will be created.
The Add sales line is actually the same PDA form as “Create Sales Order”. The difference is that instead of specifying a customer, the user selects an open sales order. Normal backorder sales orders can also be used.
The magnifier shows open lines related to the sales order. For the other fields, refer to the PDA form “Create Sales Order”.
The arrival menu covers the main aspects of doing receipt of goods. The functionality is similar to the arrival journal in Dynamics AX 2012. The arrival menu can therefore be used for several types of receipts, and the following receipts types are possible. Purchase orders, Return sales orders(RMA), Production (report as finished), Transaction, Inventory adjustments, Transfer, Bom journal, Counting, Quarantine order, Transfer order receive and quality order. For details about these transaction types, refer to standard Dynamics AX 2012 help.
The 3 options presented to the user are:
Create Arrival Journal.
This program allows the worker to create an arrival journal, and to start the receipt process.
Registrate Arrival Lines This program allows the worker to continue the receipt process of an existing arrival journal
Post Product Receipt This program allows the worker to do a product receipt of an arrival journal. This is only valid for arrival journals containing lines from a purchase order or a transfer order receipt.
To create a arrival journal and doing the actual registration process.
Type: The first step is to select the type. Several options are available, and the form will change according to what type is selected. If a Purchase order is selected, then the worker can select vendor and purchase number. If a production is selected, then the worker must select a production order etc.
Account: The account field is only visible if the type is “Purchase order”, and lets you select the vendor. This is not a mandatory step, but will help to filter and narrow down the possible purchase orders to be selected.
Warehouse: Select the warehouse where the arrival journal line will be received into. Mainly used to filter and narrow down the possible purchase orders to be selected.
Quarantine: Select this option, if the quarantine possibilities should be used. This means that the receipt will be posted into a quarantine warehouse, and then the quarantine process will take over.
Number: Enter of scan the reference number according to the type selected.
Packing slip: Enter or scan the packing slip number. This number can be used later in the process, when doing product receipt posting.
Create: When done, the press create to start the arrival registration process.
The registration of arrival lines, is the same as when happens in the arrival journal in Dynamcis AX 2012. First the lines have been create in the create arrival journal form. The form starts by scanning item barcode. The reason for this is that is seldom that any warehouse will receive the same item in two different arrival journals at the same time. It will also make the process of finding the journal ID easier for the PDA program, since most likely the goods is already barcode marked from the vendor/production etc.
To keep track of if a line is completed or not, there is a very small modification in std AX. A new Boolean field on the arrival journal lines has been added, called PDACompleted. This field is only used in this form, and will not affect and standard AX functionality. Often the warehouse manager will generate a arrival journal, using the arrival overview screen, and create the needed arrival journals. The worker can also manually create arrival journals using the create arrival journal PDA form.
Bar code: Accepts item barcodes or EAN128 codes. Lookup is filtered to only show item barcodes that has a open arrival journal associated. View details will open the released products form.
The magnifier button will open the items details for this item/barcode.
Journal and journal line. If there exists 2 open arrival journal on the same barcode, then the journal will NOT be automatically filled in, and the worker must select the correct one. This also applies, if there are several arrival lines on the same item barcode.
The magnifier button will open the a list form, showing all lines on the arrival journal, and will also show what lines that are complete, and what is still missing.
Warehouse and Location The warehouse and location can be filled in automatically, if the item do have a standard picking location. Else, the worker must scan in this.
Additional dimensions If additional dimensions are required(like Pallet ID, Batch ID and Serial ID), then field for these will also appear in the form.
The post product receipt is only valid for registrations where a purchase or a transfer order receipt is done.
Journal: Scan or enter the journal number, that should be product receipt updated. The lookup is filtered to only show journals that is posted, and that have registered inventory transactions attached. The view details will open the location journal form, filtered as default in Dynamics ax, on Open journals. The worker must therefore most likely filter to show all, and then find the correct journal. The magnifier, will show the lines on the journal.
Purchase: Normally this field will automatically be filled in when the journal is filled on. If not, then scan or enter the purchase ID. The lookup will filter to only show registered purchase orders.
Packing slip: Normally this field will be automatically filled in, since the packing slip ID was entered when the worker created the arrival journal. Else, fill in the packing slip.
Post: When ready to post the journal, then click post. This corresponds to posting receipt on the arrival journal.
The purchase menu covers 2 main aspects. The ability to do express registration, and to create and process purchase orders. The 4 options presented to the user are:
Express registration. This program allows the worker to perform a purchase line registration into a location.
Create Purchase Journal. This program allows the worker to create a purchase journal with purchase lines that can later be confirmed and sent to a vendor.
Add Purchase lines. This program allows the worker add purchase lines to a journal or existing purchase order.
Product Receipt posting. This program allows the worker to post the product receipt (Purchase Packing slip update)
Express registration is a process, where the worker very easily can do a registration of purchase lines into a location. When a purchase line is registered into a location, the quantity will be included in the physical inventory. The physical cost is not posted, and after the registration process is done, and then a product receipt posting must be done, to post the physical cost.
Field and filter explanation: Bar code: Accepts item barcodes or EAN128 codes. Lookup is filtered to only show open purchase lines. If purchase is filled in, then bar code lookup will filter within the purchase. View details will open the released products form.
The magnifier button will open the items details for this item/barcode.
Purchase: Accepts confirmed purchase ID’s.
Lookup is filtered to only show open purchase lines with the specified item barcode. If item barcode is not filled in, then purchase lookup will filter on all open purchase orders.
View details will open the purchase order form. The magnifier button will show all purchase lines in a separate form, showing quantity and remaining quantity.
Warehouse, location, pallet and Batch Based on enabled storage- and tracking dimensions, the form will request dimensions like warehouse, location, pallet ID or batch number. Only enabled dimensions will show.
Serial numbers are not supported in the express receive.
Posting When the registration is complete, the worker must press the Add button to perform the registration. When doing this, the form will be emptied, and ready for the next item/scan.
What the Columbus PDA will do when posting a express registration, it to create a single line in the Arrival Journal, and instantly post it. So all express registrations will have an arrival journal associated to the posting. The name of the arrival journal will be “Express registration, Purchase %1, Date %2”.
Other design considerations The reason why the item barcode is the first registration is because it is most likely only the product that does have a barcode attached. But to change the scanning sequence, is a small change that can be done upon request.
Setup Considerations The express receive will use the default arrival journal. It is therefore important to create a arrival journal name, that do NOT validate pick, buffer and transports. Set up the default arrival journal like this:
The create purchase journal is a small form, that allows the worker to build up purchase journals, based on scanning item barcodes. The process starts either by scanning/selecting vendor or by scanning item barcode. The scenario is that this form can be used by a warehouse working that walks around in a warehouse or a store, and orders refills from the primary vendor. After all scanning is done, the worker returns to a PC, and changes the purchase order from journal to order, and then completes the normal order processing of the purchase order.
Field and filter explanation:
Vendor: Select or enter the vendor ID. The system will automatically fill inn the vendor name in the field below.
Lookup on the vendor only filtering away blocked vendors.
View details will bring up the vendor details.
In the vendor field, it is also allowed to scan item barcode. The PDA, will then fill automatically fill in the item barcode, and the primary vendor.
Bar code: Accepts item barcodes or EAN128 codes. Lookup is filtered to only show item barcodes that has the selected vendor as primary vendor. If not vendor is filled in, then it will show all items bar codes.
View details will open the released products form.
The magnifier button will open the items details for this item/barcode.
The item name will also be displayed when the bar code is filled in.
Warehouse Warehouse will be automatically filled in, based on the primary and current warehouse, selected in the PDA setup.
Quantity The quantity will accept EAN 128. If the item barcode is associated with a quantity, then this will be used.
Open orders The open orders field is used to show other existing open purchase lines that exists for the item. This field is used to help the worker determine if he should check more before ordering.
This form have both a “create” and a “add” function, because if there already exists an open purchase journal to the same vendor, then the form will add the item barcode to the existing purchase order. If the item barcode already exists on the purchase journal, then the quantity will just increase. Else the purchase line and purchase journal will be created.
The add purchase line is actually the same screen as the create purchase journal screen.
Refer to the previous form for explanation of the field. The main difference is that the vendor field has been replaced with a purchase ID field. The other difference is that it is possible to add lines to a normal purchase order on this screen. Also a magnifier button for seeing the contents of the purchase order has been added. The idea here is that the form can be used to register/create purchase orders in the receive department. One scenario could be registration of blind receipts, where goods has been ordered without having a valid purchase order. Remember to validate and confirm the purchase order as done in the normal order processing after the registration is completed.
Posting of product receipt is an important process in Dynamics AX 2012. The process will generate a product receipt formletter, and will also change the inventory transactions to status “received”. Also any item cost will be physically posted to ledger.
Purchase: The Columbus PDA product receipt posting will ONLY post registered quantities. If the form does not accept the purchase ID you enter/select, it is because the purchase order lines are not registered. The scenario is that the worker uses express registration, and when done the worker can do a product receipt posting to complete the arrival process.
The other criteria is that the selected purchase order must be “confirmed”. Only approved purchase orders will generate a error.
The purchase magnifier will show the registered quantity, and the “remainder” quantity.
Product receipt number: This is the vendors packingslip number, and must be entered/scanned to be allowed to post the product receipt.
Document date: If the goods are received on another date then the current date, then the document date can be adjusted.
Print: If the user wants a printout of the product receipt, then select the print option. The printer is determined by the print management setup of standard dynamics AX 2012.
I wanted to share with you how I have enabled the rich functionality of Dynamics AX 2012 to be run on a wireless device. What I show you here is 100% based on AX 2012 feature Pack, and everything is created in AX 2012. I decided also to have no changes on std. AX elements, and only use existing available functionality of AX 2012.
The wireless communication can be achieved either through the customer’s wireless infrastructure or a cellular network. To speed up the data mining process, the device must support touch screen and either barcode scanning or radio frequency reading.
Each wireless device can connect to an individual session through Remote Desktop Services of Microsoft Server 2008.
The key benefits of this setup:
• The build in communication and security features of Windows are utilized. • Maintenance and deployment tasks are centralized, because all logic are located and run on one server and not on each device. • The customer’s own IT department can set up new devices, because only the communication information is to be set up on the device. • No business critical data is stored or executed on the device.
Wireless device
· Microsoft Windows Mobile 6.1 or later · Remote Desktop Service client 7.0 (build into Windows Mobile 6.1) · VGA (640 X 480) color touch panel (Other resolutions is just a configuration) · Wireless network adaptor or cellular adaptor (EDGE or better) · Barcode scanner or RF-tag reader
Due to past experience with several hardware vendors, and the requirements of the PDA solution, I have can recommend the Motorola MC75 wireless device. The MC75 is available in different configurations and can fulfill the specific needs of a typical customer.
All forms in a PDA solution should have the same generic properties, and what I have done is the following.
In addition, it is recommended to have a visual confirmation to the user. Like a flash green, if the input is accepted, and red permanent background if the scanned/entered data is not accepted.
To efficiently use a PDA, all items should have an item barcode associated to each item. The main reason for this, is that the item barcode will contain the unique reference to item and the product dimensions like configuration, size, color and style. If it is not a possibility to have item barcodes on the products, than use the item number as the item barcode.
To generate item barcodes, it is possible to automate this with a set of jobs than can be ran to periodically generate standard item barcodes.
The main menu, if the first screen that the user will access. I can recommend to implement a command line parameter, to automatically start the PDA. This means that when the user logs into the RDP, an auto startup command with AX32.exe –startupCmd=PDA, that will start the PDA menu automatically.
In addition it is recommended that the Exit button do a log-out of the user from the RDP session. If the user just wants to exit the PDA menu, then press “ESC” to exit, and the RDP sessions is closed.
The PDA screens should also be configured per user in a setup.
In the setup, the user can set up a default “current warehouse”, so that lookups and scanning is limited to the specified warehouse. In addition the worker can enable/disable functional areas that are not applicable to the workers normal operations, and therefore also reduce the number of options on the main menu.
Then the user is keeping his finger down on the screen, the current selected menu.
The menu items are also attached to configuration keys, so if a configuration is disabled (like project or production), then the menu will not be visible.
In several places a magnifier glass will appear like this:
This is a menu button to drill further based on the information that is filled in. In general there are 4 main types for generic forms. Item information, dimension specification, lists and picture.
The item information form will show primary information, like item barcode, item number, item name, standard purchase and sales price. In addition there are a editable field under the “location”. This is the warehouse. Normally the default warehouse will be filled in here, but the user can change this. This will affect the display of the primary picking location, and the fields for on hand, like available physical, Physical and ordered.
In the bottom, the item barcodes product dimensions, in addition to the item description.
The default product image is also seen here. By clicking on the image, the system will bring up a full size picture of the product.
The item dimension specification form, is typical used when there is not enough space in the form to specify all dimensions. Then a separate form will popup, where the user must specify/rescan item barcode, and also specify additional dimensions like pallet ID, Batch or Serial number.
This form is mainly used in picking situations, and what fields/dimensions that should be visible is dependent on the storage and tracking dimension group of the item.
The product picture form is a very simple form, that just gives the user a full size picture of the product. In addition, item bar code, item number, item name and product dimensions will be shown.
In some cases the magnifier will bring up lists to give the worker an overview. This could be an overview of all purchase lines, all items on a location, all lines on a journal etc.
The list contains a list with different information, a reminder and a quantity. The list changes based on from where it is called, and what it is supposed to show.
In this example it will show open purchase lines, showing item, reminder and line quantity. In the bottom the item bar code and product description is shown.
In the bottom section all dimensions from the line will be shown. Both product, storage and tracking dimensions will be shown here.
The default product picture is clickable, and will show the picture in full format.
Summary
To have these generic and common forms and framework, the development of the functional forms become very easy, and I could focus on the actual functionality. Drop by my blog in the weeks to follow, and I’ll show you how the functionality actually works.
I was woring on a small PDA screen for send a shipment in Dynamics AX 2012. Normally this is done from the shipment screen as follows:
The people at the warehouse wanted a smaller and easier screen to work with, and one that fits a PDA screen, like Motorola MC75. So I decided to create a PDA program for that. It looks like this:
When the operator scans the shipment ID, the user will see the shipment status, name, and number of staged and loaded pallets. In addition we wanted the ability to very easily print the bill of lading and the packing slip when the shipment is sent. So that the operator just could fetch the paper documents from a nearby printer. I decided that using the print management setup would be great, and I could use the same printer as setup for packingslips
So I needed to find a way to print out these documents without any printer dialog. Through MSDN I found all I needed, but I wanted to share this with you. I have created a small job in X++ that illustrates the code I used to automatically print out the bill of lading:
This is my first posted video EVER, so do not expect to see anything of high quality. The video is a small view into a set of PDA programs created for Dynamics AX. This one will do an express registration of 2 purchase lines into different locations. What you see is 100% built in Dynamics AX 2012, and is basically doing the same as arrival overview and arrival journal posting, but from a handheld PDA.
Here the other day I came over a functional change in AX 2012 compared to AX 2009 and earlier versions. It is related to the “Deliver Now” field on the sales lines and on the line quantity form.
In earlier releases we could use this field to reverse a packing slip or to credit an invoice. This is no longer an option. The reason is to make sure that you reverse the right transactions with the right dimensions. Also in AX 2009 it was possible to reverse a packing slip that had already been invoice, and completely messing up the transactions with no way to correct it up. With this new restriction in AX 2012 that problem is gone.
Now you must either use the “credit note” or the copy features to reverse the transactions.
Microsoft has also given us the “Correct” and “Cancel” feature on the packing slip journal and invoice journal.
Personally I first though this was a bug introduced in AX 2012, But I now realized that it actually was a good new feature J.
In today’s posting I wanted to focus on the processes of deleting and cancelling a picking route. What I write here is valid on both AX 2012 and AX 2009, but I wanted to set focus on it.
I get questions on why does Dynamics AX leave an open output order when you DELETE a picking route using ALT-F9.
I see customers just deleting picking routes, and then they are left with a bunch of open output orders, that they need to manually delete to be able to recreate a picking route. The output orders are just changed from status “handling” to status “created“. This can be time consuming and annoying.
The reason and explanation is easy. You are doing it the wrong way. The steps are:
First CANCEL the picking route
Then you may delete it.(But I actually recommend to keep the cancelled picking routes to have a history of the actions)
This will correctly also cancel the output order, and you can then recreate your picking route as expected.
I hope this makes working with picking routes a bit easier.
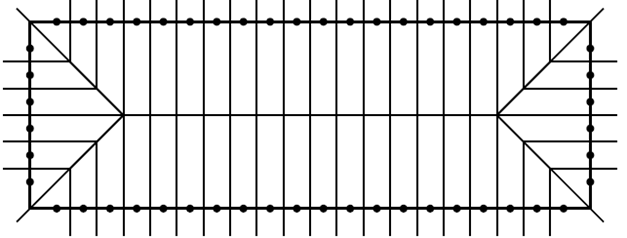
In AX 2009 we had many important tables related to WMS, and the location table is one of the most important ones, if you are into warehousing. In AX 2009 the location form consisted of two tables. The WMSLocation, that contained attributes and parameters for a location, and the WMSLocationSum that contained the “load” of this location. In relation to “load” I mean that if keeps track of how many pallets there are available space for.
The AX 2009 basically only tracked available pallet positions per location. But in AX 2012, this has changed.
Now Dynamics AX 2012 keeps track of available pallet locations, volume and weight. To reflect this change, Microsoft has also changed the name of the table. The “new” name is now “WMSLocationLoad”
The functionality is pretty similar to AX 2009, but there is a technical rebuild on this functionality. For us that works with WMS, and a focusing on fill-rates of the warehouse (The ability to store more goods in the warehouse), this is a welcomed feature. Now it becomes easier for us to implement more advanced slotting features, and also to restrict that heavy items goes to the “top-shelf”.
Today I wanted to start a series of blog posts to show some of the smaller improvements related to warehouse management in AX 2012. Dynamics AX 2012 does have some major improvement, but sometimes it good to know that smaller changes also manages to get into new releases.
In this posting I want to look a bit deeper into a form that used to manually pick items without using picking routes.
In Dynamics AX 2009 the picking form looked like this :
Here the user could mark the lines(Inventory Transactions) that was wanted to be picked, and then override the dimensions. In AX 2012 this form has changed.
Pay specially attention to the field at the top. Here Microsoft has added a field to scan inventory dimensions. Like location, serial, batch and kanbans.
I think it works best for tracking dimensions like pallet, serial and batch numbers, and will move the inventory transactions to the lower part of the screen, and also change the issue status on the inventory transaction to “Picked”.
BUT! There are a few things you need to know. There are a set of checks in the code, so it will only work in those cases where the dimensions is NOT specified on the original transaction. So in my case here, if I SCAN the location “PICK” that is a valid location on the warehouse 11, the result will be the following, where the system picks all lines against location PICK.
For my technical readers, here is where is happends:
The source code for this check is available in the class InventTransWMS_Pick.createFromHandlingUnit().
Also pay attention to the following code:
Here the validation that the “source” dimension needs to be “BLANK” for it to work.
In earlier Damgaard days, one of the creators of AXAPTA had a nice slogan : “Copy with pride”. Since ALL Microsoft code are available when we make improvements, we should get good ideas from one part of the application and use it other places. We as implementers of Dynamics AX 2012 now have the option to improve this feature by adding support for more intelligent scanning, by incorporate support for EAN128 in the scanning field(s). Then multiple dimensions like PalletID(SSCC), Batch, serial etc could be fetched out of the scan, since EAN128 do support application identifiers For more information on the EAN128 see my post on Hidden Barcode Secrets in AX 2012.
AX2012 has come with many new improved features. One of my favorites are the ability to create Computed View Columns. In a project we have created a form, where the datasource is a Table view, and it does have some nice use of the Computed View Columns feature. But we then face an issue. The table is “read-only” as expected, but we wanted to create a EDIT-method on the form datasource to make some adjustments. The edit method will not do changes to the datasource, but will change some other data. But as you may know, Edit methods let’s you get the record from the form datasource. The issue is that regardless of what we try, the EDIT method/field becomes “read-only”, and we cannot make the field editable.
Regardless of how we try to adjust the fields properties on the field it will not be editable as long as the grid data source is a table view.
A few times every year I suddenly discover solutions and ideas that completely surprises me. Today was one of these days. We have all heard about sure step and rapid start, and they are great tools. Now To-Increase has created an integrated business process tool that allows you to model your business processes right from Dynamics AX. When I often see tools like this, I often feel that it is a framework, and you need to build all yourself. But the To-Increase Rapid Value is actually filled with contents, and real and proven business processes. Here are some screen shots from the application.
One of the best part is the smooth integration to VISIO and other Microsoft Office applications. Pick you processes from Dynamics AX 2012, and use them in the Visio to show the flow of your business processes.
It’s also works with Sure step and Rapid Start Microsoft, and is a valuable addition to this. I look forward to working with customers on this tool, and I’m quite sure that this will bring rapid value to our customers. My last comment is “bye, bye whiteboard, and long process definition meetings”
If you want to take a closer look at it, browse into the To-Increase site here:
The first stage of the fulfillment cycle is the way in which your business processes a customer’s order. How your business handles orders has a major impact on customer service, from encouraging initial interest to prompting repeat business. Factors such as price, quality of product or service, range of goods, stock availability are vital to achieving sales in the first place, but a responsive, fully automated order-fulfillment procedure plays a key part in overall customer satisfaction.
Improving how you handle orders
You need to know exactly how well your business deals with order handling before you can make improvements. You should evaluate how orders are processed by doing the following:
Identify the connections between sales, planning, purchasing, etc. Flow charts and activity diagrams can help you map out your processes and highlight the links. There are simple software tools like (Microsoft Visio) available to help you do this.
Consider linking your systems to those of your customers if you operate in a business-to-business environment. Find out what systems they use and determine if yours are compatible.
Ask staff for their input – they may be able to help you identify problems and solutions.
Encourage customers to give you feedback on how their orders were handled.
Automating your Dynamics AX system can help achieve the speed and efficiency you need from order processing. It brings together all departments that handle the order, from website or sales reps to warehouse staff. Tie in your website with other facets of your business, such as planning, manufacturing and distribution. Connect your suppliers and customers to your Dynamics AX 2012 system. Integrate your sales order processing closely to your website, and when customer orders arrive in your system they can be automated, and even transformed into purchase orders to your suppliers. With this they can benefit from more timely, accurate order information, with invoices sent and processed automatically.
Automating your internal systems may speed up order processing, but remember that some customers may still prefer personal interaction to maintain the customer service experience.
Ensuring that customer orders are delivered quickly and efficiently is integral to any e-commerce service. Delivering what you promised relies on seamless interaction between your business processes and the actual fulfillment service that you have. For those products requiring a physical delivery, the issues associated with conventional logistics need to be addressed alongside the technology needed to manage the process.
Dynamics AX 2012 do have many processes that can be automated, and many companies have already done this. Pretty much can be done without making customizations or choosing an ISV solution.
Let’s say we have the following simplified process:
Confirmation
I will not go through the recommended setup for automation, because this varies for very implementation
The first place we can automate is on the generation of confirmation. You can find the menu item under Sales and Marketing\Periodic\Sales Update\”Sales order confirmation”
Use the late selection option to make sure that the query specified is used every time the batch is executed, and also use the print management destination to control the printout or destination of the form letter. Then set the job into batch, and let it execute once a day, or as often as required.
Picking route
When the shipping date is closing, then release the picking route. You have several options here, but I’ll focus on the simple one. You can find the menu item under Sales and Marketing\Periodic\Sales Update\”Picking list”.
In addition to what is described on the confirmation, make sure that only confirmed sales orders are sent to picking. Also, if backorder handling is allowed, then enable the “Reduce quantity” so that the picking route is only released of items you have on hand. There is another option under the “other”-tab, called “Reservation”, that I would recommend checking that it is enabled, because then the items will be reserved against the order. When the picking route is printed, then pick the items. Put it into batch, and let it run as often as required.
Picking route registration (The manual step)
The next step in the process is that actual picking. Some companies choose to release picking routes, where the items already transactional picked, and this is a setup on the parameters. But I prefer and recommend the picking route registration screen, available as a menu item under “Sales and Marketing”\Journals\Sales orders\”Picking list registration“.
In AX 2012 the picking route can be printed with a barcode version of the picking route id, that can be scanned into the picking route field on top. The next step is to finalize the picking, and make the necessary adjustments on quantity, dimensions (like serial, batch, pallet id etc), and then use the “UpdatesàUpdate all/selected” to actually pick the items, and therefore also updating the on hand values correctly.
Packing slip update
The next step in the automated process is the packing slip update, that is available under “Sales and Marketing\Periodic\Sales update\”Packing slip”.
Choose only to packing slip update the picking sales orders, and print out the packing slip either send it automatically on email as a PDF to the customer, or even electronically as a ASN/XML to the customer. Depending on how the process is, the packing slip batch job can automatically be printed or sent electronically.
Invoice update
The last step in this automation of sales order processing is the invoicing. The menu item is placed at “Accounts receivable\Periodic\Sales Update\Invoice“.
Set the Quantity parameter to “Packing slip”, and the invoicing will invoice all packing slip updated sales orders. Set up the printout and use the print management destination setup to control where and what should happen with the form letter. Set up the batch-job to run periodically for automation.
Summary
There are many more options available in Dynamics AX 2012, for consolidation of picking, packing and invoicing, but my main message is to start to look into automating these processes to speed up, and reduce the time spent on routine tasks. Let your Dynamics AX 2012 be the engine that pulls the processes, instead of valuable people that needs to push the processes. This will free up time to other important tasks.
What I also want to mention is that when the requirements to automation increases, and you cannot find the solution to your problem in the standard functionality of Dynamics AX, then please evaluate the To-Increase Warehouse Management and Distribution. Here the automation has been lifted a few steps to support mass transactional processes and the integration to warehouse equipment and to freight forwarders.
The utilization of barcoding and barcode readers has transformed business efficiencies of an incredible number of businesses both large and small. Simple still effective, the bar code as an invention has made itself indispensable only by the multi-faceted advantages that it is offers to the user through the entire barcoding spectrum. Some of the killer advantages of these marvelous invention is.
1: Speed plus Accuracy
A really good information entry operator could enter a Twelve digit number (including product code one example is) on his PDA in approximately 4-5 seconds, but the average could well be more like 7 just a few seconds or more. The same operation in case performed with a bar code scanner would take just one flick in the wrist, less than a second. The use of the bar code scanners is unmatched to use ability to plough through significant volumes of these operations effortlessly. While an information entry operator will make keyboard errors whenever he types with data, the chances of a new barcode reader giving wrong output is actually nonexistent tending almost for you to zero. For all simple purposes, accuracy is exact, every time this barcode reader creates its flowing movements over the barcode.
2: Implementation Ease
You decide you need to start using barcodes to your products but are uneasy that you have never completed it before? Fear not, to get in 10-20 minutes of energy that scenario could possibly get reversed. The use of barcode readers is almost childishly uncomplicated with no prerequisite intended for usage. Not only can any individual do it, but they are able to do it quickly in addition for the learning curve of using barcodes is extremely steep and brief.
3: Bang for the dollar
If you could get information quickly in addition to accurately, it could exclusively mean a tighter provide chain and well-knit company processes based on these records. With superior information and facts, you can take excellent business decisions that increase shareholder benefit. Imagine what disastrous consequences incorrect info could have on your organization! A vast collection of bar code scanners and barcode code reader usage data has revealed that the investment made in this technology pays back in as short a time as 6 to 10 months ? Way faster in comparison with most modern technologies of which attempt to improve the approach we take to conduct our enterprise. Thus the bar code genre is one the place that the customer truly may get good value for money and high return on investment.
But there is more.
Did you know that Dynamics AX 2012 do have a complete platform for building barcode enabled functionality? Dynamics AX is already using this in several places to give us some idea of how it can be used. A EAN128 barcode label often looks like this.
One of the places where the use has been taken to the extent is in the arrival journal.
Here there is a field for scanning EAN128/UCC128 barcodes. The great thing about EAN128, is that is the barcode can contain multiple information. So in the example, I have included pallet/SSCC and itemId, and when is it scanned, the system will automatically fill in the fields for me :
To give you an insight, I have created the following job-code that shows how to use the barcode classes:
This will generate the following infolog:
In my example above in the item arrival journal, I just took the Barcode HR, then removed the (), and pasted it into the arrival journal, and then the decoding happened, and the fields where automatically filled in.
Out of the box, Dynamics AX can decode the following application identifiers of EAN128: (00) SSCC – PalletID. The item arrival journal will also create the pallet ID in DAX (01)+(02) EAN – Itembarcode, that will then identify itemid + product dimensions (10) Batch (21) Serial number (30) Quantity –
But do not despair if you feel something is missing. Microsoft has made it easy for us to extend the number of application identifiers, that we can fetch out of a EAN128 barcode. Take a look at \class\BarcodeEAN128 .classDeclaration(): for other EAN128 application identifiers see http://en.wikipedia.org/wiki/GS1-128
I also want to add that the To-Increase WM&D solution are using this technology several places, and I know that the functionality will be extended as the solution goes forward. The WM&D solution uses integration to BarTender to produce the labels, but Dynamics AX do have capability to print barcodes.
Today, companies management is expecting that the financial departments is contributing with up fresh data to support decisions and with a good overview over regulations.
If your answer is “no” to one or more of the questions below, you should continue reading to see how an effective and correct periodic closure can help your business:
• Do the financial functions deliver what they are supposed to, in an effective manner and at desired cost?
• Is reporting done in an appropriate manner?
• Is your company focusing on the appropriate management parameters?
• Does your company have the right competencies and capacities?
Experience shows that solid routines tied to an effective periodic closure gives:
• Improved reporting and basis for analyses
• Correct KPI’s and measurements
• Improved budget and forecasting, and follow-ups
• Effective transaction processes
• Effective operation and organization of the financial function
• More competent and content employees
An example of a periodic/monthly closure checklist with the use of Dynamics AX can be:
Date
Task/Description
Responsible
T-2
Open next period
T
Make sure that all delivered orders are invoiced (Status Sold)
T
Make sure that all received orders are posted (Status Purchased)
T
Updated exchange rated
T
Control and check all open finance/inventory journals etc.
T
Update fixed assets balance sheet
T+1
Carry out bank reconciliation
T+1
Draw balance list distributed by age, customers
T+2
Send out account statements/reminders to customers
T+2
Make sure that all costs of labor are issued and posted
T+2
Draw balance list distributed by age, suppliers
T+2
Carry out inventory/warehouse closing procedure
T+2
Post turnover
T+3
Close period
T+3
Draw trial balance
T+3
Draw profit and loss statement, balance report and division balance sheet
T+3
Draw stock value report and stock reconciliation
T+3
Draw cash flow forecasting and currency needs for the next period
T+3
Draw VAT-report, and report to authority
T+5
Report to management
(T = the first day in the next period)
This checklist will give your organization:
More effective periodic closure and reporting
Determined management and financial reporting
Effective budgeting, estimation and reporting
Improvement of structure and efficiency in the financial function
“Shared Service Center” and merger of financial functions possible
The current slotting in WM&D is based on Pre-slotting. This means that there is a system to do the slotting/location planning upfront. This works quite good in environments where they have a lot of picking locations, and where it is known what products that should be sold in the next period.
The main processes for doing pre-slotting is:
Select items that should be included in the slotting
Select locations that should be included in the slotting
Map items to locations in a “simulated plan”
Activate the location plan, and archive the old location plan.
In std DAX, the slotting is stored in a table called InventItemLocation, that looks like this:
Here we can see that it is possible to add one picking location per item dimension. In WM&D it is possible to have multiple picking locations per item dimension per warehouse. To make this possible, WM&D has created a “shadow” table that mirrors the InventItemLocation:
Then there is a possibility to have multiple planned picking locations per warehouse per item. In WM&D we also have the ability to simulate the slotting into a slotting plan, before activating it, and there is therefore a “plan” table exists (WeeInventItemLocationPlan). Since it is sensible to also track previous locations, an archive table exists (WeeInventItemLocationHistory).
But why am I writing this ? The reason is that I have extended the WM&D slotting with a new concept called Dynamic Slotting. I previously described the benefits for dynamic slotting can be seen here.
Dynamics slotting overview
Dynamic slotting—managing the physical location of inventory—is critical to workforce’s ability to fill orders quickly, accurately and safely. Dynamic slotting determines the best picking profile for the warehouse and suggests timely, intelligent adjustments as inventory trends change.
Dynamic slotting uses data on each product’s physical characteristics and order frequency to calculate a relative value for each potential slot position within the warehouse facility. The values for all products are aggregated. It then compares millions of slot combinations against user-configured strategies to determine the optimal layout for the warehouse.
As input data changes, such as seasonal ordering trends or new or discontinued products, Dynamic Slotting can incrementally revise its recommendations to keep the warehouse at maximum efficiency without costly overhauls.
Dynamic slotting can also track changing inventory to enable continual improvements. The Dynamic slotting can be used from day one to plan racking requirements and maximize capital investments in costly warehouse infrastructure.
Dynamic slotting automates and manages many critical warehouse slotting components, including:
Organize by velocity(real and expected) to maximize throughput
Balance volumes among the aisles to decrease bottlenecks
Identify golden zones to reduce worker fatigue and accidents
Keep similar items separated to reduce miss-picks
Group by product families to improve customer service
Optimize placement to reduce product damage
Determine optimal capacity of pick locations to reduce replenishment trips
Simplify picking by storing kitted items together
Apply customized filters to target specific SKUs for re-slotting
Automate the slotting process to minimize manual tasks
Dynamics slotting on top of WM&D
To implement dynamic slotting in WM&D I needed to extend the algorithms that WM&D are using. The WM&D has therefore been extended with the following functions/tools:
ABC – Classification of items To give the fastest items the fastest locations, will reduce the picking time. Pickers need to walk less, and the warehouse can deliver more within the same time. The main criteria for calculating this is to find a way to calculate item velocity. It is easy to calculate based on history, but if it is a new item, then a forecast must be applied.
The algorithm is very close to the std. ABC classification found on items, but here all items/sizes/configs will be classified as A, B or C, based on real and expected issues an item will have. I have also included a weighting of the items issues, so you could say that real picks should weight 60%, while forecast and ordered should weight 20% each. Then new items will get a proper A-B-C classification without that it has been in sale. The ABC value of item+dimensions is just a way of making things a bit easier for the users. Behind there exists a full transactional system, that evaluated many parameters, and also lets you correctly get the right ABC classification of new items without recalculating all items each time.
ABC classification of locations
To classify locations, a simple ABC classification PDA form has been created, that makes it simple for the warehouse worker to select which location should be classified as A, B or C.
The user just selects classification, and then starts scanning locations. What should be A, B or C location must be a subjective classification by the warehouse users.
Automatic weight and volumetric calculations Since WM&D can automatically record volume and weight of every inbound cargo, this information can be used to automatically populate the average weight and item volume. In std. AX weight and volume is properties on items, while on WM&D you can find these data also on the sizes. (note : Having it on inventDimCombination would be better, I agree)
Create a controllable picking sequence
One important aspect we see, is the ability to pick as fast as possible, by minimizing the walking time. We need the ability to pick ascending and descending according to the Aisle. To control this, WM&D will use the sorting criteria on the Aisle Register :
The descending field (that is a std. ax field), will both control the locations sort-code, but also in witch direction the aisle will be picked in a consolidated picking scenario using PDA’s.
If we mark that each rack is an Aisle, then WM&D is able to create a consolidated picking route like this:
If we define that an Aisle is the “space” between the racks, then WM&D is able to create a consolidated picking route like this:
This will save up to 20% in walking distance, because an aisle is picked in a “zig-zag” picking pattern.
Hot-spot analysis
To make sure that we don’t get “hot-spots” in the warehouse, the dynamic slotting will try to balance and spread out the “hot”-items through the warehouse. This is done by maintaining an expected pick load (Hot-spot sort-code) per aisle. The algorithms is making sure that as soon as a “hot” item has been slotted to an aisle, the aisle will be sorted/prioritized down at the next dynamic slotting approach. This will evenly balance the pick-load per aisle.
Release locations that are no longer used. The first step was to create a system that automatically free up space in the warehouse. Without making locations as free, I cannot start using it for other items. I therefore created a class that looks on on-hand of an item, to see if the current fixed location could be released. This is a typical scenario in the retail industry, where products are only purchased in a defined quantity.
What this program remove current location from the location plan, if the on-hand is zero, and there are no expected receipts. When the items arrive again to the warehouse, the put-away will dynamically find a new location for the item.
The actual dynamic slotting The dynamic slotting works like this. When there is a receipt (from a purchase, or internal transfer) or an internal replenishment from a Buffer Location to a Picking location, then the dynamic slotting will first check if the item do have a fixed location, else give the item a fixed location, that suits the velocity criteria for the item. Not many nice forms to show this, but you can see the results in the WM&D location planner :
But we see that “A”-items gets allocated to “A”-locations automatically. What we also have seen in the live customer environment, is that the picking now takes drastically shorter time. Here is a real life example from a consolidated picking route :
58 pcs has been picked from 9 locations, within 5 minutes. If we estimate around this, it means that with the new Dynamic Slotting it could possible for a single picker to pick from more than 100 locations per hour, and in a full working day this would be 750 locations and, with an average of 4 pcs per location, this could mean more than 3000 pcs per picker per day.
Disclaimer:
The solution shown here is not a part of standard WM&D, and has therefore been built as a customer customization on top of WM&D.
At a customer site, we sometimes saw that the recid is “jumping” in Dynamics AX 2009. We cannot explain why, but it seems to happen a few times every year. To deal with this, we created the following SQL trigger :
Thanks to FSB-development that came up with this. I share it to the community, because it would be easy to modify for other purposes.
First I would congratulate Microsoft with the release of Dynamics AX 2012. It looks very nice, and we get very good feedback from the marked on it. But this blog post is questioning the statement that AX 2012 is much faster than AX 2009. The reason why I raise this is because I often feel that the AX 2012 actually is slower than AX 2009 when it comes to opening, and using AX forms. I was then wondering if it could be related to the fact that I was using the Hyper-V image from Microsoft. I also wondered if it could be related to the hardware we used. To check out this, I decided to make some simple tests to compare AX 2009 to AX 2012 performance.
The first thing I did was to eliminate hardware restrictions. I get a new portable PC, with 8 CPU cores, 16 Gb RAM and 2 SSD disks. I then installed Windows Server 2008 R2 and MS SQL 2008 R2 with all updates from windows update. I then also installed AX 2012 locally from scratch, and applied the Cumulative 1 to the AX installation.
Then I decided to look into the form/List page “All customers”( CustTableListPage), because this form is functionally quite similar to AX 2009.
AX 2012 CustTableListPage form
AX 2009 CustTableListPage form
I then focused on opening this form, and time it. To get the best results as possible, I decided to open the form a few times before I started to time the opening of the form, to make sure that the AOS and SQL server had cached every thing in memory.
My findings was this:
Form name
AX 2009
AX 2012
CustTableListPage
1.4 seconds
3,83 seconds (With Aero)
3,5 seconds (Without Aero)
I have retried in several different environment and configurations, and the results are pretty much the same AX 2012 is SLOWER than AX 2009, when it comes to forms. And 3-4 seconds to open a form IS regarded as slow, because we often get the response requirement from customers.
I decided to see where AX 2012 is actually using time, and therefore started using the code profiler to time the AX 2012 with and without AERO
Form name : CustTableListPage
Duration
Method calls
AX 2012 with Aero (client)
3835150,0000 ms
790
AX 2012 without Aero (client)
3470196,0000 ms
745
AX 2009
1413078,0000 ms
253
We see that AERO enabled, the client actually needs to perform 45 additional method calls when opening this form on AX 2012, but the number of method calls compared to AX 2009 is more than doubled.
Here is the profile for when opening the form in AX 2012:
We see here that AX 2012 uses a lot of time in the SysSetupFormRun.init(), and that the SysSetupFormRun.loadUsersettings() is actually loaded 10 times. The reason for this is the fact boxes related to this form.
If we hide the fact boxes, we get a much better performance :
Form name
AX 2012 with fact boxes hidden
CustTableListPage
2.0 seconds
In the profiler we see
So the conclusion is, that to speed up the AX 2012, reduce the number of fact boxes that is loaded, because for each fact box added to a form, the SysSetupFormRun.loadUserSetting() is slowing your system down. To hide fact boxes, the following can be done :
Also remark that AX 2009 is faster, because of fewer method calls. AX 2012 seams to redraw the screen for each loadUsersetting.
PS! It would be fun to compare AX 3.0 to AX 2012. Here I think the difference would be even larger.
The new version of Dynamics AX 2012 looks very nice, and it can be downloaded from Mircosoft partner source.
But one of the initial reactions to the released hyper-V, was that I experienced that the performance was poor. I especially saw that refreshing forms took several seconds. We quickly saw that it was not lack of hardware, because the hyper-v was allocated with 16 Gb ram, 4 CPU cores and a raid for disk.
But I found a solution that worked perfectly for me :
In standard AX the production module do have a separate process of generating picking routes, but it is possible to set up std. AX so that consolidated picking routes are generated. The advantage is that then the picking routes generated from production is the same as picking routes from sales and transfer orders. Then the warehouse workers will use the same picking screens and processes regardless of there the picking process is initiated from.
Production Picking
While processing the production order, it is important to have required goods picked from the respective location at appropriate time. While working with large scale warehouses having bulk locations for picking goods, it is highly required to have optimized production picking to save the cost and time. This has become a challenge for the warehouse managers to transfer all necessary goods to the shop floor in an optimized way.
Using the WM&D production picking process, all goods required at shop floor will be shipped at once and would guide Fork lift or conveyors to optimistically do the picking and shipments.
This article explains the functionality of and how to use the production picking.
Process description
Understanding Production picking process integrated with Standard AX
Production picking would require consolidated picking setup to be done. Once the consolidated picking process is setup for the production order, the picking process will use shipments to complete the picking.
Please find below the process flow from Production order to picking of goods using forklift. This is explained in below section:
Please find the reference of the statuses for orders based on specific setup and using the above work flow:
SNo
Steps
Production
Shipment
Inventory Transaction
Status
Picking Status
Status
Pick
Issue
1
Production Order
1.1
Creating Production Order
Created
None
No Shipment
No Shipment
No Transaction
1.2
Update-> Job Scheduling
Scheduled
On Order
No Shipment
No Shipment
Reserved Physical
1.3
Update-> Release
Released
Picking Now
Reserved
Registered
Reserved Physical
2
Shipment
2.1
Functions-> Activate
Released
Picking Now
Activated
Activated
Reserved Physical
3
ForkLift Main Menu
3.1
Consolidated Picking
Released
Picking Now
Activated
Activated
Reserved Physical
3.2
Select Shipment
Released
Picking Now
Activated
Activated
Reserved Physical
3.3
Selected
Released
Picking Now
Activated
Activated
Reserved Physical
3.4
Picking Routes
Released
Picking Now
Activated
Activated
Reserved Physical
3.5
Select Picking Routes
Released
Picking Now
Activated
Started
Reserved Physical
3.6
Scan Location
Released
Picking Now
Activated
Started
Reserved Physical
3.7
All Items are Scanned
Released
Picking Now
Activated
Started
Reserved Physical
3.8
Scan Cargo Label
Released
Picked
Picked
Started
Picked
4
Production Order
4.1
Update Start
Started
Completed
Deducted
Setting up base setup for Production Picking
Consolidating picking should be setup for one of the following to get the Output Order
Inventory Model Group
Selecting “Consolidated picking method” for Inventory model group will use shipments and picking of multiple orders as the mechanism.
Warehouse
The setting can be overruled on warehouse as it might and might not be required per warehouse.
Warehouse Items
The setting can be overruled by Warehouse Item as consolidated picking might be or might not be required.
Production Order using WM&D
WM&D supports consolidated picking for production order and helps to override all settings and use as per the needs of the production.
Default setup for WM&D as per the warehouse is done in Parameters form of WM&D
Production order could overwrite all setup for consolidated pickup in Setup tab which is initially setup as per the default setup of WM&D.
Setting up Shipment Template
Automatic Shipment Creation should be checked and appropriate criteria should be setup to make it work with Production orders.
To setup shipment template, following are the pre-requisites as per standards AX, please look in the Standard Ax for further details.
Setting up Shipment Reservation Combinations
Setting up Shipment Reservation Sequences
Processing Steps for Production Picking using Consolidating Picking Setup
Production picking process using consolidated order
Production Order – Create Production Order
The Production Orders form can be opened from Production > Production Order Details.
Create a new production order and fill the required details.
Production Order – Update Job Scheduling
Run the process of Job Scheduling.
Production Order – Update Release
Select Release to release the production orders that are ready for the shop floor. This will in turn create Output order so to start the picking process of the raw material.
Find shipment related to production order
The shipment is created for the production order to support the picking and shipping it to the location.
Locate the production reference by looking into the General Tab of the Shipment Lines as shown below:
Shipment – Activate Shipment
Activate the shipment after confirming the details so it can be located by the forklift driver to pick the inventory. This will change the Pick status of the shipment to be “Activated”
Forklift Main Menu – Select Consolidated Picking
Forklift person will be working on his forklift menu and will looking in the consolidated picking list.
Select Shipment
Select all the shipments until ready to start picking up of the goods.
Selected Shipment
Select “Selected” to see the selected shipments.
Picking Routes
Select “Picking Routes” to see other details related to the goods that need to be picked.
Select Picking route and Scan Location
Select the picking route will change the Pick status of the shipment from “Activated” to “Started“.
Scan the location from where the goods need to be picked.
Scan Item
Scan the items that is picked for the shipment
Scan Cargo and Print Cargo
After finishing with scanning of the items, scan the outbound cargo which will be used to ship the goods. Scanning the Cargo will change the Production Pick Status to “Picked“.
This will also change the Inventory Transaction to “Picked“.
Once done, print the Cargo details to be pasted on the shipment.
Production – Update Start
Starting the production order by posting the picking list will change the pick status to be “Completed“. This will also change the Inventory Transaction status to “Deducted“.
This article is about the value added services(VAS) module in To-Increase Warehouse Management and Distribution solution for Dynamics AX 2009.
VAS = Value Added Services
Value Added Services is among the crucial elements of any supply chain management system. It enables companies to adopt postponement strategies and mass customize products at the time of distribution and fulfillment to ensure customer requests are fulfilled correctly at the lowest total supply chain cost. Companies get greater ability to accommodate rapidly changing customer tasks and product requirements, get more flexibility over their inventory, reduce inventory on hand and product obsolescence, highly improve customer service.
The Value Added Services module of the Warehouse Management and Distribution solution enables assembly and kitting right in the distribution center. It facilitates personalization and other product enhancements, single and multi-station kitting and assembly, packaging and labeling operations for existing products, and complex final assembly operations for customer-specific products, all encapsulated in a very intuitive and easy to use interface, from creating Value Added Service by an operator and to guiding a VAS worker though all the required steps with touch sensitive station interface.
Build on Inventory
One important requirement met developing the VAS extension is the customers’ ability to customize which services the company offer and at what price. Because VAS is based on the standard Dynamics AX Inventory functionality, the VAS extension not only offers new functionality to DAX but also exploits the many great features build into the inventory module.
This means that all the standard DAX features, in relation to inventory items, also is available for VAS services – for example setting up multiple languages, pricing, trade agreements and forecast etc. A VAS service is simply an item in the Inventory management module, but of the type “Service”.
To turn an item into a VAS service, simply check the “Value Added Service”-check box on the Item details form (Inventory management > Common forms > Item details, and select the Setup tab page). This automatically creates a VAS template, available in the VAS templates form.
Furthermore, the VAS service, when it’s requested by the setup, will automatically keep synchronized with the corresponding service item on the sales order, enabling you to utilize the standard sales order functionality of fetching the price and discount agreements on the service, as well as invoicing the customer.
Setting up Value Added Services
This section describes how all the VAS related tables are related to setting up VAS and how they influence the way VAS is processed.
The VAS Templates form
The VAS Templates form (Warehouse Management and Distribution > Setup > Value added services > Templates) displays the VAS templates, i.e. those VASs that the company has chosen to offer customers.
There are 2 types of VASs in the system:
those that are represented by the service item and therefore are offered, then taken as order and finally invoiced to customers,
and another type that is not bound to a service item and do not incur customer involvement, but rather can be treated as a service that is not charged and unknown to the customer, but on the other hand is required in the chain of VAS operations and similarly carries a bunch of tasks that a warehouse VAS performer will take as instruction and accomplish.
Field
Description
Service ID
Is bound to a service item, this field is service item id, otherwise it contains VAS id value.
Service
Specifies if VAS is bound to a service item.
VAS
Name of a VAS
Type
Type of VAS, can hold the following values:
Item – VAS is related to a source order line (for example, sales line). This type is not available for a template.
Action – a default VAS represents an operation that needs to be done and doesn’t fall into other types.
Label – service of labeling goods, for this VAS type, label type id field must be filled in.
Package – operation of packing goods.
Assembly – operation of assembly or bundling goods.
Root – root of VAS order, this type is not available for a template.
Cost code – VAS representing misc. charges. This type is not available for a template.
Action
VAS Action group, used mainly for filtering purposes.
Sequence
VAS Sequence group, defining the order in which the service will be operated in relation to other services. For example, programming or localization of goods must be done before assembly or packing and other actions.
Action text id
Link to an action text – record containing detailed text and html description of a task in specified languages that a warehouse VAS operator will read and do in line with.
Action
Text description of VAS from Action text.
Quantity
Default quantity of a VAS.
The VAS Action groups form
The VAS Action groups form (Warehouse Management and Distribution > Setup > Value added services > Action groups) are a VAS attribute and used for workstation capabilities setup (refer to VAS Processing chapter).
Field
Description
Action
VAS Action group identifier.
Service
VAS Action group name.
The VAS Action sequence groups form
The VAS Sequence groups form (Warehouse Management and Distribution > Setup > Value added services > Action sequence groups) are used as a VAS property to establish the order in which services are performed. The less the value field, the earlier a service is going to be performed.
Field
Description
Sequence
VAS Sequence group identifier.
Name
VAS Sequence group name.
Value
Actual sequence.
The VAS Action texts form
The VAS Action text form (Warehouse Management and Distribution > Setup > Value added services > Actions) is a set of guidelines specifying all the required actions that a warehouse worker needs to perform to fulfill a VAS. The service fulfillment description can either be placed in the Action field or as an html page, using the Edit button. The latter option enables users to use different fonts and add pictures to the html document.
Since the warehouse staff often speaks different languages, action text supports multiple languages. This is set up in VAS parameters form (Warehouse Management and Distribution > Setup > Value added services > Parameters).
When creating a new action text, the system automatically creates records for all languages set up in Parameters, and records with no text appear with a warning icon.
Field
Description
Action text id
Action text identifier.
Language
Action text language
Action
Description of an action.
Html
Description of an action.
Language (Search)
Filter by language.
Text (Search)
Filter by action, separate words in the field are applied as range criteria with OR operator.
The VAS Customer groups form
The VAS Customer groups form (Warehouse Management and Distribution > Setup > Value added services > Customer groups) are used for setting up the automatic creation of VAS. A VAS customer group classifies customers into groups for which the same VAS applies. The groups are available for selection on the VAS auto. creation form, and when orders are created for these groups, the VAS lines are automatically applied to the order.
Field
Description
VAS group
VAS Customer group identifier
Name
VAS Customer group name.
To assign the group to a customer, open the Customer details form and on the Sales order tab page, specify a customer in VAS group field. The group from the customer is automatically transferred to a sales order, and can be found and changed in the Sales order details form, on the Setup tab page.
The VAS Item groups form
The VAS Item groups form (Warehouse Management and Distribution > Setup > Value added services > Item groups) are also used for setting up the automatic creation of VAS. A VAS item group classifies items into groups for which the same VAS applies. The groups are available for selection on the VAS auto. creation form, and when orders lines are created for these groups, the VAS lines are automatically applied to the order.
Field
Description
VAS group
VAS Item group identifier
Name
VAS Item group name.
To assign the group to an item, open the Item details form and on the General tab page, specify an item in VAS group field.
The VAS Parameters tab page
The Value Added Service parameters form (Open the menu: Warehouse Management and Distribution > Setup > Parameters, and then select the VAS tab) displays the setup for the module.
Field
Description
Language
Supported VAS language.
Description
Language description (read only).
Setting up VAS integration on workstations
In the Warehouse Management and Distribution solution a warehouse worker can be bound to a workstation. This defines their functional responsibilities, i.e. operations that they can fulfill.
In relation to VAS processing, a workstation is a required element. Processing different VASs requires different technical, organizational warehouse facilities and different worker skills. That is why workstation capabilities in relation to VAS processing must be defined and setup to process VAS.
To setup a workstation to utilize VAS capabilities, open the Workstation form (Warehouse Management and Distribution > Setup > Inventory equipment > Workstations) and on the VAS tab page add the action groups (described earlier in this document) that is allowed to be processed on this particular workstation.
Setting up Automatic creation of Value Added Services
Automatic creation of VASs is effective when customers always use some services meeting specific criteria.
You can specify automatic VASs for:
A specific customer account, a group of customers, or all customers.
A specific item, group of items, or all items.
A combination of the above. VASs can, for example, be added when a specific customer buys a specific item.
Open the VAS auto creation form (Warehouse Management and Distribution > Setup > Value added services > Auto setup).
The Level field
There are 2 types of automatically created VASs which correspond to the Level field at the top of the form:
Field
Description
Main
This level, adds VASs to the whole order, not depending on a particular order line. Therefore, for this level, the VAS item criteria tab page is not available. This feature is for example used, if you want heat treated packing materials for all shipping to specific regions.
Line
This level, VAS must be setup on both the VAS relation and VAS item criteria tab pages, and will be applied to every order line that matches the criteria. This feature is for example used, if labeling of some item groups for a particular customer is wanted.
The VAS relation tab page
Field
Description
Auto setup
Description of an entry.
Account code
Specifies whether the VAS is to be created for a specific account (Table), a specific account group (Group), or for all accounts (All). If you select All, the remaining fields cannot be specified.
Relation
If the value in the Account code field is set to Table, specify the account number for which the VAS is to be created. If Group is selected in the Account code field, specify the VAS customer group for which the VAS is to be created. If All is selected in the Account code field, the VAS lines will be created for any customer.
VAS
VAS to be created.
Active
Specifies if the entry is active.
The VAS item criteria tab page
Field
Description
Account code
Specifies whether the VAS is to be created for a specific account (Table), a specific account group (Group), or for all accounts (All). If you select All, the remaining fields cannot be specified.
Item Relation
If the value in the Account code field is set to Table, specify the item number for which the VAS is to be created. If Group is selected in the Account code field, specify the VAS item group for which the VAS is to be created. If All is selected in the Account code field, the VAS lines will be created for every order line.
Quantity criterion
Minimum order line quantity required for VAS to be created.
Active
Specifies if entry is active.
Integrating VAS with the Packing station
When a picking list is processed at a Packing station the system checks for the presence of unfinished VASs. If one or more VAS lines are not completed, it is not possible to proceed with the packing procedure, until all VAS lines are completed.
VAS integration on the Packing station form is visualized by changing the label of the Finish-button from “Finish” to “Perform VAS”. When the user selects the button the VAS processing form appears.
Processing Value Added Services
The VAS designer form
The VAS designer form is the main form in Value Added Services. Here you design the VASs attached to an order. This form is opened from a sales order form (Accounts receivable > Sales order > Setup > Value added services).
The VAS tree window
This section displays a hierarchy of all VASs for an order. Each VAS type has its specific icon in the tree.
In order to add a VAS service to an order, simply drag a VAS template line or order line and drop it on the needed node of the tree, the VAS edit dialog will appear and after closing it, the VAS will be created in the system.
There are some rules for creating VASs hierarchy:
Root node – is a system node, it cannot be deleted or modified.
Assembly and Package type nodes can have several sub nodes.
Action and Label nodes can have only one sub node.
Item node, representing an order line can have several sub nodes of types Label or Action, called Flat actions, which in their turn cannot have any sub nodes.
The total order line quantity cannot exceed the origin order line quantity.
The VAS details and Dimensions tab page
The VAS details tab page and Dimensions tab page display main attributes of VAS, corresponding to the currently selected tree node.
The VAS template lines tab page
The VAS template lines tab page displays a list of VAS templates currently available. These templates can be used to build up a set of VASs connected to the order.
The set of filter fields includes:
Action – Action group filter
Type – VASs type filter
Acton text – filters by action, separate words in the field are applied as range criteria with OR operator.
The Order lines tab page
The Order lines tab page shows the lines of the order VAS is designed for.
The Setup tab page
The Setup tab page contains a number of VAS tree options.
Group
Description
Item
Specifies what information should be displayed on tree nodes of Item type.
Setup
Confirm deletion – checked, dialog confirmation required when deleting node.
Edit when adding – checked, VAS creation form appears on adding the node.
Text format in order items
Displays what data is displayed on tree nodes of Item type.
Used symbols
Shows icons that are used on the tree depending on the node type.
The VAS Designer button panel
The button panel to the left contains buttons representing the following main functions:
Button
Function
Add
Opens the VAS creation dialog. The VAS will be added to the node currently selected.
Edit
Opens the VAS edit form
Delete
Deletes the VAS selected in the VAS tree.
Template
Adds the selected node to the VAS templates.
Order synchronization
The source order is synchronized and kept in consistency with the VAS connected to it:
The total order line quantity cannot exceed the origin order line quantity. If the quantity in the order line is decreased and the VAS quantity related to this order line is larger, the user has to adjust the VAS quantity first.
When a VAS that is invoiced to a customer is added, the system automatically adds the order line with the corresponding quantity to the order, and vice versa, order line will be deleted or quantity adjusted if a VAS is deleted or its quantity corrected.
The VAS processing form
The VAS processing form, if not opened from the Packing station form, can be opened from Warehouse Management and Distribution > Value added services processing. The form is designed with touch screen capabilities.
Action + Text tab page
The Action grid is comprised of the following fields:
Field
Description
Scan document
A sales order id or a picking list id can be scanned into the Scan document field. As soon as the document is scanned, the user is presented with the first action to be processed.
Tag
Displays the tag that the current item, assembly or package needs to be marked with. When tag is required for an action, a corresponding message appears in the message area below. (Tag is explained in detail in the scenario later in this chapter)
Action tab page
The Action tab page displays the guidelines of processing the next VAS to a VAS operator.
Text
In the Text field there is action description in the current user language.
Processing item tab page
In the Processed item grid the following fields are displayed:
Field
Description
Item
Item number if action is to be applied to an item, or element type (Package or Assembly), if action is to be applied to an Assembly or Package.
Name
Item name if action is to be applied to an item, or element tag, if action is to be applied to an Assembly or Package.
Quantity
Quantity that the action is completed for.
Information grid
At the bottom of the form an information grid log is located which displays all the system messages.
Button panel
The following buttons available in the screen:
Button
Description
Clear journal
Clears the Scan document field and results of previous activity.
Confirm
Confirms the current action.
When the VAS operator completes the VAS they have to click this button to confirm that the service is completed.
The button label have the following format “Confirm X of Y”, where X is the number of current action and Y is the total number of services on this workstation to fulfill.
This is also a progress indicator for the VAS operator.
Confirm all
If the VAS operator has to complete several of the same action, for example if it is required to label 20 of the same items, using the “Confirm all (X)” confirms all 20 actions in one click.
VAS operator prints all 20 labels and sticks them to items, and then, in one click, confirms all 20.
Show instructions
Hide instructions
Toggles between showing the Instructions tab page with HTML rich description or the Text tab page.
Log
Displays the VAS log.
Print label
Becomes available when a VAS of type Label is current. Activating the button prints the label on the workstation printer, using label type and data specified on the VAS.
Print all labels
If the VAS operator must print labels for a number of equal items, using the “Print all labels (X)” button prints all 20 labels in one click.
Instructions tab page
Using the button Show/Hide instructions toggles between showing the Instructions tab page with HTML rich description or the Text tab page.
Log + Overview tab page
The Log + Overview tab page displays the full list of VAS operations that is applicable to the sales order. The user can view all the VAS line details and re-print labels for label services.
In the Log + Overview tab page the following fields are displayed:
Field
Description
Sequence
Sort order, in which the VASs must be completed.
Log type
Operation log type:
Process able
The VAS action can be completed on the current workstation. I.e. no other VAS action at other workstations must be completed before this VAS action can be completed.
Confirmed VAS action is completed.
Other workstation processing VAS action must be completed at another workstation.
Other workstation processing prerequisite VAS action must be completed at another workstation as this VAS completion is a prerequisite to start completing VAS actions at the current workstation.
Depending on the type, the grid-lines are colored with:
Gray color when VAS is confirmed.
Green when it is Process able.
Red otherwise.
VAS
VAS identifier.
Name
VAS name.
Quantity
Quantity of VAS.
Confirmed
Quantity of VAS already completed.
Tag
Tag which this VAS action must be marked with.
Print label
The Print label field holds a printer icon if the VAS action is of type Label. Clicking on the icon prints the corresponding label.
The Processed item tab page
The Processed item grid contents are identical to the one on Action tab page, showing processed items of the log operations.
The following buttons are available here:
Button
Description
Show text
Opens the Text tab page where action text is displayed. Double click on text will maximize the Text form.
Show instructions
Opens the Instructions tab page where html instructions are displayed. Double click on content will maximize the Instructions form.
Show log
Opens the Overview tab page.
Action
Opens the Action tab page.
Scenarios for Value Added Services
Scenario 1 – Creating a sales order with a invoiced gift packing VAS
A customer calls our company and places an order for 1 “Sony Vaio Laptop, model X1” and 1 “Logitech Anywhere Mouse MX”. Besides that, the customer orders some VASs: he requires that this order is packed into a gift package, our service SRV0004.
Susan, the order processor, creates a sales order and adds the needed lines.
She then opens the VAS Designer to add required VASs. She drags and drops the VAS line template with service id SRV0004, “Gift packing”, and clicks Ok in the VAS create dialog.
She then adds (drags and drops), from sales order lines, “Sony Vaio Laptop, model X1” and “Logitech Anywhere Mouse MX”. Quantities are 1 by default.
The VAS structure now looks the following way:
When Susan returns to the sales order form, having refreshed it, she finds that the system has added the service as a sales line. Therefore this service will be included in the invoiced.
This completes Susan’s work.
Scenario 2 – Creating and process a sales order with co-packing, labeling and pre-configuration of an item
One of our customers, a retail company, has planned to run a campaign. To boost the sales of the Sony Vaio Laptop, model X1, they plan to give away a Logitech Anywhere Mouse MX. They also want the laptop and mouse packed together (service SRV0006, Co-packing, default band) and the package labeled with a special promotional label (SRV0005, service Color label, 100 X 200). Finally, since they see the growing demand for Microsoft Windows 7 Home Edition OS, they want the laptops to be pre-configured with this software installed (service SRV0003, Installing Microsoft Windows 7 Home Edition). The customer calls the company and places an order for 20 units.
Susan, the order processor, creates a sales order and adds the needed lines.
She then opens the VAS Designer to add required VASs. She drags and drops a VAS line template, service SRV0005, “Color label, 100 X 200”, specifies the label type in the creation dialog, keeps the quantity 1 and clicks Ok.
Then as a sub-node of labeling, she adds VAS line template service SRV0006, “Co-packing, default band”, with the quantity of 20.
Then as a sub-node of co-packing, she adds items from the sales order lines “Sony Vaio Laptop, model X1”, and “Logitech Anywhere Mouse MX”, both with quantity 1.
Finally, she adds SRV0003, “Installing Microsoft Windows 7 Home Edition” as a sub-node to the “Sony Vaio Laptop, model X1”.
The VAS structure now looks the following way:
This completes Susan’s work.
John, the warehouse worker, picks the items into a pick basket and places it at the VAS station.
Sammy, the VAS operator, scans the picking list number into the Scan document field and is presented with the first action on the screen:
Sammy notes that he needs to install Window 7 on the laptop but in the information window he also notes that 20 similar actions need to be done.
Sammy then carefully reads the instructions and installs OS in all 20 laptops.
When finished, he clicks the Confirm all (20) button. This updates all 20 actions and brings up the next action.
The next action is to bundle together one laptop and one mouse. The number of those bundles to be created is 20 (according to the information window) and moreover every bundle must be marked with tag “1”.
Sammy completes the bundling and sticks a tag “1” to every bundle.
When finished, he clicks the Confirm all (20) button. This updates all 20 actions and brings up the next action.
The next action is to label all packages with tag “1”. Those are the packages that he marked with this tag at the previous step. In Order to print all labels in one go, he clicks Print all labels (20) button.
When finished, he clicks the Confirm all (20) button. This updates all 20 actions and brings up the next action.
Finally, Sammy is informed that all VAS lines are completed and that he can scan the next picking list.
Sammy puts the packages into the pick basket and then places it at a packing station.
Lisa, the warehouse packer, packs all the packages into a carton and adds filling.
Lisa, prints and attaches labels to the carton and ships the goods.
This completes the scenario.
Scenario 3 – Explaining the use of “tags”
A customer ordered 5 DVD players. One of those is to be shipped overseas by our customer. As result of this request, and only for the DVD player that is to be shipped overseas, the customer has requested:
DVD player customized to the regional setting required in this area.
Packed with additional filling to make sure it will be shipped unbroken.
The procedure at the warehouse is then:
Susan, the order processor, creates a sales order and adds the needed lines.
John, the warehouse worker, picks the 5 DVD players into a pick basket and places it at a VAS station.
Sammy, the VAS operator, customizes one of the DVD-players, returns it into the pick basket and then places it at a packing station.
Lisa, the warehouse packer, packs; 4 DVD players into one carton, 1 DVD player is packed with additional filling into one carton.
Lisa, prints and attaches labels to the cartons and ships the goods.
This completes the order processing.
The issue that arises here is that after customizing one of the players, it will be put back into the pick basket. When all 5 players arrive at the packing station, Lisa is asked to pack the customized DVD player into a separate carton with additional filling. Lisa must be able to differentiate which DVD player that was customized.
This is addressed by introducing tags, or stickers. Tags could be small labels that are attached to items, in order to identify them later on the VAS route. Using the VAS system, all items in the sales order that need recognition among the same items further down the VAS route, will automatically be assigned a tag. The tag is numeric and starts from 1.
The procedure for attaching tags is:
At the VAS stations, the user has pre-printed tags from 0 to 9.
The system assigns a tag for the item; the user is prompted to stick the tag to the item.
The packer at the packing station is informed that specific packaging is required for the item with tag “1”.
Scenario 4 – Automatic creation of Value Added Services
One of our customers is located in a region where shipping requires usage of heat treaded materials. In addition, it requires that all goods that are sold to them are specifically labeled.
In order to make those services applied automatically, the following procedure must be followed:
Susan, the order taker, opens the VAS auto creation form and creates the following entry on the Main level:
She then switches to level Line and creates a line where she specifies the customer and VAS applied (Labeling) on the VAS relation tab page, and finally activates it.
On the VAS item criteria tab page she then creates a line and specifies Group as an Account code and selects that group in the Item relation field to which a set of items should already be connected. Again she checks the Active field to activate the criteria and saves the record.
Now Susan creates a sales order for Customer 1101, Forest Wholesales, comprised of 50 pieces of “Sony Vaio Laptop, model X1” and 20 pieces of “Logitech Anywhere Mouse MX”. After creating the sales lines and refreshing it she notices that 3 extra sales lines were automatically created.
The VAS structure will be the following
This concludes the detailed description of Value added services module with the To-Increase Warehouse Management and Distribution for Dynamics AX 2009.
This article describes kitting from a sales perspective. Another article will be published later that deals with the execution of the kitting and value added services(VAS).
Assembly and Kitting is a great alternative for companies that are not equipped with finished goods warehouse facilities or cannot afford the capital expenditure of setting up a finished goods warehousing facility. Your company can take advantage of the services that are necessary to forward a product to market quickly. Assembly and Kitting support the assembly of products in boxes, shrink wrap, blister, or clamshell packaging.
Some companies require assistance preparing their product for shipment and display. There is a better chance of selling your product if it is accurately packaged and prepared for market. There is nothing worse than excitedly opening a new item just to find that pieces are missing from the package.
An example of how Assembly and Kitting could work:
You have several items that belong together in a package. In an assembly line, each individual in the line subsequently adds another component to the package in a specific order. This ensures that everything is included in the package. At the end of the assembly line, an individual conducts a quality review. Part of that review could include weighing the package. If the weight of the package is accurate, then all the parts have been included; no more no less. If the weight is incorrect even by a couple of ounces, then it means that either a component is missing or there is an additional part.
Assembly and Kitting allows the warehouse to build an order for shipping then distribute or store it. Getting the distribution center to kit your products not only prepares the items for distribution, but may also save your company money, because you do not have the labor costs and capital expenditures to deal with.
Kitting and sales order
One of the requirements is to show the kitting structure in the sales order form in Dynamics AX. Kitting stipulates that there is a hierarchy of items, where only the bottom level is real items that are purchased, stocked and priced, while the upper levels are phantom BOM items. When a customer orders a product, the customer only need to relate to the uppermost BOM-level, while the warehouse workers are picking the actual contents of the kit.
Explosion
Explosion of a phantom BOM items on a sales order is built into the order line processing procedure, the procedure that takes place every time a sales line is inserted, deleted or updated. A parameter field “Kitting” is added to the item table (it is available for BOM and phantom items only). This parameter defines if a BOM item is exploded on sales line processing. Moreover, value added service (VAS) orders is automatically created upon adding such kitted items to the sales order, in order to secure that the items will be packed accordingly. The VAS orders will also ensure that we always have a combined delivery (that we cannot deliver one of the sub-lines, but must deliver the entire kit).
Explosion of BOM item is performed on all BOM levels and all the phantom BOM levels create sales lines marked as a kit, while real items create normal sales lines. The relation between levels for the Kit sales lines is established via a new reference field on sales line. When using the sales order screen, the order looks just like the normal sales order screen:
By clicking on the “Show kit lines”, all lines are shown inside each kit:
The bottom-level sales lines (real stocked items) should be editable only in terms of unit price, line discount amount and multiline discount amount, the rest: quantity, delivery dates, etc. should be derived from the uppermost line. The structure of BOM cannot be manually adjusted: sales lines that are sub levels of the top phantom BOM cannot be deleted manually.
Price and discount calculations
Price amounts and discount amounts are set on the lowest level of BOM only. The price on the upper level is always the sum of the sub lines.
Field
Calculation direction
Sales quantity
Calculated downwards
Unit price
Calculated upwards
Discount amounts
Calculated upwards
Discount percent’s
Calculated downwards
Line amounts
Calculated upwards
Inventory transactions to kits
The final kits do not have inventory transactions. The reason for this is that kits are “virtual items” that do not need a physical picking. It is the sub-components that are picked. Kits are still being packing slip updated and printed on the invoice.
Setting up Assembly and Kitting
This section describes how all the Assembly and Kitting related tables are related to setting up Assembly and Kitting and how they influence the way Assembly and Kitting is processed.
The Kitting form letter setup form
The display of the kitting structure can be shown per item and customer on confirmation, packing slip and invoice. To handle this, a new form Kitting form letter setup is available. This form is following the standard “Table, Group, All” Microsoft Dynamics AX pattern. Here the user can specify if the kitting structure is printed on confirmation, packing slip and invoice for a particular customer.
The form is available under Warehouse Management and Distribution > Setup > Delivery > Kitting form letter setup.
If the Show kitting structure is enabled, the form letter will show the kitting structure as follows:
Assembly and Kitting FAQ
This sections covers information related to Assembly and Kitting, and is described as a FAQ.
Question
Answer
I have a kitting line, but I don’t have any inventory transactions associated to it. Why?
All exploded kitting lines do not have any inventory transactions. It is only the real items that have inventory transactions. All statuses on the kit are based on the containing lines.
Why can’t I change sales price on a kit.
Price on a kit is based on the prices on each included item. To change the price of a kit, you need to change the prices on the included items.
How do I set up an item as a kit?
A kit needs to be a BOM. The flags ‘Phantom’ and ‘Kit’ also need to be enabled. (References tab page in the Item details form)
In addition, the kit item needs to have a valid BOM associated to the kit.
How do discounts work on kits?
In AX you have 2 types of discounts. Discount amount and percent. Discount amounts need to be set on the separate kit lines, while percent can be set on the kit itself.
How do taxes work with kits?
Taxes are calculated on the kit lines, and not on the kit itself. The taxes and VAT is therefore calculated like standard AX.
I see on the confirmation and invoice that only the kit contains the sales value, and the lines are zero.
Yes. This is how kitting works. The sales value and prices are placed on the kits and not on the kit lines. This is also the perception of the customer when he receives the form letter.
Can I manually add and remove kit lines?
No. Kit lines cannot be manually added or removed. The reason for this is that kitting is supported in a multilevel structure.
How can I see the kit-lines on my sales order?
You can see the kit lines by clicking on the button Show kit lines on the sales order form.
How can I take out statistics on sale of a kit?
The customer invoice will contain the information required. Therefore use information from here when creating additional statistics/reporting.
I see I get a total available and an ATP date on kits. How is this possible?
The total available is calculated on the basis of the kitting lines. The most restricting kit line will decide the total available on the kit-header. The ATP is also calculated, so the ATP date of the most restricting item is shown.
Can I part deliver a kit?
Yes, by using the deliver now column, and then starting the picking posting. But it is only possible to part deliver whole kits. You cannot part deliver sub-items in the kit. The automatic order processing will only try to deliver the entire line.
How is returns and credit notes handled for kits ?
Since kitts are items that do not have inventory transactions, all returns must be done on the kit-lines. When creating a return on kitting items, it will only be the kit-lines you can take a return on.
When it comes to choosing the right warehouse management system (WMS) for your business, it’s important to understand your warehouse needs and the benefits of having an integrated WMS before starting the selection process. Whether your goal is to automate your warehouse operations for the first time or to upgrade to a more robust warehousing system, this article is an ideal resource for finding the right WMS—including information on how to build an effective project team, ask the right questions of your software reseller, and successfully implement the system.
5 Common Mistakes People Make When Choosing a Warehouse Management System
Mistake 1: Not doing enough homework.
Analyzing and then selecting a warehouse management system takes time and effort. Information is critical to selecting the most appropriate system for your organization. You’re already a step ahead of most people because you’re reading this blog.
Mistake 2: Misunderstanding the benefits of automation
Automating warehouse operations and related functions can save your organization considerable time and money. However, if you don’t also improve your current processes and ways of interfacing with RF-based hardware, shipping systems, and warehouse equipment, automating your system won’t deliver the full return on investment you require.
Mistake 3: Ignoring hard-to-quantify benefits
It is difficult to calculate possible future gains such as increased productivity, better warehouse efficiency, improved customer service, and other factors after a new system has been successfully implemented. Remember, these types of benefits can dramatically improve your bottom line and should not be overlooked.
Mistake 4: Passing the buck
Top management and other key personnel within the organization must be involved in the selection and the implementation process. For the project to be a success, management needs to stay involved.
Mistake 5: Underestimating the ramp-up phase of a project
Many companies assume a well-designed system will operate at peak levels shortly after they make the purchase. The best system will not perform as expected until properly trained personnel have developed complete competency with the system. Allow users to gain confidence through a gradual process of operational ramp-up, including incremental training and system usage. Wait to introduce them to new and more complex system functions until they have mastered the basics.
When is the “Right” Time to Move to a New System?
Don’t wait until your warehouse operations are no longer competitive to evaluate whether you need a new system. Here are some important tips to help you maximize your business processes:
Keep pace with industry trends
The availability of new technologies and increased market demands are driving rapid change in many industries. Watch for trends such as rising customer expectations, increased competitive pressure, or dropping margins. Introducing new or improved automation management technology to your warehouse can be a powerful tool for increasing competitiveness in a challenging market.
Ensure compliance with integration requirements
If you plan to sell to large retailers, you’ll need to comply with their terms in order to remain in good standing and keep your margins in place. Most large retailers have strict vendor compliance requirements that make a modern warehouse management system absolutely critical for success. Since many large retailers use EDI (Electronic Data Interchange), an ideal WMS solution will have EDI integration and be able to automatically transmit order information into an ERP (Enterprise Resource Planning) system.
Manage the changes required by e-commerce
If you’re one of the many businesses selling products over the Web, a WMS is essential. An online business encounters higher transaction volumes and greater customer expectations. Your material-handling needs also change when you ship directly to consumers rather than to businesses. Instead of pallet or case shipments, most online businesses fulfill many small unit shipments. As shipping times decrease, new requirements such as cross-docking may be required. Without the right system, many errors can occur. And with thin margins, shipping errors can be detrimental to your business. You want a WMS solution that supports and integrates with your e-business initiatives.
Automating your warehouse
If you’re finding that the lag time between warehouse activities and the entry into your warehouse system or accounting database is slowing down your business, you may want to consider automating those processes. A strong WMS solution integrated into your ERP system will allow you to monitor the warehouse activities in real time, minimizing entry errors, and measure the efficiency of your warehouse employees.
Make the most out of a warehouse move
If you plan to relocate to a new warehouse, this may be a good starting point to implement a new warehouse management system. By designing a plan from the ground up at your new location, you can eliminate the bottlenecks and inefficiencies of your old warehouse. The sooner you plan and implement, the sooner you can reap the benefits of your new system. Measure your current capabilities An objective way to assess your warehouse efficiency is to conduct a detailed benchmark measuring your current capabilities. The benchmarks can show you how well your warehouse is performing and the areas you may want to improve. If your assessment indicates significant changes are necessary, now is as good a time as any to implement a new system that provides the required functions of your warehouse.
5 Important Questions to Ask Before Implementing a New System
It’s important to ask questions, especially if you’re finding that your warehouse is not as productive as it can be. Discuss order fulfillment, shipping/receiving, inventory control, labor, and equipment challenges. Here are some questions to address:
1. How are inaccuracies negatively impacting your organization?
2. What do you need to accurately pick, pack, and ship your orders?
3. How can your current system integrate with your e-business initiatives?
4. What information do you need to make strategic decisions?
5. How fast do you need warehouse data to be available across the enterprise?
Getting Started
Today, more than ever, warehouse efficiency is a critical success factor to effectively manage your supply chain and achieve peak performance. Implementation of the latest technologies can significantly improve warehouse operations, employee productivity, and customer satisfaction. By installing the right system and realigning how your warehouse interacts with your employees, customers, and vendors, you can streamline your warehouse operations while achieving a high return on investment.
Build the case for a new system
The greatest challenge to implementing a WMS may not be finding the right system; it might be convincing your management team of the need for it. While most executives agree an accounting system is a must-have, the sentiment does not always apply to WMS. You probably have to sell the idea of a new system to the rest of your senior management team. They may be skeptical about whether the investment is really necessary. You’ll need quantifiable metrics, such as predictive error rate, RMA (Return Materials Authorization) costs, etc. That’s why it is important to determine all the ways your company will benefit from the system, both directly and indirectly, and be prepared to explain these benefits to senior management.
Form a project team
Assemble the team of people who will decide what your company needs from the new system and what functions it must include. Depending on the size of your company, team members may include the warehouse manager, a senior finance representative, and the director of IT. Define each person’s role and their level of involvement and decision-making during this process. Clearly define each team member’s responsibilities so they know up front how much time and effort will be required of them. You may need to restructure work priorities during the selection and implementation phases to make sure your project team has the resources to get the job done.
Evaluate your current system
To get the most out of your new WMS, you need to do more than simply add technology to your current processes. The more you know about the problems you expect the new system to solve, the more successful your final choice will be. Discuss what modifications need to be made to current system procedures. What works? What doesn’t? Consider not only how technology can automate current processes, but also examine other ways they can be improved. Encourage your team members to be candid about what they find frustrating, redundant, or ineffective. Examine how your warehouse interacts with customers, suppliers, and your organization’s departments; look for weaknesses and ways to improve these communications.
Share your expectations
Once you’ve agreed on the process and the timeline, have each member of your team share their expectations for the new system. Conduct a session to brainstorm ways the existing system can be improved, including new functions and processes that aren’t currently in place.
Agree on your needs
Have each team member create a list of key functions they feel the new system needs to provide for the company. Then have them prioritize these items as Essential, Greatly Desired, or Would Be Nice. Encourage team members to differentiate between functions they want and functions they definitely need. Achieve a general consensus within the team, defining the rank of each function and then combine those items into a prioritized list.
Create your list of required functions
Once you have consensus, refine your mandatory requirements into a formal Required Functions List. Your Required Functions List should be a short, one- to two page prioritized list that includes all of your must-have functions. This list of mandatory features will help you quickly eliminate systems that don’t meet your needs.
Consider the benefits of back-office integration
Selecting WMS software that integrates with your ERP system ensures complete control and flow of information between your back-office and warehouse floor. An integrated WMS system will keep your warehouse activities in synchronization with your accounting data, eliminating manual intervention and transcription errors while providing accurate and up-to-date inventory control. Look for a smooth-running warehouse system that can easily and reliably interface with your financial data—supplying in-depth information across the enterprise. Just as important, an integrated WMS will support your Web order and EDI needs, and send back Advance Ship Notices (ASNs) to notify customers of incoming shipments.
Don’t forget about hard-to-quantify benefits
The right warehouse management system maximizes the productivity of your warehouse staff. It frees them from tedious, time-consuming tasks and allows them to focus energy on picking the right items the first time, every time. It allows your company to benefit from increased inventoryhandling accuracy and reduced carrying costs associated with obsolete and slow-moving stock.
Avoid RFPs
Contrary to what your colleagues may tell you, the next step is not to create and send out a Request for Proposal (RFP) to resellers you are considering. Creating an RFP, sending it out, waiting for proposals, and reviewing them can take months. You can achieve the same results in days by asking potential resellers if their system provides the key functions you require. Obviously, if your company requires you to use an RFP, this step is necessary.
Finding a Reseller
The ideal reseller has knowledge of end to-end operations, including warehouse management, accounting, order management, customer relationship management, and integration with EDI and wireless data collection systems. Another critical aspect is their experience with implementing software for businesses in your industry. When evaluating a reseller, ask yourself these questions:
Can the reseller provide my company with a complete service package?
Critical elements of any software implementation are product training, technical support, future maintenance, and upgrades. Look for a reseller who wants to assist you not only with the immediate sale and installation, but also with long-term training and service.
Does the reseller listen effectively?
This question separates the true solution provider from a product peddler. To make the best recommendations for your organization, a reseller must first learn about your organization—including your systems’ current capabilities and those missing (but required) items or functions. Has the reseller attempted to learn as much as possible about your organization? Has the reseller spoken to more than one person within your company?
Does the reseller communicate clearly?
Be wary of resellers who spend all their time discussing features of a program. Your focus during discussions with a reseller should include the system training and services the reseller can offer in addition to features and benefits of the WMS software itself.
Can I work with the reseller?
Remember, you’ll be working closely with the reseller over a period of weeks, maybe even months. It’s important to find a reseller you enjoy working with, who is a good fit with your company’s philosophy, and who you feel will provide the necessary expertise and consultation in a professional manner.
Find the Best Fit
Just ten years ago, you could easily evaluate every warehouse solution available on the market. Today, with so many solutions to choose from, you can spend months looking at demos and still not see them all. Every warehouse is unique—with different processes, tracking systems, and problems. This is why it’s critical to choose a system tailored to your specific needs.
Generally, look for a system capable enough to significantly improve inventory control and staff productivity. This is first accomplished by integrating your warehouse staff with the tools and equipment at their disposal: radio frequency (RF)-based communications equipment, shipping systems, lift trucks, forklifts, etc. Secondly, all the information gathered by utilizing this equipment should be made available to your entire enterprise—including the accounting and inventory management data.
The vendor you choose should be dedicated to serving the changing needs of the warehousing and logistics industry, and consequently committed to upgrading and improving the product. Consider the following factors when evaluating available WMS solutions:
Know the benefits of working with a reseller
Before you begin narrowing your list of WMS contenders, it is important to understand the benefits of working with a reseller. Typically, resellers have been through the process many times before and can save you time and effort. They can help you select the right software for your warehouse, install new networks or hardware, and make sure the system is running by your target date.
A good reseller will:
Evaluate and suggest the best WMS software for your organization.
Save your company time and money during system installation and subsequent training.
Help you get the most out of your WMS implementation based on your organization’s requirements.
Screen potential solutions
E-mail a copy of your Required Functions List to the resellers you are considering so they have time to prepare and can quickly answer your questions. Conduct a phone interview with each reseller to determine how well their solution matches your required functionality. Note whether each feature comes standard with the system, is available as an add-on module for an additional fee, or is not available at all. A good reseller will also need to ask you many questions to determine which system is the best fit for your company.
Consider implementation time
Look for a complete solution that can be up and running smoothly and rapidly. The less upfront customization your system requires, the more quickly the implementation process can be completed. Ask your reseller how long the implementation will take and what factors may increase or decrease the amount of time needed.
6 Questions to Ask Resellers About a New System
Pick the best three systems and ask each reseller to provide the following information:
1. Estimated license costs for your implementation.
2. Estimated build-out costs to adapt the system to your requirements.
3. If automated wireless data collection and bar-coding equipment are a good fit for your company, what are the estimated costs?
4. Timeframe and cost for implementation.
5. Annual support and maintenance costs.
6. Training methodology and training costs.
Choosing the Right System
As you narrow the field of software contenders, begin examining the companies more closely to see how well they meet your needs. Consider the following factors to weed out vendors that won’t fit with your long term strategy for distribution excellence:
Interview resellers before the demo
Familiarize yourself with the various WMS solutions available on the market so you can be confident about your top picks when you shortlist the best options for your company. By interviewing as many software resellers as possible in advance, you can avoid time wasted by lengthy, irrelevant demonstrations.
Get to know the software manufacturer
Are you familiar with the company that makes the software? Are they a respected name in the software industry? How long have they been in business? What is their vision for the future—for their products and for the company? These are just some of the questions about the manufacturer you want to address when evaluating WMS solutions. Clearly, you don’t want a “here today, gone tomorrow” organization.
Insist on a user-friendly system
Even with all the functions your system promises to deliver, if your WMS is not user-friendly, your staff won’t be able to maximize the full benefits. Make sure you select a solution that’s logical and easy to use. Ask these questions during the interview process:
Does the system enable users to easily sort and view information, allowing warehouse employees to know exactly which activities need to be done at all times?
Does the software use the familiar navigational model of a standard hand-held browser?
Can the software provide a real-time window into your warehouse operation and access to critical data with only a few clicks?
Look for a solution that integrates with your accounting data
Make sure the WMS software has solid integration with your accounting data so multiple departments and your warehouse staff can more effectively track inventory and order fulfillment. Real-time integration of inventory and shipping information to your back-office data can reduce transcription errors, lower the staffing requirements for data entry, and improve access to information throughout your organization. The best way to ensure this real-time integration is to have the WMS functions as a module within your ERP system.
Ask about the capability to automate the warehouse management processes
Look for WMS software that supports wireless RF-based technologies. The warehouse management data is updated as soon as information is captured on an RF-based hand-held device. Also, if a system promises real-time delivery, make sure vital business information (for example, inventory count) with orders requiring same-day shipping—which can result in high compliance fines.
Understand how the wireless system collects data
Consider how well the system monitors your critical operational activities. When you’re running at full capacity, can you monitor which items have been received? If so, what communication standard is used to capture and transfer data? Most RF-based technologies collect data using the 802.11 communication standard. Make sure the system you choose supports this widely accepted standard, and isn’t limited to a proprietary communication standard.
Find out costs for extra users and modules
In addition to maintenance, upgrade, and support costs, it is important to consider how much you’ll have to pay for additional users. Solutions that include all modules generally cost less than those that don’t, but will often charge a higher cost per number of users. You may also encounter vendors who are relatively inexpensive when it comes to adding seats, but charge significantly more for additional modules. Be sure to ask the reseller what the cost structures are for adding users and modules.
Ensure options for growth
Before you make a purchase, find out if your software vendor has a maintenance program in place that gives you access to frequent updates. A good vendor invests heavily in engineering and develops new product features and enhancements regularly. They stay abreast of new technologies and make sure their customers do too, particularly those customers with fast-growing businesses. The opportunity to move to a similar, but more powerful, solution provides you greater flexibility as your company grows. Often, software upgrades cost far less than the retail price of the full program. Some vendors even provide upgrades within their support programs. Imagine purchasing a new car a year ago, and then seeing this year’s model and wanting some of the new features. You can’t have those new features unless you purchase the new model! In contrast, a good software manufacturer will provide product upgrades at reasonable prices or as part of a yearly service agreement.
Inquire about the system’s capacity
What is the maximum number of users allowed to work with a particular application at a given time? What happens if your business needs to add another warehouse or configure multiple work zones in your existing warehouse? It’s important to consider what your warehouse will need in the future to avoid having to purchase another new system within a short period of time. There are always opportunities for further efficiency gains by maximizing warehouse automation equipment and perhaps reworking some of your existing inventory-handling processes. When selecting a system, ensure the software has the capacity to grow with you.
Look for e-business strength
Online retail fulfillment is very different from traditional fulfillment—requiring different picking strategies and special material handling operations. Fulfillment operations for a Web store will have thousands of orders, but usually with only one or two lines. In contrast, traditional fulfillment typically has fewer orders, but many lines per order. If your company is considering electronic commerce, look for a flexible system that can manage a multitude of operational strategies. You’ll also want a scalable solution to ensure that seasonal peak volumes can be handled accurately and efficiently.
Get powerful reporting
Look for a system with the ability to extract relevant information easily. Your warehouse manager should be able to track labor productivity and provide order fulfillment, and inventory movement information. A good system can provide virtually unlimited reporting capabilities. Ask for samples of reports when evaluating the different systems.
Evaluate system security
The degree to which sensitive functions and reports can be protected will affect how the system rates in security. Ideally, you should be able to specify which operations certain users can perform at specific times. A good system can be set up so your warehouse technicians only see information relevant to their job function.
Conduct product demonstrations
Before each product demonstration, have your team meet to discuss the perceived strengths and weaknesses of each software solution and areas they think require particular attention. Inform resellers ahead of time the order in which you want the functions demonstrated. It will make the demonstrations easier to assess if they are all presented in the same order. Keep the demonstration focused on the functions your company needs and not on the ones that look most impressive on-screen. Have your team fill out comment sheets during each interview for use during the final decision process.
The software demonstration is an excellent time for your team to understand the features and capabilities of a particular solution. Take full advantage of this opportunity by following these guidelines:
Inform software resellers about your specific needs in advance. A software demo is a reseller’s opportunity to profile their products and services. By informing them ahead of time about your specific needs, you direct the demonstrator’s attention to your interests, not theirs.
Make sure your core team is able to attend the demos. Make it a priority to keep your core team up to date about their appointments. Since each team member has a different area of expertise, it’s important for everyone on the team to be at the demonstrations in order to get the most out of each demo. Encourage team members to remain in the room through the entire demo; shared concerns can be flagged more effectively if everyone is present to hear questions raised by others on the team.
Plan your questions. Have the core team come up with questions for each product demonstrator. You may also want to plan the sequence in which the questions will be asked, to ensure that everyone stays on topic during each demonstration.
Establish a system for scoring each issue addressed by the demonstrator. Keeping tally for individual issues makes the entire scoring process efficient. It prevents situations in which someone from your team forgets how a particular demonstrator addressed an issue. The scores will also come in handy when it’s time to decide which of the shortlisted solutions is best suited for your organization.
Ask the reseller to follow up on issues not fully addressed. The reseller may need to consult with colleagues or the software manufacturer before providing answers to more in-depth questions. Be sure someone on your team follows up on any unanswered questions after the demo.
Ask questions during the demo
If someone on the team has a question, such as whether the RF-based technology being demonstrated can update inventory in real time, make sure they ask during the demo. It will be easier to get a clear answer if you ask questions when they occur to you, and while the functionality in question is on the screen.
Understand the difference between standard functions and “extras”
Some software vendors provide basic functions but then make you purchase “extras” that come standard in competing solutions. Confirm which functions are included in the core pricing and which must be purchased separately.
Ask about technical support
Your reseller will be a good resource regarding technical questions or other issues that arise. However, you may still need to rely on the software vendor’s technical support team as well. Find out the cost for technical support as well as the policies for maintenance, upgrades, and support. Ask your reseller what you can expect in response times to support questions and if there are support packages available for purchase.
Implementing Your System
You’re almost there. You’ve done your homework, chosen a reseller, and a solution—now it’s time to put your system in place. To ensure a smooth and successful implementation, consider the following guidelines.
Start with a plan
Begin the implementation process by laying out the goals of the project. This helps keep every team member focused. An installation usually takes between one to three months with an off-the-shelf package that requires minimal customization. If you have numerous goals to achieve, plan on a longer implementation with more consulting resources.
Revisit your timeline
Make sure your implementation timeline is realistic. Your reseller will propose a timeline with deadlines they feel confident they can either meet or beat. Find out what you need to do and which individuals need to be available to help with the process.
Remember: Time is money
Your reseller will probably give you a range of hours each task will take. The general rule is the more resources you allocate for implementation, the less it will cost you in both time and money. The reverse is also true. If you aren’t able to give your reseller the time and resources requested, the process is going to take longer and cost more.
Provide ongoing training
If you want your warehouse operations to reach their full potential, maintain constant vigilance over your system. Ideally, WMS training never ends. Promotions, new hires, and the start of every quarter introduce new opportunities for training. Develop a training agenda focused on continuous learning, along with supporting materials, such as written tests and training guides. These tools will enable you to reinforce existing methods and procedures, teach new hires, and ensure that you’re optimizing the efficiency of the people in your warehouse.
Postpone modifications
Don’t request any major modifications to the software before you’ve actually installed it and started using it. Instead of trying to make the software work the old way, wait until you and your staff are familiar with the new system before attempting to change or customize it.
Schedule a good rollout time
Find an appropriate time to roll out your new system. It’s difficult to schedule a “right time” to do this, but at the very least, plan to install the new software during your organization’s slowest time of year, to minimize business interruptions.
Measure against the old system
The success of your warehouse management system in part depends on the goals you have established for your operation. Once your system is up and running, be sure to benchmark it carefully and compare the results to your pre-system benchmarks. You’ll collect vital information to help calculate the return on your investment. The benchmark also sets a standard for your team to beat. With ongoing benchmarks, you can put measurable employee incentives in place, compare your results to industry averages, and set targets for coming years.
Sample Warehouse Management Software Checklist
General Features
Excellent
Adequate
Deficient
Paperless check-in
Bar-code verification and labeling
One-step put away to bins
Stock immediately available for picking
Cross-referencing of supplier part numbers
Incorrect shipment identification
Express and normal receiving options
RMA (Return Materials Authorization) processing
Random storage
Efficient handling of special and non-stock items
Discrepancy reports
Inbound freight management
Low stock alert
Picking and Packing Features
Direct picking to shipping carton(s)
Variety of picking styles: wave, batch, order, and product picking
Simultaneous and sequential zone picking
Forward picking from fast-flow locations
Product substitutions
Carton picking from dedicated or random locations
Kitting function
Order verification and price ticketing in multiple formats
Tracking of serial numbers or lot codes
Inventory Control Features
FIFO stock rotation
Cycle count by date/product/bin location
Inventory tracking of product through the warehouse
Tracking of both picking and overstock
Replenishment requests based on actual orders (vs. min/max)
Efficient transportation planning, execution and billing pose a daily challenge for distribution companies. With To-Increase Warehouse Management and Distribution, companies can increase customer satisfaction and tap new cost-saving potentials.
Transportation planning module is a front-end module to plan the transportation requirements. Some customer will use transportation planning, while others will not use transportation planning.
In the process from orders to shipment an intermediate step can be created, that controls how the transportation should be. The transportation planning is not a mandatory step, and the use of transportation planning should be controlled in the delivery rule setup of WM&D. The transportation planning handles multisite distribution and shipments. Meaning that the transportations/trucks can have multiple pickup addresses and multiple delivery addresses. The loading sequences are very important, because the trucks must be loaded and unloaded in the right sequences.
Explanation of definitions
Definition
Explanation
Transport route line
A transportation route line is the actual route that the transportation needs to go. It can be several pickup addresses and several delivery addresses on a truck route, and each of this combination will have a transport route line.
Each transportation route line will have properties like estimated weight, volume and body length/width. A sequence of transport route lines is the destination addresses.
Transport route
A transport route is in this document defined as a planned transportation. The transportation is most often related to a “mode of delivery”. The transport route has some physical limitations like max payload weight, max volume, max cargo body length/width. The transport route is the “header” of a set of transportation route lines, and is most often represented as a truck or container.
Outbound cargo
The outbound cargo is the unit that is combined under a Serialized Shipping Container Code (SSCC). Most often it will be a pallet that consists of a set of items. The buildup of an outbound cargo is done when picking the goods, or at the staging area at the outbound cargo build, or at a packing station, depending on how the logistic process model is defined.
Sales orders
Sales order is normal Dynamics AX sales order, and represents what is sold to the customer.
Transfer orders
Transfer orders are internal transfers between two warehouses in the same company. There are no invoicing related, but the process will follow the same processes as sales orders.
Inventory/output orders
If a sales order or a transfer order has been created and you want to inform the warehouse that the items are to be picked and shipped to the customer, you can use a picking list or an output order. An output order is an advanced picking function and is the basis of a shipment. From the shipment you can activate a pallet transport, a picking route, or both.
Shipments
A shipment is a collection of items that are packed in the same container for transport by, for example, ship, rail, truck, or plane. A shipment includes an entire order, a part of an order, or a consolidation of multiple orders.
Based on the contents of the shipment, one or more picking routes, one or more internal transports, or both are created.
Output order is a request for picking requirements and is the basis of a shipment. From the shipment you can activate an internal transport, a picking route, or both. The shipment status is based on the lowest denominator of the shipment lines status.
Inventory order transaction
The inventory order transaction is the actual lines that are to be picked. The inventory order transactions are not created before an inventory order has been connected to a picking route.
Picking route
The picking route is the picking lists that a warehouse operator will pick from an area, warehouse or/and according to a defined sequence.
ETD
Estimated Time of Departure – local time
RTD
Real Time of Departure – local time
ETA
Estimated Time of Arrival – local time
RTA
Real Time of Arrival – local time
Key scenarios
Ted
• Transportation coordinator
• Logistics
Ted tracks shipments and advises on customs regulations and shipping documentation. Ted is knowledgeable about shipping, the freight forwarding industry, and international trade issues. He has key relationships across these areas.
Sammy
• Shipping and receiving
• Logistics
Sammy manages shipping and also receives goods and verifies them against purchase orders. He also supervises the other warehouse employees.
John
• Warehouse worker
• Logistics
John puts received items away and picks items that need shipping. John waits for Sammy to tell him what to do.
In this section we will describe some of the key scenario’s to create a transportation plan:
Scenario name
Create transportation route
Problem statement
Ted has the responsibility to order and plan transportation to a set of customers. Ted wants to order trucks to transport the goods to the end customer.
User situation
Ted will have an overview of orders that are now ready to be released for picking and shipping. It is the responsibility of the order management to release orders for shipping, and to create the Inventory Orders. The Inventory orders are the main source of information for Ted.
User goals
After the transportation planning is done, Ted has scheduled one or more trucks to arrive at the distribution centers. The date and pickup time is planned. Ted also creates the shipments, but does not activate the shipments. He informs Sammy, that the shipments are now ready, and that we have planned transportations to the set of shipments.
Persona(s)
Ted – Transportation coordinator – Logistics
Scenario steps
Ted opens the transportation create screen to see what inventory orders is now available for shipping. Ted filters the available inventory orders according to a shipping template, and other criteria’s.
Ted marks the Inventory orders he would like to create transportation for, and create transportation route lines. A transportation route line is a transportation task from a pickup address to a delivery address.
Ted has integration to the freight forwarder, so he can send all transportation route lines to the freight forwarder, and the freight forwarder will then plan the number of trucks needed and the loading sequence for each truck.
Based on the input from the freight forwarder, trucks will be built up. Truck building means, that transportation route lines will be assigned to transportation routes. This can be done based on the results from the integration, or manually when moving transportation route lines.
When Ted is pleased with the transportation plan, Ted creates the needed shipments. The shipments are then the main source for the rest of the process of picking, packing and shipping. Sammy and John will take over the process and execute.
Transportation planning in relation to multi-warehouse picking.
In a multi warehouse/site scenario the transportation planning must include the ability to have multiple pickup addresses. To handle this, a Transportation route type algorithm is implemented. This algorithm can be schematically described like this.
Transportation route types
Description
Central distribution
All goods will be shipped from the central distribution center. If internal replenishment is required, the replenishment system (Wave planning) will handle this.
Decentralized distribution
All goods will be distributed from another warehouse than a central distribution warehouse. This is typical for full trucks going directly to customer from a production finished goods warehouse.
External Terminal
All goods will be picked from different warehouses. The carrier will consolidate, sort and ship the goods from the carrier’s terminal. In this scenario a multi warehouse pickup is possible, but all goods (transport route lines) will have the address of the carrier’s terminal. The cargos will be marked with the final delivery address.
Multi warehouse distribution
In this scenario the freight forwarder will pick up the goods from several warehouses. The load sequence is important here. In this scenario, the transport route lines can have different types.
Transportation route line types
Description
Internal replenishment
This type is used for moving goods from one warehouse to another. This type can only be used on transportation route lines. This type is also used for filling up the distribution center when required.
Collection
This type is used for picking up goods at warehouses. This type can only be used on transportation route lines. A transportation line of the type collection means that this pickup is in a sequence of pickups. The final pickup place will have the type “final loading“.
Final loading
This type is used for picking up goods at warehouses. This type can only be used on transportation route lines. A transportation line of the type final loading means that this is the last pickup place. At this place the necessary form letters needs to be printed (CMR, Bill-of-lading, packing slip, proforma-/invoice etc)
Example scenarios that is supported
Multi warehouse shipments with internal replenishment
2 pickup locations + internal transport
Description:
Steps
Description
Prepare
Transportation route lines are created on the basis of inventory orders, securing that all limitations like max weight, volume etc is maintained.
Plan internal
Ted, the transport planner, may change the transportation route type on the Transportation route lines, to decide what the external carrier should pickup, and what should be internally transported.
Plan external
The transportation route lines are then sent to the external carrier to book the transportations. Internal transports are not sent to the carrier. The carrier may come with other suggestions, that effect the plan.
Create shipment
On the basis of the transportation, the system will create a shipment for each truck. The system will generate one picking route per warehouse, as status “registered”. The shipment will cover all planned pickups and deliveries.
Picking and
Replenishment
When the transportation date closes, Sammy, the shipping manager, will release all picking routes and internal replenishments related to the shipment. This will happen 1 day (or x days) prior to the shipping date. John, the warehouse worker, will pick the goods accordingly into “outbound cargos“. When an outbound cargo is picked, the outbound cargo will get the status “picked“. Each outbound cargo can be marked with a shipping label and a contents label. If the outbound cargo is sent internally, the outbound cargo status will be “In transit” until received at the final shipping warehouse. The outbound cargo will wait at the outbound dock until the truck arrives. The status of the outbound cargo will be “staged” when the outbound cargo is placed in the outbound dock.
Loading
When the truck arrives, John, the warehouse worker, will load the outbound cargo into the truck. The status of the picking route and outbound cargo will change from “staged” to”loaded“.
Final load
At the final pickup place all related documents are printed (Bill-of-lading)
Multi warehouse shipments
3 pickup locations
Description:
Steps
Description
Prepare
Transportation route lines are created on the basis of inventory orders, securing that all limitations like max weight, volume etc is maintained.
Plan internal
Ted, the transport planner, may change the transportation route type on the Transportation route lines, to decide what the external carrier should pickup.
Plan external
The transportation route lines are then sent to the external carrier to book the transportations. The carrier may come with other suggestions that affect the plan.
Create shipment
On the basis of the transportation, the system will create a shipment for each truck. The system will generate one picking route per warehouse, as status “registered”. The shipment will cover all planned pickups and deliveries.
Picking and
Replenishment
When the transportation date closes, Sammy, the shipping manager, will release all picking routes related to the shipment. This will happen 1 day (or x days) prior to the shipping date. John, the warehouse worker, will pick the goods accordingly into “outbound cargos“. When an outbound cargo is picked, the outbound cargo will get the status “picked“. Each outbound cargo can be marked with a shipping label and a contents label. The outbound cargo will wait at the outbound dock until the truck arrives. The status of the outbound cargo will be “staged” when the outbound cargo is placed in the outbound dock.
Loading
When the truck arrives, John, the warehouse worker, will load the outbound cargo into the truck. The status of the picking route and outbound cargo will change from “staged” to “loaded“.
Final load
At the final pickup place all related documents are printed (Bill-of-lading etc)
Delivery through distribution center
In this scenario all goods will be consolidated at the distribution center, and there will be internal movements from decentralized warehouses to the distribution center
Warehouse managers often ask, “Does RF Data Collection give me the same optimization benefits as a Warehouse Management system?
The question to return is: “Who is faster (has lowest amount of labor)? The picker who picks via paper, or one using a radio frequency (RF) device?”
The answer is the paper picker. He/she doesn’t have to unholster, scan, and holster the RF device. So RF Data collection doesn’t optimize labor, it just provides a more accurate process. You have to have tools to improve accuracy, as well as optimize labor (work flow).
So how do you gain high inventory accuracy, high asset utilization, and labor optimization in your distribution center? Via a combination of warehouse management, and best practice business processes. Warehouse management solutions, unlike RF Data Collection, can execute best practices in real time that give you the accuracy, labor, and space optimization you desire. They can also react in real time to unexpected errors, correct them immediately, and put a plan in place to address the error (alert, cycle count, etc.).
So the answer is “No, RF Data Collection does not give you the same benefits as WMS.” RF is just a tool to be used when having good WMS processes. Implementing RF without good WMS processes will not give you the benefits that you are seeking.
At the end of the day, the best approach is to find a company with the type of supply chain management consulting skills and experience to help you determine the best approach. An approach that targets the most critical KPI’s for your business. If you can find a trusted supply chain expert, you can drive business value around your specific needs.
It is time for a more technical Dynamics AX posting here. I want to describe what was needed to be done to upgrade a very complex solution, that consist of several ISV solutions and also have local customizations on top. Overall, the task can be visualized like this.
The upgrading was related to new Rollup package from Microsoft, new releases of the ISV solutions; RCM from Microsoft, WM&D from To-Increase and Inventory II from FSB development. My biggest concerns was:
The ISV solutions needed to be merged into common layers. This results in different TableID and FieldID.
Several fields and tables had been renamed in the ISV solutions.
The risk of loosing data in the process is high, unless I get the mapping right.
The database is approx. 1 Tb large, so table changes etc is very heavy operations.
There is a central table in Dynamics AX 2009, called SQL dictionary, that translates AOT ID’s to actual SQL names.
And you can see this in the application like this:
When going from old solution to new solution I needed to make some changes in the SQL dictionary to make sure that I don’t have any dataloss. Since Dynamics AX 2009 are quite good to handle changed table names and field names, I could concentrate on making the new mapping correctly in the SQLDictionary.
Here is what I did to make this happen. I installed all NEW layers and customizations on a separate installation, making sure that there where no compile errors etc.
The next was to create a conversion tool to manipulate SQL dictionary, that handles both changed ID’s and changed Names. I therefore created a table to handle the SQLdictionary from old format to new format. I created a small table, that looks like the SQLDictionary, and then created New and Old tableID, FieldID, name and SQL name.
The first process was to read this out of the OLD database, with the following script:
So now I have a table that is a “copy” of the Old SQL dictionary. My next step is to correct up all ID’s. To do this, is a painstaking process, because it has to be done manually. So I created 2 methods for manipulating the SPA_SQLDictionary. The UpdateTableId() and UpdateFieldID()
Then I called these two methods to set the new ID’s:
In my case, there where more than 500 tabels that needed to be handled this way. Manually defining from ID. Luckily I could use the Tablename2Id and fieldname2id methods to give me the new ID’s.
The last step in the prosess was to copy the new ID’s into the SQLDictionary:
After this has been done, the system is ready to by synchronized, and all tables and fields have the correct mapping.
With this approach I did not have any dataloss, I did not have to export/import a 1 Tb database J. I also want to point out, that AX 2009 is the last version where we will have this problem. (I hope). In AX 2012 we will have installation specific ID’s, and you can read more about that here.
WM&D have many options for picking. This document describes how you perform picking of items by using what is called the “packaging station”. This step is where the picked items are physically packed into boxes, pallets or other units used for shipments. In this picking process we do all warehouse processes for delivering stock kept items in just one step.
The process includes also making of the relevant information / documents for shipping the goods.
Order Processing
The picking list identifies items to be sent at the same time to the same destination. The picking list can be a consolidation of several sales orders, one sales order or a part of one sales order. The picking process is the same in all cases.
If wave picking is used a group of sales orders are grouped on one picking list to make the picking process more efficient.
For order picking there is only one order linked to each picking list.
Order picking
A sales order has been made and confirmed for delivery. Based on the reservation rules used, the Items on stock will be reserved either when the order is generated or when the picking list is generated. The picking route for sales orders is generated based on the delivery rules in the setup of AX2009.
WM&D can automatically release picking routes through the order processing, or manually release of Picking routes using in the menu <Inventory Management> – < Periodic> – “Release sales order picking”. In the pop-up selection screen fill in the relevant limitations you want to base your sales order selection of.
You will then enter the release sales order for picking screen as showed:
In this screen you select the sales order(-s) you want to deliver and push the – button. Normally it is recommended to use the automatic order processing and the delivery rules to release pickingroute.
Reservation rules relevant for items on stock are not part of this document.
Printing paper based Picking lists
Enter the <Warehouse Management and Distribution> – Module and choose the menu “auto Print Picking Routes” in the section <Periodic>.
Mark the lines you don’t want to process (Push the button in front of the line and hold down <ctrl> if more than one).
Push the button to delete the lines from your selection.
Push the button and the picking lists will be printed.
Picking
In the <Warehouse Management and Distribution> module in the section <Common Forms> you select the menu “Packing Station”.
By using the “Packing Station” in WM&D the picking of items is done directly into the carrier that will be shipped to the customer.
The first step is to scan the picking list number. The picking list number can also be typed manually or selected in the drop down menu. When the picking list number has been entered all lines included on this picking list will appear in the packing station.
Notice that the items is divided into several lines. The reason for this is that it is picked from several different locations.
Select the shipment unit type / Cargo ID you pick the items to (“Enter/scan bar code” field). This is the carton or pallet that will be sent to the customer. This can also be selected by pushing the button.
Scanning of items:
In the system an item can be identified by a barcode. All unique units will be provided by a unique bar code. That means that a bar code will identify the dimensions of an item. In the barcode setup, the quantity is also set. If an item is stored in units with 5 items in each, the barcode on this unit should represent 5 pcs of an item. This is a setup made on the barcode setup. It is important that you follow the number of items picked when items are scanned.
After scanning an item, the Remaining quantity will be reduced by the number you picked.
If for some reason, it is not possible to scan a barcode, the registration has to be done in another way. This can be done by using the buttons “Pick one”, “Pick some” and “Pick all”:
Do the following:
Press to pick one item (or scan item). When using the Pick one button, the system will pick one item at the time. Separate items, not included in a pack can be counted.
Press If you want to pick more than one (you get a pop-up-window where you enter the amount of items you are picking.
Press to pick the complete quantity on the picking list.
Press If you want to cancel the registered picked quantity.
Pack in multiple boxes
If the entire shipment cannot fit into one shipping unit, additional packages must be created. To do this put in the type of the next carton, into the “Enter / scan barcode” field. When entering a package type, a dialog box asks if a new package should be created.
When saying yes to this a new package id will be created. When continuing packing, this new package id will be used. On the tab “All picked lines”, it is shown what package id each line was packed in. On each line the package id can be changed.
Complete packing
As the item lines are fully picked, they will not any longer be listed in the tab “Picking Lines”.
When your Picking is completed the “Complete”-button will be available. Press to finish your packing/picking.
The Complete stage of the packing station process will take the order 2 steps further in the packing and delivery process. The ordered items will go from being physical reserved to actually being issued from the location and into the status delivered. In this step “Pallet label” and “Packing List” will be printed.
When the order has been completed it is no longer possible to cancel the packing of a picking list.
Printing
“Pallet label” and “Packing List” will be printed when the “complete” button is pressed.
Label:
To identify packages, labels can be printed from the packing station. The label holds necessary information about sender and receiver. The label also held the information number of packages on a shipment and package number on of a specific package (for example package number 1 of 3).
Packing slip:
After completing the packing the packing slip can be printed. Packing slip will be shipped together with the goods to the customer. The packing slip list all items and packages on the shipment.
Pro forma invoice:
I some situation it is necessary to have a pro forma invoice shipped together with the goods. Particularly this can be crucial for shipments going across country boarders. It will then be used for custom clearance of the goods. The Pro form invoice is printed by push the Print Proforma invoice button.
This document is a manual for using the WM&D Receive station.
The receiving station is made to optimize the receipt process of purchase orders. The purpose of the receive station is to have an effective receipt of large quantities of goods, have a standardized way of handling the goods, and to have a high quality assurance of the process. To obtain this goal, this process is optimized for use with both touch screen and a scanner-device to minimize the usage of keyboard and mouse.
The Receive station supports the standard way Dynamics AX2009 is handles the receipt and the statuses the purchase order lines goes through; open order, arrived, registered and received.
The receive process can be divided into a number of main processes as illustrated in the following picture:
The first is to create a receipt, and to add lines to receive from the corresponding purchase order. The next step is to go through start receiving and post the Packing Slip. At the end the barcode label is printed out.
In the following sections we will go through these processes in details.
Enter the receive station
Go to The module <Warehouse Management and Distribution>, in “Common Forms” choose the menu <Receiving Station>.
Create new
Enter the Receiving Station:
The first step in the receive process is to create the receipt. Click the Create new button.
Register a new receipt:
The purpose of creating a receipt is to select what to receipt. This can be done by different kind of criteria’s.
Select <Purchase Order> in Receive Type.
When selecting <Purchase order> you can select all or a range of order lines on a purchase order to be received. If one single purchase order is to be received it can be selected by using purchase order line. Internal transfers can also be received by using the receive station.
If you plan to receive multiple purchase orders that have been put into one container, you can select <container> in the field receive type. Then all purchase order lines contained on this container will be selected.
The warehouse should be specified and the receiving dock. The receiving dock is the physical inbound dock where the goods are to be received.
A putaway method can also be specified. The reason for this is to tell the system where “putaway messages” should be sent. Messages can be sent to a conveyor system, forklift terminal, handheld terminals or paper.
Depending on the selected receive type, a selection of what to receive can be done. If a container has been selected in receive type, the selection under reference will change to container. If purchase order line is selected, purchase order line will show etc. After doing the selection; click OK.
In the Purchase order field you put in the corresponding purchase order number that matches the delivery you now will receive. Then all the lines from the purchase order will be copied from the purchase order into receipt lines in the receipt document.
A receive header have now been created together with one or more lines to receive.
Check and Post receipt
Start the receive process:
And check all the receipt lines and do necessary corrections to quantity and texts.
Choose for all lines that are delivered according to the suggested quantity or make adjustments on the line under the folder “Receive Transactions”
NOTE: There are some general parameters to setup if we are to accept over and under delivery, and how many percentage we are to accept. These parameters are also valid her, and will be used when closing the receive.
When corrections are done and the quantity for receipt has been checked you confirm the quantities by choosing:
.
Notice the first column in both the header and the lines. These are symbols used as information about the status.
Not started, In progress Complete
To post the Packing Slip for the receipt choose the button .
In the Posting picture an Reference to the receipt a Packing Slip number have to be entered. In this field you put in the Pacing slip from the vendor as a reference.
Barcodes
Before putting the item into stock it must be marked and identified by a barcode tag.
The label with the barcode is printed by using the button
Choose the right number of labels and press “OK” to print the labels
You have now completely received the item(s) and they are available for picking.
This article describes, in detail, how the process Extended ATP is implemented in the To-Increase Warehouse Management & Distribution solution (WM&D).
Process definition
We define ATP as a planning tool to know when a sales order can be shipped, and then the physical reservation, picking and shipping can be started. Available to promise takes the simple availability calculation, adds time phasing and takes into account future scheduled receipts.
Available to promise may be calculated for each day or broken down into larger time buckets. The ATP starts by taking on-hand inventory and add any scheduled receipts. The ATP calculation will then deduct any allocations scheduled prior to the next scheduled receipt (which may be several periods in the future). Subsequent periods without any scheduled receipts will have the same available to promise as the previous period. Subsequent periods with scheduled receipts will generally start with a fresh calculation, ignoring any remaining available to promise from previous periods.
There are many variations on exactly how available to promise is calculated and it is also important to note that available to promise often works independently of allocation/reservation systems. This can sometimes create conflicts since ATP is expecting that the delivery dates should be followed ascending.
ATP Calculations in standard Microsoft Dynamics AX
Microsoft Dynamics AX calculates the available-to-promise (ATP) quantity based on the “cumulative ATP with look-ahead” method. The main advantage to this method of calculating ATP is that it can handle instances when the sum of issues between receipts is bigger than the latest receipt, that is, when it is necessary to use a quantity from an earlier receipt to meet a requirement. By including all of the issues until the cumulative quantity to receive is bigger than the cumulative quantity to issue, the ATP quantity in an earlier period considers the need to use some of that quantity in a later period.
The ATP quantity is the uncommitted inventory balance in the first period and is normally calculated for each period in which a receipt is scheduled. The program calculates the ATP period in days, and calculates the current date as the first date for the ATP quantity. In the first period, ATP includes onhand inventory less customer orders that are due and overdue.
Microsoft Dynamics AX calculates the ATP using the following formula:
ATP = ATP for the previous period + the receipts for the current period – the issues for the current period – the net issue quantity for each future period until the period when the sum of receipts for all future periods, up to and including the future period, is greater than the sum of issues, up to and including the future period.
When there are no more issues or receipts to consider, the ATP quantity for the following dates is the same as the latest calculated ATP quantity.
If all of the dimensions used for an item are not given when the ATP check is done, they might still be specified on the issue and receipts. In this case, in the ATP calculation, the receipts and issues must be aggregated to the existing dimensions, to reduce the number of receipt and issue lines used in the ATP calculation.
The ATP quantity shown is always > = 0. If the calculation returns a negative ATP quantity (for example, if a larger quantity than the available quantity has been promised earlier), the program automatically sets the quantity to 0.
Requested and confirmed delivery date
When a sales order line is registered, the salesperson must enter the requested delivery date. The sales order line processing will then calculate the best ATP date for this order line. The best ATP date is defined as the customers requested date or the date when the line can be delivered in full.
Based on the delivery rule, the operator can select if the customer wants a single full delivery, or a number of part deliveries. If the delivery rules states a complete order, then the worst-case ATP date can decide the confirmed delivery date on the entire order. The worst-case ATP date will then be copied into the confirmed delivery date fields on the sales order and on the lines. This process should happen when the order is confirmed.
Subsequence ATP calculations
If it is not possible to give a line an ATP date, then the ATP date will be set to “zero”. A “zero” ATP date means that this line needs to be manually processed by order management or by planners. This means that the order management must go though the Master planning/MRP to create a receipt. As soon as a receipt is created, the system can give an ATP date to the issue transaction.
Dimensional and level based ATP
In the ATP calculation, the ATP will be given at the lowest level that is specified of the storage dimension. The storage dimension is Site, Warehouse etc. When entering a sales order line and only site dimension is specified, then the ATP calculation will give the ATP date based on the items that is available on that site.
When a sales/transfer order line is physically reserved, then the ATP should be based on the reservation dimensions.
To accommodate this, the ATP will use the dimensions on the sales- or transfer-line to decide what level the ATP should use. At reservation the warehouse will be specified on the transaction.
To omit a warehouse from ATP calculation, then place the omitting warehouses under another site, like QA, returns, production etc.
ATP overview per sales order
After a sales order has been completely entered, it should be possible to give an ATP overview of the sales order.
The overview will show which lines that can be delivered in relation to the customer requested and confirmed delivery date. A differentiation between full, partly and none is visible. The colors “green“, “yellow” and “red” is used to inform the user of delivery status.
Green means that the allocation is physically reserved and ATP is OK.
Yellow means that the order line is not completely reserved.
Red means that the order line is not allocated or the ATP is not OK.
To support the extended ATP, the ATP will provide some additional functions. ATP quantity is available, but for performance reasons this field is omitted in the sales order screen.
ATP overview all sales orders
The form named ATP overview is available to the order management and show what sales orders, and what customers where manual processing and re-planning is needed.
In this ATP overview it is possible to see if an ATP change is possible. This functions like advancing the delivery prior to the expected ATP date. The processing for a new improved ATP date must be a manual process.
ATP delivery rule actions
These actions will be defined under the delivery rule.
The actions are:
ATP quantity change actions:
No action: No actions will be taken based on the fact that a sales order has lost its ATP date or quantity.
Automatic split sales line: If only some items can be delivered at the ATP date, then the system split the sales line so that all lines get an ATP date. Let’s say the customer ordered 10 units, and all 10 could be delivered at the requested delivery date (1/7).
This is backed up by the following receipt from this purchase order:
There also exists a later purchase order of 5 pcs to be delivered on the 15/7:
If the quantity expected on the first purchase order is reduced from 10 to 5 pcs. Extended ATP will then split the sales line into two deliveries, with different delivery dates:
Delay days before split:
This parameter is used to control, that the delay must be larger than X days before Extended ATP will split a sales order line. If delay days before split are set to 0 then the value from the ATP time fence will be used as criteria for splitting the sales order line.
Loss of ATP date actions selections:
No action : No actions will be taken based on the fact that a sales order has lost its ATP date.
Manual reconfirm: When this option is enabled, the automatic order processing will cancel the current order confirmation, and remove the confirmed delivery date on the affected lines will be removed. The document status on the sales order will be set to “none”, and the order management must manually reconfirm the order.
Automatic reconfirm: When this action is enabled, the current order confirmation will be cancelled, and a new order confirmation will be created, and automatically sent to the customer if this is enabled on the customer.
ATP Inquiry overview for kits and BOM items
The ATP calculation does also support the possibility to perform ATP calculations on kits and BOM items. The property of a kit is that it is a phantom item on the sales order. The real items are the contents of the kit, and can be a multi level structure.
The ATP Inquiry forms overview tab is used for doing delivery simulations for kits without creating a sales order. By entering a kit-item, quantity and requested delivery date, the system will show how much that it is possible to deliver on the requested date, and what the delivery date is for the remaining quantity.
The ATP Inquiry form
To use this form, create a line in the “filter” grid, by specifying an item, site/warehouse, quantity and requested ship date. Extended ATP will then calculate ATP date and on hand on the item. The lower grid is used for additional specifications, more particularly when the item is a kitting item, then the full ATP for the kit will be shown here. It is also possible to set the ATP Inquiry form to update in batch.
ATP Algorithms
In standard Dynamics AX there are already an ATP calculation with an algorithm that loads on-hand per dimension, and then loads all issues per date and all receipts per date. This function builds up a table like this:
In standard AX this evaluation is done transaction by transaction, while in Extended ATP this is changed to use more efficient ATP calculations by grouping issues and receipts per delivery date. In addition, when a transaction is physical reserved, it will always get ATP date equals today. This reduces the number of time an ATP calculation needs to be performed.
To keep track of ATP dates, the ATP is in WM&D a field on the sales order line and on the transfer order line. The ATP field is set at order processing, and when an ATP date is set it remains on the sales order line. The ATP date on the sales order line will not be set before the sales order is confirmed.
ATP Algorithms for kitting
Processing ATP on sales orders with kits will be calculated for the lowest items in the kit, and then the “worst case”-items ATP properties will be the ATP for the kit. This is also called “bubble” up.
The ATP “bubble” process will happen as a sub-process to the order processing.
Other high level aspects
Rules for losing an ATP date is an important aspect. The rule for losing an ATP date is that some conditions has been changed. Changing the following conditions will always result in a recalculation for a sales order line:
Sales Unit,
Sales Qty,
Requested receipt date,
Requested ship dated,
Confirmed receipt date,
Confirmed ship date.
When the expected receipts unexpectedly changes (moves in time or a quantity is changed), then there is a risk that the current ATP calculations are no longer valid. It could in these cases result in change of or even removed ATP dates.
When the system needs to change the ATP dates, it needs to recalculate it in the right sequence. The general rule to lose ATP should happen based on FIFO. There are also times when the system will have originated from a “blanket order” or a “reservation order”. To be able to fulfill this rule ATP is based on sorting the orders in “ATP Sequence”. This is a new field that states the sequence for when a sales order was registered.
On the periodical order processing, the system will then be sorted according to this field.
Periodic ATP calculations
Most ATP calculations in WM&D are automated, and are done when an order is order processed. In the normal order processing it is not possible to improve the ATP date because a full ATP recalculation requires visibility on all issues and receipts. For example, when moving a purchase forward in time, it will release a new ATP calculation on all affected orders.
Here the ATP calculation can be monitored, as the ATP calculation is a background process in the order processing framework. It is also possible to manually start an ATP processing on all items with open sales order lines.
ATP FAQ
This section covers information related to ATP, and is described as a FAQ.
Question
Answer
When I have zero on stock, I see that my sales lines requested delivery date is set to today +X days ?
The ATP calculation works on a time fence. The time fence could be set to X days. If there is not enough on hand, then the ATP will move the delivery date outside the ATP time fence.
How to I enable Extended ATP
In the WM&D parameters you need to enable the ATP marking to enable the extended ATP calculations. Each line must also have delivery date control set to ATP.
Can each item have different ATP time fences?
Yes. On the item master under Default order setting, you can set can enable ATP on selected items, and also set time fence.
Do ATP also work for kits ?
Yes. ATP works on kits, and the ATP is calculated on the bases on the leaf items (Items lowest in the KIT-BOM). ATP is the bobbled up to the top item, that shows the “worst-case” ATP date.
I see a field called ATP sequence on sales orders, inventory transaction and on transfer orders. What is that ?
With extended ATP some orders can be prioritized over others. Let’s say you have a Blanket order, and you release a sales order. Then this released order will have a higher priority than other orders, and will get items before others. The ATP sequence control this, and shows a date + time for when the order or blanket order was created.
I need to understand the ATP better. What is the best source?
ATP is much based on standard AX. Also try to look into the Dynamics AX online manuals.
I see that the ATP field is transferred down as
estimated date on the inventory transaction. Why ?
This happens when the ATP date is delayed in relation to the requested or confirmed delivery date. This will secure a more realistic ATP calculation. When the ATP date on the sales order is moved, then the estimated date on the inventory transaction will also be moved.
In the following blog posts I will focus on the picking process in a warehouse. There are extremely many combinations in this area, so it is worth understanding what we meet when we will be out there and selling Dynamics AX. There will be follow up postings posts later with picking options in Dynamics AX and also what picking strategies that are available in WM&D. This article shall lay out a 10 step plan for evaluating the multitude of alternatives available in designing a piece picking system.
Area of Concern
Piece picking is one of the most labor intensive processes within a distribution center and as such, it is a major area of concern for operations professionals. As a result, operations professionals are often asked this question… “Which piece picking method is best?”
For the purposes of this article, piece picking is defined as any order selection process that requires the product (units) picked to be individually handled and/or placed into an outer carton, tote, or other container before shipping.
In comparison to full-case or pallet picking operations, piece picking typically has lower unit volume, lower revenue, and higher labor costs. The higher labor costs are accrued due to the need to open vendor cartons, pick SKUs less densely, erect/pack/seal shipping cartons, and apply carton labels while picking less volume per item than full case or pallet picks. The movement towards just-in-time supply chains and the proliferation of direct-to-consumer catalog/internet fulfillment operations is driving a change in order profiles. Smaller orders (those with fewer line and piece counts) are being received more often in many industries and market channels.
To design or re-design a picking operation, one needs to develop a cost versus benefit analysis to include the systems to be considered. In order to fully analyze the nearly innumerable alternatives available, one can follow a 10 step plan to narrow down to the feasible options as illustrated below:
Step 1: Selection of Possible Storage/Picking Types
Mine available historical operational data, apply design year projections, and profile item inventory, movement, & unique characteristics to determine the alternative pick types available (cubic velocity by SKU). In an over-pack picking system high density drawers, bin shelving, carton flow rack, vertical lift modules, and carousels may be among the candidate infrastructure to be considered.
Systemic support and overall capital budget constraints may eliminate some of the more mechanized alternatives. The matrix below provides some high-level rules of thumb for pick type selection.
Step 2: Mode of Order Transportation
There are two common options in selecting the method used to transport the order to and from each pick location:
Pick to cart
Pick to conveyor
A decision is typically made based on the overall size of the piece picking area (travel requirement). SKU velocity, pick density, and related considerations often define the appropriate method.
A combination or hybrid of the pick to cart/pick to conveyor option is commonly used, in which, fast pick items would be picked to conveyor and slow picks would utilize a cart. Conveyor could be used to transport orders to and from each cart pick zone. The picker may load the cart at the beginning the zone and unload to cartons or totes to conveyor at the end of the zone.
Step 3: Selection of Picking Technology
Operations with a large number of picks in a small area benefit the most from pick to light technology, while operations with picks spread across a large pick area (many pick facings) are better suited for either RF or voice picking.
The benefits of voice versus RF is that voice is “hands free”, the picker never has to put down (or holster) an RF device (scan gun) to either pick or open cartons. In a voice system, picking time can be reduced by the picker listening to the voice directive while traveling to the next location instead of stopping to read the RF device.
The RF device, however, has the ability to capture detailed item information, typically a production batch or serial number, quickly by scanning item barcode labels. Voice may be more cumbersome in these applications.
Step 4: Order Batching
Order batch picking is the process of grouping orders together to create a larger pick order, which reduces the overall pick lines in an operation versus a discrete order pick (picking of one order at a time). Since multiple orders are being picked into one container, in most cases this will result in the requirement for an order sortation station, an area designed to split the pick order into the individual customer orders (discrete orders). If the order batch contains all single unit orders or all orders of the same item, the batch will typically not require a separate sortation station, the items are allocated to a specific order at the time of packing or manifesting. Hardware costs based on number of users, not locations Hardware costs based on number of users, not locations Hardware costs based on number of users, not locations Hardware costs based on number of users, not locations
Step 5: Batch Sortation Technologies
Much like the picking technologies, batch sortation can be performed utilizing paper, RF, voice, or a put-to-light system (which is a reverse of a pick-to-light system). Since a piece pick batch sortation is typically in a condensed area, usually consisting of sections of carton flow rack or shelving, the methods that are most commonly used and are the most effective are RF and put-to-light. Put-to-light is more expensive, but the productivity rates are considerably higher, 100-150 lines/hr for RF versus 200-over 250 lines/hr for put-to-light (broad industry estimates).
Step 6: Cluster Picking
Cluster picking is a methodology of picking into multiple order containers at one time. The containers could either be either totes containing order batches, discrete order shippers, or discrete order totes. There are two main piece picking systems that benefit from the use of cluster picking:
Pick to cart operations, in which, a cart would be loaded with multiple totes or shippers and the picker will make one pass through the pick zone and sort to the pick containers, thereby avoiding unproductive travel.
Vertical lift modules (VLM) or carousel operations utilizing the independent zone picking technique, the picker would setup the pick container batch, this would initiate the mechanized pick modules, and the items would be sorted to the proper pick container. This technique is used to optimize the VLM & carousel pods by limiting the number of machine cycles.
Step 7: Cluster Picking Sortation Technologies
The same options and reasoning that applied to batch sortation applies here. The same task is being performed on a smaller level, typically sorting into two to four pick containers. The most common cluster picking system contains a put-to-light cart, whereas the picker utilizes RF or voice picking technology.
Step 8: Select a Picking Container
Pick to tote operations typically utilize order batching & sorting techniques that reduce the picking labor greater than the additional labor required for packaging and sorting. Pick to shipper operations are executed in one of three ways
Picker erects the cartons at time of picking. Requires the replenishment of cartons to multiple areas.
Cartons are erected and transported to the pickers via separate conveyance system (i.e. monorail). Requires added capital equipment expenditure.
Cartons are erected and inducted directly into the system with the contents pre-allocated. Requires extensive systems support.
Step 9: Multiple Pick Zone Order Routing Methodology
Pick to tote operations with order batching lends itself to the independent zo ne pick method, a process in which segments of each order are picked independently in various zones and directed to a consolidation area where the elements of the order are combined to the shipper (batch sortation area).
Pick to shipper or discrete order pick to tote operations are typically most effective in either a pick and pass or zone routed system. This routing method will reduce the overall number of totes or cartons in the system. A zone routed system although more complex and costly, will significantly improve productivity and work flow especially in operations in which an order requires picks from multiple zones. Unlike a pick and pass system, zone routed totes or shippers are only touched by those people in zones where product needs to be picked. All touches are productive as a result.
Step 10: Order Consolidation Methodology
There are several methods with which to consolidate an order before shipping. If your operation is shipping only parcel orders, this might not apply if each carton is shipped independently of each other and no physical consolidation is necessary. For operations that must keep order integrity at the shipping dock, the common techniques are as follows:
Consolidate the order before packing occurs when either pre-picking orders before all items are available or discrete order picking to a tote with a 100% order check or to reduce outbound cartons.
Manual sortation on conveyors – human sortation system, a person is assigned the task of sorting the totes to gravity conveyor lanes typically directed by RF scan
Automated sortation on conveyors – requiring controls and diverts
Tote mini-load system AS/RS (Automated Storage & Retrieval System) – stores all totes until order is complete then releases entire order to packing in a “slug” or “train”.
Sortation is commonly required after packing, typically for LTL or TL shipments.
Manual sortation on conveyors – human sortation system, a person is assigned the task of sorting the totes to gravity conveyor lanes typically directed by RF scan
Automated sortation on conveyors – requiring controls and diverts
Conclusion
Once the options available for your operation are narrowed down a cost versus benefit analysis must be performed for each remaining alternative. Some questions that need to be answered are:
What is the projected labor cost?
Does the alternative meet the projected throughput requirements?
What are the initial capital costs?
Are there any on-going costs & expenses?
How much space does this system consume?
Does it meet order accuracy goals requirements?
Does the alternative meet the required packaging standards and that of your customers?
Is the system flexible and scalable?
What are the risks associated with deploying such a system?
In the previous posting we looked into the theoretical pure Transportation Cross Docking, where there are dedicated cross docking warehouses. But often cross docking is classified into several categories. Cross docking reduces handling costs, operating costs, and the storage of inventory. That’s why this logistics method is used in various industries, e.g. the retail and grocery distribution. Originally cross docking was solely done by moving goods from one truck directly into another. Nowadays cross docking is able to handle larger and more complex operations. Therefore cross docking distribution centers may include highly efficient automation systems for staging, sorting and consolidating inbound materials for shipping. And even a very short term warehousing function might be included. Here are some cross docking types that is often refered to:
Manufacturing Cross Dock Use Cross Docking for the receipt, consolidation, and shipment of a pre-defined quantity of raw materials or component parts, typically from many suppliers, to the product plant.
Distributor Cross Docking Cross Docking is performed on a wide variety of merchandise. Typically it is conducted in operations where various manufacturers, making complementary items, ship their merchandise to a common distributor who assembles the products on a multi=SKU Pallet before delivery to the next level of the supply chain.
Transportation Cross Docking Transportation companies sort and consolidate parcels and pallet loads based on geographic destination.
Retail Cross Docking Products are received at these retailers’ distribution centers, moved across the dock, and married with other products bound for the same store. A few types of display-ready-pallet builds for end-users fit the cross dock profile; items are off-loaded but not put-away, the display ready pallet is built, and then released without being put-away. All would have to transpire within 24 hours.
For now, I would like to focus on two main cross docking methods.
Cross Docking I (Transportation Cross Docking) – This process consolidates inbound products from different vendors into a mixed product pallet for the same store, which is delivered to the customer when the final item is received. Logistics companies then deliver the goods to the respective stores. In this scenario the crossdocking warehouse can be a pure provider of cross-docking services. If we compare this to Dynamics Ax, it means that there are no sales orders, purchase orders or inventory transactions. The information on how to cross dock is information either on labels attached to the pallet, or information received as ASN (Advance Shipment Notification)
Cross Docking II (Distributor Cross Docking) – This process combines shipments from a number of different carriers. All suppliers receive an overall order summarizing the orders of the individual stores. They then transport the goods as one big delivery to the staging area where the goods are repacked onto pallets with other goods from other carriers for the same store. Logistics companies then deliver the goods to the respective stores. This type of Cross Docking is both an advantage for the customer and the supplier as there is only one order or delivery per day or per week.
A Dynamics AX approach to support cross docking II (Distribution cross docking).
Standard Dynamics AX do not have cross docking support out of the box, but I see several companies is using the direct delivery function to achieve cross docking. By doing this, one purchase line can be linked to a sales order line, and the delivery information is transferred from the sales order to the purchase order. The drawback is that there is a “one-to-one” relationship between the receipt transaction and the issue transaction. There is also an issue that the cross is close to 100% manual. (PS! There is an option to specify a shipment reservation sequence that should look for items in the receiving dock, but this is not a pre determent cross docking ).
But in the real world we see the need of a many-to-many relationship. One receive, should be cross docked to several sales orders, meaning that you may receive a large quantity from a purchase order, and it will fulfill many different sales order to different customers. Often it is even not customers, it could be transfer orders to other warehouses, or retail stores classified as warehouses.
Standard AX do have “traces” of solving this. It is called inventory marking.
Here you do have a many-to-many relation between transactions. It is even documented on the inventory transactions as shown here:
Here the Lot-ID points to the Reference Lot on the inventory transaction. So by doing some manipulation on the inventory marking we can make Dynamics AX keep references between issues and receipts. And this is also something that can be the origin to a cross docking II scenario.
But there is a few more things that needs to be in place to make the cross docking efficient. The first thing is to an efficient way of transporting goods from the receipt dock to staging area/shipping docks. But the transportation system must also support transport to all kinds of areas in the warehouse, like buffer location, picking location, outbound docks or to automated warehouse solutions. This can be visualized like this:
Standard AX do have a pallet transportation logics, even though the looks of it could be improved;
Here the user select the pallet ID, and starts the transport. Arriving to the destination location, the user completes the transport. This screen does the job, but the for a warehouse worker on a forklift, it is difficult to use. A forklift operator wants to use barcodes and/or touch sensitive screens. The other negative element is related to that it only supports full pallets. In a real world scenario we often see that transports are needed on cartons or even on items that do not have a unique identifier. In the To-Increase Warehouse Management & distribution, this transportation system has been extended to support transport on both pallet and carton license plates(also called SSCC), and also transport of goods without having a identifier;
When a good way of identifying goods, and a good transportation method is in place, that it is possible to do cross docking efficiently. As shown in the figure below, the cross docking is then processed in the same way as any other transport:
The screen above is the receive transactions where a single purchase line has been split to 10 inbound transports, where the first is cross docked to picking area, while the others are received into the warehouse. In a cross docking scenario the destination location would be an outbound dock, and the name of the customer would also be visible. To-Increase WM&D also support the ability to create the license plates, and to create the correct labeling for the goods to be cross docked and to the correct customer.
So to conclude in how to make an efficient cross docking with dynamics AX you need:
Build a framework on top of inventory marking to mark how cross docking shoul happen, and that works even when you have a long supply chain.(Going through several warehouses before being shipped out)
Create a receiving system that allows you to receive ASN and the goods, control the inbound transport.
Modify the transportation system to support more scenarios(Pallets, Cartons and items)
Create an efficient system that can be used on forklifts and RF/PDA
Crossdocks are high speed warehouses. If an arriving item has already been requested by a customer there is no need to store it as anticipation inventory; instead, the item can move directly from receiving to shipping, without intermediate storage and retrieval. Thus the item can move much more quickly through the facility and the most costly part of warehouse labor can be avoided.
In a high-volume crossdock the turnover times may be measured in hours. To support this velocity of movement, a crossdock may be nothing more than a slab of concrete with a roof and walls punctuated with doors for trailers. Freight is pulled off arriving trailers, sorted and loaded onto departing trailers without intermediate storage.
There is little or no storage provided in a crossdock because items do not stay long enough; but there is generally a lot of material-handling equipment, such as forklifts and pallet jacks, to move freight. Labor is frequently the main cost and it is devoted to unloading incoming trailers, moving the freight to the appropriate outgoing trailers, and loading. Consequently, the issues within a crossdock are those of material-handling and product flow rather than location and retrieval.
Why crossdock?
The biggest reason to have a crossdock is to reduce transportation costs.
This can be achieved by consolidating multiple shipments so that full truck loads can be sent. The Home Depot is a major retailer and the largest user of Less-than-Truck-Load (LTL) shipping in North America. (LTL means sending shipments that do not fill a trailer and so are not economical to send by themselves. Instead, an LTL freight company consolidates many such shipments and so achieves efficiencies.) At the present writing, LTL costs about twice the cost of Truck Load (TL) shipping, so there is a strong incentive to fill trailers. The Home Depot has begun doing this by having vendors ship full trailers to its crossdock. (The trailers are full because they hold product for many stores.) At the crossdock the product is sorted out for individual stores and consolidated with product from other vendors bound for the same store. The result is that each store has enough freight that it or it and a few close neighbors generate a full truck load from the crossdock. The result can be considerable savings.
Additional benefits include less inventory (because all product flows right through) and less labor (because product does not have to be put away and later retrieved).
Operations
Most crossdocking freight terminals are laid out as long, narrow warehouses with doors around the perimeter.
Figure : View from above of a typical high-volume crossdock, which receives freight, sorts, and disgorges it. Each door is devoted to either arriving trailers, which are unloaded, or to departing trailers, which are loaded. Ideally, freight should flow directly across the dock rather than along its length.
A typical terminal, where the small shaded rectangles represent incoming trailers with freight to be unloaded, and small clear rectangles represent (empty) outgoing trailers. Terminals range in size from fewer than 10 doors to more than 500 doors.
Inside a terminal, a variety of material handling methods is used to transport freight. Forklifts and palletjacks carry heavy or bulky items, and carts transport smaller items. In addition, large terminals may have draglines, which circulate carts around the inside perimeter of the dock.
There are two types of doors in a terminal: receiving, or strip, doors, where full trailers are parked to be unloaded, and shipping, or stack, doors, where empty trailers are put to collect freight for specific destinations. Once established, the designations of these doors do not change, although the trailers parked at them will. A shipping door always receives freight for the same destination. A receiving door may be occupied by any incoming trailer, regardless of its origin or contents.
Arriving trucks may deliver their trailers directly to an unoccupied receiving door; or, if none is available, they may place them in a queue. After the trailer is backed into a receiving door, a worker unloads the freight. After unloading items of a shipment onto a cart, the worker walks to the destination trailer and loads the items into that trailer; or he places the cart on the dragline, if the terminal is so equipped. To handle pallet loads, the worker uses a pallet jack, or hails a forklift driver, or finds a forklift and delivers the load himself.
After a trailer has been completely stripped, a driver replaces it with another incoming trailer from the queue of trailers waiting to be stripped. After an outgoing trailer has been filled, a driver replaces it with an empty trailer to be filled with freight for the same destination.
Freight flow
The patterns of freight flow within a terminal—and therefore the work—are determined by:
Layout by which we mean the specification of doors as either receiving or shipping doors and the assignment of destinations to the shipping doors.
Geometry The shape of a terminal determines the travel distances between doors and the susceptibility to congestion. (For example, narrow docks tend to be more congested because workers have less room to manoeuver.)
Material handling systems For example, pallet jacks are slower than forklifts, but they may be more available; draglines reduce walking time, but can impede forklift travel.
Freight mix For example, terminals having a higher mix of pallet freight require more forklift travel than those receiving a majority of carton freight.
Scheduling In real time, the dock supervisor determines freight flow patterns by assigning incoming trailers to receiving doors.
Changing the geometry or material handling systems of a terminal is expensive; changing the freight mix is a marketing decision with implications outside the terminal. The two remaining ways to take work out of the system—change the layout or change the scheduling—are inexpensive. In particular, the layout can be changed simply by changing the labels on the doors of the crossdock.
There are two kinds of doors on a typical crossdock: Those reserved for outgoing trailers (for example, the “Miami trailer”) and those reserved for incoming trailers. The outbound doors are reserved for specific destinations but the incoming doors are not so specific and may be used by any incoming trailer (because, while departures are scheduled to specific destinations, the terminal does not have full control over arrivals).
Congestion
As more freight flows across a dock, congestion increases, which interferes with the flow. There are several distinct types of congestion on a crossdock:
Competition for floor space: Freight may be docked outside a receiving door if, for example, it consists of many unpalletized cartons going to the same shipping door. Then there is an incentive to accumulate it all so that fewer carts must travel to the destination door. On the other hand, freight is very likely to be docked outside a shipping door while the loader figures out how to pack the trailer tightly. When several nearby doors compete for space to dock freight, some invariably interferes with other traffic. At the very least, it takes longer for a worker to manoeveur through the docked freight.
The effects of docked freight are most severe near the inside corners of the dock, where there is less space per door, as shown in this figure.
Figure: There is less floor space per door at outside corners and therefore more likely to be congestion that retards movement of freight.
The need to dock freight suggests that busy outgoing trailers be parked away from the corners of the dock.
Interference among fork lifts: Despite the intention of moving freight simply “across the dock”, most doors will be to the left or right of a door with an incoming trailer and so a significant amount of freight must travel along the length of the dock. Most crossdocks set up two forklift “highways”, one along each long side of the dock. (It is a good idea to set up two so that, when one is blocked, some freight can still flow.) However, the flow of forklifts back and forth along the length of the dock may be interrupted by forklifts making left hand turns into doors with outgoing trailers. This effect can be reduced by parking busy outgoing trailers away from the very middle of the dock (which is also the most convenient location). Note that this works opposite to convenience, which tends to push busy outgoing doors towards the middle of the dock.
Competition for drag line capacity: Each door receiving arriving trailers will need empty carts from the dragline and, after loading a cart, will need empty cart positions on the dragline. This means that there will be diminished dragline capacity downstream of this door. If the door is far from a busy outgoing door then the region of diminished capacity can be large. This creates an incentive to intersperse incoming doors with outgoing doors. In particular, this suggests that current practice, which is to create large banks of incoming doors, reduces the capacity of the dragline.
Design
The first decision in designing a crossdock is “how many doors?”.
Generally doors are devoted to one of two types of trailers:
Incoming, from which freight must be removed; and
Outgoing, in which freight must be loaded
It is easier to unload than to load. A loader must try to get a tight pack and so may have to dock freight and this double-handling slows him down. A good rule of thumb is that it takes twice as much work to load a trailer as to unload one.
To achieve frictionless flow, the capacity for flowing freight into the dock must be balanced with the capacity to flow freight out of the dock. Accordingly, one should plan to have twice as many outgoing doors as incoming doors. Alternatively, one can balance the rates of flow by assignment or workers. For example, if there are equal numbers of incoming and outgoing doors, balance can be achieved by assigning twice as many workers to load. Note, however, that crossdocks with many doors are generally less efficient than crossdocks with fewer doors. The reasons are as follows. A door can only have a few near neighbors on a dock and so a dock with more doors means that each door is likely to have few more near neighbors but many more distant neighbors. This means that in general freight must move farther across a large dock. Consequently, labor costs are generally higher at larger docks.
An additional factor is that on larger docks more freight flows past the central doors, which are the most important because they tend to be close to many doors. In fact, the total flow of freight past a centrally-located door tends to be proportional to the square of the total number of doors. Therefore a dock with twice the doors tends to have 4 times the congestion in front of its central doors, which diminishes their value.
This follows from the following simple model: Imagine a rectilinear dock as a line with 2n doors (numbered from left to right), and assume that equal amounts of freight move between every pair of doors. Then the flow into any door is of intensity O(n). But the total flow passing the area between door i and i + 1 is i(2n – i), which means that the greatest total flow passes by the middle of the dock, door n, past which flows O(n2) units. But these central doors are exactly those that are nearest to most other doors and therefore are the best locations! Thus, as a dock design grows in length, the lengthwise traffic past the central doors increases rapidly while traffic directly across the dock remains unchanged. Increased traffic means congestion, which helps explain why docks can lose their efficiency as they grow. There are few docks larger than about 200 doors. Most are 80–120 doors long.
Do not forget to allow enough parking space in the yard for two trailers for every door. This means that for each origin or destination you can have a trailer at the door plus one full and one empty in the yard. This helps you handle surges in freight flow.
Geometry What is a good shape for a crossdock? In general, one wants to enable efficient flow of freight from incoming trailers to outgoing trailers.
Typically, a crossdock is a long rectangle, with doors for trailers around it. The capacity of a dock is increased if it has many doors, but without being too close together so that trailers (outside) or freight (inside) interfere with one another.
Figure : A typical crossdock is built in the shape of the letter I (actually, an elongated rectangle), so that freight can flow across from incoming trailers to outgoing trailers.
A typical dock, such as illustrated in the picture, is generally around 120 feet wide (36.6 meters). This is to allow freight to be staged on the floor. A standard (large) trailer is 48 or 53 feet long (14.6 or 16.2 meters) and a “pup” is 28 feet long (8.5 meters); all are 9 feet wide (2.7 meters). The width of the dock should include enough space for the trailer on each side of the dock to stage its freight (about 100 feet total, or 30.8 meters) plus allow space for travel along the length of the dock (for example, two aisles, each 10 feet wide, or about 3.0 meters). We have seen docks as narrow as 80 feet (24.4 meters), but this is practical only when it is possible to avoid staging most freight, such as when the material is palletized and also easily stackable and may be loaded in any order. If a dock is much wider than this, it just adds to the travel time to move the product from incoming trailer to outgoing trailer.
A dock does not have to be shaped like the letter I. For example, shapes of an L, U, T, and H. But every corner in a dock reduces effective capacity:
Crossdocks have been built in a variety of shapes. Clockwise from upper left: An L-shaped terminal of Yellow Transport; a U-shaped terminal of Consolidated Freightways; a T-shaped terminal of American Freightways; an H-shaped terminal of Central Freight
On the outside of a corner you lose floor space per door on which to dock freight.
This increases congestion on the dock, which interferes with the flow of freight.
On the inside of a corner, you lose door positions because trailers will interfere with each other in the yard. Because doors are lost, the dock must be longer to accommodate a given number of doors, which means that on average freight will have to travel farther to cross the dock. Thus, for example, freight has to travel farther to cross an H-shaped dock, with four inside corners, than to cross an I shaped dock. (Because the door positions will be lost anyway, inside corners are a good place to locate administrative spaces or hazardous materials storage.)
It is hard to make generalizations independent of specific bills of lading; but in general an L-shaped crossdock is inferior: It incurs the costs of one inside and one outside corner but without getting anything in return. The result is that freight must travel farther because the dock must be longer from end to end to make up for lost doors at the inside corner. Furthermore, there is congestion at the outside corner. The same observations hold even more strongly for a U-shaped dock.
An X-shaped or a T-shaped dock also incur corner costs but they have a compensating benefit: The longest distance from door-to-door is less than that for an I-shaped or L-shaped dock with the same number of doors.
Trailer management
One can reduce labor costs in a crossdocking freight terminal by parking incoming and outgoing trailers so that freight can be efficiently moved across the dock. For example, if much of the freight flowing through the terminal is bound for Miami, the Miami trailers should probably be parked in a convenient location. The challenge is to formalize the notion of “convenient”; then labor-reducing door assignments can be made with optimization models based on the geometry of the terminal, the material handling systems within, and the mix of freight passing through.
References : Copyright 1998–2011 John J. BARTHOLDI, III and Steven T. HACKMAN. All rights reserved. This material may be freely copied for educational purposes—but not for resale—as long as the authors’ names and the copyright notice appear clearly on the copies. Corresponding author: john.bartholdi@gatech.edu
Warehouses may be categorized by type, which is primarily defined by the customers they serve. Here are some of the more important distinctions:
A retail distribution center typically supplies product to retail stores, such as Wal-Mart or Target. The immediate customer of the distribution center is a retail store, which is likely to be a regular or even captive customer, receiving shipments on regularly scheduled days. A typical order might comprise hundreds or thousands of items; and because the distribution center might serve hundreds of stores, the flow of product is huge. The suite of products changes with customer tastes and marketing plans; but because the orders are typically known a day or more in advance, it is possible to plan ahead. Some product may be pushed from the distribution center to the stores, especially in support of marketing campaigns.
A service parts distribution center is among the most challenging of facilities to manage. They hold spare parts for expensive capital equipment, such as automobiles, airplanes, computer systems, or medical equipment. Consequently, one facility may represent a huge investment in inventory: tens or even hundreds of thousands of parts, some very expensive. (A typical automobile contains almost 10,000 parts.) Because of the large number of parts, total activity in the DC may be statistically predictable, but the demand for any particular part is relatively small and therefore hard to predict. This means that the variance of demand can be large and so relatively large quantities of safety stock must be held, especially since there can be usually long lead times to replenish parts to the warehouse. Indeed, sometimes there is as much safety stock as cycle stock, and so, in aggregate, these skus require much space. This in turn increases travel distances and makes order-picking less efficient.
A typical service parts warehouse manages two distinct order streams: stock orders, by which dealers replenish their shelves; and emergency orders, in which an equipment owner or independent repair shop urgently requires a few special parts to repair a broken piece of capital equipment. Stock orders tend to be large and fairly predictable replenishments of popular consumables, while emergency orders are typically small (two to three pick-lines), unpredictable, and urgent, because expensive capital equipment is likely waiting for repair. Emergency orders are typically for items that are ordered infrequently (otherwise they could have been provided by the dealer from stock inventory). Such orders—a few, slow-moving items that must be picked immediately—are relatively expensive to handle. Worse, customers ordering for repair might order before they are absolutely sure which parts need replacement; and so there can be a significant percentage of returns to be handled at the warehouse.
For most product in a service parts warehouse there are not sufficiently reliable patterns of movement to justify special processes, but one can layout stock to be more space efficient by storing similar sizes together, thereby reducing travel. Furthermore, one can hedge chances of having to travel long distances. For example, it can be advantageous, especially for emergency orders, to store products together that are likely to be ordered together.
Another complication is that the life cycle of a service part is unusual, with three stages of product life, as shown in the next Figure.
Early failures are generally due to manufacturing imperfections; mid-life failures are generally due to random events that stress the part beyond its tolerance; and end-of-life failures are due to expected wearing out of the product. Demand for product generally reflects this pattern, and creates challenges in the warehouse. For example, there is little time to ramp up availability of new product at the start of its life cycle. Also, parts are more frequently requested at the end of the product life cycle, and so it is easy for the warehouse to be stuck with obsolete merchandise. Finally, it may be necessary to relocate product as its popularity changes.
A catalog fulfillment or e-commerce distribution center typically receives small orders from individuals by phone, fax, or the Internet. Orders are typically small, for only 1–3 items, but there may be many such orders, and they are to be filled and shipped immediately after receipt. Because customer orders require instant response, such distributors typically try to shape demand by offering special prices for ordering at certain times or in certain quantities or for accepting more variable delivery dates.
A 3PL warehouse is one to which a company might outsource its warehousing operations. The 3PL provider might service multiple customers from one facility, thereby gaining economies of scale or complementary seasons that the customers would be unable to achieve on their own. 3PL facilities may also be contracted as overflow facilities to handle surges in product flow.
A perishables warehouse may handle food, fresh flowers, vaccines, or other product requiring refrigeration to protect its very short shelf life. They are typically one link in an extended cold chain, along which perishable product is rushed to the consumer. Such DCs are distinctive in that product dwells within for very short times, frequently only hours. Also, there is a great emphasis on using space effectively because, with refrigeration, it is so expensive. They face many challenges in inventory management, including requirements to ship product according to FIFO (First-In-First-Out) or FEFO (First-Expired-First-Out). Also, there are typically many restrictions on how product is handled. For example, chicken cannot be stacked on top of anything else, to protect against juices dripping onto product below and contaminating it. Finally, appropriate temperatures must be maintained and this can be different for different kind of products. A typical food DC operates separate areas for ambient temperatures, chilled (around 2 degrees C, 35 degrees F), and frozen product (-18 degrees C, around 0 degrees F). To protect stored product, it is important to avoid bringing in anything warmer. This type of warehouse will become more common as China, India, Brazil, and other rapidly industrializing countries build a middle class, which will increasingly want fresh fruit, vegetables, meat, and dairy.
While there are many types of warehouses in the supply chain, one of the main reminders is that there is a systematic way to think about a warehouse system regardless of the industry in which it operates.
What we need to realize is that the selection of equipment and the organization of material flow are largely determined by :
Inventory characteristics, such as the number of products, their sizes, and turn rates;
Throughput and service requirements, including the number of lines and orders shipped per day;
The footprint of the building and capital cost of equipment;
The cost of labor.
We also see that there is a regional difference in how to organize warehouse operations. Here is a brief survey:
North America
North America is driven by mass consumption. Think Wal-Mart. This enables huge economies of scale and, indeed, the trend has been for ever larger distribution centers and ever accelerating rates of product flow. As telecommunications enables better coordination along the supply chain, the uniformity of market and of distribution infrastructure allows fewer, more centralized and therefore larger distribution centers.
The Amazon.com distribution center shown in the following figure is typical:
One level, with conveyors and sortation equipment but little other significant automation. Such warehouses are generally built in the countryside surrounding major metropolitan areas, so that land is cheap but there is still ready access to large markets.
The fairly high costs of labor are held down somewhat by constant immigration into the US and Canada.
Warehouses in North America are coordinated by increasingly sophisticated warehouse management systems and so very rich data sets are available with which to evaluate and refine performance.
East Asia
Business in Asia has traditionally been based on personal relationships and less on computational models. Because of this tradition, data is not robust and not widely available; consequently the opportunities to improve operations by science are not fully developed at present.
In general, the most active economic areas are separated by lots of water, which means lots of product conveyed by air (for high-value or time-sensitive products) or ship (for bulky items or commodities). For both air and sea cargo, the large fixed costs increase incentives to consolidate freight. Consequently one expects to see the emergence of strong regional hubs, such as Singapore and Hong Kong, to support this consolidation.
India
India, like many developing countries, has both inexpensive land and low labor costs. Capital costs are relatively high in relation to the cost of labor and so there is less pressure to install specialized storage, even pallet rack. And because labor costs are low there is less incentive to increase efficiency. For example, it is not an attractive proposition to reduce labor costs by picking from flow rack: The labor savings cannot justify the cost of the rack or the forklift trucks.
In addition, warehouses in India distribute mainly to the local economy and so supply a market that is not wealthy. Consequently, the SKU’s are not likely to be high cost items and so there is not much savings available from reducing inventories by precise timing. Consequently information technologies cannot generate much savings.
Finally, inefficiencies in transport make India in effect a collection of smaller markets. These inefficiencies include the physical, such as roads in less-than-ideal condition, as well as the administrative. For example, each state within India levies customs duties on freight transported across the border. This slows interstate commerce and increases the expense. Such factors increase the costs of transportation and so favor a strategy of having more, smaller distribution centers rather than fewer, larger ones, where the volume of activity could better justify capital investment. The national government is attempting to revise its tax structure fix these inefficiencies.
Figure : The relatively low cost of labor, high cost of capital, and artificially small market mean that this warehouse in India may be economically efficient. (Photo courtesy of Rohan Reddy)
India is increasingly becoming a global sourcing hub and so suitable distribution centers are being built in around large ports, such as Mumbai (Bombay). However, land can be expensive there. Caleb Tan of Menlo Worldwide Logistics has observed prices comparable to those of Singapore or Hong Kong. Apparently this is due to a lack of land because of encroachment of slums as more and more people migrate from the countryside to economically vibrant areas.
China
A distinctive feature of the logistics scene in China is the seemingly boundless supply of very low cost of labor together with relatively inexpensive land. Consequently warehouses tend to be large, low buildings as in North America; but with some striking differences. For example, it is not unusual as of this writing to find a warehouse of 250,000 square feet with a single fork lift truck. The reason is that equipment is expensive but labor is cheap.
Figure : In the US warehouse on the left, cartons of beer have been palletized because labor is expensive compared to capital. The reduction in labor is worth the expense of a forklift plus the additional storage space. In the Chinese warehouse on the right, cartons have been stacked by hand and must be unstacked by hand; but labor is cheap and capital is expensive.
Despite cheap labor, China does have some capital-intensive warehouses, with the latest information technology and storage equipment. Such warehouses are most likely devoted to the distribution of high-value goods for export. Because such goods, such as consumer electronics, have high-value and short life-cycle, the warehouses can justify their equipment by substantial reductions in inventory costs.
The very different costs in the US and China sometimes leads to behavior that makes sense locally but may make the supply chain inefficient. For example, The Home Depot receives some Chinese-built product at its Import Distribution Center in Savannah, Georgia, USA. The shipping department in the warehouse in China de-palletizes freight in order to pack each trailer as tightly as possible for the drive to the sea port. Thus an expenditure of relatively cheap labor will reduce the relatively significant costs of equipment and transportation. But this means the product arrives in the US as loose cartons in containers and so The Home Depot must re-palletize the cartons before storage in deep, drive-in pallet rack. And most of it will, shortly after, be de-palletized once more when it is picked as cartons for shipment to stores.
Singapore, Hong Kong, Japan
Some economic powers such as Singapore, Japan, and Hong Kong suffer from limited space so land is much more expensive than elsewhere. Consequently, many of the warehouses are high-rise, such as shown here:
Figure :Multi-story warehouses are common in Singapore, Hong Kong, and Japan where land is expensive.
In addition, as first-world economies, labor in these places is expensive and so warehouses here are more likely to be automated. Freight elevators are likely to be bottlenecks to material flow in these facilities.
Space constraints have led to an interesting type of warehouse in Hong Kong and in Singapore: A multi-floor facility with no automation or elevators, but, instead, a spiral truck ramp so that trailers may be docked at any floor
Figure : Multi-story warehouse with no automation but accessibility provided by a spiral truck ramp.
In effect, each floor becomes a ground floor—but the cost is that significant land area, determined in part by the turning radius of a truck, is lost to the ramp and unavailable for storage. That storage space must be reclaimed up above.
This design is a clever and efficient way of using space if each floor is occupied by an independent tenant. But one must be careful if some tenant occupies multiple floors for then it may become necessary to shuttle trucks among floors. For example, a multi-story warehouse with spiral ramp would be unsuitable as a local distribution center: Trailers departing with small shipments for many customers must be loaded in reverse sequence of delivery to avoid double-handling. But since the load may not match the layout of product amongst the floors, this could require much shuttling of the trailer among floors to load.
Similarly, this might be an inefficient warehouse in which to receive shipments of diverse items that may be stored on different floors: Because rear-entry trailers restrict the sequence in which freight can be accessed, a trailer may have to shuttle among the floors to deliver all the freight to the appropriate places. Alternatively, the trailer would have to be loaded to match the allocation of product among floors at the warehouse. In either case, extra work is required.
Central and South America
This is a region of developing markets that are separated by geography such as the Amazonian rain forest and the Andes mountains. Consequently, markets tend to be relatively small and inappropriate for significant capital investment in warehouses.
Data may not be available or may not be transmitted to supply chain partners. In part this is because there has not been a strong, reliable stock market and so wealth has generally been invested in family businesses, which are less inclined to share data.
Labor costs are relatively low, but some segments of the workforce enjoy strong political protections, which results in labor inflexibility. Consequently, while labor can be cheap, it can be hard to shrink or re-deploy a workforce. Most of labor is devoted to handling small quantities, because retail stores are small and customers purchase tiny amounts daily.
Space is the main concern. Infrastructure is not well-developed and so, to reduce travel on bad roads, warehouses must locate close to the customer. But customers are concentrated in a few, very large cities such as Mexico City, Sao Paolo, and Lima, which are congested and where space is expensive.
Most warehouses in this region hold goods for domestic distribution. Because markets are not highly developed, inventory tends to be of less expensive goods and so the costs of moving inventory slowly are relatively low. (In contrast, China has many distribution centers supporting export of high-value goods, such as consumer electronics. The high cost of holding such inventory, justifies investment in facilities that enable rapid movement of product. This also holds for Mexico, which can get product quickly to market in the US and so able to justify advanced distribution centers.)
The following photograph reflects the low labor costs relative to the costs of capital in this region. Figure: A ladder is much cheaper than a person-aboard truck, though much slower. (Note the product stored as loose cartons.)
Europe
Warehouses in Europe, especially in Germany and France, are shaped by the relatively high labor costs and inflexibility of the work force. These facts push designers to find engineering solutions rather than social solutions to logistics challenges. For example, there is a greater inclination to use automation than in comparable facilities in North America.
In the past, the economies of Europe were separate. More recently the economies are integrating into a common market, which will create economies of scale, which will likely lead to larger warehouses. However, urban areas, many of which have grown out of ancient towns, will still present challenges to the efficient flow of product. All this is reflected in Figure, Figure: A highly automated distribution center in Germany. (Photo courtesy of Kai Wittek)
which shows a distribution center of a major drugstore chain in Germany. The multi-story portion of the building, visible in the background, houses a high-rise automated storage-and-retrieval system. This is not so much to conserve space as to reduce labor costs. (Unlike the Singapore warehouses, this facility is tall only where the AS/RS is installed.)
According to the Rossman web page, the AS/RS is 30 meters high, the aisles are 127 meters long and the facility provides 14,000 pallet positions. The delivery trucks in the foreground are relatively small, at least compared to the 48-foot trailers common in North America. The small trucks are necessary to deliver to stores in the centers of cities, the ground plans of which may have been laid out centuries ago and cannot accommodate large trucks. But the warehouse is large, reflecting the extent of the market it serves.
References : Copyright 1998–2011 John J. BARTHOLDI, III and Steven T. HACKMAN. All rights reserved. This material may be freely copied for educational purposes—but not for resale—as long as the authors’ names and the copyright notice appear clearly on the copies. Corresponding author: john.bartholdi@gatech.edu
Inventory II is an add-on module to Microsoft Dynamics AX, that focuses on improving and extending inventory management. Before I look deep into the product, I wanted to take a look at the developers of the module. The company behind the Inventory II is ‘FSB‘. FSB is the first letters of Flemming, Søren and Benny. For us, that have been with the Dynamics AX from the beginning, will recognize these developers, because they are the founding fathers of most of the costing, supply chain and production code in Dynamics AX. They worked closely together with Erik Damgaard to create to Axapta(That later became Dynamics AX). Much of the current source code of Dynamics AX originates from ‘FSB‘-team. This tells me that the Inventory II is made by developers with probably the best knowledge of how the inventory architecture in Dynamics AX is build up.
So what is it all about ?
First we need to understand how standard Microsoft Dynamics AX is maintaining on-hand and how the inventory values are tracked. In AX all transactions are stored in a table called inventTrans. Each time records are inserted, updated or deleted, these changes will update another table called InventSum. As the name suggests; InventSum contains a summary of the onhand per dimension(like color, size, location, warehouse, pallet etc). The data model can be visualized like this :
Normally this model works very fine, but there are some drawbacks in the model.
Very large joins
Since the table InventSum and InventDim table can be VERY large, I have often seen performance problems when these two tables are joined in queries. Often from a financial perspective you may want to get the inventory value in total per warehouse. At a customer site where they have approx. 13000 SKU’s and generate approx. 50.000 inventory transactions a day, they have around 60 million inventory transactions in total. What trying to get a total inventory value, the reports often needed to run for many hours. It seems, when you need to join the two very large tables, the performance of SQL drops drastically.
Reporting on historical values
Another issue is how to report inventory sum and values on a specific date. Like “1/1/2010”. I have looked deep into this, and see that the way std. AX is working, is to take the current InventSum, and “sum-reverse” inventory transactions posted between now and the wanted reporting date. If you have many transactions, you will see that this quickly will take a lot of time to make an overall reporting.
Database locking
At a customer site where we implemented Axapta 3.0, we had 18 packing stations, that packingslip and invoice updated sales orders all day long. The average size of the sales orders was 8 lines. What we very often experienced, was “blocking locks” at the packing stations when they did the postings. The reason was that when the packingstations invoice updated the orders, Axapta also did a update on the InventSum to reflect this posting. If this also happened on another packingstations, it very often could lead to a blocking lock, where the two packingstation was waiting for each other to complete. At that time we concluded that the main reason for this was the “UPDATE INVENTSUM” that std Axapta made. This process has been improved in AX 40, and AX 2009, but the update processes still there, that could lead to blocking locks.
Inventory value
With std. AX there is a need to run a periodic process called “inventory closing”. The inventory closing is the process of settling receipt cost values with the issue cost values. To say it simple; If the financial on-hand quantity is Zero, the financial value should also be zero. This is actually a great feature, because it allows you to sell the items before you receive the vendor invoice, and the real cost from the vendor invoice can be propagated to the respective sales orders/ issue transactions. But what we see in practice is that the inventory closing is ran one a month, and then it could take several hours to complete. Also a lot of issues related to this has also been seen, which could result that the inventory values suddenly gets bigger than the US military budgetJ.
Level based reservations / intelligent reservation
For large distributors, reservations are a “must-have”. The ability to promise the customers that the order has been reserved almost guarantees that the customer will get the goods in time, and that no other sales order will “steel” the items. But many distribution centers differentiate between buffer and picking locations. In std. AX you could physical reserve the items, but this prevented the users from moving the goods from the buffer area to the pick area, where the items could be picked. The reason for this is that the reservation is “exact”. In Axapta 3.0 this resulted in that we needed to make a system called “virtual on-hand”, to maintain reservations, but still have the opportunity to move the items around. Another important feature I missed was the ability to control the allocation. So that some on hands dimensions are used before others. A scenario for this is if you have an automated warehouse area, and you want to control this area in relation to other area’s.
Inventory II
When we should upgrade the customer to AX 2009, we got to know the FSB, and got trained on the Inventory II product. WOW, did this solve most of our biggest problems. The solution was elegantly small, and easy deploy into the system. The Inventory II was also built into the To-Increase module “Warehouse Management & Distribution”. The architecture is a bit different, and can be visualized like this :
The complexity of on-hand has been replaced by a single table, called ImTrans. This system uses a ‘insert-approach’, meaning that there do not happen any SQL-“update” statements on any of the records. This way it removes any “blocking locks” and maximizes concurrency in the database when updating the on-hand values. FSB also introduced a system called “Watermark” to keep track of what records are valid for the current on-hand. If we take the process of a sales order going from “On order” to invoiced, the ImTrans would have transactions like this :
Step 1 : First transaction – Sales order line is created with 10 pcs of item V1. Inserted with an issue status of ‘on order’, and the watermark level is ‘W1’
Step 2 : Line is reserved; This results in a “reverse transaction” where the first transaction is eliminated (If you do a select sum() you would only get that 10 pcs is reserved physically)
Step 5 : Then we “jump” forward to the invoice step, and each time the previous statuses are reversed.
So the on-hand transactions are not a single record, but a SUM of the records. The watermark will make sure that you only fetch the latest values when you do reporting. So this solved the issue of the blocking lock when doing postings.
But will this not generate a gigantic table ? The answer is yes, it would, and the heart of the inventory II is therefore a background engine, that will eventually remove ImTrans records that no longer represents any valid data. In inventory II this engine can be visualized like this :
Here there is a parameter for how long the inventory II should keep the records in the intermediate status postings. FSB has also included a monitor for what the inventory II engine is doing :
But the engine does much more. It also do the cost settling, background reservations, compression, issue alerting and posting cost differenced to general ledger.
But for me feature I like the most is the level based reservation(Also called intelligent reservation), where sales order can be reserved on a warehouse at order intake, but not specify location, batch on the reservation. Later in the process when picking route has been created, the reservation can be tighten down to location etc. And at the end when the transaction is picked,(or posted) the final dimensions like pallet ID, serial ID etc is specified.
The nice thing is that the set up for this is dynamic, and is specified on the dimension group an item is related to:
Conclusion
With the experience I have had with Inventory II, I can truly recommend this solution. I would never go ahead to implement a high volume/transaction customer without inventory II, because I have truly felt the pain without it. The support is very good, and help is always near if you need it. The question is how will this change in AX 2012. As far as I have seen and heard, the inventory II features are still needed in AX 2012, and I know that the FSB guy’s are working on an AX 2012 build. I look forward test it out.


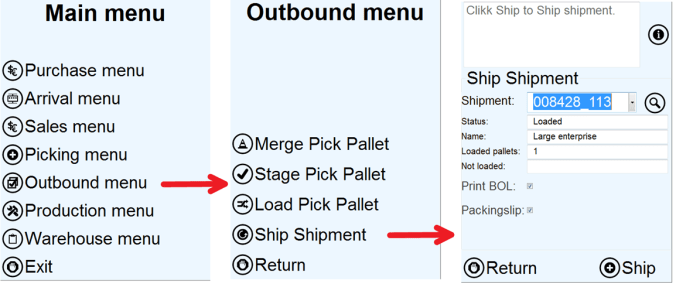
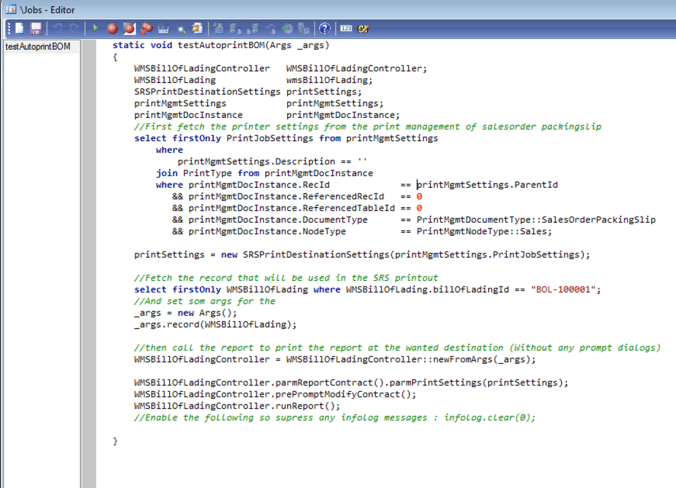


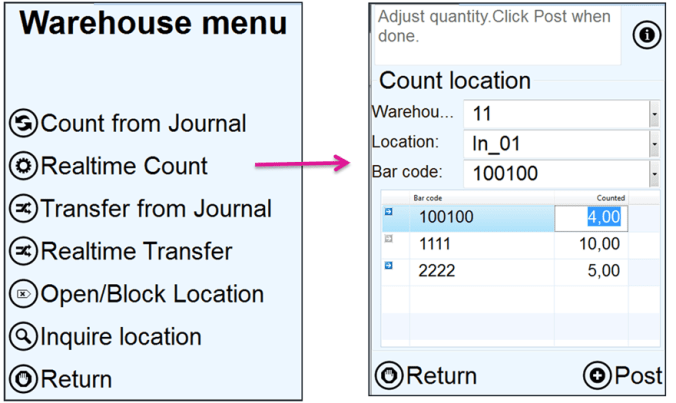


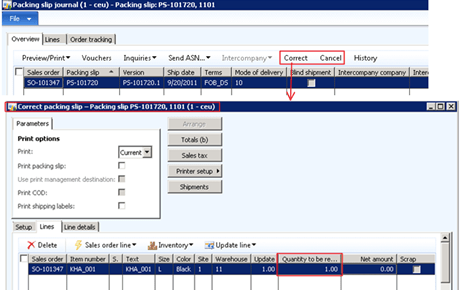
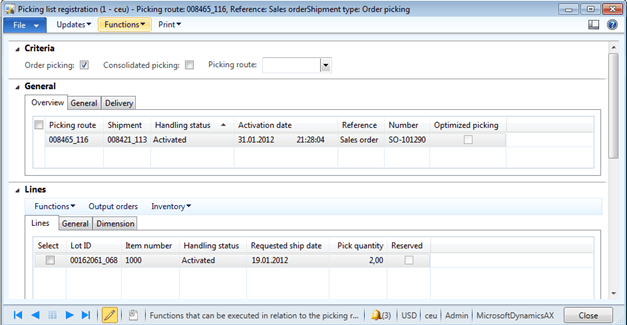
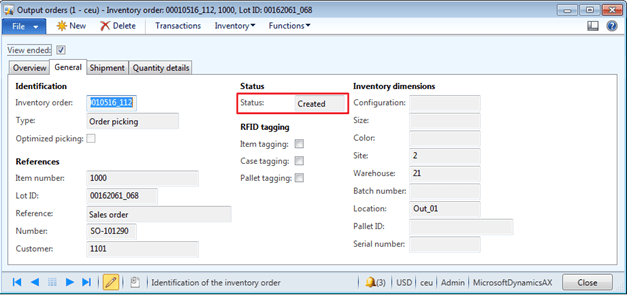

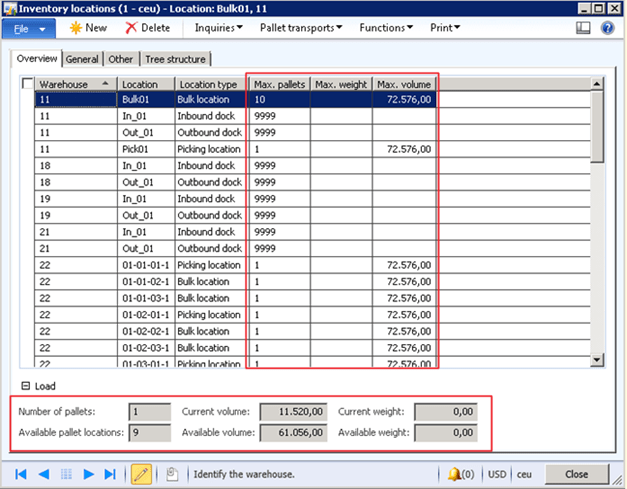


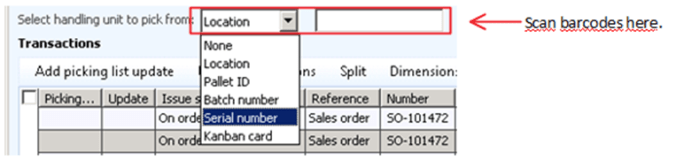


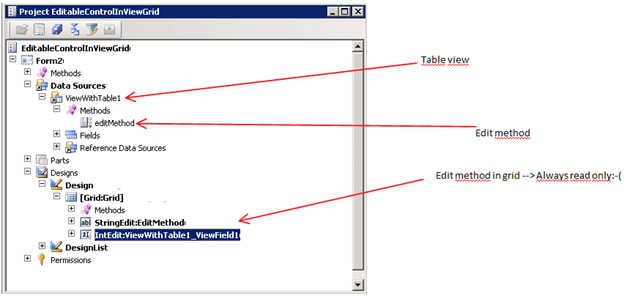
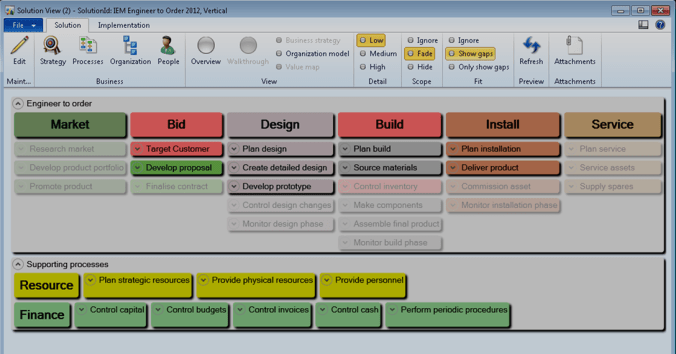
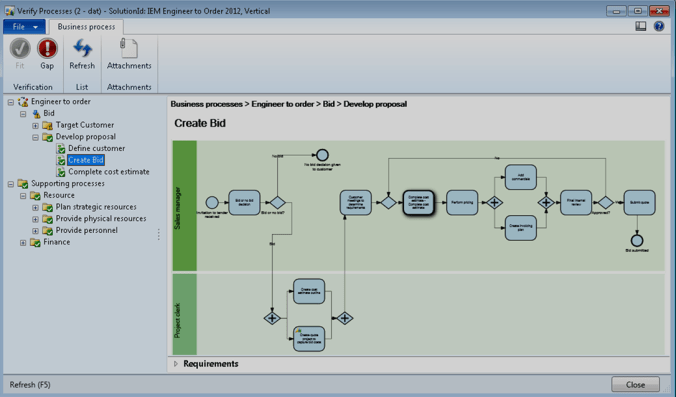


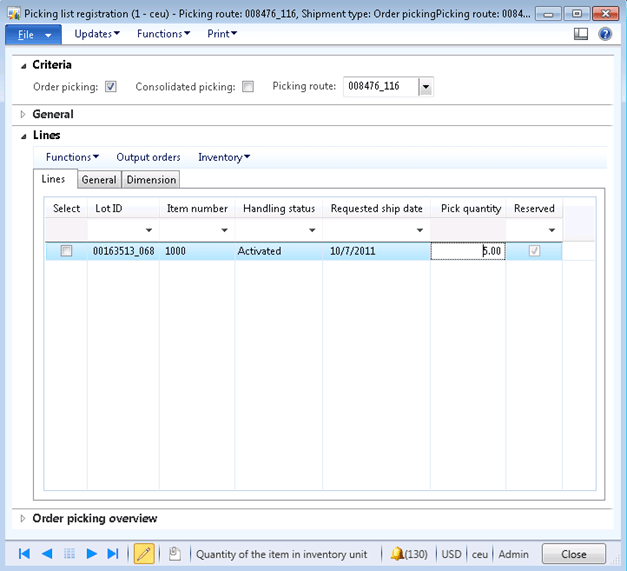

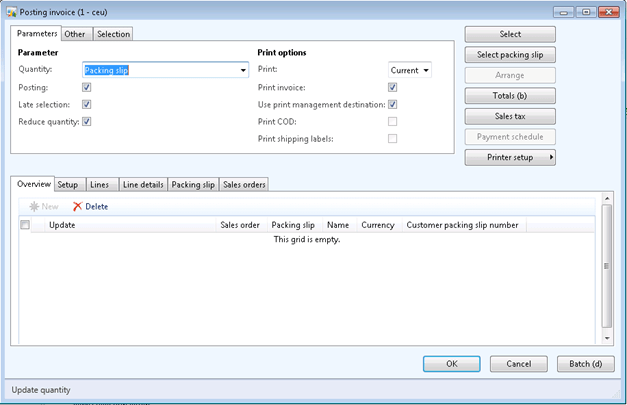


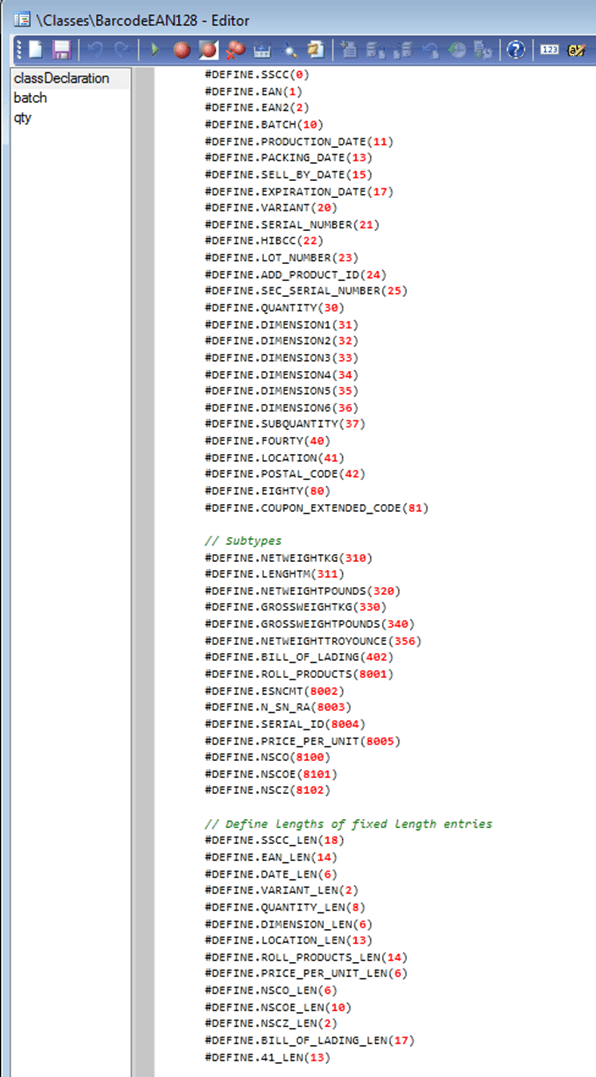
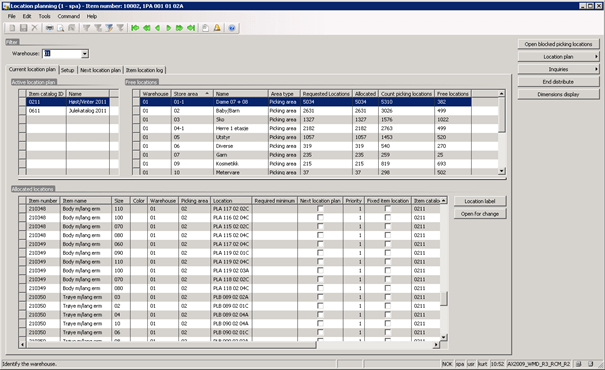

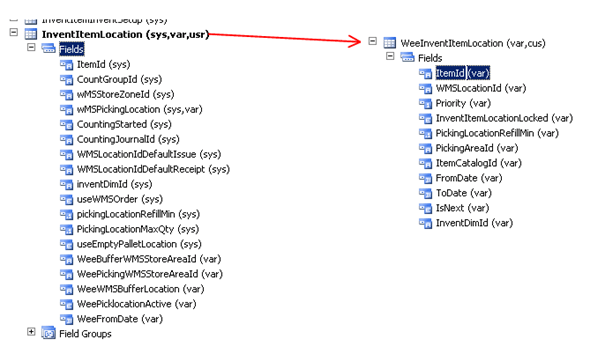
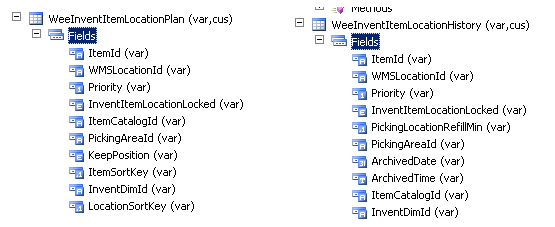
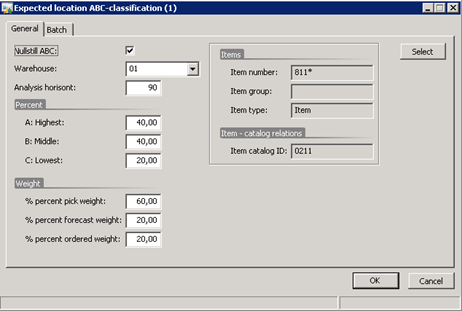
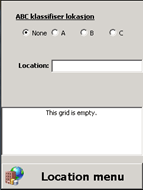
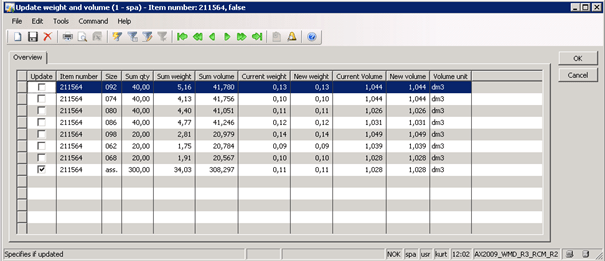

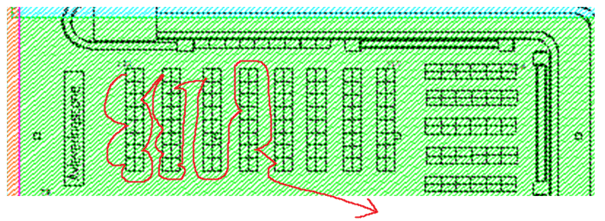
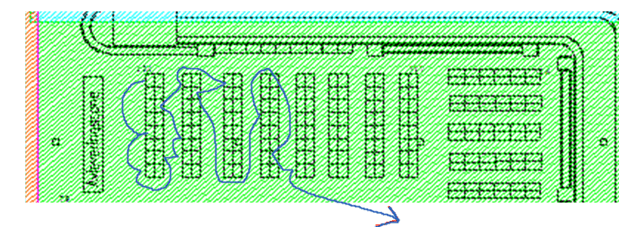
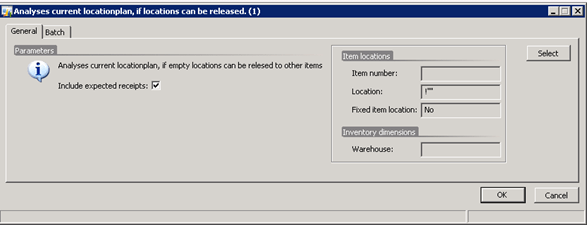
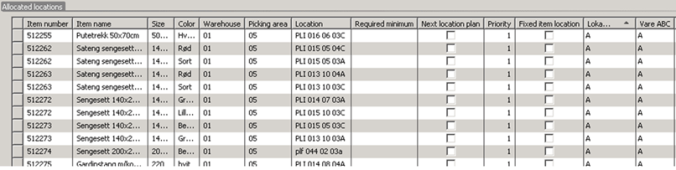
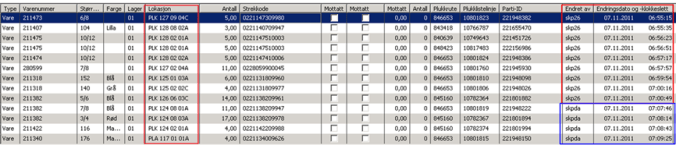
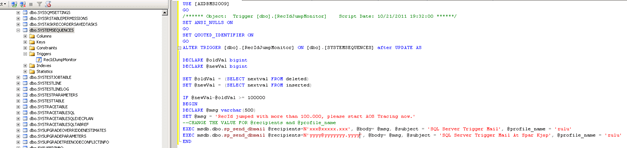
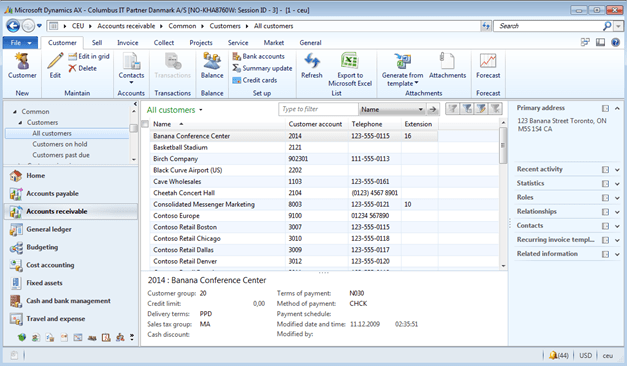
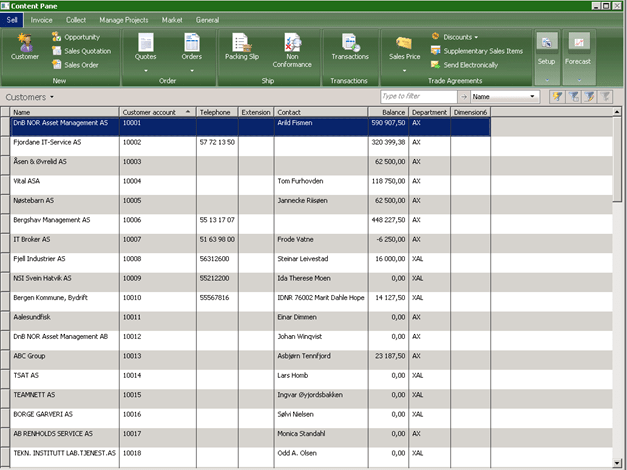


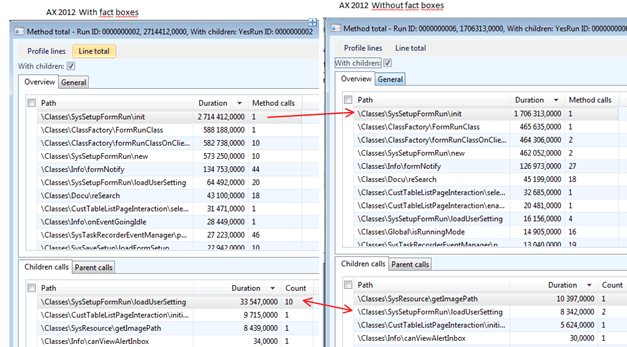

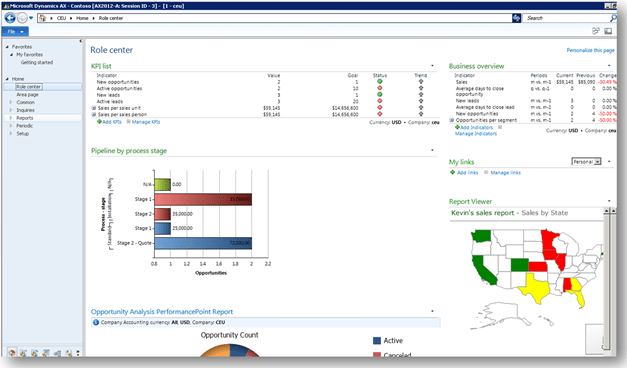

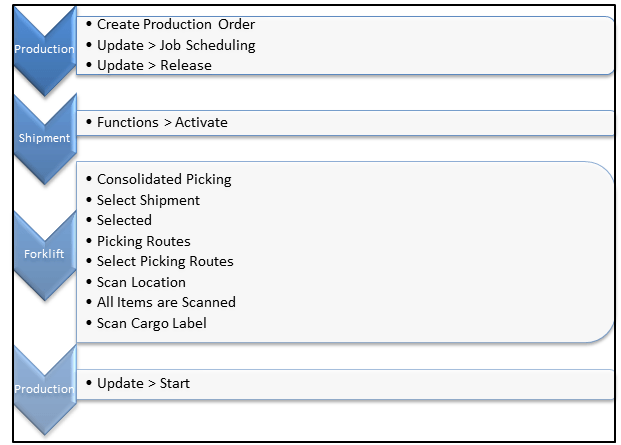
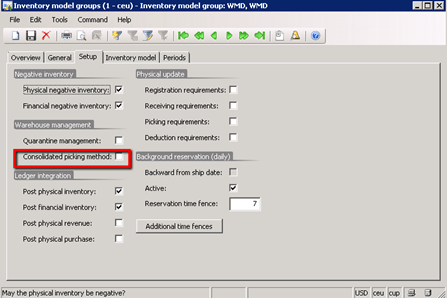
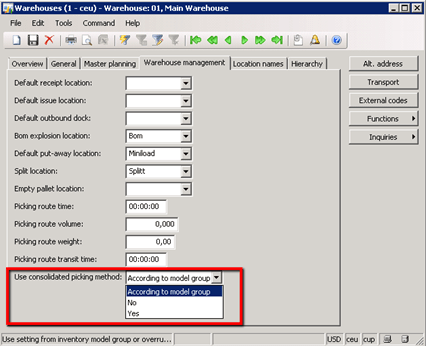
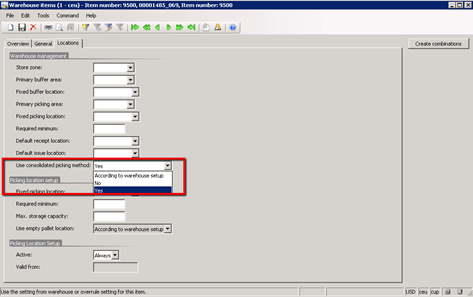
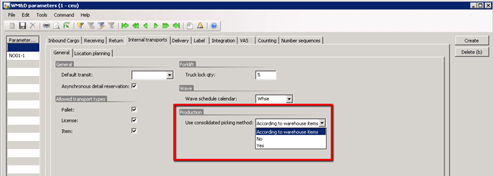
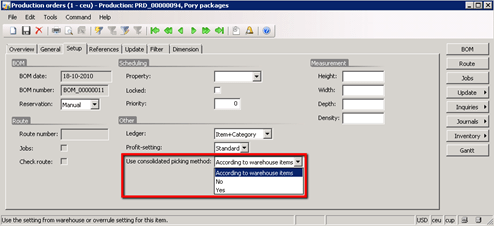
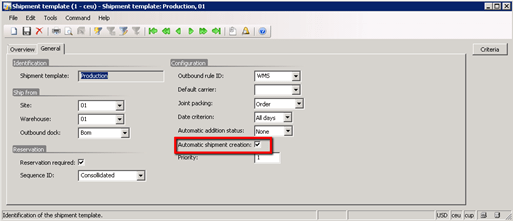
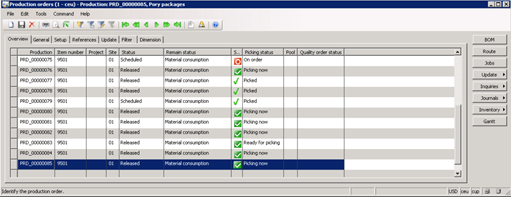
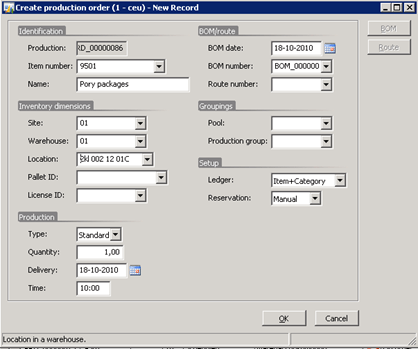
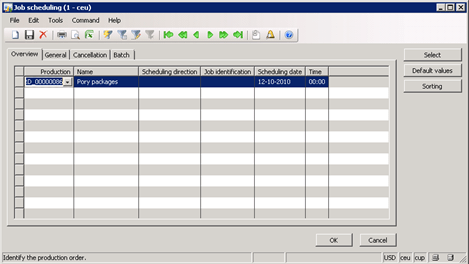

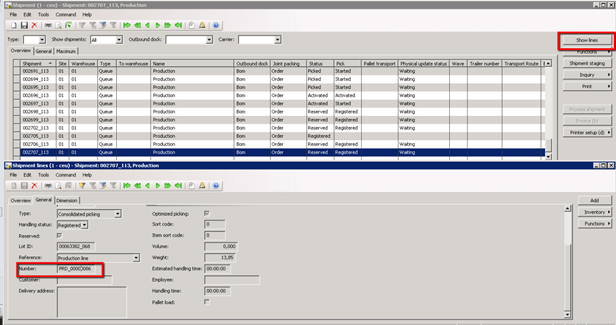
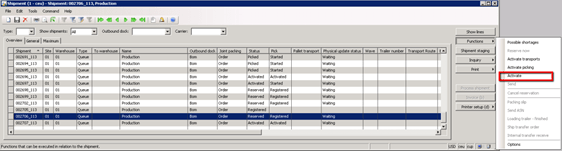
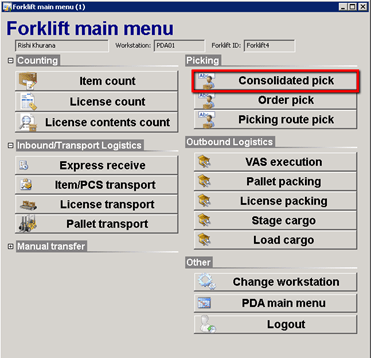
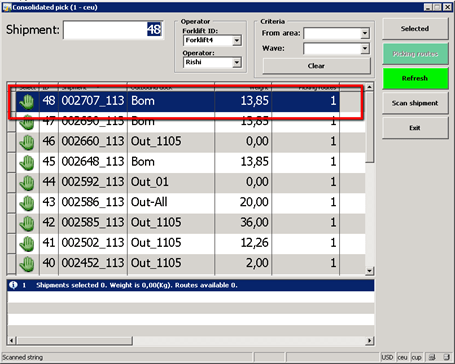
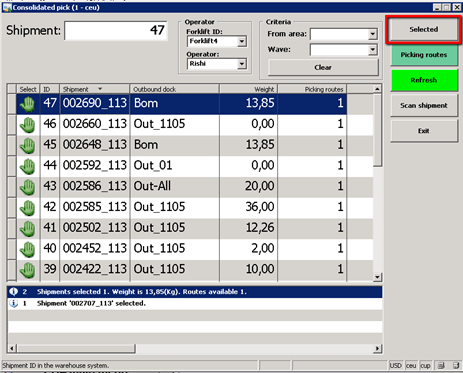
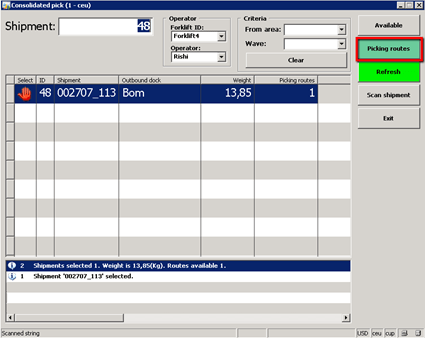
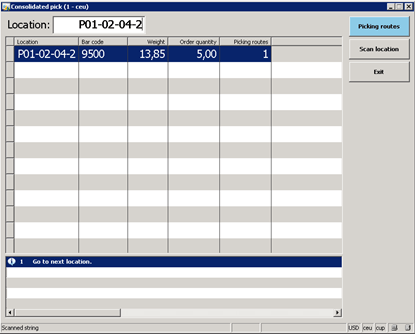

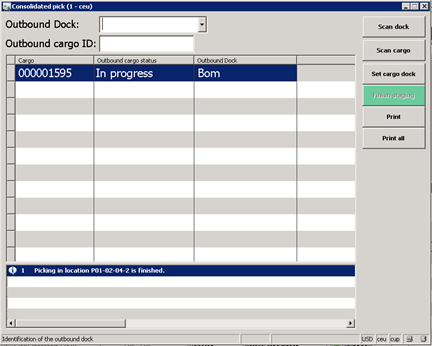
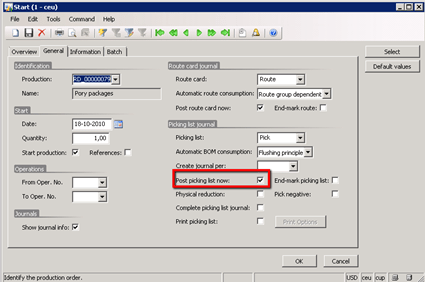


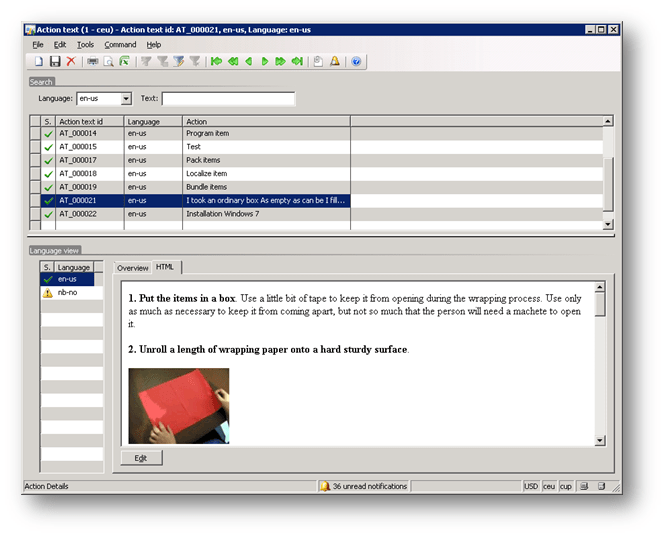


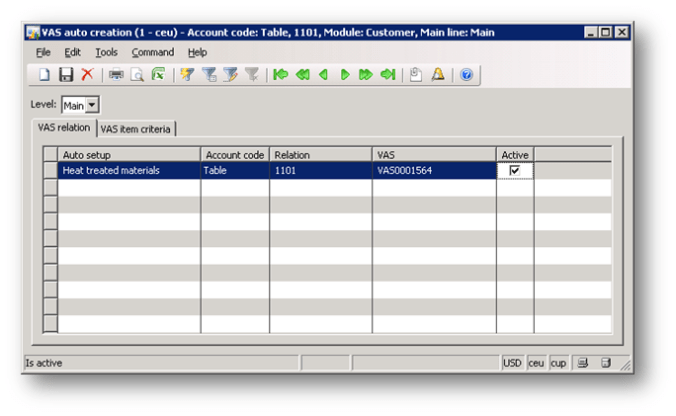


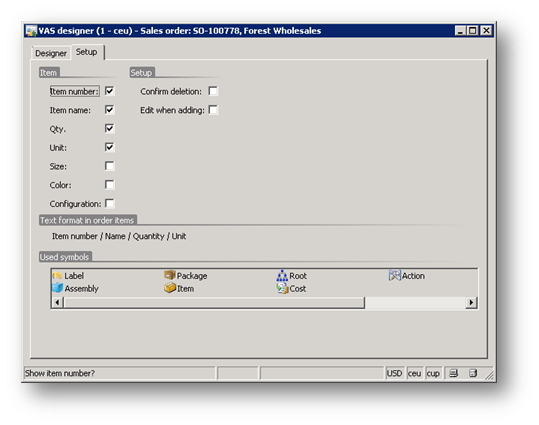


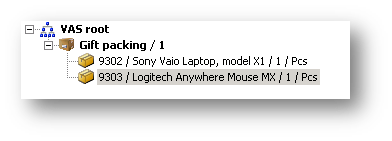


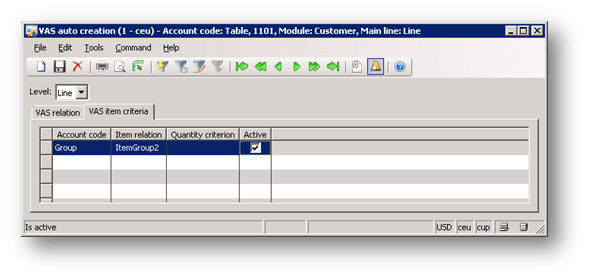
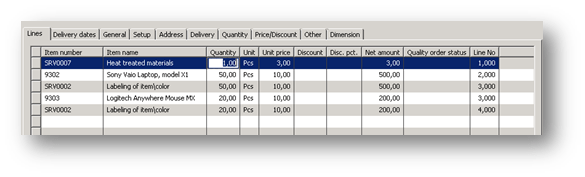

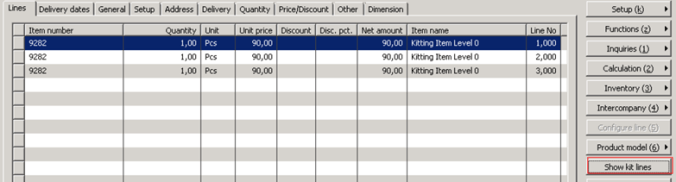


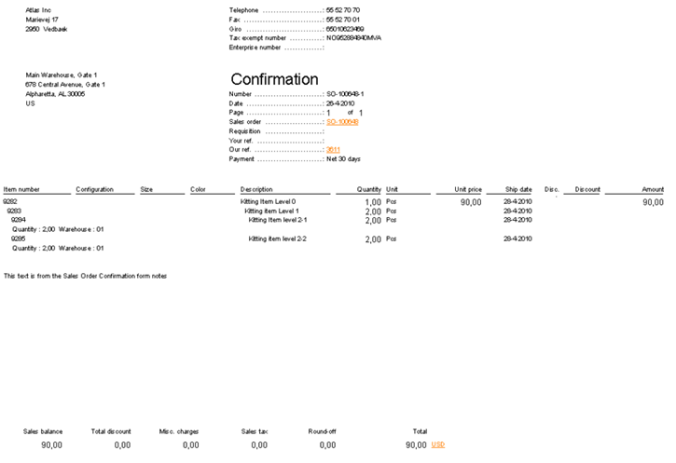

 Automating warehouse operations and related functions can save your organization considerable time and money. However, if you don’t also improve your current processes and ways of interfacing with RF-based hardware, shipping systems, and warehouse equipment, automating your system won’t deliver the full return on investment you require.
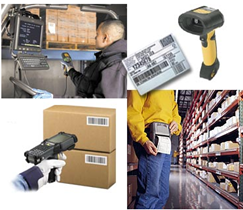 The availability of new technologies and increased market demands are driving rapid change in many industries. Watch for trends such as rising customer expectations, increased competitive pressure, or dropping margins. Introducing new or improved automation management technology to your warehouse can be a powerful tool for increasing competitiveness in a challenging market.
 The greatest challenge to implementing a WMS may not be finding the right system; it might be convincing your management team of the need for it. While most executives agree an accounting system is a must-have, the sentiment does not always apply to WMS. You probably have to sell the idea of a new system to the rest of your senior management team. They may be skeptical about whether the investment is really necessary. You’ll need quantifiable metrics, such as predictive error rate, RMA (Return Materials Authorization) costs, etc. That’s why it is important to determine all the ways your company will benefit from the system, both directly and indirectly, and be prepared to explain these benefits to senior management.
 management, and integration with EDI and wireless data collection systems. Another critical aspect is their experience with implementing software for businesses in your industry. When evaluating a reseller, ask yourself these questions:
 Just ten years ago, you could easily evaluate every warehouse solution available on the market. Today, with so many solutions to choose from, you can spend months looking at demos and still not see them all. Every warehouse is unique—with different processes, tracking systems, and problems. This is why it’s critical to choose a system tailored to your specific needs.
 Insist on a user-friendly system
 Before you make a purchase, find out if your software vendor has a maintenance program in place that gives you access to frequent updates. A good vendor invests heavily in engineering and develops new product features and enhancements regularly. They stay abreast of new technologies and make sure their customers do too, particularly those customers with fast-growing businesses. The opportunity to move to a similar, but more powerful, solution provides you greater flexibility as your company grows. Often, software upgrades cost far less than the retail price of the full program. Some vendors even provide upgrades within their support programs. Imagine purchasing a new car a year ago, and then seeing this year’s model and wanting some of the new features. You can’t have those new features unless you purchase the new model! In contrast, a good software manufacturer will provide product upgrades at reasonable prices or as part of a yearly service agreement.
 Conduct product demonstrations
 Start with a plan
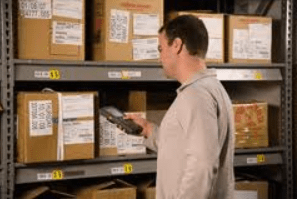
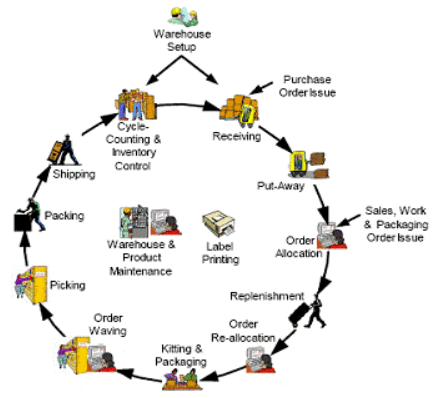

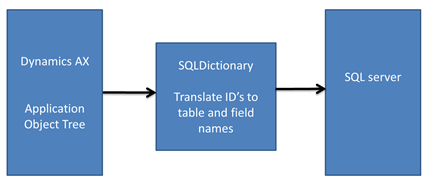
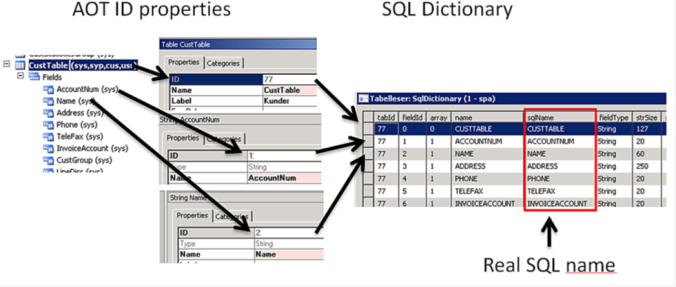
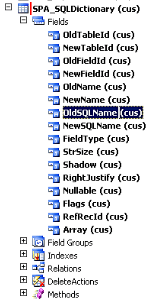
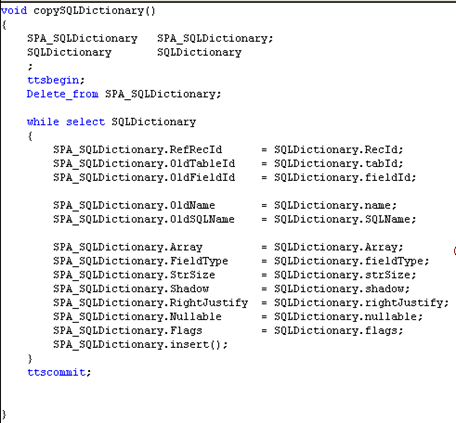


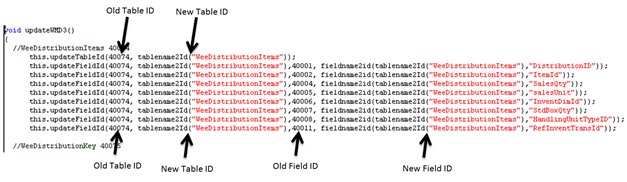
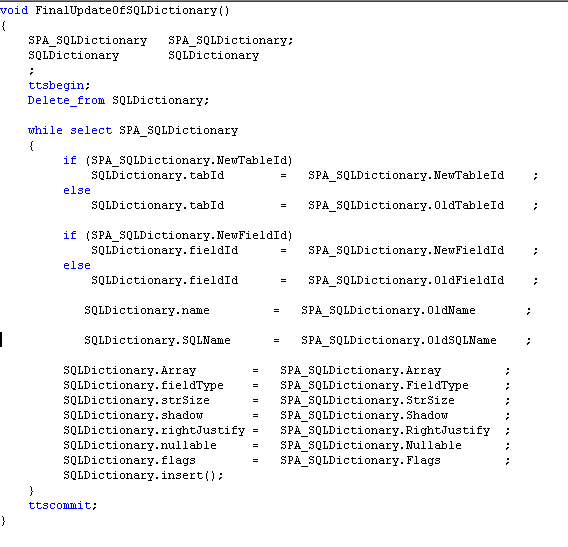


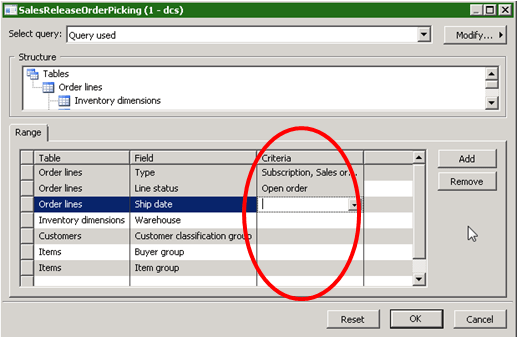

 – button.

 button to delete the lines from your selection.
 button and the picking lists will be printed.


 button.
 to pick one item (or scan item). When using the Pick one button, the system will pick one item at the time. Separate items, not included in a pack can be counted.
 If you want to pick more than one (you get a pop-up-window where you enter the amount of items you are picking.
 to pick the complete quantity on the picking list.
 If you want to cancel the registered picked quantity.

 to finish your packing/picking.


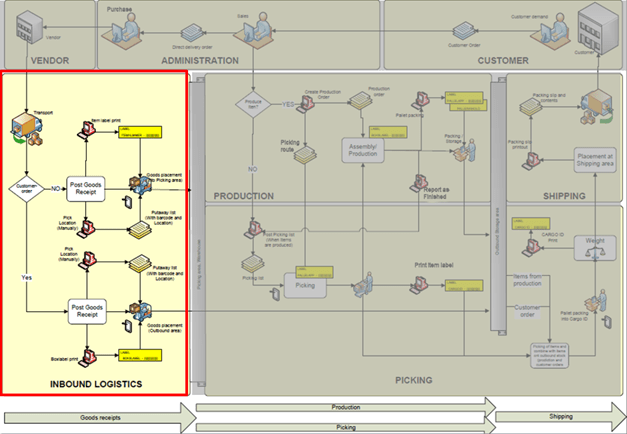
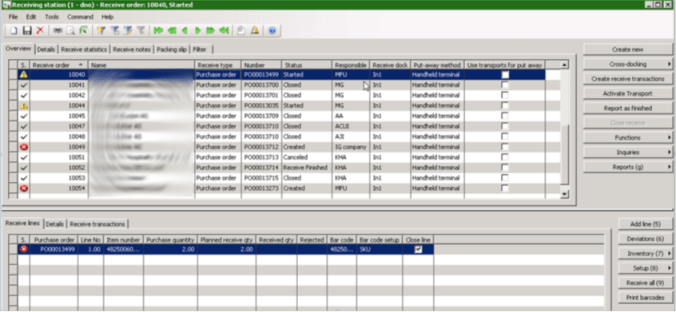


 for all lines that are delivered according to the suggested quantity or make adjustments on the line under the folder “Receive Transactions”

 .
.
 Not started,
  In progress
  Complete
 .
.


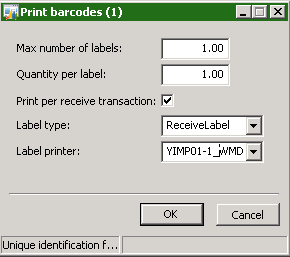


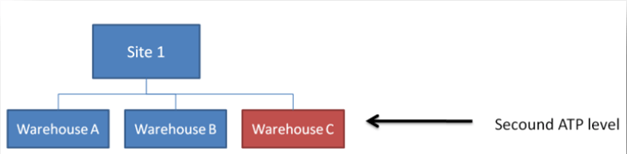


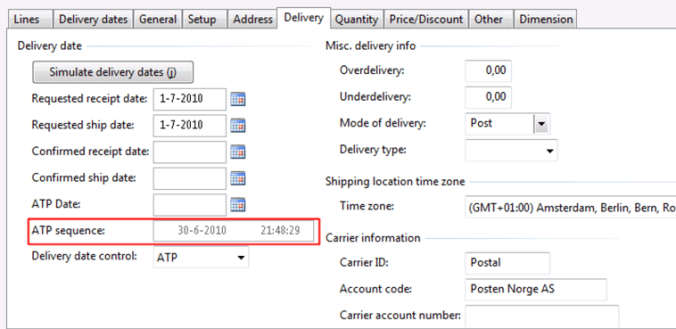

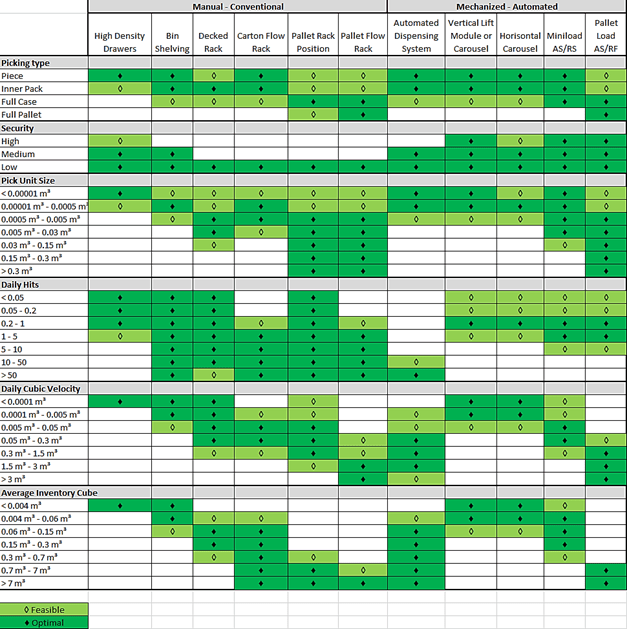
 Transportation
 suited for either RF or voice picking.
 Order batch picking is the process of grouping orders together to create a larger pick order, which reduces the overall pick lines in an operation versus a discrete order pick (picking of one order at a time). Since multiple orders are being picked into one container, in most cases this will result in the requirement for an order sortation station, an area designed to split the pick order into the individual customer orders (discrete orders). If the order batch contains all single unit orders or all orders of the same item, the batch will typically not require a separate sortation station, the items are allocated to a specific order at the time of packing or manifesting. Hardware costs based on number of users, not locations Hardware costs based on number of users, not locations Hardware costs based on number of users, not locations Hardware costs based on number of users, not locations
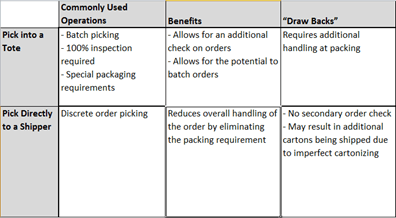
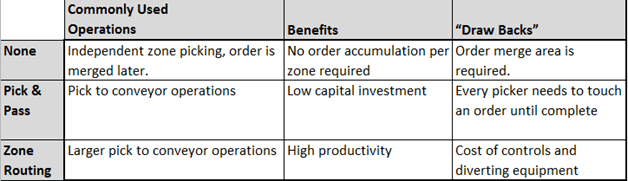 Pick to tote operations with order batching lends itself to the independent zo ne pick method, a process in which segments of each order are picked independently in various zones and directed to a consolidation area where the elements of the order are combined to the shipper (batch sortation area).