Receive station
This document is a manual for using the WM&D Receive station.
The receiving station is made to optimize the receipt process of purchase orders. The purpose of the receive station is to have an effective receipt of large quantities of goods, have a standardized way of handling the goods, and to have a high quality assurance of the process. To obtain this goal, this process is optimized for use with both touch screen and a scanner-device to minimize the usage of keyboard and mouse.
The Receive station supports the standard way Dynamics AX2009 is handles the receipt and the statuses the purchase order lines goes through; open order, arrived, registered and received.
The receive process can be divided into a number of main processes as illustrated in the following picture:

The first is to create a receipt, and to add lines to receive from the corresponding purchase order. The next step is to go through start receiving and post the Packing Slip. At the end the barcode label is printed out.
In the following sections we will go through these processes in details.
Enter the receive station
Go to The module <Warehouse Management and Distribution>, in “Common Forms” choose the menu <Receiving Station>.

Create new
Enter the Receiving Station:
The first step in the receive process is to create the receipt. Click the Create new button.

Register a new receipt:
The purpose of creating a receipt is to select what to receipt. This can be done by different kind of criteria’s.
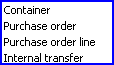
Select <Purchase Order> in Receive Type.
When selecting <Purchase order> you can select all or a range of order lines on a purchase order to be received. If one single purchase order is to be received it can be selected by using purchase order line. Internal transfers can also be received by using the receive station.
If you plan to receive multiple purchase orders that have been put into one container, you can select <container> in the field receive type. Then all purchase order lines contained on this container will be selected.

The warehouse should be specified and the receiving dock. The receiving dock is the physical inbound dock where the goods are to be received.
A putaway method can also be specified. The reason for this is to tell the system where “putaway messages” should be sent. Messages can be sent to a conveyor system, forklift terminal, handheld terminals or paper.

Depending on the selected receive type, a selection of what to receive can be done. If a container has been selected in receive type, the selection under reference will change to container. If purchase order line is selected, purchase order line will show etc. After doing the selection; click OK.
In the Purchase order field you put in the corresponding purchase order number that matches the delivery you now will receive. Then all the lines from the purchase order will be copied from the purchase order into receipt lines in the receipt document.
A receive header have now been created together with one or more lines to receive.

Check and Post receipt
Start the receive process:

And check all the receipt lines and do necessary corrections to quantity and texts.
Choose  for all lines that are delivered according to the suggested quantity or make adjustments on the line under the folder “Receive Transactions”

NOTE: There are some general parameters to setup if we are to accept over and under delivery, and how many percentage we are to accept. These parameters are also valid her, and will be used when closing the receive.
When corrections are done and the quantity for receipt has been checked you confirm the quantities by choosing:
 .
.
Notice the first column in both the header and the lines. These are symbols used as information about the status.
 Not started,
  In progress
  Complete
To post the Packing Slip for the receipt choose the button  .
.
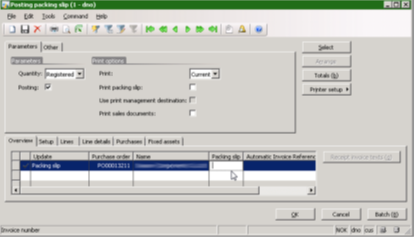
In the Posting picture an Reference to the receipt a Packing Slip number have to be entered. In this field you put in the Pacing slip from the vendor as a reference.
Barcodes
Before putting the item into stock it must be marked and identified by a barcode tag.
The label with the barcode is printed by using the button 

Choose the right number of labels and press “OK” to print the labels
You have now completely received the item(s) and they are available for picking.

Hi kurt , I looked at the receiving station for ax2009 , where can we buy / get this module ?
LikeLike
Hi Gerrit. AX 2009 is very old, and the WM&D have not been maintained and upgraded. I suggest looking into AX 2012/AX ‘7’ and the new warehouse management features. Happy Dax’ing 😉
LikeLike