Import/Export: Reinventing the wheel

I was suppose to create a small tool for simplifying integrations to freight forwarders, but I ended up with an easy to use and zero footprint import/export solution. I wanted to create a solution that was easy to use for end-customers and business consultants, enabling them to very easily create CSV, XML and Excel files.

The Consignor integration tool made available for Dynamics AX is a multipurpose tool for creating, exporting and importing CSV-files, XML-files or Excel spreadsheets. The tool has been specifically created to enable end-users and business consultants to perform data export and import, without knowing how do develop in Dynamics AX and X++. The feedback I have received colleagues is very good, and it works as a basis for the upcoming consignor integration.

  1. How to use the consignor integration

    For an end user it is very easy to use the tool. There are two approaches to start the export.

  2. Export file using short-cut

    In Dynamics AX it is possible to short-cuts. For the Consignor, this short-cut is CTRL-Z. Then the following menu will be visible, if there exists a defined consignor format.


    Here the user can select a predefined format. If a Excel format is selected, then Excel will be opened and filled in. Also if XML or CSV is selected, a file containing the defined format will be opened.


    Export file using Menu

    It is also possible to create menu buttons to start the export, and this require a small “drag-and-drop” of a menu item to the form you want to have the consignor integration activated on.


    How to setup an integration

    The consignor integration setup is located under system administrationàperiodic, and consists of two menu items.

    Consignor menu

    In the consignor message types, the definition of the integration is setup.

    The consignor messages is all logged messages, when this are enabled for an integration.

    Consignor message types

    The consignor message types, it the form that is used to defines integrations. The form contains several settings, and in this chapter all fields are described.


    Message file details

    Field Description
    Message type Unique identifier of the integration. This is the name that the user will select, when selecting an integration type.
    Name Name of the integration type
    Note A small note can be added. Use this to log changes made to the integration.
    Approved Select if the integration is approved. Only approved integrations can be selected by the user. Also, when approved, the integration cannot be changed
    Include column names When exporting to a CSV file, the first line can contain the fieldnames. For Excel and XML this parameter have no effect.
    Log message To log all messages, enable this parameter.
    Open file After a file has been exported, the consignor integration can open the file. CSV files will normally be opened in Excel, and XML will be opened in internet explorer. But it’s the windows file association that decides when program to use when opening the file.
    Import/Export Define if the definition is an export, or an import. In the initial release, import is only supported using CSV files. But this will be changed in future releases.
    File type Select the file type of the export/import. The following format are available: Comma Separated File(CSV), XML and Excel.
    File path File path where the export files will be exported, and where files will be imported from.
    Archive file path When importing a file, from the “file path”, the file can be moved to the “Archive file path”. The reason for this, is because when importing files, the import batch-job can read a folder, and fetch all files that is dropped into this folder.

    Message datasource setup

    Field Description
    Source Class It is possible to select a predefined class, where all the fields have been setup. This simplifies creating integrations. The source class also provides support for more complex integrations that require coding to perform. When a source class is selected, the Main table is also automatically given. The field is not mandatory. For a detailed, list of available source classes se the appendix 1 for source classes.
    Main Table identifier All integration need to have a main table identifier. This is used to help the selection of what integrations that can be used, based on the data when the integration is started. If the user is on the customer form, then only integrations that have the customer table defined in the Main Table Identifier can be selected.
    Query setup The consignor integration supports quite complex data structures, where information is fetched from different tables, and display methods. The query will use available relations to present what can be associated with the main table. Right click on the data source to select what tables you want to add. Both n:1 and 1:n relations is supported, but in a 1:n relation, only the first record in the applied relation will be used in the integration
    Button:Criteria The criteria button is used to simplify the consignor message type selection. If the user have several integrations for different customers, then it is possible to define a selection query, so that the correct integration is presented to the user.
    Button:Reset Resets the query, leaving only the main table left.

    Message field setup

    Buttons Description
    Add a new field to the consignor integration definition
    Remove the selected fields from the integration
    This button will create all the fields for the integration, based on the source class.
    This button will create all the fields, based on the query that is associated with the integration.
    Renumber will renumber the fields, so that no fields have the same number. The field field will get the value 1, and so on.
    Multi select fields, and activate/deactivate the fields.
    Field Description
    Field ID This is the name of the field. When manually creating a integration, it will be the column name, or the XML tag identifier. If a source class is selected, normally the fieldname is automatically provided.
    Type The field type can be a database field, Class method, display method or a free text. Selecting Field means that the value is fetched from the associated table and field.
    Class method, means that the value is fetched/calculated in the associated source class. Display method, means that the value is fetched from a table display method.

    Free Text means that the values is defined in the default value field.

    Table Tables means the table where the value is selected from. Since the data source can be a query, there can be several tables to select data from.
    Field This is the field from the selected table. If the type is a display method, then the name of the display method can be selected here. For Class methods, it is not necessary to select a field. But when importing data, the data will always be placed in the field defined.
    Default value When exporting or importing data, and the source is missing a value, then the default text will be used.
    Description Just a textual description of the field. By default the text here is fetched from the help field in the extended data type.
    Active Only active fields will be imported/exported. Fields that is not active will be filtered away on approved messages.
    Field number The field number defines the sequence that the fields will be defined in a file. In a CSV file, field number 1 will be first, followed by 2. The field number can be defined manually, or automatically by using the “renumber” button. The field number can also be moved up/down by using the “up/Down” buttons.
    Unique index field This field indicates will this field should be regarded as a unique index field. When importing data, sometimes we want records to be updated instead of being inserted. To find the associated record to update, the Consignor integration will use all “unique index fields” to find the record to be updated.
    Mandatory Fields can be defined as mandatory. This means, that when importing, this field needs to be filled in.

    Export format setup

    The export format is used to defined if the “export dialog” should be presented to the user.

    Field Description
    Worker Name of the worker
    Show dialog Indicates if the “export dialog” should be presented to the user.

    Other menu items

    In the top of the form, there are some more buttons.

    Button Description
    Create a new integration
    Delete an integration
    Shows logged messages
    Manually export data, using a query window
    Import messages by selecting a file, or by selecting a path to fetch all the files from. The import can also be set in batch, and can periodically be executed to import the files.
    To improve performance, the consignor integration does a lot of caching of export/import definition. When changing on an existing integration, the cache should be reset, by clicking on this button.

    Consignor messages

    All consignor import/exports can be logged, so that the exported/imported values is documented. There is a small performance penalty on logging messages.

    Field Description
    Message A unique message ID
    Message type Type of the message
    Processing date Date the message was imported/exported
    Worker Name of the worker that performed the import/export
    Import/Export Import/export type
    Filename Name of the file that has been exported/imported.

    Field values

    In the field values, all the field values are presented.

    Field Description
    Field ID Name of the field. This is used on column name, or in a XML tag.
    Field number The field number that is used
    Field value Value of the field
    Description Description of the field
    Multi line Field value In the bottom there is also a field that shows a multiline version of the value. Fields like addresses is often multiline, and will be correctly represented here.

    I hope to release the tool to CodePlex in the beginning of 2014.

    Happy DAXing J

SQL script for rebuild/reindex indexes for Dynamics AX 2012

I often use my blog as a personal archive, and this post is for me to quickly find a script I use at customers that have not set up a proper SQL maintenance plan for indexes and statistics. This script will evaluate each index in the database, and determine if it should be reindexed or rebuilt based on how fragmented they are.

I have very good experience in doing this, and it really increases performance the Dynamics AX 2012 databases.

-- Ensure a USE <databasename> statement has been executed first.
SET NOCOUNT ON;
DECLARE @objectid int;
DECLARE @indexid int;
DECLARE @partitioncount bigint;
DECLARE @schemaname nvarchar(130); 
DECLARE @objectname nvarchar(130); 
DECLARE @indexname nvarchar(130); 
DECLARE @partitionnum bigint;
DECLARE @partitions bigint;
DECLARE @frag float;
DECLARE @command nvarchar(4000); 
-- Conditionally select tables and indexes from the sys.dm_db_index_physical_stats function 
-- and convert object and index IDs to names.
SELECT
    object_id AS objectid,
    index_id AS indexid,
    partition_number AS partitionnum,
    avg_fragmentation_in_percent AS frag
INTO #work_to_do
FROM sys.dm_db_index_physical_stats (DB_ID(), NULL, NULL , NULL, 'LIMITED')
WHERE avg_fragmentation_in_percent > 10.0 AND index_id > 0;

-- Declare the cursor for the list of partitions to be processed.
DECLARE partitions CURSOR FOR SELECT * FROM #work_to_do;

-- Open the cursor.
OPEN partitions;

-- Loop through the partitions.
WHILE (1=1)
    BEGIN;
        FETCH NEXT
           FROM partitions
           INTO @objectid, @indexid, @partitionnum, @frag;
        IF @@FETCH_STATUS < 0 BREAK;
        SELECT @objectname = QUOTENAME(o.name), @schemaname = QUOTENAME(s.name)
        FROM sys.objects AS o
        JOIN sys.schemas as s ON s.schema_id = o.schema_id
        WHERE o.object_id = @objectid;
        SELECT @indexname = QUOTENAME(name)
        FROM sys.indexes
        WHERE  object_id = @objectid AND index_id = @indexid;
        SELECT @partitioncount = count (*)
        FROM sys.partitions
        WHERE object_id = @objectid AND index_id = @indexid;

-- 30 is an arbitrary decision point at which to switch between reorganizing and rebuilding.
        IF @frag < 30.0
            SET @command = N'ALTER INDEX ' + @indexname + N' ON ' + @schemaname + N'.' + @objectname + N' REORGANIZE';
        IF @frag >= 30.0
            SET @command = N'ALTER INDEX ' + @indexname + N' ON ' + @schemaname + N'.' + @objectname + N' REBUILD';
        IF @partitioncount > 1
            SET @command = @command + N' PARTITION=' + CAST(@partitionnum AS nvarchar(10));
        EXEC (@command);
        PRINT N'Executed: ' + @command;
    END;

-- Close and deallocate the cursor.
CLOSE partitions;
DEALLOCATE partitions;

-- Drop the temporary table.
DROP TABLE #work_to_do;
GO

Turn your Dynamics AX WMS from ‘Where’s My Stuff’ to an actual ‘Warehouse Management System’

Problem 1

“Your receiving area is so packed that you haven’t seen the floor since 1994.”

Ask for Advanced shipping notice (ASN)

With the technology available in Dynamics AX companies have EDI capabilities using the AIF. Sharing container level detail via ASN’s has become common practice. ASN’s can reduce the effort to receive by as much as 70%. It can eliminate the need for detail receiving from trusted vendors. It will simplify labeling, counting and sorting.

Since it is known upfront what is expected, it can also reduce the need for receipt breakdown, with the use of pre-sorted containers and pre-calculated system directed put away path.

Perform receiving sortation

Receiving sortation can improve productivity when receiving breakdown and detail receiving are required. Receipts of partial pallet quantities contain a mix of products that will be stored in different areas can be improved. Products are received in small quantities that don’t justify a trip into the warehouse on their own can be collected and wait until the require quantity if reached.

Receiving sortation involves separating products based on put away area. Master licenses can be constructed for given areas. Put away can be postponed until there are enough items destined for the same area to warrant the travel. System directs operators in the most efficient travel path.

Problem 2

“It takes so long to get product put-away you composed a new song called The Fill Rate Blues

Staying on top of put away tasks

When push comes to pull, put-away is one of the work tasks that takes a back seat to picking, replenishments and loading.

Pulling resources from put-away can have several negative effects like lower fill rates, congestion in the aisles and obstructions to picking that leads to lower productivity.

Managing the put away process

The process becomes manageable by defining the put-away as a process, where you plan, execute and monitor the put-away process.

Plan:

  • Review expected receipts
  • Review current backlog
  • Calculate resource requirements based on standard rates per zone

Execute

  • Assign resources based on plan
  • Consider factors such as:
    • Zone congestion
    • Hot receipt priorities

Monitor

  • How many tasks are outstanding
  • What part of the facility are they destined for
  • How many people are currently doing put away tasks

Then repeat the process!

Problem 3

“Your wave templates have become so numerous and complicated your actively recruiting a rocket scientist from MIT to run the allocation process”

Document and analyze

Document how many waves you run each day for a one week period. Capture reasons why so many waves are needed, and document perceived benefits and negative results.

Analyze your current process and look for ways to:

  • Pre-define and save wave templates
  • Develop a daily schedule that governs
    • Which wave templates to run
    • When to run them
  • Automate the allocation process when it make sense
  • Apply some general rules of thumb

General rules of thumb

One word; KISS (keep it simple stupid). Reduce the number of wave templates used and work to a schedule like “I need to run wave templates at 9:00AM everyday”

Allocate as close to picking as possible. The Dynamics AX WMS has a better picture of inventory at picking time: Pending put away tasks, moves, etc.

Allocate a few large waves vs. many small ones, because when Dynamics AX WMS has a larger group of orders allows optimal work assignment size and allows for better order grouping to optimize pick path.

Problem 4…

“The warehouse is so full you set up an overflow storage area in the lunch room where employees sit at full pallets rather than tables”

Re-warehousing and consolidation

Re-Warehousing is the process of moving goods from one warehouse to another or to a different location within a warehouse. Re-warehousing can be performed in several ways, like based on storage strategies and on picking strategies. Also use Dynamics AX WMS transactions to identify and execute on consolidation opportunities. Then create a set of re-warehousing/transfer moves and schedule them accordingly.

Problem 5…

“Product demand and velocity change so often that you begin using an ouija board to slot product”

Warehouse optimization

Objective is to improve picking productivity by reducing travel time and improving ergonomics for high demand product. WMS supports opportunity based optimization (slotting) through strategy changes and re-slot products through normal picking and storage processes.

As velocity changes so does optimal pick and storage locations. By changing master strategy products can be cleaned out of non-optimal locations as a normal part of picking. Also products can be stored to new optimal location as a normal part of put away.

Storage/put-away examples

High velocity product. Always try to store to prime locations first.

Sequence

Zone/sub zone

Pallet

Carton

Each

1

10 (reserve)

Y

N

N

2

20 (forward)

N

Y

Y

3

30 (forward)

N

Y

Y

4

40 (forward)

N

Y

Y

Low velocity product. Always try to store to non-prime locations first.

Sequence

Zone/sub zone

Pallet

Carton

Each

1

10 (reserve)

Y

N

N

2

40 (forward)

N

Y

Y

3

30 (forward)

N

Y

Y

4

20 (forward)

N

Y

Y

Picking examples

High velocity product. Always try to pick from none-prime locations first and clean stock out of none-prime locations first until there is only stock left in new prime locations.

Sequence

Zone/sub zone

Pallet

Carton

Each

1

10 (reserve)

Y

N

N

2

40 (forward)

N

Y

Y

3

30 (forward)

N

Y

Y

4

20 (forward)

N

Y

Y

Low velocity product. Always try to pick from prime locations first and clean stock out of prime locations first until there is only stock left in new non-prime locations

Sequence

Zone/sub zone

Pallet

Carton

Each

1

10 (reserve)

Y

N

N

2

20 (forward)

N

Y

Y

3

30 (forward)

N

Y

Y

4

40 (forward)

N

Y

Y

Product profiling steps

The saying “A place for everything, and everything in its place” almost sums up the idea behind warehouse slotting and profiling. A more accurate version might be, “An ideal place for everything, and everything in the most efficient place.” Analyze for optimal product placement based on

  • Velocity
  • Demand
  • Bin trips
  • Compare to actual product location.
  • Identify and prioritize opportunities to relocate product.
  • Schedule and execute moves.

Slotting

Balancing picking efficiency and replenishment frequency is an important factor in achieving least-cost labor associated with both activities, while also maintaining adequate inventory in pick slots to attain high customer service levels. Steps to achieve this is to:

Analyze

  • Racking requirements (linear length of racking)
  • Recommended fixture type to SKU (bins vs. pallet flow lanes)
  • Overall productivity rates, replenishment requirements, etc.

Slot

  • Ideal SKU to Location assignment throughout warehouse
  • Precise Location sizing (opening size, capacity) to meet on hand inventory requirements
  • Exact SKU slotting characteristics (# faces, orientation) to maximize utilization of racking space

Maintain

  • Analysis of SKU moves required to improve overall profile
  • Generation of moves to maximize utilization of labor in completing moves

Problem 6…

“Your picking productivity is so low you’re considering benchmarking it as a reverse logistics operation”

Picking productivity

Picking is the most labor intensive time critical operation in the warehouse. Optimizing other operations at the expense of picking costs more in the long run. Manage the flow of picking work to avoid congestion, bottle necks and shipping delays

Improving picking productivity

Ergonomics – take the time to make product pick ready. Develop special storage fixtures when warranted. Orient product to make it easy to pick. Remove excess packaging. Locate heavy or odd shaped product in easy to access locations.

Properly slot product based on Ergonomics and demand/velocity, and develop an ongoing slotting program to analyze and relocate products. Even minimal effort can reap significant benefits.

Validate that you are using the appropriate type of picking. The theme is eliminate non-value added steps. Evaluate pick and pack vs. pick and consolidate. Eliminate packing processes where appropriate. Minimize travel time – keep the pickers in the aisles. Look for ways to pick multiple orders at a time by using batch and bulk picking. And measure, measure, measure!

  • Establish a benchmark
  • Implement adjustments and compare to benchmark
  • Incremental improvements add up over time

Communicate productivity expectations to employees

  • Engineered time standards
  • Standardized work assignments

Give employees feedback on performance and evaluate one on one vs. public. WMS provides all the necessary productivity data. Develop daily work plan and communicate it to the team. Communicate progress throughout the day and remember that co-workers are the best motivators.

Problem 7…

“You handle products so many times in the warehouse you may have to start selling them as used”

Eliminating waste

Map your processes. Flow charts or process flows are proven tools and analyze each step for the value it provides. Eliminate non-value added steps and look for ways to streamline and simplify. “We always did it this way”… doesn’t cut it anymore. Great new ideas get bogged down by exceptions. If you spend more than 10% of the time dealing with an exception then it probably is not an exception.

Focus on incremental approach because silver bullets are rare and small improvements add up over time

Problem 8…

“You are considering purchasing turbo charged fork lifts to help your material handlers get Replenishments done in a timely fashion”

Replenishment do’s and don’ts

Stock one day’s inventory in forward pick locations where possible. If space is short – focus on the highest velocity items. Manage the priorities of replenishment tasks through the WMS, can classify emergency vs. regular. Avoid fit problems and let the WMS release replenishments when they will fit.

Employ the correct replenishment model by zone

  • Real time – when flow is fairly even
  • Allocation based – when spikes in demand are common
  • Scheduled – when there is enough stock in forward to support daily picking demands

Avoid excessive replenishments and set thresholds properly. Don’t streamline replenishments at the expense of picking. The true measure of success is keeping enough stock to support picking with a minimum of effort.

Monitor replenishment activities through the WMS

  • Look for backlogs from zone to zone
  • Identify the number of employees currently assigned
  • Adjust as needed

Problem 9…

“The auditors are so carried away with inventory accuracy they want you to cycle count the contents of vending machines in the lunch room”

Warehouse Manager vs. Auditor

Warehouse Managers and Inventory Auditors have different objectives. Managers want accuracy with minimal effort and auditors want minimal risk of errors. Dynamics AX WMS is very good at maintaining inventory accuracy… Take advantage of that fact! Negotiate with your auditors to reduce the requirements and propose a pilot with verifiable results.

Minimize your effort

Reduce your dependence on cycle counting to correct errors. Look for ways to ensure accuracy on the front end.

  • Simplified processes
  • Procedures that promote accuracy
  • Thorough training
  • Validation, validation, validation
    • Bar Codes
    • Check Digits

Look for incentives to motivate employee accuracy.

Minimize the risk

Standardize your accuracy reporting and track accuracy on a weekly basis. Research and correct root causes like training, problem employees or complicated processes.

Leverage the data available in your Dynamics AX. Establish benchmarks both you and the auditor can live with. Build a solid track record to support future changes.

And the number 10…

Turn your Dynamics AX WMS from ‘Where’s My Stuff’ to an actual ‘Warehouse Management System’

Happy DAX’ing, and with R3 we will be closer.

SYNC for AX 2012 R2 CU7

A few weeks ago, I released the Kitting solution on Codeplex, and WOW!   Now 307 downloads on kitting for AX 2012 R2 CU6.   We also have a lot of people that wants to participate to further develop the kitting.  MSDynamicsWorld.com also created a story on this here. This commitment to the community truly inspires me.

I have therefore uploaded an AX 2012 R2 CU7 release of the kitting, that can be downloaded.

I also have released another small tool for master data synchronization. It’s called SYNC for AX 2012 R2 CU7, and is available on Codeplex here. Check it out.

image

Happy DAX’ing !!

My Dynamics AX preselling tips.

I have done countless pre-sales Dynamics AX presentations, both on-line and in-person in front of a potential customer. I wanted to share some of my thoughts, techniques and topics that works for me. I’m not saying they will work in all settings, but I normally get good feedback.

My first step is to think through the presentation beforehand. I first want to find the story that I want to bring to the audience. I have a passion for power point, but I don’t use a lot of text on them. I try to have pictures, screenshots and bullet points.

image

It is important for me to tell the story, not just read it. So when I do my presentation I’m trying to bring them into my story. I’m trying to explain the WHY and not the HOW. WHY do we have a role center? WHY does the sales order screen look like it does?

And I also do some real demo’s in Dynamics AX, and my favorite list of short 1-2 minutes demo’s are:

Role based navigation and organization hierarchy

clip_image004

Tip : Use the CFO role center. Fantastic graphics and a fun overview.

Create new customer/Create a sales order

clip_image006

Tip : Cleanup the screen upfront, so that only the needed fields show. Use the “hide” function extensively. Sales orders is a very common core function, and we must show how easy it actually is.

Export to Excel

clip_image008

Tip: Show it…. And smile BACK to the audience. They will love this.

Add some of your own flavor.

Most of us have our own small add-ons implemented at our customers. I have the DCS/PDA and label printout.

clip_image010

Advanced – Show supply schedule

clip_image012

Tip: Put some data in. Makes it more fun to look at.

Advanced – Show the BOM designer

clip_image014

Tip: Drag and drop, or just double click to add items to your BOM.

Advanced – Show the action messages graph

clip_image016

Tip : Explain the “apply”, and show it. Tell that it can really save inventory carry cost.

clip_image018

Tip: Run master planning first, to show how action messages affects each order

Advanced – Show the new retail eCommerce sites

clip_image020

clip_image022

Tip: The clean design gives good inspiration. But build down the expectation. A lot of work is needed to bring such a site online for a customer.

Advanced – Show sales/purchase category

clip_image024

Tips: Tree structures are easy to understand.

Advanced – Show resource capacity and reservations

clip_image026

Tips: Add data !

Advanced – Show gantt plan

clip_image028

Funny

Show the two games we have: Tetris and horse race

clip_image030

Have fun and happy DAX’ing.

The warehouse dream

I was mesmerized by this simple but cool Microsoft Surface demo at Convergence conference in Copenhagen 2009.  Lachlan Cash was kind enough to share the video here as a great example of how touch can transform visualization and manipulation of complex line-of-business information. 

From 2m 15s

http://channel9.msdn.com/Blogs/benriga/Using-Touch-in-Line-of-Business-Apps

The demo during Kirill Tatarinov’s keynote session shows top-down heat-map visualization of the bins in a warehouse.  The color-coding gives an immediate view into the status of the warehouse with blue showing cold (i.e. bins with low pick rates) and red showing hot (i.e. bins with high pick rates).  Multi-touch is fully supported on Surface allowing multiple warehouse staff to collaborate while manipulating the data to optimize the warehouse for fast picking.

Very nice vision.

Retail and Supply Chain Trends

One of the most famous principles in retailing is, of course, “retail is detail” — this is where the challenge lies: how do you become more detailed and what detail should you focus on? All retailers know that having products available to customers is one of the most fundamental requirement. Manufacturing, distribution and selling a product can challenge the best organizations. As a retailer’s business drivers change, business processes, SCM technology investment and the overall approach to supply chain management must change and keep pace. An inefficient and poorly functioning supply chain can negatively impact every aspect of a retail organization, jeopardizing the long-term performance and success of a business.

To remain successful companies need organization-wide buy-in to supply chain excellence and some will need to re-evaluate their current processes and performance with these key trends in mind:

• Demand Planning
• Globalization
• Price pressures
• Shorter and complex product life cycles
• Online Collaboration

Companies that reevaluate their business and how the current supply chain structure supports the business-from a strategy, process, technology and organizational perspective-must focus on keeping their supply chain aligned with the overall business strategy.

To succeed, companies must embrace Supply Chain Excellence as a core competency at all levels throughout the company and recognize that supply chain management is executed in many areas, not just the functional supply chain organization.

Dynamics AX works closely with leading retailers and helps them address their business challenges. From our experience working with key companies in food and beverage, consumer products, high tech and industrial manufacturing, there are five key trends causing significant impact and change to retailers performance.

Demand planning

The demand-driven approach helps retailers to create a more customer-focused mindset, without sacrificing operational efficiency. I have often seen that Demand Planning success is often tied to organizational structure. Companies with the right tools and dedicated resources focused around demand planning and forecasting yield stronger results and drive more value to their business. I expect that demand planning will a very important feature to look into when the AX 2012 R3 is released.

Globalization and Supply Chain Management

The business landscape is rapidly becoming more global. Largely due to improvements in communications, globalization is dramatically impacting the way business is managed and transacted, even on the most local levels. No area of a business is affected more by the trend to a global business environment than the supply chain. Manufacturing, distribution, sourcing of materials, invoicing and returns have all been significantly impacted by the increased integration of a global customer and supplier base, and many companies find that existing processes and technology are not flexible enough for this new business environment.

Global competition and price pressures

The internet has changed our shopping habits and will continue to do so. E-commerce websites have opened up the world of “non-geographic” retail — a retail world without the need to visit the physical store. The emergence of “etail” from retail has been the biggest change over the past 20 years. Historically, price, product features and brand recognition were enough to differentiate many products in the marketplace. With the continued commoditization of many products, companies need better ways to distinguish themselves. Product innovation and brand equity is no longer allowing retailers to command a higher price in the market. In order to continue to compete with that commoditized product they made significant cost improvements with supply chain re-design and technology. Retailers are looking to their supply chains in two ways to help offset this trend. First, they are looking at ways to reduce cost and are creating a more efficient value chain to remain cost competitive. Second, retailers are looking at ways they can provide value-added services to meet the demands of more sophisticated customers.

Shortened and more complex product life cycles

As the economy becomes more global, labeling and compliance to packaging requirements and regulations have become critical to success. Without adherence to local packaging and labeling regulations a product may violate local requirements, preventing it from being distributed and sold in that market. Product lifecycle management technology and processes can help ensure that products being produced and targeted for specific markets are well-managed and are compliant. Product lifecycle management processes have helped retailers with their efforts to try to continually drive demand through packaging and labeling innovation and design. Implementation of an optimal PLM process and technology can allow retailers to effectively produce and distribute products that are only targeted for regional promotions or consumer preferences.

Integration and collaboration with customers and suppliers

As supply chains continue to develop and mature, a move toward more intense collaboration between customers and suppliers has occurred. The level of collaboration goes beyond linking information systems to fully integrating business processes and organization structures across companies that comprise the full value chain. The ultimate goal of collaboration is to increase visibility throughout the value chain in an effort to make better management decisions and to ultimately decrease value chain costs. With the right tools, processes and organizational structure in place, collaboration provides key people throughout the value chain with the information needed to make business-critical decisions with the best available information. As retailers are increasingly using their supply chain to compete and gain market share, spending and activity in this area are notably on the upswing. Technology and process upgrades at forward-thinking companies clearly show that supply chain excellence is more widely accepted as an element of overall business strategy and that increasing value to customers is not just management’s, but everyone’s business.

Technology supporting these trends

As supply chain networks have become more complex, the need for greater and improved solutions has become critical. The Dynamics ecosystem have done significant investments in developing solutions and verticals to address the needs of retail and distribution companies in areas, such as:

• Transportation and Inventory Optimization
• Logistics and replenishment Optimization
• Product Lifecycle Management and labeling
• Handheld solutions
• Sales and Operations Planning
• Procurement
• Manufacturing Optimization
• Business Intelligence
• eCommerce
• Collaboration platforms

These technologies have helped enable the retail and supply chain “information worker” innovate, drive cost reductions, improve service and meet customer expectations better than ever. In order to have sustainable improvement in retail and supply chain performance, the Dynamics ecosystem must find the right balance of investments in organization, processes and technology. Lack of investment and focus in these areas will reduce the ability to achieve fundamental, sustainable improvements.

Microsoft Acquires WAX/TRAX

Yesterday, one of the most public secrets was officially announced.

Microsoft (MSFT) Acquires Blue Horseshos’ WAX, TRAX Solutions

It will be interesting to see how this will evolve, and we welcome more focus on WMS and logistics.  When more information becomes public, I will keep you up to date on what to expect and how this solution will fit different segments requirements. The release date is expected at the end of this year, and will at the first version be a optional feature pack located in a separate layer.

Show if data is synchronized

The post is related to the masterdata synchronization.

I wanted to give end-users an explanation why they cannot change some of the fields in a synchronized records.  I  decided to create a generic way of alerting the end-user, like you see in the screenshot below, and also to lock any fields that is synchronized.

image

So if a record is originating from another master-company, then the following yellow text will be visible. Doing this on a single form is surely easy, but I wanted to create a generic solution that has Zero footprint, and NOT making any changes to any standard form. 

Can it be done ?  Yes 🙂

So what I did, was to create a event handler on the info.formNotify():

image

Then the code looks like this (the code contains some ColSync* references, but you see the idea:

public static void colSyncEnableFields(XppPrePostArgs _args)
{
    FormRun                 formRun;
    FormDesign              formDesign;
    FormNotify              event;
    FormNotifyEventArgs     eventArgs;
    ColSyncCache            colSyncCache;
    Common                  common;
    ColSyncLine             colSyncLine;
    ColSyncTable            colSyncTable;
    ColSyncDefinition       colSyncDefinition;
    ColSyncDestinations     colSyncDestinations;
    FormGroupControl        actionBarGroup;
    FormActionPaneControl   actionPane;
    FormGroupControl        firstGroup;
    int                     defaultBackgroundColor;
    FormStaticTextControl   actionBarMessageText;
    int                     i;

    #define.SyncActionBarGroup('SyncActionBarGroup')
    #define.SyncActionBarMessageText('SyncBarMessageText')

    event     = _args.getArg('event');
    eventArgs = _args.getArg('eventArgs');

    switch (event)
    {
        case FormNotify::RecordChange:
            if ((eventArgs != null) &&
                (eventArgs.formDataSource()))
            {
                formRun   = _args.getArg('formRun');
                colSyncCache = ColSyncCache::construct();
                common = eventArgs.formDataSource().getFirst(true) ? eventArgs.formDataSource().getFirst(true) : eventArgs.formDataSource().cursor();
                if (common.RecId &&
                    colSyncCache.isSyncEnabledDestination(common))
                {
                    formDesign = formrun.design();
                    for (i=1; i<=formDesign.controlCount(); i++)
                    {
                        if ((formDesign.controlNum(i).handle() == classNum(FormActionPaneControl)))
                        {
                            actionPane = formDesign.controlNum(i);
                            break;
                        }
                    }
                    formRun.lock();

                    if (actionPane != null)
                    {
                        for (i=1; i<=formDesign.controlCount(); i++)
                        {
                            if ((formDesign.controlNum(i).handle() == classNum(FormGroupControl) &&
                                 formDesign.controlNum(i).name() == #SyncActionBarGroup ))
                            {
                                actionBarGroup = formDesign.controlNum(i);
                                break;
                            }
                        }

                        if (!actionBarGroup)
                            actionBarGroup = formDesign.addControl(FormControlType::Group, #SyncActionBarGroup, actionPane);
                    }
                    // add directly to top of form design
                    else
                    {
                        for (i=1; i<=formDesign.controlCount(); i++)
                        {
                            if ((formDesign.controlNum(i).handle() == classNum(FormGroupControl) &&
                                 formDesign.controlNum(i).name() == #SyncActionBarGroup ))
                            {
                                actionBarGroup = formDesign.controlNum(i);
                                break;
                            }
                        }

                        if (!actionBarGroup)
                        {
                            // find the first group control on form (if one exists)
                            for (i=1; i<=formDesign.controlCount(); i++)
                            {
                                if ((formDesign.controlNum(i).handle() == classNum(FormGroupControl)))
                                {
                                    firstGroup = formDesign.controlNum(i);
                                    break;
                                }
                            }
                            if(firstGroup)
                            {
                                actionBarGroup = firstGroup.addControl(FormControlType::Group, #SyncActionBarGroup);
                                actionBarGroup.top(FormTop::Auto);
                            }
                            else
                            {
                                actionBarGroup = formDesign.addControl(FormControlType::Group,#SyncActionBarGroup);
                                actionBarGroup.top(1, FormTop::Auto);
                            }
                        }
                    }

                    defaultBackgroundColor = formDesign.backgroundColor();
                    actionBarGroup.frameType(FormFrameType::None);
                    actionBarGroup.height(27);
                    actionBarGroup.hideIfEmpty(false);
                    actionBarGroup.topMargin(1);
                    actionBarGroup.bottomMargin(1);
                    actionBarGroup.widthMode(FormWidth::ColumnWidth);
                    actionBarGroup.colorScheme(FormColorScheme::RGB);
                    actionBarGroup.verticalSpacingValue(0);
                    if (System.Windows.SystemParameters::get_HighContrast())
                    {
                        actionBarGroup.colorScheme(FormColorScheme::WindowsPalette);
                        actionBarGroup.backgroundColor(WindowsPalette::TooltipBackground);
                    }
                    else
                    {
                        actionBarGroup.colorScheme(FormColorScheme::RGB);
                        actionBarGroup.backgroundColor(WinAPI::RGB2int(255,255,153));
                    }
                    // don't reserve space for details forms
                    if (formDesign.style() == FormStyle::DetailsFormMaster || formDesign.style() == FormStyle::DetailsFormTransaction)
                    {
                        actionBarGroup.visible(false);
                    }

                    for (i=1; i<=actionBarGroup.controlCount(); i++)
                    {
                        if ((actionBarGroup.controlNum(i).handle() == classNum(FormStaticTextControl)))
                        {
                            actionBarMessageText = actionBarGroup.controlNum(i);
                            if (actionBarMessageText && actionBarMessageText.name() == #SyncActionBarMessageText)
                                break;
                        }
                    }

                    if (!actionBarMessageText)
                    {
                        actionBarMessageText = actionBarGroup.addControl(FormControlType::StaticText, #SyncActionBarMessageText, actionBarGroup);
                    }
                    actionBarMessageText.backStyle(FormBackStyle::Opaque);
                    actionBarMessageText.colorScheme(FormColorScheme::RGB);
                    actionBarMessageText.backgroundColor(WinAPI::RGB2int(255,255,153));
                    actionBarMessageText.widthMode(FormWidth::ColumnWidth);
                    actionBarMessageText.text(strFmt("@SYN112"));
                    actionBarMessageText.visible(true);
                    formRun.unLock();

                    while select  SyncFieldId from  colSyncLine group by SyncFieldId
                            where   colSyncLine.SyncTableId == eventArgs.formDataSource().table()
                                &&  colSyncLine.SyncType == ColSyncType::SynchronizeField
                        exists join colSyncTable
                            where   colSyncTable.SyncId == colSyncLine.SyncId
                                &&  colSyncTable.SyncTableId == colSyncLine.SyncTableId
                                &&  colSyncTable.SyncActive == NoYes::Yes
                        exists join colSyncDefinition
                            where   colSyncDefinition.SyncId == colSyncLine.SyncId
                                &&  colSyncDefinition.SyncActive == NoYes::Yes
                        exists join colSyncDestinations
                            where   colSyncDestinations.SyncId == colSyncLine.SyncId
                                &&  colSyncDestinations.ToDataAreaId == common.dataAreaId
                                &&  colSyncDestinations.LockSyncFields == true
                    {
                        eventArgs.formDataSource().object(colSyncLine.SyncFieldId).allowEdit(false);
                    }
                    eventArgs.formDataSource().allowCreate(false);
                    eventArgs.formDataSource().allowDelete(false);
                }
                else if (common.RecId &&
                         colSyncCache.isGlobalTableEnabled(common))
                {
                    eventArgs.formDataSource().allowCreate(false);
                    eventArgs.formDataSource().allowEdit(false);
                    eventArgs.formDataSource().allowDelete(false);
                }
            }
        break;
    }
}

Enable database logging on groups and parameters

First I would say that I do NOT recommend to enable any database logging, unless it is business important for you, and you need to have a track of parameter changes.

But in some cases customers demand to have database logging.  I agreed and explained that it will have performance consequences, but we could do it on parameters and groups.

But I’m a type of guy that likes to create scripts to enable things.  So I wanted to share with you a small script that enables database logging on all groups and parameters.

(This script is for AX2009)

static void KHA_AddDatabaseLogging(Args _args)
{
    #AOT Name name;

    TreeNode treeNode;
    SysDictTable sysDictTable;
    DatabaseLog  DatabaseLog;
    ;
    treeNode = TreeNode::findNode(#TablesPath);
    treeNode = treeNode.AOTfirstChild();
    while (treeNode)
    {
        name = treeNode.AOTname();
        sysDictTable = SysDictTable::newTableId(treeNode.applObjectId());

        if ((sysDictTable.tableGroup() == tableGroup::Parameter ||
             sysDictTable.tableGroup() == tableGroup::Group) &&
             !sysDictTable.isMap() &&
             !sysDictTable.isTmp() &&
             !sysDictTable.isView() &&
             sysDictTable.enabled())
        {
            select firstonly DatabaseLog where DatabaseLog.logTable == sysDictTable.id();
            
            if (!DatabaseLog)
            {
                DatabaseLog.domainId = "Admin";
                DatabaseLog.logType  = DatabaseLogType::Update;
                DatabaseLog.logTable = sysDictTable.id();
                DatabaseLog.logField = 0;
                DatabaseLog.insert();
            }
            info(strfmt("Databaselogging enabled on %1",sysDictTable.name()));
        }
        treeNode = treeNode.AOTnextSibling();
    }
}

Master data synchronization using ColumbusSync

I wanted to share a nice tool I’m working on for Dynamics AX 2012.  It is called ColumbusSync, and solves some requirements we often see at larger enterprises.  The ability to quick and easy distribute master data from a master company to a set of “client” companies.  In this way a large set of companies can act as a single enterprise, even though it actually are a set of unique companies.   

image

What makes this tool great, it that is generic and uses all known relations defined in Dynamics AX 2012.  This means that if you want to synchronize your customers, then all other tables that have a dependency will also be suggested to be included in the synchronization. RecID related relations are also handled. Transactions(like sales orders, inventory transactions etc) are not supported to be included in this tool, and it will not work across partitions.

On each field you can define if the field should de synchronized, is a local field, is a fixed field or a script is associated to the field.  So parts of a record can be locally controlled and parts are synchronized.

You can also define a query criteria, so that set up that only a sub-set of the records should be synchronized to a set of destination companies.

The amount of data that could be included in the synchronization could surely be massive, so there is a set of optimizations that makes use of the Dynamics AX multithreading batch framework.  Just like the master planning in Dynamics AX,  splitting the synchronization into sub-jobs, that is executed the the correct sequence.  (Meaning that groups are typically synchronized before main table records)

The RecVersion field is also used find exactly those records that should be synchronized.  To also support “close-to-real-time” synchronization the current changed/added record can be collected just like the standard AX 2012 database log.

The tool is not ready for shipping yet, but I know that many companies has requested this.  It will also solve a requirement I have seen in the community a lot.  The ability to quickly create a new client company.  The idea is that you may just run the data synchronization to a destination company. 

Visit the blog later, and I’ll share some more details of the tool.

Take care, and happy DAXing.

Changing the query for an existing CUE

In AX 2009 we could change the query behind a personalized CUE.  This seams to have been removed from AX 2012.

image

But we that can develop, still have a chance, using X++.

Run the following job script, and you will get the query up, so that you can change the query.

image

This will bring up the normal query form, where you can make your changes, and then press OK to save the new query in you Cue.

image


Take care and happy Daxing.

AX2012 : Use queries as criteria

In Dynamics AX 2012 the relation between different records is often defined as a “table-group-all” relation. One example of this is the setup of supplementary items, where you can define the relation as a Table-Group-All relation.

image

Even though this approach is easy to use and understand, it does have limitations.  Often you would like to pin-point the relationships even further.  It can be based on other fields in the source record.

I wanted to look against another approach, where I can use a query as a criteria.  Normally queries are used to fetch specific records based on a set of ranges and defined sorting criteria.

I have a label software, that integrates Dynamics AX 2012 with BarTender, and it is generic, meaning that it can produce labels based on all data sources in AX.

image

So in this case, I can setup that when the user wants to print a label, I can search through a set of label templates, and check this record if it fits the query criteria.  I then have a endless possibility to specify all kinds of criteria to select the best matching label template.

The trick is to add the source recid as a range to the packed query criteria exactly when checking for it.  Also to add the “firstonly” hint, so that you don’t query for more than you want.

Here is some sample job, I used to test out this approach:

image

Microsoft is also using the same approach when selecting is a WMSorder can be added to a existing shipment.  Take a look at  WMSShipment.canWMSOrderBeAdded() or at wmsShipmentTemplate.canWMSOrderBeAdded(), then you see the same pattern.

I hope you see the value in this, and that it can open a complete new way of adding rules and relational information to Dynamics AX 2012.  With this approach we can generically pinpoint our criteria for our rules.

Take care and happy DAXing 

Reservation sequence in AX 2012

I have received some questions on how does Dynamics AX 2012 decide what on-hand to select when reserving. Some thinks it is the inventory model (FIFO etc), but it is not. Some times it can seam like AX 2012 has it’s own will can selects randomly.

image

If the same item is located in many different buffer locations, there is a rule. It all comes down so sorting of inventory dimensions, that is specified in the InventoryDimensions group on the table InventDim.

image

So this means that the Inventsum is sorted on these inventory dimensions alphanumeric ascending. Meaning that items on location A001 will be reserved before A002 if available physical.

If you dig deep into the following method you find the code (InventSum::newQueryReservation()):

image

image

image

There are ISV solutions that addresses this, and that solves this in a very elegant way.  But now you know where to look if you want to challenge reservation sequence in AX 2012 with a good old customization.

(There are FEFO reservation sequences in AX 2012 but this is not addressed here)

Happy Daxing

Can Dynamics AX 2012 talk ?

I was playing around on some with some of the classes, and I found a  small thing that I wanted to share with the community.  How to enable the speech synthesizer in Dynamics AX 2012.  (This is the core essence of the “virtual burger” demo)

Here is the code that makes Dynamics AX speak:

image

You also need to add the System.Speech to the references in AX:

image

Making Dynamics AX 2012 talk in a demo is great, but the functional value is normally low.

Happy Daxing Smilefjes

Dynamics AX 2012 and BarTender Commander

I have previously blogged on the BarTender integration to Dynamics AX 2012.  In this blog post I want to take the integration one step further. 

Sometimes it is not possible to have a BarTender client on each machine.  Also in a Terminal Server scenario often local label printers are mapped into the RDP session, and you suddenly see that you are using up all the printer licenses you have purchased for BarTender.

image

There is a way around this, and that is to use BarTender Commander instead of the BarTender ActiveX integration. Then the printer, copies and tag values can be sent to a XML file, that the BarTender is picking up, and will automatically print out centrally.

So I needed to create some very small changes to my BarTender module to make this happen.

image

This will generate a XML file, that looks like this.

image

The BarTender commander “picks this up”.

image

And BarTender prints out accordingly.

I also see that some of the users of the BarTender integration is using it in a different way that I expected.  They are using it WITHOUT BarTender, and are just generating the XML messages.   Then they pick up this XML file, and use it for other types of integrations, like EDI and even into a dynamic document composition tools(Like StreamServ).  They then don’t need to spend a lot of time in creating SSRS reports, but more their reporting requirements into a more user-friendly reporting tool.  My comment is WOW…. I didn’t recognize that feature when I created it Smilefjes  Users are really creative and smart.  

In my last blogpost I explained how important if it is to share knowledge.  I follow up on this, and here the actual Dynamics AX 2012 source code for creating BarTender commander XML files. 

image

image

image

(Yes I know that you would prefer a “copy-paste” version, but that would be too easy Smilefjes)

Happy Daxing

How to be rich on your Dynamics AX add-ons

First I need to say I’m sorry for the trick headlines. This quick answer is that it is very unlikely to get rich on money by developing Dynamics AX add-ons, and especially if you try to this alone. However, what you will be is much richer in experience and I guarantee you will have fun. Also a warning; if you are not internally motivated to share and learn more, than do not go down this path.

I wanted to share with you some own experience in how to create, promote and sell your great ideas.

Step 1 is the idea, and step 2 is to have a either a rich uncle, nice employer or a customer that believes in your idea. It is more difficult if you are missing on step 1 or 2, and you could risk going home hungry.

image

Step 3 is product quality and development, and this is very well discussed and described in other blogs and from Microsoft, and I will not go down there now. One important tip here is to be clear about what versions of Dynamics AX you do support.

Step 4 is documentation. When I develop Dynamics AX Add-ons/modules, I spend a lot of time documenting with the end-user in mind. The documents I create for each add-on are; brochure, installation manual, user manual, step-by-step guide, training presentation, and a sales presentation. Do it in English!

image

Step 5 is about promoting your solution, and this may be the most important part. Marketing can be very expensive. A blog (like this) is much cheaper. You may need to share more than you want to attract readers (also called potential customers). You need to write about what you are doing, how you are doing it, and why it is important. Share from your documentation. Show your genuine interest in your particular subject, and what it’s capable to do. If you can share ideas and code snippets, do so. Don’t be afraid of that some may steal your code or idea. The true value is your expertise, and the ability to have a continued focus. You will probably not be rich on the product anyway, and BING/GOOGLE will figure out that what you write have value for readers. Many of the customers that have purchased my solutions have found the solution here on this blog, and then contacted me. Also try to promote your product internally among colleges and friends.

image

Step 6 is about making your product commercial. Then you need a pricelist. One tip, is to price it so low, that other partners/developers cannot make the same features as customizations at the same price. High price = no customers. Low price = some customers. You probably also need to create a partner model, so that partners that brings customers to you can make money on it. Also, if you want to continue to improve and further develop your product, try to sell your product with yearly enhancement fees.

Step 7 is to show and demo the product. In most cases this will be Microsoft Partners, that first “scans” the marketplace according to what a potential or existing customer needs. You will therefore need tools to do this, like Lync, GotoMeeting or any other meeting tools. If your product is great, try to demo it as often as possible, to as many as possible. They need to see that it’s actually working and are living up to the expectations explained in your blog.

 image

Step 8 let your customers/partners try the product. “Try before you buy” is popular, because all have experiences to purchase things/software that does not live up to the expectations. But since your idea and product is great, be prepare to let them try it. You should also probably create a NDA (Non-Disclosure Agreement), that the customer needs to sign before you hand over all you have for trial. Let you customers try the software in the way they want, and therefore you should make the installation (XPO or AX-models) available. In many cases, customers prefer to have a Hyper-V or VMWARE image downloaded, since it will contain both solution and data ready to try.

Step 9 is to make sure the product, documentation and support capabilities are available. Use the a WEB-page where the customers must log in. I prefer a SharePoint site, where I make all installation, documentation AND support available. As long as the customer is on an enhancement plan, they have access to what they need. I also let partners and customers on NDA have read only access to this SharePoint site. Also remember to remove users from the SharePoint site, where you see/understand that they will not purchase. Tell them that they can continue to read more on the blogSmilefjes

Step 10 is to sell your product. You should then have a SLA (Software License Agreement), that make sure that you and the customer is protected. Also create a document called “How to purchase”, where you describe how customers and partners should go forward. After the product is delivered, then you invoice it.

Step 11 is to be proud, and remember that you don’t do this to get rich. You do it, because on this journey you are learning a lot, and you are creating solutions that customers benefit’s from. You will also increase your own value and public recognition on the path.

  image

Also remember that there are always winners in the lottery.  One time it could be youSmilefjes

Receipt status arrived: The forgotten jewel

There are two ways to learn how Dynamics AX is working. Users can do courses, read manuals, self-training, “try and fail”, blogs etc. Professionals can also read code. Each time Microsoft is releasing a new version I try to read the code for better understanding new features and possibilities.

I then often find traces of functionality that exists, but that Microsoft never took the “last mile” and created the front-end functionality. This code is often made by the best developers in the industry. And it is open and free to use for partners and customers.

One of these hidden jewels are the status arrived.

To explain what this is, we need to understand how the real physical logistics flow is translated and viewed in Dynamics AX.

image

Dynamics AX tries to mirror this processes with transactions, and reflect each status as both transactions and as inventory statuses. Take a look at the following Dynamics AX On-hand screen.

image

What I suggest, is that they should start using the Arrived status more. Because it can give some very important information. When an order processor (like Susan) take a look at the current on-hand, because she have a customer on the phone, she can see that the items has arrived, and it is probably just a few hours before the items are available in stock, and ready to be picked.

It also tells the warehouse manager how much goods has arrived to the warehouse, and how he should prioritize his workforce to do quality control and put-away.

It answers one of the most basic logistics questions: Has the items arrived yet?

You may now ask the question: Why have we not heard about this, and why isn’t we using this more?

There is a catch. In order to use the Arrived status, you need to use pallets, and pallet transports. Microsoft is describing the process in this blog. But it is actually quite few that uses pallets in their warehouses. Most SMB companies have warehouses, but just places the goods in cartons into the warehouse.

In the following section I would like to tell you how to go around this, so that you actually can use the arrived status without using pallets. It is just a small modification needed, and it will make sure that the “forgotten jewel” again can shine.

We do this, by making some small changes to how the arrival journal is working. When the user adds a record in the arrival journal we want the inventory transactions to reflect this.

image

This will be reflected in the on-hand screen as been before.

Here is how I made this possible.

Warning ! The following section is for developers only J, and are created for Dynamics AX 2012 R2.

1.First I need a function for summing up arrived transactions.

image

2.Create some static methods that controls the arrived status based on WMSJournalTrans.

image

image

image

3.Create event handlers on insert, update and delete methods on the table WMSJournalTrans.

image

image

4.A small correction to std. AX is also needed, so that arrived transactions can be seen from the arrival overview.

image

This concludes the adjustment to make status arrived work for companies that don’t do pallets.

Take care, and happy daxing.

How to use dynamic date ranges in RoleCenter Cue’s

In Dynamics AX 2012 (and 2009) we have the possibility to add Cue’s to the role center.

image

However, sometimes we would like to have Cue’s that reflect a dynamic time dimension. This is like: Orders today, Orders yesterday etc.

What we then can do is to use query values as today(), day(-1), LessThanDate(), RateRage() etc.

Like in the following example fetching sales order lines created today. Here I use the greaterThanDate(-1). Pay attention to the extra parentheses to make it work.

image

In AX 2012 you will find many such «dynamic» data query values, and you can find them in the class SysQueryRangeUtil.

image

Then here is the developers trick: Create your own methods to get the query range you need.

I have created my self some nice methods for getting a query rage for ThisWeek() and PrevWeek()

image

image

Or here is a way if you have a CreateDateTime field, like, and want all orders created today:

image

So now it is easy to create Role center cues with data like:

– Number of Sales order with value so far today/yesterday/this week/this month etc

Try it, and happy Daxing

PDA tools for retail stores

I have several customers with retail stores.  So I wanted to create some PDA applications that can be used in the stores, that focuses on supply chain.  It actually turned out to be a small module in the PDA solution.

image

The retail menu is optimized for scenario’s where a central distribution center is doing automatic replenishment using transfer orders of the stores, and the stores are within the same company as the central distribution center.

In scenarios where the stores is buying directly from vendors, or intercompany transactions is used, then the purchase and arrival menus can be used.

Create transfer order

The create transfer order is all about creating transfer orders from a central distribution warehouse or from other stores/warehouses. The screen is very easy-to-use, and focuses on the core process.

image

To warehouse: This is the destination warehouse (or store), and is normally auto filled based on the current user.

From warehouse: This is the Source warehouse (or store), and is normally auto filled based what is the main central warehouse.

Barcode: Accepts item barcodes or EAN128 codes.
The magnifier button will open the items details for this item/barcode.

Quantity: Accepts Quantity or quantity from item barcodes or GS1-128/EAN128 codes. The field on the left show how many units are already ordered, and (hopefully) on it way. Before ordering, check this field to prevent double ordering.

The buttons in the bottom will be either add or create, depending on of there already exists an open and untouched transfer order.

Create/Pick transfer order

The create/pick transfer order is an optimization of the create transfer order. But this process will also physically pick the items while you are creating the transfer. This form is particularly useful if you want to create a transfer order based on physical items you have in the store or at the central warehouse. One of this processes is the end-of-season distribution. Returning items to central warehouse, or sending items to other stores.

image

To warehouse: This is the destination warehouse (or store), and is normally auto filled based on the current user.

From warehouse: This is the Source warehouse (or store), and is normally auto filled based what is the main central warehouse.

Barcode: Accepts item barcodes or EAN128 codes. The magnifier button will open the items details for this item/barcode.

Location: Scan the location where the lines is being picked from.

Quantity: Accepts Quantity or quantity from item barcodes or GS1-128/EAN128 codes.

The buttons in the bottom will be either add or create, depending on of there already exists an open and untouched transfer order.

1.3. Add transfer lines

If you already have a transfer order, and just wants to add lines to a specific transfer order, then use this function.

image

This form behaves just like the two previous, but here the user can specifically select the transfer order. The lookup button will only show already open transfer orders that fill the criteria of “To”-, and “From”- warehouse.

1.4. Inquire item barcode

For retailers it is important to quickly get information that is different then what a warehouse worker needs.

image

The sales price presented here is the price including VAT. So this is the price that the customer will get in the POS.

The minimum, is the minimum on-hand, and is used for replenishment. Adjusting this can automatically create transfer orders through the master planning. The magnifier button will show a lot of information on the scanned item. This is KPI that normally is used to set the minimum level of an item at the store. Here is an explanation of the KPI’s/statistics.

Last sales date : The last date there was a sale on this item/barcode from this store/warehouse.

Sales this/last week/month : Calculates some sales statistics on the item barcode from this store/warehouse.

Sales value on-hand : Current physical on-hand * sales price inclusive VAT.

Turnover this/last year : Calculates the turnover ratio for this item in this store/warehouse. The logics for creating this is the same as in standard AX.

Lead time : Getting the lead-time of the item. The logics is the same as standard AX is using in master planning.

Multiple : Show the multiple quantity parameter as defined on the item.

Recommended minimum : This parameter give a minimum advice. The logics is the same as how standard AX is calculating safety journals, but it is rounded up to the nearest multiple quantity.

As shown in the figure, the Print-button will print retail shelf labels, and these can be setup as wanted in the Columbus BarTender integration.

Count

Counting program for stores is very much the same as counting in a warehouse.

image

Inquire location

This program is the same as found in the warehouse menu.

image

Dynamics AX 2012 architecture for carton, packages and pallets

When shipping goods, there are many requirements that needs to be fulfilled. You have the ability to have correct addresses, customer requirements, freight forwarder requirements and legal requirements. To solve this we have many different “systems” in Dynamics AX 2012 (and earlier versions) to solve each of these requirements. Some of these systems are:

  • Sales Shipping Stats – Print the std. AX delivery label, and get volumetric information on the packingslip/invocie.
  • Bill of Lading – A document used with the freight forwarder to keep track of where to deliver the goods.
  • Packing material – A system to keep track of fees related to packing material
  • Ship carrier integration – A system for integrating to shipping software, like UPS Worldship og Clipper ship. Can also be used in „test mode“ if you don’t have such a shipping software.

I have gone as deep as possible into the subject to understand, and my judgment is “The data model for storing and maintaining package information in Dynamics AX 2012 is a mess!” In reality we have more than 4 different systems for maintaining package information. In reality this means we could have 4 versions of the truth. And to cover all eventualities and requirements of a advanced distribution company we need to make sure that we update all the necessary information in all 4 different systems. If Microsoft is reading this post, my suggestion for the next release is to combine these systems into one.

image

But it can take several years before our customers could benefit from such a change. So this blog post is about how we can make this work with what we have. First I will go deep on each of these 4 “systems”.

Sales shipping stats

The first “system” is the Shipping Specification. These are fields you register when you do packing slips.

image

Here you can also select to print out the standard AX delivery label.

image

The design is not very impressive and it clearly needs some customizations to make this acceptable for any customer of freight forwarder. But I guess that the idea from Microsoft is that shipment labels is not printed from Dynamics AX, but from a shipping software.

There also exists an inquiry form, where you can reprint the standard Dynamics AX 2012 delivery labels. I have found this menuitem available in the main manu under sales –> inqueries –> distribution –> Shipments. (Quite confusing since this is a terminology used for WMSShipments)

image

After the packingslip is posted, the user cannot change the data here.

The information of this is stored in a table called SalesShippingStat.

image

The “filling” of this information is manually done before doing a packing slip update, but it gets “marked” with Packingslip ID in the following code.

image

We see from this code, that the Sales Shipping Stat system does not have any uniqueness on the data or cartons. This code just related to get the summary of weight and cartons on the packingslip. Also see that the SalesParameters.useShippingStatOnPackingslip must be enabled for it to work.

Bill of Lading

The bill of lading is a receipt for goods that the carrier agrees to transport and to deliver to a designated person. It shows the list of goods delivered for transportation. In case of loss, damage, or delay, the bill of lading is the basis for filing freight claims. The bill of lading includes information about:

  • The customer order.
  • The carrier.
  • The origin and destination of the shipment.
  • The number of units in the shipment.
  • Freight charge terms.
  • Special instructions.

The bill of lading system is originating from the shipping module, and do not share any information with the SalesShippingStat system. It makes it possible to create a formletter like this :

image

The bill of lading can be both automatically and manually created,

image

The Bill of lading system is much more comprehensive than the sales shipping stat system, because it is possible to have some kind of unique ness.

The tables and fields used in this system is the following:

image

As seen here, the tables are missing the WMSPickPalletId or any SSCC-capable fields.

The tables refers to the following :

image

The automatic creation of BOL’s are done in the WMSShipment.ship method:

image

image

What I would expect from the BOL, is that the uniqueness of each package/pallet would be more clear. In a consolidated picking scenario we do have the WMSPickPalletID, that could provide this uniqueness, but this information is never passed into the bill of lading tables.

There is therefore no way to pass information like SSCC etc, or to use the BOL system as a basis for ASN/EDI processes. It is all about creating the Bill-Of-Lading document.

Packing material

The third way of dealing with packing material is the Packing material tables

image

The packing material is primarily for calculating a packing material fee. The table is normally filled in when a sales invoice is posted.

The tables look like this:

image

The packing material system therefore seems to only have one single function. To keep track of packing material fees, and not for logistical purposes.

Shipping carrier integration tables.

The shipping carrier interface feature allows Microsoft Dynamics AX customers to integrate with shipping software. The shipping software packages can pull information from Microsoft Dynamics AX, process packages, and then move their information into Microsoft Dynamics AX, eliminating manual entry and improving tracking visibility.

In the Shipping Carrier Interface for Dynamics AX 2009, Microsoft described this feature as this in the following whitepaper.

image

It is intended that the packing is handled in an external shipping, and then later transferred to Dynamics AX. This is described as a process that happens between packing slip and invoicing.

It is possible to manually fill in the information, by placing the carrier integration in “test-mode”. When posting the packing slip update, then the following screen will appear:

image

If we look deeper into the implementation of this ship carrier system, we see that it is interesting, because it does contain much what is needed. I would say that it is the best “survival candidate” of the 4 different systems.

What happens, when the packingslip is posted is the following:

image

PS! Check out the calculation of the ShipCarrierCODPackage.codAmount. It does not cover discounts!

The fields in the requester table contains the following:

image

It is a bit sad, that it does not transfer any information about already created pick pallets into the ShipCarrierShippingRequest. In a consolidated picking scenario often these pick pallets have already been created, and it would simply the process of that was available for the shipping software.

It is in the process made so that the shipping software will return data into a staging table, that contains the following fields.

image

What is interesting here, is that the PackageId field, that is actually extended from WMSPickPalletId. So this means that pallet ID can be returned back. What is missing is information about width, height, length and volume. But Microsoft have placed this information in the table ShipCarrierCODPackage:

image

But this volumetric information is never filled in by standard AX. The table is only created from AX if there is a COD(Cash On Delivery).

A solution suggestion

There are some facts. We have AX 2012 and AX 2014 is not here yet. Our customers hate large footprint customizations, because they make upgrades more difficult. And there is already many dependencies in AX 2012 that we need to take care of. So what do I do for my customers ? I cheat the system.

  1. When picking all picking transactions will be marked with a pick pallet ID.
  2. When Packing I have a new table, that is quite large and „flat“, but contains almost all I need to fiels for my labels, freight charges, weight, volumetric information ++++
  3. After packing is done per shipment, then I will generate information’s into all the 4 systems from the „New architecture“ system, and prevent the standard AX to generate this information.

image

This gives me much more control, and also the ability to have uniqueness on all outbound cargos, tracking +++. And my footprint is ZERO in standard AX, and compatible with my PDA and label printing system (BTI)

Shipping Container Labeling guide

image

Major retailers have identified incorrect logistic unit (pallet) labeling as a major emerging supply chain issue. A recent sample audit found that approximately 44% of pallet labels are not meeting agreed upon industry requirements. The issues they face include:

  • No label has been applied
  • Label is in the wrong location
  • Information on the label does not match what is on the pallet
  • Multiple labels with different Serial Shipping Container Codes (SSCC) been applied
  • Pallet label will not scan
  • Stretch-wrap has been applied over the pallet label so it doesn’t scan

The following information contains guidelines and general information on how to create and apply good quality logistic (pallet) labels as per the standard requirements of the Retail Industry.

As the Retail Industry adopts the key principles of Efficient Consumer Response (ECR) there is increased demand for high quality data capture at all points in the supply chain. Although the industry has been numbering and bar coding trade items for a number of years, the biggest emerging problem in the supply chain is logistic unit labeling.

With the migration to more and more automated scanning in warehouses and distribution centres, it is imperative that suppliers and their logistics providers ensure 100% scannability of all bar codes which will bring mutual benefits to all trading partners. Printing and applying a good quality bar code label that complies to industry standards and which is scannable by all trading partners’ costs no more than printing and applying a bar code label that doesn’t scan.

This document and its recommendation should be read in conjunction with other GS1 technical guidelines as well as retailer specific documentation all of which can be accessed and downloaded from their respective websites.

The Importance of Logistic (Pallet) Labels

The use of the logistic label incorporating the Serial Shipping Container Code (SSCC) by all parties in the supply chain, from manufacturers to transporters, distributors and retailers, is seen to be inevitable for the identification and tracking of pallets and other forms of logistic units. The purpose of the GS1 logistics label is to uniquely identify specific information about the pallet clearly and concisely in a standard format, to facilitate the process of moving products through the supply chain quickly and efficiently.

Industry Business Benefits of GS1 Logistics Label

  • Logistics Units are identified with a number that is unique worldwide
  • GS1 standards are global and apply through the entire supply chain, from raw materials supplier to manufacturer to distributor/wholesaler to end user/retailer.
  • Provides a link with bar coded information on a logistics unit and the information that is communicated between trading partners via electronic business transactions.
  • Use to identify contents of pallets, including stock data, use-by-dates etc
  • Contributes to efficient management of stock rotation at a glance
  • Saves costs by doing it once
  • Avoids multiple label types (industry standard)
  • Faster receiving, quick turnaround
  • Improves data integrity – use by date and quantity fields
  • Stock rotation based on use by date
  • Pallet tracking from vendor to retailer can assist product recalls
  • Works in conjunction with a Dispatch Advice – Advanced Shipping Notice (ASN)
  • SSCC can be used for both inter and intra-company transactions.

image

Fig 1: Example of Numbering & Bar coding Labelling Hierarchy

Logistic (Pallet) Label Requirements for the Retail Industry

The GS1 Logistics Label can typically have many different formats. The SSCC is the only mandatory piece of information that must be contained on the label itself as ideally the information flow, which accompanies the physical flow of goods, is communicated between trading partners by EDI.

In practice, however, fully automated communication channels, which make it possible to rely exclusively on electronic files for retrieving information on the movements of goods, are not always available. In this situation there may be a requirement to add additional information to the logistics label to facilitate the process of the logistic units through the supply chain.

The purpose of the GS1 logistics label is to provide information about the unit to which it is fixed, clearly and concisely. The core information on the label should be represented both in machine (bar code) and human readable form. There may be other information, which is represented in human readable form only.

What can go wrong? – Common Pitfalls

It is imperative that suppliers and logistics providers ensure 100% scannability of all barcodes. There are many reasons as to why pallet labels may not meet industry requirements. Here are some examples:

  • Label position incorrect
  • No pallet label applied
  • Multiple or mismatching SSCCs on the same pallet
  • Duplicated SSCCs
  • Damaged label such as creases and folds.
  • Will not scan due to incorrect bar code symbology or poor print quality
  • Label applied underneath stretch wrap
  • Pallet label applied to only one side of the pallet
  • Product information applied in the bar code does not match the product on the pallet
  • Pallet label bar codes not scanning
    • Ribbon wrinkle with thermal transfer application
    • Print-head element failure leading to a line through a black bar (split bar) within the bar code
    • Poor print quality – faint print due to the label print-head heat being too low or the print speed too high
    • Poor print quality – bleeding print due to the label printer print-head heat being too high with the print speed too low
  • Handwritten changes are not reflected in the bar code and are therefore not permitted on pallet labels
  • Label applied over carton joins/seams causing tearing
  • Label Dimensions

The business requirements for most users of GS1 Logistic Labels are met by using one of following:

  • A6 (105 mm x 148 mm) – 4 x 6 inch, which is particularly suitable when only the SSCC, or the SSCC and limited additional data, is encoded
  • A5 (148 mm x 210 mm) – 6 x 8 inch

However, the label can be any size that suits the labeller’s requirements, but it must be  large enough to carry all the information required together with the GS1-128 bar codes.

Factors influencing label sizes include the amount and a type of data required the content and X-dimensions of the bar code symbols used, and the dimensions of the logistic unit to be labeled.

image

Example label used for single product parcels and pallets, with GTIN information.

image

Example label used for parcels and pallets with AI 403 – Routing code without GTIN and product information.

Logistics Label Requirements

Label Size

  • The minimum label size is A6, 105mm x 148mm, however larger label sizes such as A5 or A4 are permitted

Label Format

  • The label layout can be either portrait or landscape
  • Information contained in the top bar code can be broken down into more multiple bar codes if required, in order to maintain a larger magnification (bar width)

Label Location

  • Two identical labels, one placed on each fork entry side
  • Label should be placed between 50mm – 100mm from the right hand vertical edge
  • Label should be placed between 400mm – 800mm from the base of the pallet
  • The target placement of the label (top of SSCC bar code) is 600mm from ground level

Label Data and Application Identifiers

  • · SSCC (Serial Shipping Container Code) – AI (00)
    • It is recommended that additional information not be included in the SSCC (00) bar code unless feasible
  • GTIN of the product – AI (02)
    • The data format for AI (02) is that it has to be numeric and 14 digits in length. Note: that if your carton barcode number is 13 digits, you need to include an additional zero at the beginning to increase it to 14 digits
  • Quantity of trade units on the pallet – AI (37)
  • Date Information YYMMDD – Mandatory if this information is on consumer unit
    • Use By Date – AI (17)
    • Best Before Date – AI (15)
    • Packed on Date – AI (13)
  • Batch Number, if on consumer unit – AI (10)
  • Total Net Weight (excluding wooden pallet weight – A1 (310n) where n = number of decimal places eg. 3102 = x.xxkg, 3101 = xx.xkg, 3100 = xxxkg

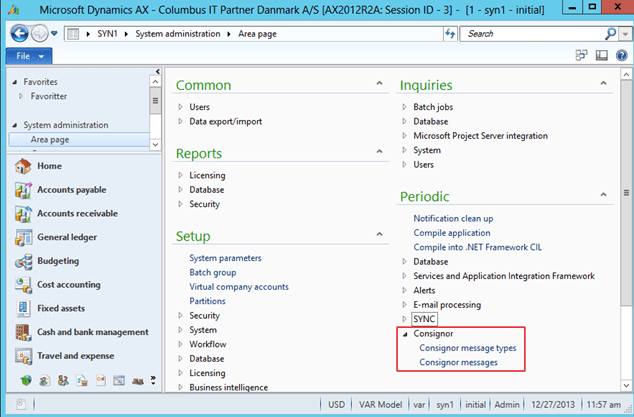
What is a Serial Shipping Container Code (SSCC)

The Serial Shipping Container Code (SSCC) is a reference number or license plate used to uniquely identify logistic units (pallets). In Dynamics AX the Pallet ID is most used for this.

The SSCC acts as a “reference key” which can be stored in a computer system to which information can be added and shared amongst trading partners as the logistic unit moves throughout the supply chain. This unique “license plate” provides the opportunity to track and trace logistic units in the supply chain.

Scanning the SSCC marked on each logistic unit allows the physical movement of units to be individually tracked and traced by providing an information flow. It also opens up the opportunity to implement a wide range of applications such as cross docking, shipment routing, automated receiving etc.

The SSCC is used to uniquely identify goods on the way from sender to final recipient, and can be used by all participants in the transport and distribution chain.

image

Figure 3: The Use of the SSCC throughout the supply chain.

Allocating an SSCC

The SSCC is a unique, non-significant, eighteen-digit number which is assigned by the company constructing the logistic unit. It remains the same for the life of the logistic unit. The SSCC is encoded in a GS1-128 Bar Code and is represented by the Application Identifier (AI) 00.

When assigning an SSCC, an individual SSCC must not be reallocated within one year of the shipment date from the SSCC assignor to a trading partner.

How you allocate an SSCC depends on the length of your assigned GS1 Company Prefix. Your company cab ne allocated a seven- to nine-digit GS1 Company Prefix.

image 

Application Identifier (00)

Used in the GS1-128 Bar Code to identify that the data following is an eighteen-digit Serial Shipping Container Code (SSCC)

Extension Digit

A digit (0-9) used to increase the capacity of the Serial Reference within the SSCC. The company that constructs the SSCC assigns the Extension digit to the logistic unit.

GS1 Company Prefix:

The GS1 Company Prefix is allocated by GS1 Member Organisations. GS1 allocates nine- or seven-digit GS1 Company Prefixes. It makes the SSCC unique worldwide but does not identify the country of origin of the unit.

Serial Reference:

A Serial Reference usually comprises seven digits (nine digits if the GS1 Company Prefix is seven digits) and uniquely identifies each transport package or logistic unit. The method used to allocate a Serial Reference is at the discretion of the company coding the package. In Dynamics AX this can be the number sequence of a WMS pallet

Check Digit:

Calculated using a mathematical formula.

Logistic Label Location on parcels

For parcels, symbol placement will vary slightly in practice; however the target placement for the bottom of the bar code symbol is 32 mm (1.25 inches) from the natural base of the item. The symbol including, its quiet zones, should be at least 19 mm (0.75 inches) from any vertical edge to avoid damage.

For smaller packages, which may be sorted automatically on a conveyor, the label should be placed on the largest surface.

image

Logistic Label Location on pallet

Industry Requirements is a GS1 Logistics Label to be placed on each fork entry side.

image

If the pallet height does not permit the pallet labels to be at least 400mm from the ground, then the pallet labels should be placed as high as possible on the right hand side on each of the fork entry sides of the pallet.

If the pallet needs to be stretch wrapped for stability, the pallet labels must be applied to the outside of the stretch wrap as shown above in order to achieve optimum scan rates.

Where there is only one layer high of the trade unit on a pallet and the trade unit height is less than the height of the pallet labels. Please ensure that the bar codes of the labels are on the vertical face of the trade unit with the human readable portion of the labels folded over onto the horizontal surface of the trade unit as shown below.

Typical Retailer Receival Processes

  • On arrival, a receiving checker will key the purchase order number or appointment number (for a multiple PO truck) into the PDA/Radio Frequency (RF) receiving unit.
  • The receiver will then proceed to the first pallet on the truck and scan all of the bar codes on the pallet label.
  • The RF scanner will send the information back to the WMS that will verify the quantities on that pallet against the order quantity on the PO. The WMS also verifies the pallet information is correct and checks that the date code on the item is suitable against the minimum and maximum dates set in the WMS.
  • If the pallet is accepted then the receiver moves along to the next pallet and repeats the process. If the pallet is not accepted the checker will conduct an investigation to identify the issue and will re label with a generic label if required.
  • Once all pallets are received, the checker will confirm the total quantity against the invoiced quantity and then close the load ready for the pallets to be put away by forklifts using RF scanners. The WMS determines the final location in the warehouse during the receival process.

Typical B2B ASN Receival Processes

  • On delivery into any receiving location, a receive checker will count the logistics units, (eg: number of pallets) and compare them to the driver’s consignment note and stamp the document accordingly. This is the initial proof of delivery.
  • The merchandise is then electronically scan receipted once it arrives at receiving locations. The Advanced Shipping Notice (ASN) must have been transmitted to the receiving company before the goods arrive in order for it to be validated (and rectified if necessary).
  • Receiving staff will validate that all SSCCs, as noted in the ASN, are physically received by scanning each Logistics label at the receiving dock.
  • When all SSCCs are accounted for, this will trigger the internal processing to update the stock and PO records and provides information to payment systems.
  • Logistic unit contents will be checked to ensure contents exactly match ASN details.

Manufacturer/Supplier Considerations

Pallet Label Quality Standards

Controlling label quality variation requires an integrated quality process incorporating people, processes, procedures and equipment.

Typically there are two options for the application of the pallet label:

  • At the point of manufacture, or
  • At the point of dispatch

The decision on when to apply the pallet label is dependent on individual organizations practices, including manufacturing, warehousing, order assembly or third party service providers.

The SSCC label standards should be incorporated into internal standards and available (electronically) to all factories and warehouses. The same standards are communicated to third party providers both at contract time and by the use of training packages, if necessary. Visual aids are encouraged in factories, warehouses etc to impart SSCC label standards, especially positioning of the labels.

With many automated and manual labeling systems check scanning controls can be purchased as part of the system, providing a level of automated bar code quality checking and control. These systems incorporate a check scanner at the front of the label printer so that as each label is printed the bar code is scanned to check quality. If a fail to read occurs the printer can print void on the erroneous label and re-print. After multiple failures i.e. 2 or 3, the unit will stop and raise an alarm.

Considerations

  • Automate the data sources to simplify printing and reduce the need for data entry.
  • Label design tested and sent to GS1 testing service for its verification report
  • Document processes
  • Train staff to visually
    • check the pallet label and position applied
    • scan label barcodes to ensure readability

Incorporate checks for

  • Correct Bar code symbology (GS1-128)
  • Label placement
  • Label verification
  • Label Defects

Visual Checklist

Does the data encoded in the pallet label bar codes match the product on the pallet eg

  • GTIN
  • Batch number (if applicable)
  • Quantity
  • Date code information, eg. best before or use by date

The pallet labels applied to the pallet must contain the same SSCC. Pallet labels should not be placed over two separate cartons. Pallet labels should be placed on the outside of the stretch-wrap. Determine if any white lines running vertically through the black lines of the bar code that may hinder the bar code from scanning are evident.

Audits

It is recommended to perform a compliance audit of the labels coming from each factory, warehouse and third party provider every quarter. Results should be reported back as percentage compliance and the issues found highlighted, together with photos, if necessary.

Training

It is imperative that anyone that is required to print or apply pallet labels understand

the industry requirements. Training and documentation is widely available.

Use of KPIs

Establish performance metrics as part of the pallet quality checking procedures. This could be plotted graphically by warehouse upon feedback from trading partners.

The data should be circulated to all factories and warehouses including third party logistics providers, each week with any relevant comments. Provide all of the raw data obtained to help find solutions to particular issues. Include the overall trend of performance for the last twelve months

Communicate progress to factory and warehouse managers at regular operations meetings to ensure the focus is maintained on the importance of achieving this and other key supply chain standards.

Third Party (3PL) Logistic Service Providers

  • What role/service are they providing
  • Are they applying labels
  • Have you incorporated them into your logistic unit labeling requirements
  • What label application and quality control process do they have in place
  • Are they scanning any part of the label prior to dispatching goods
  • What is their label printer cleaning and maintenance process

AX2012–Search and you shall find….

I wanted my customers to experience the search powers of Dynamics AX 2012 and Microsoft SQL, and decided to create a very small generic tool for finding items and products.

Suppose a user wishes to find an item, and it does not know its item number but knows few word of description and also has a small information about class, default supplier, location etc……

He can enter this info and at very next moment he would see the list displaying all the items having the various values similar to information he just entered and then he can select the required item out of it easily.

In standard AX 2012 the item lookup looks like this:

image

When installing the new item lookup (from my kitting solution), the lookup changes to this:

image

Since the lookup is attached to the itemId extended data types, this works everywhere you have items.

In the lookup form the user can fill inn filter criteria, like item name, colors, barcode, vendors/groups etc.  I can even use the product categories like this :

 image

I see here in the top, that selecting category Accessories, and selected to only show those where I have on-hand, results in 27 records. 

If I then click on the tab “search results”, I see the items (With on-hand values)

image

And just to “show of” I have sorted the list with the Physical quantity descending Smilefjes, because it is a outer-joined database view.

All filters work “side-by-side” and together.  So I can ask for products like “Find a green phone we have on stock at warehouse 22”.

The way I do this, is to build up the query in the form, based on the selected filter criteria.

image

And then just execute the query in the form.  (There are off-cause much more to it, but we can take this in private sessions)

With this very small tool the searching for products will be much easier for our customers.  Remembering item numbers is so 90’s.

Happy Daxing

AX 2012–Kitting revisited

I wanted to revist the blogpost I created on kitting, since the kitting is now built also for AX 2012.  It is a simple and easy to use customization that many of our customers appriciate, spesially since it is included in the same model as the Centralized product information form.  I must excuse the picture quality in this post, but I’m a DAX expert and not a perfect blog stylist.

Kitting is a great alternative for companies that are not equipped with finished goods warehouse facilities or cannot afford the capital expenditure of setting up a finished goods warehousing facility. Your company can take advantage of the services that are necessary to forward a product to market quickly by keeping the component on stock instead of the finished customized product. With kitting you can also speed up the order processing, because no production orders are needed.

Kitting and sales order

One of the requirements is to show the kitting structure in the sales order form in Dynamics AX. Kitting stipulates that there is a hierarchy of items, where only the bottom level is real items that are purchased, stocked and priced, while the upper levels are phantom BOM items. When a customer orders a product, the customer only need to relate to the uppermost BOM-level, while the warehouse workers are picking the actual contents of the kit.

Explosion

Explosion of a phantom BOM items on a sales order is built into the order line processing procedure, the procedure that takes place every time a sales line is inserted, deleted or updated.

The parameter field Phantom that exists on the item table. This parameter defines if a BOM item is exploded on the sales line. Explosion of BOM item is performed on all BOM levels and all the phantom BOM levels create sales lines marked as a kit, while real items create normal sales lines. The relation between levels for the Kit sales lines is established via a new reference field related to the sales line. When using the sales order screen, the order looks just like the normal sales order screen:

Salesorders

By clicking on the “Show/Hide kit lines”, all lines are shown inside each kit:

  image

The bottom-level sales lines (real stocked items) should be editable only in terms of quantity, unit price, line discount amount and multiline discount amount, the rest: delivery dates, etc. is derived from the uppermost line.

The structure of BOM cannot be manually adjusted: sales lines that are sub levels of the top phantom BOM cannot be manually added, but unwanted lines can be deleted.

Price and discount calculations

Price amounts and discount amounts are set on the lowest level of BOM only. The price on the upper level is always the sum of the sub lines.

clip_image006

Field

Calculation direction

Sales quantity

Calculated downwards

Unit price

Calculated upwards

Discount amounts

Calculated upwards

Discount percent’s

Calculated downwards

Line amounts

Calculated upwards

Inventory transactions to kits

The final kits do not have inventory transactions. The reason for this is that kits are “virtual items” that do not need a physical picking. It is the sub-components that are picked. Kits are still being packing slip updated and printed on the invoice. But still it is possible to see the order process flow of kits, since this can be calculated on the basis of the kit lines.  The line quantity form will therefore still give meaning as shown here.

image

The Kitting form letter setup form

The display of the kitting structure can be shown per item and customer on confirmation, packing slip and invoice. To handle this, a new form Kitting form letter setup is available. This form is following the standard “Table, Group, All” Microsoft Dynamics AX pattern. Here the user can specify if the kitting structure is printed on confirmation, packing slip and invoice for a particular customer.

clip_image008

The form is available under Sales and marketing—>Common—>Kitting—>Kitting form letter setup.

If the Show kitting structure is enabled, the form letter will show the kitting structure as follows:

clip_image010

Kitting FAQ

This sections covers information related to Assembly and Kitting, and is described as a FAQ.

Question

Answer

I have a kitting line, but I don’t have any inventory transactions associated to it. Why?

All exploded kitting lines do not have any inventory transactions. It is only the real items that have inventory transactions. All statuses on the kit are based on the containing lines.

Why can’t I change sales price on a kit.

Price on a kit is based on the prices on each included item. To change the price of a kit, you need to change the prices on the included items.

How do I set up an item as a kit?

A kit needs to be a BOM. The flags ‘Phantom’ also need to be enabled. (References tab page in the Item details form)

clip_image012

In addition, the kit item needs to have a valid BOM associated to the kit.

How do discounts work on kits?

In AX you have 2 types of discounts. Discount amount and percent. Discount amounts need to be set on the separate kit lines, while percent can be set on the kit itself.

How do taxes work with kits?

Taxes are calculated on the kit lines, and not on the kit itself. The taxes and VAT is therefore calculated like standard AX.

I see on the confirmation and invoice that only the kit contains the sales value, and the lines are zero.

Yes. This is how kitting works. The sales value and prices are placed on the kits and not on the kit lines. This is also the perception of the customer when he receives the form letter.

Can I manually add and remove kit lines?

Kit lines cannot be manually added, but they can be manually removed The reason for this is that kitting is supported in a multilevel structure.

How can I see the kit-lines on my sales order?

You can see the kit lines by clicking on the button Show/Hide kit lines on the sales order form, or double click on the clip_image014 symbol on the lines

How can I take out statistics on sale of a kit?

The customer invoice will contain the information required. Therefore use information from here when creating additional statistics/reporting.

I see I get a total available, picked, delivered and invoiced on kits. How is this possible?

The total available is calculated on the basis of the kitting lines. The most restricting kit line will decide the total available on the kit-header.

Can I part deliver a kit?

Yes, by using the deliver now column, and then starting the picking posting. But it is only possible to part deliver whole kits. You should not part deliver sub-items in the kit.

How is returns and credit notes handled for kits ?

Since kits are items that do not have inventory transactions, all returns must be done on the kit-lines. When creating a return on kitting items, it will only be the kit-lines you can take a return on.

If this is something that is interesting for your implementation let me know.  The solution has unfortunately a too large footprint in DAX to be distributed as a product, so it is being delivered as a customization.

AX 2012 – Negative discounts–Charges for split box delivery ?

In standard AX 2012 it is not possible to have negative discounts.

  image

But it is a very small change to actually make it work.  Just change the extended data type DiscPct.

image 

But why would any allow negative discounts ?

In many industries they have specialized on full ballet/box delivery.  If a customer needs less than a pallet/box, then a extra charge should be put on the invoice.  Then it is possible to create a line discount that increases the line amount.

But there are some aspects that you should evaluate before we start using this approach:

1. It is normally much better to use charges, but auto charges is dependent on items or quantity, so then this must be a customization.  Misc charges also have the effect to better control the ledger posting.

2. When using negative discounts, then ordinary discounts will override this.  So you are then suddenly stuck, because the real line discount is lower than the negative discount.  But this can be compensated by making sure that the real discount only kicks in in a specified quantity range. 

My recommendation is to rather extend/customize the auto charge functionality in AX 2012, and make it possible to be dependable on customer, item AND quantity :
image

Maybe an ide for next release of Dynamics AX ?

AX2012 : Centralize product information

At as Dynamics AX consultant I get the chance to work with many customers, and see good idea’s in action. At one particular customer in Norway, that are implementing Dynamics AX 2012 we have been asked to replicate some functionality from their old system.

A normal response from a Dynamics AX consultant would be that with Dynamics AX we do things differently. We use role-centers, fact boxes, fast-tabs, buttons, go-to-main table, and Excel to give a complete picture.

But this customer was persistent, and still ordered a customization. The task felt on my shoulders, and the more I do the development, the more I really see the benefits. It saves time, and gives a much easier 360 degree view.

I wanted to share these ideas with you,; this called product inquiries, and I have used the “copy with pride” technique from other std. Dynamics AX forms J So the “footprint” in standard AX is Zero.

It all starts with the following screen:

clip_image002

By typing in an item, the user will get some key information, like name description etc. But also some information like on-hand, vendor, external item ID, most common locations and picture Smilefjes

In the tab-grid part, you see some of the information, where you normally would have to click on buttons or filter on. The tab-page here shows trade-agreements with vendors, prices, lead time etc.

On the tab purchase lines we see ONLY the open purchase lines, marking, and confirmed delivery dates.
clip_image004

The Sales lines shows open sales lines:

clip_image006

The inventory transactions, shows ONLY transactions that has affected the physical on hand. Meaning Sold, deduced, picked, purchased, received and registered transactions:clip_image008

Customer invoice lines, will show all commercial transactions, related to the item:
clip_image010

The Posted vendor invoice lines, shows the following:
clip_image012

The statistics, will show statistics per month:
clip_image014

If wanted, the user can them self also key in the start and end date to get statistics on other intervals. The turnover ratio is also calculated.

For BOM/Kits we also have the following:
clip_image016

In the coming days, also price calculations per customer will be available, and then it can also be used for finding out if a specific customer should get a discount or not J

It is not revolutionary to make such screens, but I think I managed to get it working with a good performance. The number of datasources involved is large. So I have used several techniques, like caching, maps etc to get the acceptable performance.

And on the op, I have “stolen” many of the same buttons as the released products form, so these are also working.

clip_image018

I have also used the “Grid view” to get a very fast overview:

clip_image020

The conclusion is therefore to actually listen to our customers. They very often have ton’s of experience and are willing to share their knowledge.  And we as Dynamics AX consultant can help our customers to become more successful. 

Happy Daxing.

Dynamics AX 2012 SCM: Micro improvements #6

In Dynamics AX 2012(and 2009) it is possible to have delivery addresses on both the sales order header, and on the sales order line.  But it is also possible to disable the use of delivery addresses per sales order line, by disable the configuration key, like this:

image

If you disable this, then you will not have delivery addresses per delivery sales line.

But is you do this, and you also do do consolidated delivery/picking, then there is another issue that will appear.  The picking routes will miss a delivery address. 

In std. AX 2012 you will also see that the customer name is missing from a consolidated picking route.  I understand why, and the reason is that each picking route is unique per delivery address.

But most companies implementing AX 2012 still wants to have a picking route with customer name and delivery address, and with a few lines of code it is actually possible to get this.  For those of you that like X++, here is the needed code to get delivery address and customer name on a consolidated picking route:

image

  image

Take care (kim) and happy Daxing.

Dynamics AX 2012 SCM: Micro improvements #5

When working with output orders I see some customer struggling with deleting open output orders.

They typically have open output like this:

image

When deleting it, they get the following error:

image

The reason for this, it that deleting a output order will also trigger a delete on the inventory order transaction (WMSOrderTrans).  And this delete will again try to delete the original output order(WMSOrder).

To avoid this error is to disable the OCC (Optimistic Concurrency Control) for the WMSOrder, like this :

image

The issue is reported to Microsoft and is expected to be available in AX 6.2 (AX 2012 R2) or the AX 7.0.

Dynamics AX 2012 PDA devices in Production

Changing from a paper process to input on a PDA with automatic wireless transmission to the main computer can dramatically boost worker productivity. Any process that involves collecting data using paper documents is potentially a candidate for a mobile solution to reduce data entry errors and speed up the reporting process.

In my crusade to simplify and PDA enable AX 2012 functionallity I have taken a look into production, and created some easy to use PDA forms.

Most manufactured items move through the production process sequentially. The sequence starts when a production order is created and ends when the product is ready for shipment. In Microsoft Dynamics AX, each sequential step is associated with a specific status. The status reflects where the item is in the production life cycle.

You can monitor the activities in each step of the production and move the production to the next status when you are ready. If you omit intervening steps when you change the status, the system automatically runs the necessary missed steps for you.

· Create – Status of the production order when it is created.
· Estimate – Status of the production order after you run a material and cost estimation.
· Scheduled – Status after you run operation or job scheduling.
· Release – Status when the production order is scheduled and has been released to production.
· Start – Status of the production order when production starts.
· Report as finished – Status of the production order when production is finished and ready for final action.
· End – Status of the production order after final costs have been applied, the item is complete, and the order is no longer active.

The PDA production covers the basic tasks for a production order centered on material and hour consumption. The PDA program will make it easier to register these transactions in environments where ordinary PC cannot operate.

The idea of the PDA production is to simplify the entry of consumption, and to report statuses. The main functionality is therefore centered on the following functions.
image

Start production
Start the production. This will also create the picking journal that will be used in production picking. Often the reservation of BOM-line is done when starting the production.
Report BOM Lines
Report material consumption according to the BOM picking journal.
Report Hours
Report hours on jobs and operations.
Report as Finished
Report finished goods as finished into a put-away location.
End production
End the production, and perform costing. Normally this is done in back-office.

The PDA production do not have any “create production”, because creating productions, BOM, delivery date and soon, is regarded as a back office function, and it requires more detailed information about sourcing to be sure that this is done correctly.

So the PDA production focuses on what is actually taken place on the production floor.

Start production

After a production order is started, you can post costs against the order. The system can be configured to estimate material and route costs that are allocated to the order when the order is started. This allocation is known as pre-flushing or auto consumption. You can manually allocate material to the order by creating picking list journals. You can also manually allocate labor and other route costs to the order. If you are using operations scheduling, you can allocate these costs by creating a route card journal. If you are using job scheduling, you can allocate these costs by creating a job card journal.
image

The start production will therefore let you perform this step.
Barcode:
Accepts item barcodes or EAN128 codes.
Lookup is filtered to only show item barcodes that has an open production order associated. View details will open the item information form. If only one production is found on the specific barcode, then the production will be auto-filled in.
Production:
This field accepts production numbers as input. Lookup is filtered to only show productions that is an open. View details will open a list view that shows the BOM-lines associated to the production.
Start:
Specify how many that should be started. This affects the creation of production picking lists and route/job cards. In the right field, show the remaining quantity to be started (scheduled quantity – started quantity)
From – To:
If only a subset of operations should be started, then specify the From-To operations here.
Post route card now:
Select the check box to automatically post the created route journal.
Post picking list now:
Select the check box to automatically post item consumption when the production is started. The program posts transactions in the picking list journal to the ledger. This pre-flushed the BOM consumption.
Print labels:
The print labels, will print item labels, when starting the production. This can be a good thing, especially, because the barcodes in on the labels can be placed on the product as they are being produced. The labels that will be used are labels associated with the production table in the Columbus BTI/Bartender module.

When done, press the start button to start the production order.

Report item consumption

Report item consumption is picking material to the production order. It is normally used to pick from the warehouse at the specified locations.
image

The first screen is where the production is identified. If labels where printed in the start production form, it is simply to just scan the production number. The production field also accepts scanning Item barcodes IF there are only one single open production order on the item barcode.

If there are only one open picking journal, then the PDA will fetch that picking journal identifier. The item number is just the item number of the produced item.

The rest of the fields are information fields showing item name, delivery reminder of the production, delivery date, start date and current status.

The next screen will show all the locations that should be visited to pick the picking journal lines. The PDA operator scans the location (Or push the “pick” checkmark) to pick the specified line. Then the third screen will appear where the operator can confirm the item barcode and even change inventory dimensions like location, serial, batch etc.

When the user clicks on “apply” the line is picked from the inventory, and consumed in the production order.

The last step is to finish the picking that will post the production picking journal. The finish of the production picking journal will change the status of the picked items to “Deduced”.

Report resources/Hours

The Columbus PDA can be used to report hour consumption in the production. Use of the PDA report resources is the same as using a route journal, and will report process and setup hours per operation.

The PDA screens consists of 3 screens, but if Job-ID scanning is used, than only 2 PDA screens is required.
image

In the first screen the user can identify what production order that we works on. The user can here also enter the operation ID, if this is known. The user can also scan the Job identifier directly to report hours. Dynamics AX 2012 do have out-of-the-box support for printing barcodes directly on the job card, as shown here:
image

If the user do not specify any operation or job-id, then the select operation screen will show when pressing start.

In the select operation, only the remaining operations will be shown, and the user can either enter the operation number, or click on the “pick” field.

In the third screen, the user can enter process hours, setup hours. The user can also report number of good and error units on this operation. If an operation is reported with error, then the error cause can be entered. If the operation is complete, then it is also possible to checkmark this. This will have an effect on resource reservations, and also the progress reporting. In the top, the user can also select another worker, if several workers uses the same PDA.

The registration screen is have a column showing the remaining hours/quantity in the gray fields, as shown here.
image
When posting the hours, a production route journal will be created and posted. In this way, the reported hours are close to real time. To correct any wrong postings, just create a journal manually, and reverse the transactions.

The PDA resource reporting is using exactly the same validations as the production journal.

Report as finished

As the production progresses, items are finished. Then the PDA operator can perform a report as finished. The report as finished is therefore a put-away process. It is possible to also use the PDA arrival functionality, but the process shown here is optimized for production.
image

First the PDA operator identifies the production either by scanning the item barcode or production id. The item barcode field accepts production numbers. Then the operator enters the number of units to report as finished. The PDA will then ask for additional inventory dimensions, like location, pallet batch etc, depending on what is mandatory of the item to specify. The PDA will also suggest a put-away location.

Confirm the put away by clicking “apply”, and the items are then “registered” into the location.

The user can also report number of errors/failed products. And even limit the “from-to” operations, to just report as finished selected operation. The end job, means that all remaining jobs should be marked as ended.

The operator can also print labels here that can be useful if tracking dimensions like batch or serial numbers are used in the production process.

End production

The end production is the final step in the production process, and changes the receipt and issue transactions to “purchased/sold”. The costing details must still be fetched from the rich AX 2012 production form, but the actual ending can be done with the PDA.
image

The Production end form on the PDA is very simple. It contains two input fields, and some quantity status fields.

If the user scans the item barcode, then the available productions order lookup will be filtered based on this. The lookup is also filtered on the current warehouse.

If there only exists one “reported as finished” production order, then this will automatically be select.

To end the production, just click post, and the production is ended.

Conclusion

With the Columbus PDA, it is possible to PDA enable your production, and take benefit of the realtime production process.  A lot of readers of this blog has asked if this PDA solution is available, and the answer to this is yes, but only for AX 2012 RTM and Feature pack.  Just contact usSmilefjes

My next PDA project will be …….. project Smilefjes.  Here is a silent preview:
image

Stay tuned, and happy DAXing.

Create PDA – Kinder Surprise II (for sales and purchase)

In my previous post I wrote about compressing standard location, movement and counting into a single process in Dynamics AX 2012. Today I wanted to show that the my PDA solution also can save time in purchase and sales scenario’s. If there is one thing we all like so save, it is time. So to save time, some PDA features has been implemented to speed up processes, but still maintaining on hands accurately. So this post is about making life easier for those companies, that don’t need or want to have more advanced WMS capabilities and features.

1. Create a sales order, and pick it in the same operation.
clip_image002
This scenario is typically used in a retail scenario, where a store employee walks together with the customer, and creating sales order AND pick it while they are collecting the items. Then the last step is just to invoice the order. In this scenario, it means that the locations are updated in real-time.

2. Create a purchase order, and register it in the same operation.
clip_image004
This scenario is more common than you think. People is ordering goods, but they don’t create a purchase order. Not exactly best practice, but is surely happens. Here the receiver can build up and receive the goods in one single operation. Scan item barcode, specify location and quantity, and the purchase order is created, and placed into the warehouse.

In the solution there are off course the possibilities for other scenario’s, as can be seen in the Sales and Purchase menus.

clip_image006

Happy Daxing, and my next post will cover the new features for production on PDA. Here is a silent preview:

clip_image008

Create PDA – Kinder Surprise

Kinder Surprise, (or Kinder Egg’s that is also called) is something that most kids loves. Why ? It contains 3 positive elements, and that are (normally) a surprise, chocolate and a toy.

image

I wanted to create a Kinder Egg function on the PDA, that simplifies 3 tasks into one task. The tasks of my choice was:

1. Set the default issue/receipt warehouse location for an item,

2. Move all on hand of this item into the new location.

3. Adjust/count the new location.

So I created the following PDA screen:

image

Here the PDA asks for an item barcode, and then the user can scan the new default location, and select if the system should move ALL on-hand to the new location. After the movement has been done, then the PDA will adjust the final quantity in this location. In the background the PDA used standard AX journals.

For smaller companies this truly save time. Just imagine the time you would have to spend to do this using the item warehouse setup, transfer journal and counting journal.

That is Kinder Egg Smilefjes

Search for available putaway location using X++

When receiving products from purchase, production or any other receipt, then most companies wants the system to present a location where the items should be placed.

Dynamics AX 2012 have the capability to find a available location in the warehouse, but this algorithm is based on that the receipt do have a pallet.

If you want to examine the standard X++ code for this, then take a look at Table\WMSPallet.findFreeLocation(..), and just move forward in the code. 

But we who have been working with logistics for many years, know that it is just a fraction of our customers, that are using pallets. Most just have pure SKU’s that they want to store in their warehouse.

So in the PDA, I implemented a way to suggest put-away locations to the warehouse operator, that works without pallets.

image

The algorithm is simpler than the standard DAX2012 search for pallet location, but the response I get from my customers, it that it is more practical.  So what the code basically do is :

1. If the item/warehouse have a default receipt location, then use this.

2. If the item have a default picking location, then suggest this.

3. Search for a existsing buffer location with onhand, and then suggest this.

4. Seach for a buffer location where the item has been before, but now is empty, then suggest this.

5. Search for any empty and available buffer location.

Here is the code available for the Dynamcis AX community. (it’s not perfect, but ment as an inspiration for all DAX developers that every day is creating value for our customers)


WMSLocationId suggestedWmsLocationId(ItemId _itemId, InventDimId _inventDimId)
{
    InventItemLocation inventItemLocation;
    WMSStoreZoneArea   WMSStoreZoneArea;
    InventDim          parmInventdim = InventDim::find(_inventDimId);
    InventDim          inventDim;
    InventDim          inventDimCriteria;
    InventDimParm      inventDimParm;
    InventSum          inventSum;

    InventSum          inventSum2;
    InventDim          inventDim2;
    WMSLocation        wmsLocation;


    if (parmInventdim.wmsLocation() )
         return parmInventdim.wmsLocationId;

    inventItemLocation = InventItemLocation::findFixedWarehouse(_itemId, _inventDimId);
    if (inventItemLocation)
    {
        //1. use default receipt location on item
        if (inventItemLocation.wmsLocationIdDefaultReceipt)
            return inventItemLocation.wmsLocationIdDefaultReceipt;

        //2. use picking location on item
        if (inventItemLocation.wmsPickingLocation)
            return inventItemLocation.wmsPickingLocation;
    }

    //3. Search for existing buffer locations with item onhand
    inventDimCriteria = parmInventdim;
    inventDimParm.initFromInventDim(inventDimCriteria);
    inventDimParm.wmsLocationIdFlag = false;
    inventDimParm.wmsPalletIdFlag = false;
    inventDimParm.InventBatchIdFlag = false;
    inventDimParm.InventSerialIdFlag = false;

    while select firstonly sum(PhysicalInvent) from inventSum
            group by InventDimId
            where   inventSum.ItemId == _itemId
                &&  inventSum.PhysicalInvent > 0
            #InventDimExistsJoin(InventSum.inventdimid,inventdim,inventDimCriteria, InventDimParm)
            exists join wmsLocation
                where   wmsLocation.InventLocationId        == inventDim.InventLocationId
                    &&  wmsLocation.wmsLocationId           == inventDim.wmsLocationId
                    &&  !wmsLocation.InputBlockingCauseId
                    && (wmsLocation.LocationType            == WMSLocationType::Buffer ||
                        wmsLocation.LocationType            == WMSLocationType::Pick)
    {
        if (inventItemLocation.wMSStoreZoneId) 
            {
                select firstonly WMSStoreZoneArea 
                    where   WMSStoreZoneArea.storeZoneId == inventItemLocation.wMSStoreZoneId
                        &&  WMSStoreZoneArea.storeAreaId == inventSum.inventDim().wmsLocation().storeAreaId;
            
                if (WMSStoreZoneArea)
                    return wmsLocation.wMSLocationId;   
            }
        else
            return inventSum.inventDim().wmsLocationId;
    }
    //4. Search for existing buffer locations where the item has been before, is zero, and no other items
    while select firstonly sum(PhysicalInvent) from inventSum
            group by InventDimId
            where   inventSum.ItemId == _itemId
                &&  inventSum.PhysicalInvent == 0
            #InventDimExistsJoin(InventSum.inventdimid,inventdim,inventDimCriteria, InventDimParm)
            exists join wmsLocation
                where   wmsLocation.InventLocationId        == inventDim.InventLocationId
                    &&  wmsLocation.wmsLocationId           == inventDim.wmsLocationId
                    &&  !wmsLocation.InputBlockingCauseId
                    && (wmsLocation.LocationType            == WMSLocationType::Buffer ||
                        wmsLocation.LocationType            == WMSLocationType::Pick)
    {
        select firstonly sum(PhysicalInvent) from inventSum2
            where   inventSum2.ItemId != _itemId
                &&  inventSum2.PhysicalInvent > 0
                exists join inventDim2
                    where   inventDim2.InventLocationId  == inventSum.inventDim().InventLocationId
                        &&  inventDim2.wmsLocationId     == inventSum.inventDim().wmsLocationId;
        
        if (inventSum2.PhysicalInvent == 0)
        {    
            if (inventItemLocation.wMSStoreZoneId) 
            {
                select firstonly WMSStoreZoneArea 
                    where   WMSStoreZoneArea.storeZoneId == inventItemLocation.wMSStoreZoneId
                        &&  WMSStoreZoneArea.storeAreaId == inventSum.inventDim().wmsLocation().storeAreaId;
            
                if (WMSStoreZoneArea)
                    return wmsLocation.wMSLocationId;   
            }
            else
                return inventSum.inventDim().wMSLocationId;
        }   
    }
    //5. Search for empty and available location in buffer
    while select wmsLocation order by SortCode, wmsLocationId
        where   wmsLocation.InventLocationId == parmInventdim.InventLocationId
            &&  !wmsLocation.InputBlockingCauseId
            && (wmsLocation.LocationType           == WMSLocationType::Buffer ||
                wmsLocation.LocationType           == WMSLocationType::Pick)
        exists join inventDim
            where   inventDim.InventLocationId  == wmsLocation.InventLocationId
                &&  inventDim.wmsLocationId     == wmsLocation.wmsLocationId
        exists join inventSum
            where   inventSum.InventDimId    == inventDim.InventDimId
                &&  inventSum.PhysicalInvent == 0
                &&  inventSum.Ordered        == 0
    {
        select firstonly sum(PhysicalInvent) from inventSum2
            where   inventSum2.ItemId != _itemId
                &&  inventSum2.PhysicalInvent > 0
                exists join inventDim2
                    where   inventDim2.InventLocationId  == wmsLocation.InventLocationId
                        &&  inventDim2.wmsLocationId     == wmsLocation.wmsLocationId;

        if (inventSum2.PhysicalInvent == 0)
        {    
            if (inventItemLocation.wMSStoreZoneId) 
            {
                select firstonly WMSStoreZoneArea 
                    where   WMSStoreZoneArea.storeZoneId == inventItemLocation.wMSStoreZoneId
                        &&  WMSStoreZoneArea.storeAreaId == wmsLocation.storeAreaId;
            
                if (WMSStoreZoneArea)
                    return wmsLocation.wMSLocationId;   
            }
            else
                return wmsLocation.wmsLocationId;
        }    
    }
    return ''; //No locations was found 😦
}

Get product attributes from X++

The product attributes is a nice feature, where we can add attributes to the products without adding any additional fields on to the inventory table.

image

But I wanted to be able to fetch out only the attribute names and values from X++, that had values.

image

Here is how I solved it.


static void Demo_GetProductAttributes(Args _args)
{
    inventTable                 InventTable;
    EcoResProductAttributeValue ecoResProductAttributeValue;
    EcoResAttribute             ecoResAttribute;
    EcoResValue                 ecoResValue;

    while select InventTable where InventTable.itemid == "1604"
        join RecId from ecoResProductAttributeValue
        where ecoResProductAttributeValue.Product == InventTable.Product
            join Name from ecoResAttribute
            where ecoResProductAttributeValue.Attribute == ecoResAttribute.RecId
                join ecoResValue
                where ecoResValue.RecId == ecoResProductAttributeValue.Value
    {
        info(strFmt("%1 - %2 - %3", InventTable.ItemId, ecoResAttribute.Name, ecoResValue.value()));
    }
}

AX 2012 invoice is optimized for US legal letter format

I’m going deeper into the topic of reports, and then I found the following 3 blog posts:

http://addicted2ax.de/index.php?/archives/17-Creating-SSRS-Reports-in-Dynamics-AX-2012-Whats-no-longer-possible-in-AX-reports-Part-I.html

http://addicted2ax.de/index.php?/archives/18-Creating-SSRS-Reports-in-Dynamics-AX-2012-Whats-no-longer-possible-in-AX-reports-Part-II.html

http://addicted2ax.de/index.php?/archives/21-Creating-SSRS-Reports-in-Dynamics-AX-2012-Whats-no-longer-possible-in-AX-reports-Part-III.html

If you are developing reports for AX 2012 SSRS, I suggest you read theese blogposts.

Split Case Picking: Like a Trip to the Grocery Store?

Sometimes called piece picking, split case picking is one of the most common order fulfillment methods. It is also the easiest way of picking in Dynamics AX 2012, and do not require a lot of setup.

What can a trip to the local grocery store teach us about split case order picking?

image

In a split case picking system, individual items are picked from bins or open cartons. This method is sometimes called each-pick or piece picking operations. Most of the time, these operations involve a great many SKU’s – in the tens of thousands at times – and low pick quantities. This is prevalent in e-commerce operations, here items are shipped directly to the customer; parts operations, and other item-intensive operations.

The methods for broken case picking are:

The basic order picking method.

Basic order picking is the way most of us use the grocery store. We have a shopping list, a cart, and we’re off to the races grabbing the things we need for our order (and quite probably some things we don’t).

image

In a basic picking system, the product is stored at a fixed location in racking or shelving (sometimes in flow racking or other semi-automated equipment) and pickers walk to it in a manner not too different than the way you buy groceries – items are stocked in a spot and you go get it. Using a pick ticket, the order picker picks a single order, following his route through the static storage area.

The way your warehouse is laid out in relation to the pick ticket is key. You want the route to be the most efficient possible, allowing the picker to work through his picks and end up back at his workstation. The pick ticket should be arranged in the same order the storage is, so that the picker doesn’t have to backtrack to pick any particular order. In a Pareto analysis, the fastest moving items should be the most accessible, closest, and easiest to pick. Analysis of what the fastest-moving items are should be done frequently enough to ensure that your picking flow isn’t a detriment to productivity. If a seasonal change or a market change has altered the fastest movers, it’s worth the time to reconfigure your storage layout.

Travel time is probably the most important basic split-case picking system issue. You should look at your order volume and the number of picks per order – the higher the picks per order, the fewer orders, the more viable a basic system can be.

Basic order picking equipment

  • Industrial Shelving
  • Pallet Rack
  • Carton & Gravity Flow Systems
  • Bins & Totes
  • Packing & Shipping Workstations
  • Order picking carts
Batch picking systems

pallet jack moving an order

To take the grocery shopping analogy further, imagine a store where you and eight other shoppers each split the store up into zones for picking. You pick up the eggs and dairy for everyone while someone else hits the produce aisle, and another person picks up bottled water, soft drinks, and juice. You and the other shoppers in this batch meet at the checkout area to distribute the groceries to each person in the batch. While this sounds like a silly way to shop, it works in a distribution environment.

Orders in a batch system are grouped into “batches” where an order picker picks related groups of SKU’s for each batch in a single pass. Typically, less than a dozen orders comprise a batch.

The picker selects one item or group of similar items for every order in the batch at the same time.

This is especially true when the batch picking system is automated so that the order pickers can easily and quickly identify all the items necessary for their batch. It reduces travel time – after all, you’re only going to one aisle instead of all of them – and you can make additional picks in the same area. Since you’re picking multiple orders simultaneously, you’d have to be sure the orders didn’t get mixed up and one shopper’s cart isn’t given two jars of peanut butter while someone else gets none.

One disadvantage is that orders waiting to become part of a batch aren’t being shipped. This can slow your process and may not work for some operations.

Batch picking equipment

  • Industrial Shelving
  • Pallet Rack
  • Carton & Gravity Flow Systems
  • Bins & Totes
  • Packing & Shipping Workstations
  • Order picking carts
  • Carousels


Pick & Pass systems (zone picking systems)

automated conveyor system

Imagine yet another trip to the grocery store. This time, order pickers assigned to a station along that aisle fill your shopping cart as it moves along the process. The pickers don’t move – your cart does – and a picker is responsible for only one small group of products, his specific pick zone.

Consider it the equivalent of an order-picking assembly line. Orders move from zone to zone and the picker responsible for that zone fills the order for picks from his zone only. Typically a conveyor system  is used in this kind of order picking system.

The challenge with pick & pass systems is that you must balance the zones so that one zone isn’t trying to cope with a mass of orders while another is idle. In that fictional grocery store, imagine assigning milk, eggs, and dairy to one zone and beef jerky to another. The first zone will always be trying to keep up while the second zone picker has nothing to do. The busiest zones should be adjacent to the conveyor line, ensuring that the most common picks require little travel time.

Pick & Pass systems are best for large operations where you have lots of sku’s and orders, but not too many picks per each order. In the grocery store analogy, pick & pass might work well for a quick, evening trip for a few things, but not for the weekly family-shopping spree. Pick & Pass also gives you the flexibility to assign certain items to secure pick areas, automated systems, and other specialized pick systems as needed.

Equipment list
  • Automated Conveyor Systems
  • Industrial Shelving
  • Pallet Rack
  • Carton & Gravity Flow Systems
  • Bins & Totes
  • Packing & Shipping Workstations
  • Order picking carts
  • AS/RS Systems
  • Carousels
Wave picking

Wave picking is a hybrid of both pick & pass and batch picking, except that everything for all active orders is picked simultaneously. All the zones are picked at once and consolidated into individual orders & shipments. It would be difficult imagining this working for that mythical grocery store, but the parallel would be that pickers race to get all the banana orders for every shopper who needs bananas as the same time, filling a central shopping cart, then distributing them to shoppers after all banana orders are filled. At the same time, pickers would be working in waves to get peanut butter, cat food, and other items for everyone who wants them, at the same time.

This would typically be the fastest way to get all of a particular item dealt with in a multi-order system where there are plenty of orders, lots of SKU’s, and a good number of SKU’s per order. It’s good for categorizing orders by shipper, route, or region.  Wave picking is not supported directly in AX 2012, but with some investments in a ISV or customization can be well worth. 

Start picking, and happy Daxing.

Source : Cisco-Eagle

AX2012 FP Product receipt from X++

Here the other day I have seen a change in functionallity between AX 2012 (6.0) and AX 2012 Feature Pack (6.1).  At several customers we are using simplified product receipt, where the warehouse worker and do a product receipt from a small PDA screen, after the items has been registrered :

image

A small demo X++ code for doing the product receipt is like this (for AX 2009 and AX 2012):

image

Warehouse menu

The warehouse menu covers ordinary tasks like counting, moving, inquiry etc.

image

Count from Journal:
This program will do a controlled count, based on a counting journal that has been generated. This is typical for cycle counting or when doing aisle counting.

Real-time count:
This program can be used when doing ad-hoc counting of locations.

Transfer from Journal:
This program will perform internal transfers between dimensions. Typical when moving from a location to another, but based on a transfer journal.

Real-time transfer:
This program will perform ad-hoc internal transfers between dimensions. Typical when moving from a location to another.

Inquire item barcode:
Inquire information on an item barcode, and to see where the item is located.

Inquire location:
Inquire contents of locations

Count from Journal

Journal counting is the most common way of counting in Dynamics AX. It used a counting journal to confirm the counting. The process therefore starts by creating a counting journal in Dynamics AX. The PDA journal counting cannot add new items to the journal. It can just count the lines that already exist in the journal. Several workers are allowed to work on the same journal.

image

The count from journal PDA form will change in the process.

image

image


Warehouse:
Enter or scan the warehouse. Normally this will be automatically filled on based on usage data.

Journal:
Select or enter the journal number. The lookup will show open journals, that is not blocked and that do have counting lines. The magnifier button will show the lines on the journal. When the journal has been filled in, then the grid will show all locations that needs to be visited.


Location:
Select or scan the location, that exists in the journal/list.

When the location has been entered, the form will change, and instead of showing next location, it will show the item barcodes available on the location.

image

Barcode:
Select or enter the barcode that should be counted. The lookup button will only show barcodes available on the journal. The magnifier button will show barcode details, like item name, picture and current on hand values.

Counted:
When the barcode is scanned, the cursor will jump to the corresponding line, where the worker can fill in the counted quantity. There exists more items with different tracking dimensions, then look at the dimension view in the bottom screen.

Grid line coloring:
When a line has been counted the line will “jump” to the bottom of the grid, and it will change color. White means that the line has not been counted. Green means that it has been counted with a positive value. Red means that the quantity has been counted away.

image
Post:
When all lines have been counted, the command button “post” will be visible, and the journal can be posted.

Real-time count

Real time counting is quite similar to journal counting, but the worker does not have a journal.
image

Warehouse:
Enter or scan the warehouse. Normally this will be automatically filled on based on usage data.

Location:
Select or scan the location. When the location has been entered, it will show the item barcodes available on the location.

Bar code:
Select or enter the barcode that should be counted. The lookup button will show all barcodes available. The magnifier button will show barcode details, like item name, picture and current on and values.

Counted:
When the worker has scanned in a barcode, the cursor will jump down to the lines, where the worker can specify the counted quantity.

If more mandatory dimensions must be specified, then the item dimension specification form will pop up. In the picture to the left, the PDA requires that both pallet ID and Serial must be specified.

image

Grid color/icon coding
To visualize progress in counting, each line have been added with a small counting symbol.

Grey – The existing line has not been counted
Green – The existing line has been counted
Blue – New line has been counted in
Red – The line has been counted out.

image

Post:
To commit the counting, the user must click on the post button. It the user just returns without clicking post, the counting will not be posted. All posting in the real-time counting will be posted using a counting journal. The journal is created and posted within the same transaction. The journal lines will also be marked with the worker ID, and posted date/time.

Outbound menu

The outbound menu is related to a consolidated delivery. Processes here is related to what happens after the items have been picked is covered.

image

Merge pick pallets:

Merge pick pallets will combine two pallets into one pallet. This is often done for consolidated deliveries, and typical if the pick pallets actually are boxes or pick baskets.

Stage pick pallets:

Staging is the process of aligning up the delivery pallets at an outbound dock. Also to sort and organize the sequence of how the pallets should be placed in the truck

Load pick pallets:

Loading is done, when placing a pallet into the truck/carrier.

Send shipment:
Sending a shipment corresponds to the send shipment on the standard Dynamics AX form.
Here the worker and also specify if packing slip and bill of lading should be printed.

Merge Pick pallets

Merging of pallets should be done to simplify the staging and loading processes, and to keep a better overview of the contents of the outbound dock.

image

From Pallet:
Specify the from pallet. When filled in the delivery name and address will be displayed. The lookup will show all pallets on the current warehouse. The magnifier button will show all items that is currently on the pick pallet.

To Pallet:
Specify the destination pallet. All items and picking lines will be moved into the pallet. The lookup will show all pallet at the current warehouse. The magnifier will show all items that currently exists on the destination pallet.

There are a validation of what ”to pallet” that can be used. This is the same validation as standard AX is using, checking that you cannot combine two pallets destined for different shipments, addresses and customers.

Stage pick pallet

To stage a pallet just means that the status of the picking line changes to status “staged”. It is common to stage the pallet several time to different outbound docks. If the truck/carrier is planning to drive into another outbound dock, than all pallets can be “re-staged” to the new outbound dock.

image

Pallet:
Specify the staging pallet. When filled in the delivery name and address will be displayed. The lookup will show all pallets on the current warehouse. The magnifier button will show all items that is currently on the pick pallet

To location:
Specify the staging location. Normally this is a outbound dock. The lookup will show outbound docks at the current warehouse. The magnifier button will show all items that is currently on the outbound dock.

Stage:
Performs the actual staging

Load pick pallet

Pallet loading should be performed to make sure that all pallets have been correctly loaded into the truck/carrier. To reverse a loading, just stage the pallet again.
image

Pallet ID
Specify the pallet to load. When filled in the delivery name and address will be displayed. The lookup will show all pallets on the current warehouse that is ready to be loaded. The magnifier button will show all items that is currently on the pick pallet.In addition the working instructions will show the expected shipment that the pallet should be loaded into.

Shipment
Scan or enter the shipment where the pallet is loaded into. The lookup button will show all shipments that is not shipped at the current warehouse. The magnifier button will show all items that is currently loaded into the shipment.

Load:
Load the selected pallet into the shipment.

Send shipment

Send shipment is the last task needed to close the shipment and to generate packing slip and bill-of-lading documents. The task corresponds to doing a ”send shipment” in standard Dynamics AX 2012.

image

Shipment
Scan or enter the shipment where the pallet is loaded into. The lookup button will show all shipments that is not shipped at the current warehouse. The magnifier button will show all items that is currently loaded into the shipment.

Status:
Display the expedition status of the shipment

Name:
Display the name of the shipment

Loaded pallets:
Display the number of pallets that have been loaded into the shipment

Not loaded:
Displays number of pallets that have not been loaded into the shipment. If this number is larger than zero, then there are pallets that have not been loaded into the shipment yet, and the operator show wait with sending the shipment.

Print BOL:
Print Bill-of-Lading document based on what has been loaded into the shipment. The print management setup for packing slip will be used as the printer.

Packing slip:
Post and print the packing slip. This is only valid for sales orders and transfer orders.

Send:
The send button will send the shipment, and corresponds to the following standard AX function.

image

Picking menu

The picking menu supports more advanced picking features, and is regarded as advanced WMS features.

image

Start picking Route:
This menu will start the picking route, and also start the picking process of a route.

Create Pick Pallet:
In a consolidated delivery scenario, the worker can pick goods into pallets or pick baskets. This menu will allow the user to mass generate pick pallets.

Print pallet Label:
When picking is done, then a pallet label many wanted to be reprinted. The Pallet label will contain deliver addresses, and a pallet contents label. Printing will use the BarTender label printout when this is available.

Post picking Route:
When the picking is finished, or the worker must short ship, then the post picking route can be used. This menu will also allow the worker to generate a packing slip for the picked items.

Picking lines that have not been picked, will be cancelled, and can be repacked on the next picking route.

Cancel picking route:
If the picking route must be canceled, ten use this menu. It will cancel the picking route, and it can also unpick any picked lines.

Start picking route – Order pick

The start picking route will look differently depending on if it is a order picking, or if it is a consolidated picking. The main difference is that use of pick pallets. These two scenario’s will be covered separately.

The first scenario is order picking without pick pallets.

image

Picking route:
The process starts with that the worker enters or scans the picking route ID. The system confirms back with reference and delivery information and address.

The worker then starts the picking process by clicking start.

image
The next screen that the worker will see is a list of all the locations that he needs to pick goods from.

The worker confirms that he as arrived to a location, by scanning one of the locations specified in the list.

If the locations do not have bar codes, the worker can also click in the “pick” column in the grid.

In the bottom, the worker can se a small picture of the product, item number and other dimensions. The item text will also be visible.

image

When the worker confirms the location, the followig confirmation screen will pop up.

Here the worker must confirm the item barcode, bu scanning this, and also fill inn any additional dimensions, if this is missing. Like pallet, batch or serial number.

The requested quantity is on the right of the quantity field

When the quantity is filled on, the item quantity dialog will close, and the worker can start on the next picking line.

image

The last step in the picking process is to post a picking route. This will also generate the packing slip.

Start picking route – consolidated pick

The consolidated pick, is using output orders and shipments to control the process. The Sales order generate output orders, and they are collected in a shipment. It is important to understand the main process of consolidated picking to make sure that the steps are followed. The main thing is the use of pick pallets that must be in place to cover the following process.

image

The process starts with the picking process, that is quite simular to the order picking, but where the worker places the picket items on to a pick pallet. The next step is to stage the pallet at a outbound dock. Here the pallets will be placed until they are loaded into a truck or a carrier. The last step is to send the shipment, that will be the final delivery to the customer/warehouse. For more information on using output orders and shipments, please refer to standard AX 2012 documentation.

image

If a consolidated picking route has been generated, then the start picking route screen will change to include pick pallet. In this form a pre-created pick pallet can be selected, or the worker can create a new pick pallet, by clicking on the “new” button”. The select location screen will also have pick pallet as a criteria, where the worker can decide on whish pick pallet the goods should be collected on.

image

When done, the PDA will return to the ”start picking route”, ready for the next picking route.

Create pick pallet

In a consolidated pick scenario, it is often needed to generate a lot of pick pallets. Often the creation of pick pallets will also produce a label, that the pallet/pick basket can be marked with. Free pallet can look like this, if generated using Columbus BarTender integration.

image

image

The PDA used for generating pick pallets have the following fields :

Type: Enter the pallet type. This is a property on the pallet, that controls size and volume. It also controls if this is a pick basket.

Warehouse:Enter a warehouse where the pick pallet is stored.

Location:Enter a location where the pallet is located. Normally this will be a ”empty pallet” location. The default value is fetched from the empty pallet location defined on the warehouse record.

Print:Specify if the label should be printed. If Columbus BarTender integration is installed than this printer will be used.

Quantity:Enter number of pallets that should be generated.

Print pallet label

Normally each pallet is marked with an anonymous pallet label. Often it is wanted to print a new pallet label, that do contain delivery name and addresses. Sometimes a pallet contents label is printed, and placed on the physical pallet after it is wrapped. This makes it easier in the staging are to know what pallet belongs to what shipment/customer etc.

image

Picking route:
The field picking route is not a mandatory field, and is just used for simplifying the lookup of the pallet ID. If filled in, then only pallets belonging to the specified picking route will appear. The magnifier button will show the lines on the picking route.

Pallet:
Specify pallet ID

Num labels:
Specify number of label(copies) that is wanted.

Print:
Will print the new pallet label

1.5. Post picking route

Post picking route only have a function in when the picking route is order based and NOT consolidated. The post picking route will complete the picking route, and post the packing slip for the picked lines.

image

Picking route:
Spesify the picking route that is going to be posted, and packing slip updated.

The lookup will only show picking routes that have the expeditionstatus registered to loaded at current warehouse.

Post:
Post the picking route

Cancel picking route

The cancel picking route is a PDA program for cancelling a picking route. All lines will be returned to the original status, and a new picking route must be generated before they can be picked again.

image 

Picking route:
Spesify the picking route that is going to be cancelled.
The lookup will only show picking routes that have the expedition status registered to loaded at current warehouse. The magnifier button will show the lines on the picking route.

Unpick:
If this selection is set, then any picked lines will be unpicked, and the items will be return to the original location.

Cancel:
Cancels the picking route.

Sales menu

The PDA sales menu is created for doing express picking and for creating sales order journals.

image

Express Pick:
This program will pick sales order lines when picking routes are NOT used. The program expects that the sales order has already been created and are confirmed. The user then scans the item barcodes, and picks, until the sales order is finished.

Create Sales Order:
This program will create a sales journal, and add sales order lines.

Add Sales Lines:
This functionality of this program is similar to the create sales order, but the user can upfront select the sales order. The program can also add lines to ordinary sales orders.

Packing slip update:

The packing slip update will post a packing slip for the picked lines.

Express pick

The express pick form, expects that there already exists a created sales order, that is NOT a journal. Then the user can scan the items, and PICK the lines. When all lines are done, then the sales order can be packing slip updated.

image

Sales:
Scan or fill in the sales number. The lookup will show all sales orders that has the sales status “backorder”, and will even be filtered on item barcode, if this already have been filled in.

If the sales order do not have any lines to pick, then the sales order will not be accepted.

The magnifier button will show “remaining lines” on the sales order. When all lines have been picked, then the list will not show any lines.

Bar code:
Accepts item barcodes or EAN128 codes.
Lookup is filtered to only show item barcodes that exists on the sales order. View details will open the released products form. The magnifier button will open the items details for this item/barcode.

Dimensions:
The express pick do not support batch and serial numbers.

Quantity:
As soon as the quantity has been filled in, the quantity will be picked. The quantity field accepts EAN128. If a negative quantity is entered, then the picked quantity will be returned.

Packing slip:
The last step is to packing slip update the picked items. This option is only allowed if all lines have been picked. The packing slip will be printed according to the print management setup.

Create Sales Order

The create sales order program will create a sales order journal. The scenario for this program, is that a warehouse worker can go around in the warehouse, and create a sales order, by scanning the products. When done, the worker can return back to a normal AX client, and make the necessary adjustments on price delivery date etc, and send a confirmation to the customer.

The Create Sales order will not pick the goods !

image

Customer:
Fill inn or select the customer. The lookup will not show customers that are blocked. When customer is filled in, the customer name will be visible on the name field.

Bar Code:
Accepts item barcodes or EAN128 codes. Lookup is not filtered. View details will open the released products form. The magnifier button will open the items details for this item/barcode. When “Bar code” is filled in, then the item name will be visible in the name field.

Dimensions:
The create Sales Order can only be specified with warehouse and location. Other dimensions like pallet, batch and serial must be specified in the picking process, or on a full AX client.

Quantity:
The quantity field accepts EAN128.

Create/Add:
If there already exists an open sales order journal, the sales line will be added. If not, then a new sales order journal will be created.

Add Sales Line

The Add sales line is actually the same PDA form as “Create Sales Order”. The difference is that instead of specifying a customer, the user selects an open sales order. Normal backorder sales orders can also be used.

image

The magnifier shows open lines related to the sales order. For the other fields, refer to the PDA form “Create Sales Order”.

Packing slip update

The PDA packing slip update will physically update of the sales order, and create a packing slip for the sales lines that have been picked.

image

Sales order:
Scan or enter the sales order number. The lookup is filtered to only show sales orders that have lines that are picked.

The sales name will be displayed in the Name field.

Document date:
If the lines was picked on another date then today, then the document date can be changed.

Print:
The packing slip printout will be printed using the print management feature in Dynamics AX 2012.

Arrival menu

The arrival menu covers the main aspects of doing receipt of goods. The functionality is similar to the arrival journal in Dynamics AX 2012. The arrival menu can therefore be used for several types of receipts, and the following receipts types are possible. Purchase orders, Return sales orders(RMA), Production (report as finished), Transaction, Inventory adjustments, Transfer, Bom journal, Counting, Quarantine order, Transfer order receive and quality order. For details about these transaction types, refer to standard Dynamics AX 2012 help.

The 3 options presented to the user are:

image

Create Arrival Journal.

This program allows the worker to create an arrival journal, and to start the receipt process.

Registrate Arrival Lines
This program allows the worker to continue the receipt process of an existing arrival journal

Post Product Receipt
This program allows the worker to do a product receipt of an arrival journal. This is only valid for arrival journals containing lines from a purchase order or a transfer order receipt.

Create Arrival Journal

To create a arrival journal and doing the actual registration process.

image

Type:
The first step is to select the type. Several options are available, and the form will change according to what type is selected. If a Purchase order is selected, then the worker can select vendor and purchase number. If a production is selected, then the worker must select a production order etc.

Account:
The account field is only visible if the type is “Purchase order”, and lets you select the vendor. This is not a mandatory step, but will help to filter and narrow down the possible purchase orders to be selected.

Warehouse:
Select the warehouse where the arrival journal line will be received into. Mainly used to filter and narrow down the possible purchase orders to be selected.

Quarantine:
Select this option, if the quarantine possibilities should be used. This means that the receipt will be posted into a quarantine warehouse, and then the quarantine process will take over.

Number:
Enter of scan the reference number according to the type selected.

Packing slip:
Enter or scan the packing slip number. This number can be used later in the process, when doing product receipt posting.

Create:
When done, the press create to start the arrival registration process.

Registrate Arrival Lines

The registration of arrival lines, is the same as when happens in the arrival journal in Dynamcis AX 2012. First the lines have been create in the create arrival journal form. The form starts by scanning item barcode. The reason for this is that is seldom that any warehouse will receive the same item in two different arrival journals at the same time. It will also make the process of finding the journal ID easier for the PDA program, since most likely the goods is already barcode marked from the vendor/production etc.

To keep track of if a line is completed or not, there is a very small modification in std AX. A new Boolean field on the arrival journal lines has been added, called PDACompleted.  This field is only used in this form, and will not affect and standard AX functionality. Often the warehouse manager will generate a arrival journal, using the arrival overview screen, and create the needed arrival journals. The worker can also manually create arrival journals using the create arrival journal PDA form.

image

Bar code:
Accepts item barcodes or EAN128 codes.
Lookup is filtered to only show item barcodes that has a open arrival journal associated. View details will open the released products form.

The magnifier button will open the items details for this item/barcode.

Journal and journal line.
If there exists 2 open arrival journal on the same barcode, then the journal will NOT be automatically filled in, and the worker must select the correct one. This also applies, if there are several arrival lines on the same item barcode.

The magnifier button will open the a list form, showing all lines on the arrival journal, and will also show what lines that are complete, and what is still missing.

Warehouse and Location
The warehouse and location can be filled in automatically, if the item do have a standard picking location. Else, the worker must scan in this.

Additional dimensions
If additional dimensions are required(like Pallet ID, Batch ID and Serial ID), then field for these will also appear in the form.

Post Product Receipt

The post product receipt is only valid for registrations where a purchase or a transfer order receipt is done.

image

Journal:
Scan or enter the journal number, that should be product receipt updated. The lookup is filtered to only show journals that is posted, and that have registered inventory transactions attached. The view details will open the location journal form, filtered as default in Dynamics ax, on Open journals. The worker must therefore most likely filter to show all, and then find the correct journal. The magnifier, will show the lines on the journal.

Purchase:
Normally this field will automatically be filled in when the journal is filled on. If not, then scan or enter the purchase ID. The lookup will filter to only show registered purchase orders.

Packing slip:
Normally this field will be automatically filled in, since the packing slip ID was entered when the worker created the arrival journal. Else, fill in the packing slip.

Post:
When ready to post the journal, then click post. This corresponds to posting receipt on the arrival journal.

image

Purchase menu and functionality

The purchase menu covers 2 main aspects. The ability to do express registration, and to create and process purchase orders. The 4 options presented to the user are:

image

Express registration.
This program allows the worker to perform a purchase line registration into a location.

Create Purchase Journal.
This program allows the worker to create a purchase journal with purchase lines that can later be confirmed and sent to a vendor.

Add Purchase lines.
This program allows the worker add purchase lines to a journal or existing purchase order.

Product Receipt posting.
This program allows the worker to post the product receipt (Purchase Packing slip update)

Express registration

Express registration is a process, where the worker very easily can do a registration of purchase lines into a location. When a purchase line is registered into a location, the quantity will be included in the physical inventory. The physical cost is not posted, and after the registration process is done, and then a product receipt posting must be done, to post the physical cost.

image

Field and filter explanation:
Bar code:
Accepts item barcodes or EAN128 codes.
Lookup is filtered to only show open purchase lines. If purchase is filled in, then bar code lookup will filter within the purchase.
View details will open the released products form.

The magnifier button will open the items details for this item/barcode.

Purchase:
Accepts confirmed purchase ID’s.


Lookup is filtered to only show open purchase lines with the specified item barcode. If item barcode is not filled in, then purchase lookup will filter on all open purchase orders.

View details will open the purchase order form.
The magnifier button will show all purchase lines in a separate form, showing quantity and remaining quantity.

Warehouse, location, pallet and Batch
Based on enabled storage- and tracking dimensions, the form will request dimensions like warehouse, location, pallet ID or batch number. Only enabled dimensions will show.

Serial numbers are not supported in the express receive.

Posting
When the registration is complete, the worker must press the Add button to perform the registration. When doing this, the form will be emptied, and ready for the next item/scan.

What the Columbus PDA will do when posting a express registration, it to create a single line in the Arrival Journal, and instantly post it. So all express registrations will have an arrival journal associated to the posting. The name of the arrival journal will be “Express registration, Purchase %1, Date %2”.

Other design considerations
The reason why the item barcode is the first registration is because it is most likely only the product that does have a barcode attached. But to change the scanning sequence, is a small change that can be done upon request.

Setup Considerations
The express receive will use the default arrival journal. It is therefore important to create a arrival journal name, that do NOT validate pick, buffer and transports. Set up the default arrival journal like this:

image

Create purchase journal

The create purchase journal is a small form, that allows the worker to build up purchase journals, based on scanning item barcodes. The process starts either by scanning/selecting vendor or by scanning item barcode. The scenario is that this form can be used by a warehouse working that walks around in a warehouse or a store, and orders refills from the primary vendor. After all scanning is done, the worker returns to a PC, and changes the purchase order from journal to order, and then completes the normal order processing of the purchase order.

image

Field and filter explanation:

Vendor:
Select or enter the vendor ID. The system will automatically fill inn the vendor name in the field below.

Lookup on the vendor only filtering away blocked vendors.

View details will bring up the vendor details.

In the vendor field, it is also allowed to scan item barcode. The PDA, will then fill automatically fill in the item barcode, and the primary vendor.

Bar code:
Accepts item barcodes or EAN128 codes.
Lookup is filtered to only show item barcodes that has the selected vendor as primary vendor. If not vendor is filled in, then it will show all items bar codes.

View details will open the released products form.

The magnifier button will open the items details for this item/barcode.

The item name will also be displayed when the bar code is filled in.

Warehouse
Warehouse will be automatically filled in, based on the primary and current warehouse, selected in the PDA setup.

Quantity
The quantity will accept EAN 128. If the item barcode is associated with a quantity, then this will be used.

Open orders
The open orders field is used to show other existing open purchase lines that exists for the item. This field is used to help the worker determine if he should check more before ordering.

This form have both a “create” and a “add” function, because if there already exists an open purchase journal to the same vendor, then the form will add the item barcode to the existing purchase order. If the item barcode already exists on the purchase journal, then the quantity will just increase. Else the purchase line and purchase journal will be created.


Add purchase line

The add purchase line is actually the same screen as the create purchase journal screen.

image

Refer to the previous form for explanation of the field. The main difference is that the vendor field has been replaced with a purchase ID field. The other difference is that it is possible to add lines to a normal purchase order on this screen. Also a magnifier button for seeing the contents of the purchase order has been added. The idea here is that the form can be used to register/create purchase orders in the receive department. One scenario could be registration of blind receipts, where goods has been ordered without having a valid purchase order. Remember to validate and confirm the purchase order as done in the normal order processing after the registration is completed.


Product receipt posting

Posting of product receipt is an important process in Dynamics AX 2012. The process will generate a product receipt formletter, and will also change the inventory transactions to status “received”. Also any item cost will be physically posted to ledger.

image

Purchase:
The Columbus PDA product receipt posting will ONLY post registered quantities. If the form does not accept the purchase ID you enter/select, it is because the purchase order lines are not registered. The scenario is that the worker uses express registration, and when done the worker can do a product receipt posting to complete the arrival process.

The other criteria is that the selected purchase order must be “confirmed”. Only approved purchase orders will generate a error.

The purchase magnifier will show the registered quantity, and the “remainder” quantity.

Product receipt number:
This is the vendors packingslip number, and must be entered/scanned to be allowed to post the product receipt.

Document date:
If the goods are received on another date then the current date, then the document date can be adjusted.

Print:
If the user wants a printout of the product receipt, then select the print option. The printer is determined by the print management setup of standard dynamics AX 2012.

Enabling wireless PDA capabilities in AX 2012

I wanted to share with you how I have enabled the rich functionality of Dynamics AX 2012 to be run on a wireless device. What I show you here is 100% based on AX 2012 feature Pack, and everything is created in AX 2012. I decided also to have no changes on std. AX elements, and only use existing available functionality of AX 2012. 

The wireless communication can be achieved either through the customer’s wireless infrastructure or a cellular network. To speed up the data mining process, the device must support touch screen and either barcode scanning or radio frequency reading.

Each wireless device can connect to an individual session through Remote Desktop Services of Microsoft Server 2008.

The key benefits of this setup:

• The build in communication and security features of Windows are utilized.
• Maintenance and deployment tasks are centralized, because all logic are located and run on one server and not on each device.
• The customer’s own IT department can set up new devices, because only the communication information is to be set up on the device.
• No business critical data is stored or executed on the device.

Wireless device

· Microsoft Windows Mobile 6.1 or later
· Remote Desktop Service client 7.0 (build into Windows Mobile 6.1)
· VGA (640 X 480) color touch panel (Other resolutions is just a configuration)
· Wireless network adaptor or cellular adaptor (EDGE or better)
· Barcode scanner or RF-tag reader

Due to past experience with several hardware vendors, and the requirements of the PDA solution, I have can recommend the Motorola MC75 wireless device. The MC75 is available in different configurations and can fulfill the specific needs of a typical customer.

image

General properties of a PDA form

All forms in a PDA solution should have the same generic properties, and what I have done is the following.

image

In addition, it is recommended to have a visual confirmation to the user.  Like a flash green, if the input is accepted, and red permanent background if the scanned/entered data is not accepted.

image

Item barcodes required

To efficiently use a PDA, all items should have an item barcode associated to each item. The main reason for this, is that the item barcode will contain the unique reference to item and the product dimensions like configuration, size, color and style. If it is not a possibility to have item barcodes on the products, than use the item number as the item barcode.

To generate item barcodes, it is possible to automate this with a  set of jobs than can be ran to periodically generate standard item barcodes.

Main menu and setup

The main menu, if the first screen that the user will access. I can recommend to implement a command line parameter, to automatically start the PDA. This means that when the user logs into the RDP, an auto startup command with AX32.exe –startupCmd=PDA, that will start the PDA menu automatically.

In addition it is recommended that the Exit button do a log-out of the user from the RDP session. If the user just wants to exit the PDA menu, then press “ESC” to exit, and the RDP sessions is closed.

The PDA screens should also be configured per user in a setup.

image

In the setup, the user can set up a default “current warehouse”, so that lookups and scanning is limited to the specified warehouse. In addition the worker can enable/disable functional areas that are not applicable to the workers normal operations, and therefore also reduce the number of options on the main menu.

Then the user is keeping his finger down on the screen, the current selected menu.

image

The menu items are also attached to configuration keys, so if a configuration is disabled (like project or production), then the menu will not be visible.

Generic and common forms

In several places a magnifier glass will appear like this:

image

This is a menu button to drill further based on the information that is filled in. In general there are 4 main types for generic forms. Item information, dimension specification, lists and picture.

Item information

The item information form will show primary information, like item barcode, item number, item name, standard purchase and sales price. In addition there are a editable field under the “location”. This is the warehouse. Normally the default warehouse will be filled in here, but the user can change this. This will affect the display of the primary picking location, and the fields for on hand, like available physical, Physical and ordered.

image

In the bottom, the item barcodes product dimensions, in addition to the item description.

The default product image is also seen here. By clicking on the image, the system will bring up a full size picture of the product.

Item and dimension specification

The item dimension specification form, is typical used when there is not enough space in the form to specify all dimensions. Then a separate form will popup, where the user must specify/rescan item barcode, and also specify additional dimensions like pallet ID, Batch or Serial number.

image

This form is mainly used in picking situations, and what fields/dimensions that should be visible is dependent on the storage and tracking dimension group of the item.

Product picture

The product picture form is a very simple form, that just gives the user a full size picture of the product. In addition, item bar code, item number, item name and product dimensions will be shown.

image

Lists

In some cases the magnifier will bring up lists to give the worker an overview. This could be an overview of all purchase lines, all items on a location, all lines on a journal etc.

The list contains a list with different information, a reminder and a quantity. The list changes based on from where it is called, and what it is supposed to show.

image

In this example it will show open purchase lines, showing item, reminder and line quantity. In the bottom the item bar code and product description is shown.

In the bottom section all dimensions from the line will be shown. Both product, storage and tracking dimensions will be shown here.

The default product picture is clickable, and will show the picture in full format.

Summary

To have these generic and common forms and framework, the development of the functional forms become very easy, and I could focus on the actual functionality.  Drop by my blog in the weeks to follow, and I’ll show you how the functionality actually works.