Dynamics 365 Branding and Commerce (Preview) Firsthand experience

PS! Remember to read the last lines in this blogpost

As I hope you have seen in your never-ending twitter/news feed is that Microsoft again adding lot’s of new apps and features to Dynamics 365. Microsoft are delivering on the communicated vision of Dynamics 365. We now have apps where we have a holistic approach to business processes. To solve business requirements users will be using a combination of apps that works natively together. We see how the entire solution is being connected, and further split up into specific areas. In the old days when we had large ERP suites, and we sold functional modules. We are now implementing connected apps that enable business processes per user. If anyone wonder what the “new” hashtag is, it is easy: “#MSDyn365“, and get used to it. We no longer a need to put things into additional silo’s to explain the legacy, and to succeed we must embrace and deliver the right combination of apps that solves the business requirements per business process.

One of the most exiting news in the current wave 2 release is the delivery of Dynamics 365 Commerce(preview). I have been privileged to validate and try of this solution the last days. My current experience is that: This Rock’s! Microsoft finally can deliver a complete suite to give a true omnichannel experience. One interesting finding is that Microsoft will rebrand their “Dynamics 365 for Retail” offering to “Dynamics 365 Commerce”. Why? Because what is now being offered extends the binderies of the traditional retail solutions. As seen in the following figure you can get a complete integrated end-to-end system. And this is not just for retailers, but for all companies that want to digitalize their processes and offer true omnichannel can benefit of this.

1 : Picture from Microsoft presentations

To try out this new solution, you can request a preview. You ask for a preview here. When/if accepted you will receive an email from Microsoft containing instruction on how to deploy this preview. This guide is also available her and it is important that the guide is followed very carefully. To complete the guide, you need to get some assistance from you Azure AD tenant administrator. Also, the preview is currently only deployable to US Azure datacenters, and this put’s some latency into the commerce experience.

One interesting thing with the commerce, is that even though this is a tier-1 environment, you get the possibility to deploy RCSU and the e-Commerce Server. The data set is basically standard Dynamics 365 for Retail, where the configuration key for retail essential enabled. So we can showcase that the Dynamics 365 Commerce also can be delivered as a standalone app or be extended with the finance and supply chain management apps.

The preview commerce solution is what you expect an e-commerce solution to be:

The back-end editor for the editor is easy to use, and it is easy configure your

To get a full understanding of the solution also head over to Microsoft DOC’s to learn more : https://docs.microsoft.com/en-us/dynamics365/commerce/

But I’ll do something better for you; You can check-out the preview solution yourself right now: https://d365commerceus2ecom-eval.commerce.dynamics.com/DXCCommerce (I expect that the site will be available for a only few days, so hurry)

If you want to buy something use Card number: 4111-1111-1111-1111, Expiration: 10/20, CVV: 737 . Also remember that this is a US-based Azure Datacenter and NOT a production grade scaled system.

Happy DAXing and DXCuLater!

D365 Retail – Buzz Alert !

THIS IS COOL !
Microsoft is launching several new product lines for retailers.

Dynamics 365 Commerce

Empower your business to create exceptional, insightful shopping experiences for every customer with Dynamics 365 Commerce—built on our proven Dynamics 365 Retail solution.

https://dynamics.microsoft.com/en-us/commerce/overview/

Microsoft Connected Store

Empower retailers with real-time observational data to improve in-store performance. From customer movement to the status of products and store devices, Dynamics 365 Connected Store will provide a better understanding of your retail space. (Check out the video)

https://dynamics.microsoft.com/en-us/ai/connected-store/


D365F&O, Lots of new high value content on DOC’s

The Microsoft Dynamics team have been quite buzzy after the vacation producing a lot of valuable content to Dynamics 365. I would like to highlight some of the latest additions that is worth checking out and to share in the Dynamics 365 ecosystem. Just this year alone, 714 articles have been published, and just the last 2 months close to 300 articles are made available. With this amount of information, I do get questions if there are some hidden gems on docs. And here some of them are:

1. Learning catalog

There are now more tailored learning paths towards customers and partners, with references to free, self-paced online learning path, Tech-talks, and formal instructor-led training. Here you will find articles, videos, and all you need to start learning Dynamics 365.

2. Test recorder and Regression suite automation tool for Retail Cloud POS

Now we can start creating regression testing on Retail POS. Cool stuff, and in my mind where we actual see the true value of regression testing. Retail is Detail, and this delivers quality.

3. Master planning setup wizard

Setting up master planning involves taking many decisions and here you can read how this is done in 10.0.5.

4. One Version service updates FAQ

This page answers a lot of question on the One Version strategy, and what this means for you. At many customers I see that extensive, time-consuming and costly testing processes are being manually executed each time Microsoft is releasing a new monthly updated. Why? I do not see the need to perform full testing on all modules on a monthly basis. Yes, it is a fact that nobody releases flawless code. (Even not Microsoft), but if you follow the procedures and guidelines from Microsoft, the monthly updates should be safe to deploy. There are several release rings and programs in place ensuing that quality is in place at GA. (General Available). Please align to the release cadence updates, and focus on your essential core processes. If you find painful bugs, report them asap.

5. Environment planning

I have seen several projects where the focus is to save costs on implementation environments. This page explains a lot on Microsoft’s take on this. My simple advice is use Tier-1/One box for development on a cloud hosted CSP subscription, and the rest of the environments as Tier-2 or higher (my recommendation is to have 2 additional Tier-2 environments for larger projects). The benefit to use self-service processes is priceless. Also keep in mind that Azure costs are very cheep compared to consultancy hours trying to maintain and manually transfer databases between environments. Also take a look at the great Denis Trunin’s blogpost on development VM’s performance.

6. Business events overview

This is the future and start adopting this feature into your business processes. This is also a key enabler for working closer with the Dynamics Power platform.

7. Regulatory updates

Here you find localized information for your country, and how to comply to specific local requirements. This is being updated very often.

8. Unified product experience

Do you want to keep the products from D365F&O synced with D365Sales ? This article explains how to achieve a near real time bi-directional integration with CDS. Great stuff also explaining dual write capabilities.

9. Adyen payment processing with omnichannel experience

Payment connector is far more versatile than just for retail. Also check out the FAQ.

10. Asset management

Great stuff on the horizon. Keep track of your stuff

11. Franchising

No longer in the official 2019 Wave 2 release. So, we must keep waiting for this in the future.


Take care, and

DXC you later


Analyzing Cloud POS performance in Dynamics 365 for Retail

It is a constant requirement that systems retailers are directly interacting with should be Bigger, Better, Faster, Stronger (BBFS). In this blog post, I will dig into how the POS performance can be analyzed to better understand the transactional performance of the Dynamics 365 POS. What I’m specially interested in is how perceived performance is towards actual. What we think is good performance is relative to the observer. The average reaction time for humans is 250 ms to a visual stimulus, but newer studies shows that we can identify visual stimulus down to 13 ms. Your screen has a refresh rate of 17 ms. As time is relevant and the expected performance is close to real-time, this can sometimes lead to performance expectations that is actual irrelevant towards what is wanted to be achieved. We as humans cannot go beyond 250 ms visual response time, so this is important to keep in mind.

As you can see in the following video, 4 items is scanned and then a quick cash payment is done. The total time taken to complete this example transaction in CPOS is approx. 5 s.

But as you can see on the screen, there is a lot happening, and when the user interface is being redrawn. I wanted to go deeper to understand exactly what is happening when scanning. More specifically on what’s happening when adding the sales lines in the POS.

As the CPOS is a 100% web based application, we can use Google Chrome to take a deeper look into exactly what is happening. By pressing the F12(Or CTRL-Shift-I), you get up the developers tools.

Then start the recording (CTRL-E), add a line in POS, and stop the recording. Then you will see:

1. CPU load, Activity bars, Network calls
2. The actual animation on the POS display each millisecond
3. Exactly how long calls to the Retail Server is taking.
4. The entire REST-call stack being executed on the CPOS client.

Here you see an example where I added one line to the POS basket, and this resulted in 2 calls to the retail server.

If we look at one of the calls happening:

ScanResults() (*.dynamics.com/Commerce/ScanResults(‘07100’)?$expand=Customer&api-version=7.3) – This scans the product/item barcode and sends it to the retail server. In google development tool, we can analyze exactly what is taking place on this call. Here we see that the total time was 559.54 ms but the actual waiting time for the RSSU to respond is 263,69 ms(Waiting TTFB). The browser is waiting for the first byte of a response. TTFB stands for Time-To-First-Byte. This timing includes 1 round trip of latency and the time the server took to prepare the response.) I have measured the network latency to this Tier-2 with RCSU system to be 40 ms.

If I scan the item again, we see that the caching of DNS etc kick’s in the TTFB lowers to 132,80 ms.


As you can see you can really go deeeep, and analyze all what is happening, from client execution to server execution, without any debugging tools. Down to the milliseconds, and better understand the performance. The profile created can be exported and imported for deeper analysis. We can see that there are many factors that influence performance, from network delay’s to form refresh. Microsoft could have the pleasure of shaving milliseconds of the animations, server calls and J-scripts, but this is an ongoing investment from and R&D perspective.

My honest opinion is that the Cloud based Dynamics 365 for Retail POS is performing good. Network elements and the speed of light is a fundamental restriction. The use of animations also seams to affect how performance is perceived, but it does not affect the general performance and usability. Legacy system that is on-prem have the benefit of not having latency, but the cloud solution brings so many other positive elements. If you choose MPOS instead, these tools are not available and you can use fiddler for analysis. But a small tip is to have a CPOS client available when performance testing, as this also will affect MPOS.

Bigger, Better, Faster, Stronger !

Meetings: Every minute counts, and snooze to 1 minute before meeting starts

As a consultant I’m used to having a lot of “back-to-back” meetings, and when the next meeting is near, I typically get an outlook reminder 15 minutes prior to the meeting.

Then using the “Snooze” button is good. If I snooze until 5 minutes before I am too early. 0 minutes before and I am too late. You know that in the drop-down, the minimum selection is 5 minutes? That is too much for me. I would like to have a new reminder when it is 1 minute before the meeting start. But did you also know that you can type into the field? You can actually write “1 minute”, and this will then remind you when it is 1 minute to the meeting start.

A smaller more advanced way is to set the default reminder to 16 minutes, prior to the meeting

And then when the reminder “pop’s” up, to can select to “Snooze” and select to be reminded in 15 minutes. That is exactly 1 minute before the meeting starts.

Now I have just “earned” 4 more minutes where I can create D365 customer value before the meetings starts

D365F&O – Address performance tips

Sometimes the smallest thing can make a huge difference. At a customer we experienced a huge load (DTU +70% average), and the LCS shows that there was a single SQL query that was the reason for the load. The data composition here was that there was close to a half million customers in the customer table, and most of them had addresses, email and phone numbers assigned to them. Except of the customers used for retail statement processing.

In LCS environment monitoring you can see this as spikes in the overview.


The query you typical see looks like this:

(@P1 int,@P2 nvarchar(256),@P3 int,@P4 bigint)SELECT TOP 1 T1.COUNTRYREGIONCODE,T1.DESCRIPTION,T1.ISINSTANTMESSAGE,T1.ISMOBILEPHONE,T1.ISPRIMARY,T1.ISPRIVATE,T1.LOCATION,T1.LOCATOR,T1.LOCATOREXTENSION,T1.PRIVATEFORPARTY,T1.TYPE,T1.ELECTRONICADDRESSROLES,T1.MODIFIEDBY,T1.RECVERSION,T1.PARTITION,T1.RECID FROM LOGISTICSELECTRONICADDRESS T1 WHERE ((T1.PARTITION=5637144576) AND ((T1.TYPE=@P1) AND (T1.LOCATOR<>@P2))) AND EXISTS (SELECT TOP 1 ‘x’ FROM LOGISTICSLOCATION T2 WHERE ((T2.PARTITION=5637144576) AND (T2.RECID=T1.LOCATION)) AND EXISTS (SELECT TOP 1 ‘x’ FROM DIRPARTYLOCATION T3 WHERE ((T3.PARTITION=5637144576) AND (((T3.LOCATION=T2.PARENTLOCATION) AND (T3.ISPOSTALADDRESS=@P3)) AND (T3.PARTY=@P4)))))

By downloading the query plan, we see that there is a index seek on the table LOGISTICSELECTRONICADDRESS.


This results in that the indexes don’t get a good “hit” on the logisticselectronicaddess.type.

The solution was surprisingly easy. Add Phone, Email address and URL to the customers.


Then the DTU drastically goes down, and normal expected performance was achieved.


Conclusion; Remember when having many customers, to fill inn contact information.

This just must be shared

D365F&O – Community Driven Engineering

I have previously blogged about the importance of reporting new ideas, issues and bugs to Microsoft, and also why the community will benefit from sharing. I see that experienced engineers have the solution available and are more than willing to give it for free to get the fixed-up code into the standard solution to benefit customers and future projects.


But the formalized support path does require time and energy and remember that not all Microsoft support consultants are engineers that you can discuss X++ topics with. But how can the process of contributing to the D365 community be easier?

But did you know that Microsoft have a program for Community Driven Engineering with Dynamics 365 F&O? This covers not only bugs, but also new features. Community driven engineering (CDE) is a Microsoft effort to make external engineers more efficient at providing recommended bug fixes as minor features to Microsoft, as well as to make Microsoft more efficient in accepting fixes from the community. If the fix is accepted, it will be merged into the main Dynamics 365 F&O branch. I have tried the program, and reported in a fix for auto-report as finished, and the fix was accepted, and hopefully in the near future the entire community can benefit from it.

How to start?

If you have the right skills and the willingness to share and give away your fixes (or features) you can sign up at https://aka.ms/Communitydrivenengineering. You need to be accepted into the program, and your user must be whitelisted before you can access. The CDE also have a private Yammer group, that you get access to when accepted. But I must warn you. This program is meant for the most experienced and technical people we have in our community, and that are deep into X++ and AzureDevOps. You must have approval from CxO-level in your organization that you can share code with Microsoft. (Lawyer stuff)

Here is the overall flow for the external engineer:

  1. You create a bug or a Feature in CDE Azure DevOps
  2. The bug or Feature is reviewed by the MS team and accepted or rejected
  3. You create a branch for this work and commit in this branch
  4. When done you create a Pull Request
  5. The Pull Request is reviewed by the MS team and feedback is provided
  6. After some iterations the Pull Request will be approved and complete
  7. The MS team will take over the code and include in a future release

Here are the more technical details of how it works.

The following text is copied from the onboarding documentation of the CDE.

It takes approximately one hour to get started with CDE, the majority of which is the initial build time.

  1. Obtain a development VM from LCS with build 8.1.195.20001 (app 8.1, platform update 22) or later. The latest branch I have access to is 10.0.80.19, that basically is 10.0.2 PU 26.
  2. Make sure you have opened Visual Studio at least once on the VM to sign in and pick default settings.
  3. Install Git on the machine from https://git-scm.com/downloads . The default installation options should work fine.
  4. From an administrator command line instance, clone this repo to a location on the machine.
    pushd k:\
    mkdir git
    cd git
    git clone https://dev.azure.com/msdyncde/_git/cde

  5. Define your user name and email in Git
    git config –global user.name “John Doe”
    git config –global user.email johndoe@example.com

  6. Mount the git repo into the F&O deployment
    pushd K:\git\cde
    powershell .\Mount.ps1
  7. Open Visual Studio as administrator and rebuild the following models
    ApplicationSuite
    ApplicationWorkspaces
    FiscalBooks
    GeneralLedger
    Project
    Retail
    Tax

At this point you can start development(in the SYS layer actually)

How to submit a change?

Changes submitted by the community are committed to the same REL branch matching the version on the dev VM. Once the pull request (PR) is completed, that signals that Microsoft has officially accepted the change and it will show up in a future official release, usually the next monthly release (depending on what day of the month the release closes). The change will only enter the master branch of msdyncde through a future official release. Syncing to the tip of a REL branch will pull in other community changes submitted from that version.

  1. Create a Bug or Feature depending on whether the change is related to incorrect behavior of existing code, or new behavior.
    https://dev.azure.com/msdyncde/cde/_workitems
    New work item > bug
    Fill in the title, assign it to yourself, and set the Area to your best guess as to where the behavior belongs (will help us review appropriately)
    In repro steps and system info, provide information on why this change is necessary
  2. In Git, create a topic branch to work on. Branches are usually named by username/bug number.
    git checkout -b johndoe/482
    git push –set-upstream origin johndoe/482

  3. In Visual Studio make changes to Application Suite SYS code as normal. Changes are actually being made directly in the Git folder.
  4. Push your changes to VSTS.
    git add -A
    git commit -m “Message explaining what is being changed”
    git push

  5. Send a pull request from VSTS
    https://dev.azure.com/msdyncde/_git/cde/pullrequests?_a=mine
    New pull request
    Source branch = johndoe/482, Destination branch = Rel_8.0.30.8022 (or whatever version you have)
    Fill in the title and description, link the work item > Create

Any feedback from Microsoft reviewers (or other Community reviewers) will show up in the PR. Changes can be made to the PR by editing in Visual Studio, and doing git add / commit / push again. Once Microsoft has signed off, all comments have been resolved, a work item is linked, and all other polices have been met, then you can click Complete to complete the pull request. When a PR is completed, that is official acceptance by Microsoft that the change will become part of a future official release, usually the next monthly release.

Behind the scenes

  • The powershell script starts by checking what version of source code exists on the VM by examining the K:\AosService\PackagesLocalDirectory\ApplicationSuite\Descriptor\Foundation.xml file.
  • It then checks out the REL branch associated with that version, which matches the platform and other model versions currently on the machine.
  • The development config files are updated to allow changes to SYS models, which is normally disallowed on dev VM’s.

In addition to having an accelerated approach to get fixes into main branch, participants also have some more benefits. You will have access to the latest & greatest code changes through all code branches that Microsoft makes available. You can search through the code and see if there are code changes that affects extensions or code that is local to you installations. You can also see how the Microsoft code is evolving and improvements are made available in the standard application. You will also build gradually very valuable network towards the best developers in the world, where you will discuss technical topics with the actual people creating the world’s best ERP-system.

One final joke for those considering going into this program: Git and sex are a lot alike. Both involve a lot of committing, pushing and pulling. Just don’t git push –force


D365F&O – Auto-report as finished in a Retail scenario

For many years I have had the opportunity to work on Dynamics 365 topics involving Kitting, Value Added Services(VAS) and Bill-of-Materials(BOM). Today I would like to write about the released product parameter “Auto-report as finished” in a retail scenario, and you can read more about report as finished at the Microsoft docs. To explain the business scenario, let’s take hot-dogs. A hot-dog is normally assembled as the customer wants, but in this scenario, we have a standardized hot-dog with 4 ingrediencies.

As a retailer, I would like to sell the finished product, but keep track of the raw materials. To do this you need to create a BOM, and when the hot-dog is sold, Dynamics 365 will automatically report a hot-dog as finished, and draw the ingrediencies from the store warehouse. It is possible to use a production order, but for retailers this is overkill. Something much easier is needed. Instead of exact BOM’s, then average BOM’s can also be used, since knowing exactly how much onion or mustard the customer will apply is not an exact science.

Dynamics 365 have a nice feature for this; Auto-report as finished.

What this parameter does, is then when the product is physically deduced (or Sold) a BOM journal will be created and posted. This will create issue-transaction (sold) from your inventory.

Here I have created a BOM for my hot-dog:

When creating a sales order and posting a packing slip you will see that a Bom journal is automatically created and posted.

The posted BOM Journal looks like this, and here we see that a hot-dog is added to the warehouse, while the ingrediencies are subtracted from the warehouse.

For retailers, this means that we can sell goods in the POS, and when the statement posting process is creating and posting sales orders, the auto-report as finished functionality will be posted. So, no need of any production order, or manually posting Report as Finished journals. So, Dynamics 365 have an alternative to retail kit’s, if a more standardized BOM’s are used. The BOM can then also be used for cost calculations on food and retail produced items. Comparing the counting and the actual transactions will also help to know how accurate the BOM are for describing the cost picture of the products. Master planning will also catch this, and you can get replenishment to work on ingrediencies.

BUT!!! There are some issues.
As a workaround and to make this work you will have to specify default warehouse per site per item in the default order settings.(I know this is an impossible task if you have 500 products and 500 stores, as this would mean you have to create 250.000 default order settings). I have a support request going with Microsoft to change this, so that this is not needed, and that the warehouse can be inherited from the parent transaction. So, if you get error like this, then you have done nothing wrong, and hopefully it will be fixed on future releases.

STOPP HERE, unless you like X++

Here is something for the “technical” guys; The code that automatically triggers this auto-report as finished is actually the class InventUpd_Physical.updatePhysicalIssue(). For those of us, that have worked quite some time with Dynamics, we understand that this class is very central, because all physical inventory transactions are posted through this class. The behavior of auto-posting BOM’s will therefore influence all places where a physical transaction is posted.

Microsoft have created a method on the movement classes named ” canBeAutoRepAsFinished()”, that let’s them refuse this behavior on certain transaction types.

If you don’t want to wait until Microsoft fixes the feature where the warehouse dimension is inherited from parent BOM, then you do have an option to extend the class BOMReportFinish.initInventDimFromBOMRoute(), and here set the InventLocationId from the parent. Her is at least my suggestion to fix the issue in the standard code(without extension):

Here is the code for validating that warehouse storage dimension is used on the BOM-line, and sending this back to the report as finished class.

Take care and I’ve got to get back to work. When I stop rowing, the mothership just goes in circles.

Near real-time replenishment in Dynamics 365 F&O

There is a lot of good stuff on the horizon for Dynamics 365. I highly recommend that you check out the following article of some new planning services that will come in the April 2019 release.

https://docs.microsoft.com/en-gb/business-applications-release-notes/April19/dynamics365-finance-operations/planning-service

To make this happen, I would expect the planning to go deeper into the SQL stack, and also to maximize the utilization of in-memory processing of the transactions.

For Retailers, this will be highly appreciated, where limited space in the stores means that shelf replenishment several times each day is common. Especially for perishable products with limited shelf-time. Keeping things fresh and presentable is a necessity for the customer to buy. The ability to more quickly react to customer demands ensures that the customers actually find the products in your store. And the same aspect, when there are a slower sale, the ability to adjust down the replenishment according to activity. This saves cost and increases profit. In Retail, it is the small improvements that in sum creates the big results.

For the planning service to work, it needs the transactions to take action on. In Dynamics 365 for Retail we must choose between the ability to aggregate the transactions coming from the POS/Channel databases, or more quickly posting the statements. I’m looking forward to many good discussions on this area.

The future is faster

Retail Enterprise Architecture mapping using ArchiMate and ARDOQ

The warning; The blog post is High Level, but the benefits can be mind-blowing.

Enterprise Architecture is about understanding and change. In today’s business, change is everywhere and the essential part to survive. But change is not easy. To have insights and understanding of your own organization is essential for change and risk assessment. Understanding how people, processes and technology are connected will give focus to achieve high value benefits. In my profession we use the Microsoft Dynamics technology stack as a main driver for implementing improvements. But we also acknowledge that Dynamics 365 is not the only system at work. Even though Dynamics 365 is a central component, there always will be many other systems, processes and technologies that is included in the enterprise architecture (EA). We need a way to describe all these connections in uniformed way, that allows us to communicate a model for enterprises dynamically.

But why should EA mapping be a central part of your business? here are 6 business motivators and benefits of having a structured approach of the EA mapping:

Increased stability and availability. It is critical vital that all central systems have a near 100% availability. POS and back-end systems must always work, and the supporting processes must be streamlined to secure that risks related to business improvements and changes are minimized and understood. The EA mapping documents the relationships and show consequences changes.
Guaranteed Performance. Having acceptable system response 24/7, that can deal with business pikes must be planned and built around the system. Systems must deal with a variable load, handling that the sudden event changes the transaction volume. Any disruptions quickly result in customers walking away. The EA mapping must document components central for performance compliance, and the business actors involved
Scalable capacity. New stores or changes in the business model can quickly change the requirement for transaction and processing capacity. To be cost effective, the capacity scalability must dynamic according to the actual need. Both in terms to scaling up and down. The EA mapping documents components central for scalability, and the business actors involved.
Strong security. Cyberattacks are increasing and it is vital important to secure information and transactions. Being GDPR compliant puts demands on systems and internal processes on how to handle own and customer information. Security, tractability and audit trail builds trust into the system and documenting compliancy. The EA mapping documents governance and role compliance, and the business actors involved.
Right focus. There are always new business opportunities and process improvements. Keeping track on where to focus will lead to better and faster implementation of changes in a secure and stable manner. New ideas must be analyzed, and risk assessed, and also to understand the implications. The EA mapping can assist in focusing on what changes have the highest priorities and benefits.
Cost control. Being a retailer involves large investments in technology like POS, Mobile apps, customer portals and enterprise systems. Moreover, there may be large fluctuations in system usage throughout the year. By purchasing these features in the subscription form, it is possible to equalize the operating costs and that you only pay for what is needed. Good liquidity is archived by balancing cost full investments towards the revenue stream and securing actual return on these investments

To move forward a “language” is needed to describe an enterprise architecture model where you can visualize, plan, implement and maintain all relationships that exists today, in transitions and the final vision.

Architecture Layers using ArchiMate

The overall mapping can be modelled in 5 main layers; Here I would like to focus on the symbolism used for identifying. The notation here is ArchiMate, that is open and independent enterprise architecture modeling language to support the description, analysis and visualization of architecture within and across business domains in an unambiguous way.

Motivation Elements defines the overall drivers and goals that the enterprise have. Much of the vision is located here. The Motivation elements can also be seen as a vertical layer, in close relationship to all layers.

The Strategy layer defines the overall course of action and a mapping towards resource and business capabilities.


The Business layer defines the business processes and the services the enterprise is providing, and the here the main business processes are defined. To simply the modeling it is relevant to start with the Business Objects, Business processes, Business Roles, Business actors, Business events, Business Services and Business Rules and Logics.

The Application layer contains application services and capabilities, their interactions and application processes. Here Dynamics 365 and much of the power platform is located. To simply the modeling it is relevant to start with Data objects, Application functions and Application components.


The Technology and physical layer describes the software and hardware(physical or virtual) capabilities that are required to support the deployment of business, data, and application services; this includes IT infrastructure, middleware, networks, communications, processing, standards, etc. The underlaying structure of Microsoft Azure would typically be described here. To simply the modeling it is relevant to start with Artifacts, System Software, Technology Service, Device and Communication network.

Architecture Relationships using ArchiMate

The real beauty comes, when the relationships between architecture elements are being defined. But to do this, a set of predefined relationships needs to be defined. The most common used is the following one

If putting this together in a combined setup I get the following relationship diagram of what is relevant to document.

(*Credits to Joon for this visualization)

As seen here, the business processes are a realization of the application functions, and this clarifies how a proper Enterprise Architecture modelling is documents. With this model, we can what business actors is assigned to what Business roles. This again shows the business process assignment to the role. The Business processes are there to realize business services.

Building the Architecture model using Ardoq

The architecture relationships can be challenging to describe using tools like Visio. Often, we see that great work is done, but not used to the potential. An alternative is to use cloud based mapping tools as ardoq, that covers most aspects in documenting relationships between business processes, applications, roles, risks and transitions. This is not a commercial for this tool, but I find it great. So, I decided to try to use Ardoq to model the Contoso demo data.

Here I will focus on the Application Layer, as this is the layer where the application functionality and data are located. First, I create the application components:

Then I create the Application Functions, and I also import the Business Roles that is available in the Contoso demo dataset.

Next job is to build the relationship between the application functions(D365), business processes(vertical processes) and business roles. This will allow me to visualize and to trace dependencies across all the EA mappings. Let’s take an example looking into the responsibilities of an employee named April Mayer.

I can here see that she is related to the business roles; Accounts payable clerk and manager. If I click on the “Accounts payable clerk” I jump into the view of this business role, and I can see that it is related to the business processes of accounts payable, and an association to April Mayer.

Jumping to accounts payable allows be to see the business processes involved.

I can also visualize the entire Enterprise Architecture Map will all objects and relations,

And zoom into specific on the relations; This graph shows me that April Meyer belongs to the role “Employee”, Accounts payable manager and clear. The Accounts payable clerk is associated with the business process “Accounts payable”. The clerk role is associated with the Financial management modules in Dynamics 365.

Here is another visualization, that shows the how the business objective of “Marketing” can be achieved, and what Business roles are involved, what Business processes, Application functions and what application components are also involved.

Knowing the relation and the ability to communicate is a key to happy Enterprise Architecture mapping.

Give is a try, the result can be very powerful.

Additional information

1. A high value blogger on Enterprise Architecture is http://theenterprisingarchitect.blogspot.com/.

2. Homepage of archimate: http://pubs.opengroup.org/architecture/archimate3-doc/toc.html .

3. Homepage of ARDOQ : https://ardoq.com/ Give it a try !

MPOS – Open full (kiosk) screen mode when having dual display

For a retailer, every saved “click” is appreciated, and the ability to remove any noise appreciated.

When starting MPOS in maximum mode, you will often see that you have a title bar at the top, and the app-bar at the bottom.

In windows 10 you can also use the “tablet-mode” to get the MPOS into full screen mode.

BUT! If you have a dual display setup, it the tablet mode does not work.

If you want to remove them, there is a smart keyboard short-cut:

Shift-Windows-Enter

This will put the MPOS in full screen mode, and giving a nicer appearance without the bar’s.

Then the questions is how to make this always happen, when starting the MPOS ? This was actually not a easy task, but a colleague of me (Espen) made it possible , du using a powershell script.

The following page contains a small powershell script, that opens a UWP app in full (kiosk) screen mode:

Add this to a “start up folder”, and create a new powershell script containing ;

[Path]\StartUWPAppFullScreen.ps1
-app
Shell:Appsfolder\Microsoft.Dynamics.Retail.Pos_tfm0as0j1fqzt!App


Then create a shortcut towards this new powershell app.

How initial investigations (by Sven Erik) shows that the MPOS app ID is Microsoft.Dynamics.Retail.Pos_tfm0as0j1fqzt!App and let’s hope this ID stay’s permanent.

Then the MPOS looks nicer for the user, without noice.


Retail assortments and planned orders extensions

Microsoft have created an excellent description of this in the Assortment management doc-page. Retail assortments are essential to define what products that should be available across retail channels. Assigning a product to an assortment, will assign the product to the stores that have the assortment. This makes it possible to sell the product in the store.

But there is something missing, and that is to use assortments for replenishment and procurement. Retailers want the master planning to only suggest procurement and transfers on products that belongs to the stores assortments. You can control requirement parameters per warehouse, but there is no standard way to use the assortment to control the generation of planned orders.

This blog post is to show how to make a very small extension that allows you to make sure that only products that belongs to a stores assortment will generate planned orders. The solution I will make use of is to look into how the product lifecycle state functionality is working, and extend this with an assortment planning parameter. I have called this parameter “Is lifecycle state active for assortment procurement

What it will do, is to validate if a product is in the assortment of the store, and if it is, then the product will be requirement calculated and will generate planned orders. If the product is not in the assortment of the store, that no planned orders will be generated.

To make this happen, I needed to create 4 extensions. The three first is adding a new field on the product lifecycle form.  For an experienced developer this is easy to create, and no need to spend time on in this this blog-post.

The real fun is how to manage and control the planned order generation. This happens in in an extension to the ReqSetupDim class.  Here there is a lookup to the assortment on the product, and checks if the store have this assortment.  If not, then the masterplanning will not generate any planned orders. I therefore create an extention class and use the new method wrapping/CoC feature to add some additional code.

[code language=”csharp”]
///

/// Contains extension methods for the ReqSetupDim class.
///

[ExtensionOf(classStr(ReqSetupDim))]
final class ReqSetupDim_extension
{

///

/// Validates if a product should be assortment planned
///

/// The parm of the ReqSetupDim class.
/// false if the product is not assortment planned; otherwise, return default value.
public boolean mustReqBeCreated(InventDim _inventDimComplete)
{
Boolean ret = next mustReqBeCreated(_inventDimComplete);

if (ret)
{
if (inventdim.InventLocationId)
{
InventTable inventtable;
EcoResProductLifecycleState ecoResProductLifecycleState;

//Fetching fields from inventtable
select firstonly ProductLifecycleStateId, Product from inventtable where inventtable.ItemId == this.itemId();

//validating if the product is active for planning and that also assortment planning is enabled.
select firstonly RecId from ecoResProductLifecycleState
where ecoResProductLifecycleState.IsActiveForAssortmentPlanning == true
&& ecoResProductLifecycleState.IsActiveForPlanning == true
&& ecoResProductLifecycleState.StateId == inventtable.ProductLifecycleStateId;

if(ecoResProductLifecycleState)
{
RetailStoreTable store;
EcoResProduct product;
RetailAssortmentLookup assortmentLookupInclude;
RetailAssortmentLookup assortmentLookupExclude;

RetailAssortmentLookupChannelGroup assortmentLookupChannelGroupInclude;
RetailAssortmentLookupChannelGroup assortmentLookupChannelGroupExclude;

//Finding OMOperatingUnitID from the inventlocationId
while select firstonly OMOperatingUnitID from store
where store.inventlocation == inventdim.InventLocationId
{
//Check if the product is in the assortment of the store in question
select RecId from product
where product.RecId == inventtable.product
exists join assortmentLookupInclude
where assortmentLookupInclude.ProductId == product.RecId
&& assortmentLookupInclude.lineType == RetailAssortmentExcludeIncludeType::Include
exists join assortmentLookupChannelGroupInclude
where assortmentLookupChannelGroupInclude.OMOperatingUnitId == store.OMOperatingUnitID
&& assortmentLookupChannelGroupInclude.AssortmentId == assortmentLookupInclude.AssortmentId
notexists join assortmentLookupExclude
where assortmentLookupExclude.ProductId == product.RecId
&& assortmentLookupExclude.lineType == RetailAssortmentExcludeIncludeType::Exclude
exists join assortmentLookupChannelGroupExclude
where assortmentLookupChannelGroupExclude.OMOperatingUnitId == store.OMOperatingUnitID
&& assortmentLookupChannelGroupExclude.AssortmentId == assortmentLookupExclude.AssortmentId;

if (!product)
{
ret = false; //The product does NOT belong to the stores assortment, and should not be planned
}
}
}
}
}
return ret;
}
}
[/code]

I also have code to restrict creation of manual purchase orders, and where simular code can be used, but let’s hope that Microsoft can further extend standard Dynamics 365 with assortment based procurement planning.

Copy with pride, and let’s hope next year will give us 365 more opertunities.

POS Invoice Pay – #Dyn365F&O

A very nice omnichannel capability made available in Dynamics 365 version 8.1, is the ability for customers to pay their invoices directly in the POS. A scenario is that a customer is allowed to purchase “on-account” and then later pay all the invoices. Let’s say that the customer is in a hotel, and allows the customers to buy food, drinks and services throughout the stay. At the end of the stay the customer pays for all the services at the reception. Like “pay-before-your-leave”.

There is no requirement that the goods have to be sold on a POS. It is fully omnichannel capable. So, the orders can be created in the call-center, WEB or in stores. I would like to share this with you and how you can set it up in the Contoso demo data set. If you open the functionality profiles, you will find the possibility to enable paying:

  • Sales order invoice
  • Free text invoice
  • Project invoice (Yes! Even project invoices!)
  • Sales order credit note

The next thing you need to do is to add a “Sales invoice” – button to the transaction screen. (I’m using Houston store, and button grid F2T2)

This will add a sales invoice button to the POS design, that allows for paying invoices in POS.

The next thing is to create a POS transaction/order. First select a customer (like Karen), and then use the on-account button to sell the goods.

On the payment screen you can say how much you would like to put on account, and you also see that the credit limit and balance is available.

The next step requires that the there are some periodic batch jobs, that needs to run;

1. Run the “P-job”, to fetch the transactions from the channel database.

2. Run the “Calculate statement” (manually or in batch)

3. Run the “Post statement” (This process will create the sales order and the invoice)

!Make sure the statement is posted and invoiced before continuing!

The option you now have is to continue to the process in Dynamics 365, and create an automatic sending of the invoice to the customer through print management, or have the customer come to the “reception” and pay for the goods directly.

To pay the order, select the Karen customer, and use the Sales Invoice button.

If you have done all right, you should find the invoice in the list now. (If you have enabled aggregation in the parameters, you will have a single invoice per customer)

I can then select the invoice (or multiple), and pay it using cash, card, loyalty (And even on-account again)

This opens up for some very nice omnichannel processes, and I hope that Microsoft invests further in this. It would be nice to actually see the actual lines on the invoices that is being paid, and to even print-out the invoice if the customer requires this. Also I suggest that for retailers, use the modern report possibility to make the invoice look awesome.

Take care friends, and thanks for all your support and encouragement!

A quick look at download Retail distribution jobs (CDX)

Commerce Data Exchange (CDX) is a system that transfers data between the Dynamics 365 F&O headquarters database based and retail channels databases(RSSU/Offline database). The retail channels databases can the cloud based “default” channel database, the RSSU database and offline databases that is on the MPOS devices. If the look at the following figure from Microsoft docs, this blog post is explaining how to practically understand this.

What data is sent to the channel/offline databases?

In the retail menus you will find 2 menu items; Scheduler
jobs
and scheduler subjobs. Here the different data that can be sent is defined.

When setting up Dynamics 365 the first time, Microsoft have defined a set to ready to use scheduler jobs that get’s automatically created by the “initialize” menu item, as described here.

Scheduler jobs is a collection of the tables that should be sent, and sub jobs contains the actual mapping between D365 F&O and channel database fields. As seen in the next picture, the fields on the table CustTable in D365 is mapped towards the AX.CUSTTABLE in the channel database.

To explore what is/can be transferred, then explore the Scheduler jobs and scheduler subjobs.

Can I see what data is actually sent to the channel/offline databases?

Yes you can! In the retail menu, you should be able to find a Commerce Data Exchange, and a menu item named “Download sessions”.

Here you should see all data that is sent to the channel databases, and here there are a menu item names “Download file”.

This will download a Zip file, that contains CSV files, that corresponds to the Scheduler
jobs
and scheduler subjobs.

You can open this file in Excel to see the actual contents. (I have a few hidden columns and formatted the excel sheet to look better). So this means you can see the actual data being sent to the RSSU/Offline channel database.

All distribution jobs can be set up as batch jobs with different execution reoccurrence. If you want to make it simple but execute download distribution job 9999 to run every 30 minutes. If you have a more complex setup and need to better control when data is sent, then make separate distribution batch-jobs so that you can send new data to the channel databases in periods when there are less loads in the retail channels.

Too much data is sent to the channel databases/offline database and the MPOS is slow?

Retail is using change tracking, and this makes sure that only new and updated records is sent. This makes sure that amount of data is minimized. There is an important parameter, that controls how often a FULL distribution should be executed. By default it is 2 days. If you have lots of products and customers, we see that this generates very large distribution jobs with millions of records that will be distributed. By setting this to Zero, this will not happen. Very large distributions can cripple your POS’es, and your users will complain that the system is slow, or they get strange database errors. In version 8.1.3 it is expected to be changed to default to zero, meaning that full datasets will not be distributed automatically.

Change tracking seams not to be working?

As you may know, Dynamics 365 have also added the possibility to add change tracking on data entities when using BOYD. I have experienced that adjusting this affect the retail requirement for change tracking. If this happens, please use the Initialize retail scheduler to set this right again.

Missing upload transactions from your channel databases?

In some rare cases it have been experienced that there are missing transactions in D365, compared to what the POS is showing. The trick to resent all transactions is the following:

Run script: “delete crt.TableReplicationLog” in the RSSU DB. And the next P job will sync all transactions from RSSU DB (include missing ones).


Using Cloud POS as your retail mobile device

Handheld functionality for retailers is a question I get a lot. Then typical in the area of counting, replenishment, receive and daily POS operations. In version 8.1 Microsoft have taken a small step forward to make it easier to use any handheld device that supports a common browser. Because Cloud POS (CPOS) runs in a browser, the application isn’t installed on the device. Instead, the browser accesses the application code from the CPOS server. CPOS can’t directly access POS hardware or work in an offline state.

What Microsoft have done is to make the CPOS change according to the screen size, to work more effectively on your device. To make it simple, I just want to show you how it looks on my iPhone.

Step 1: Direct your browser towards the URL of where the CPOS is located. In LCS you will find the URL here:

Step 2: Activate your POS on mobile device by selecting store and register, and log in

Step 3: Log into CPOS and start using it. Here are some sample screens from my iPhone, where I count an item using CPOS.

You can also “simulate” this in your PC browser, but just reducing the size of your browser window before you log into CPOS. Here I’m showing the inventory lookup in CPOS.

What I would love to see more of is:

– Barcode scanning support using camera

– The ability to create replenishment/purchase orders in CPOS

– More receive capabilities like ASN/Pallet receive etc.

– Improved browser functionality (like back-forward browsing etc)

To me it seems clear that we will see additional improvements in CPOS, making it the preferred mobile platform for Dynamics 365 for Retail. As we get a little, I hope to see more of this as Microsoft is definitely investing in this area. In our own customer projects we will be developing more and more functionality using RTS (Real Time Service calls) to add more features to be used together with CPOS.

To take this to the next level, please also check evaluate to create a hybrid app, that incorporate CPOS in a app friendly way. Sources say that this will also allow us to build extensions like camera barcode scanning

The direction is right and my prediction for the future is that: Mobile Retail device = CPOS.

Focus18 – EMEA – London

The User Groups for Dynamics 365, AX, CRM, BC/NAV, and Power BI road-trip named Focus is arriving to Europe and is making a stop in London from 5-6 September, 2018 featuring dive deep sessions covering advanced topics on D365 Finance and Operations and Customer Engagement. Additionally, specific topics to the Retail space including modern POS, inventory management, sales orders, ecommerce, credit card processing and more. This is great stuff!

It is a privilege for me to participate and present together with great MVP’s, Microsoft experts and the Dynamics 365 community. If you want to check out my sessions, I will have the following sessions:

Deep dive into retail pricing and discounts. 

This session is about what product sales price and discount options that exists in Dynamics 365 for Retail – “out-of-the-box”.  With actual and real examples of how to implement and maintain your retail prices.


Learn, Try, Buy for Retailers.

The “Learn, Try and Buy for Retailers” is an accelerated onboarding approach that enables you to evaluate if a cloud enabled Dynamics 365 for Retail is the right direction, and to be able to learn as much as possible prior to performing a business- and solution analysis. This is available for agile and iterative approaches, and this sessions shows why buying a small Dynamics 365 license is an affordable investment to purchase before scope of implementation have been defined. Using VSTS (Visual Studio Team Services) is a central topic in this session.

Power BI and Retail.  How to get the numbers.

This sessions shows how to publish retail transactions into a Azure SQL database or CDS(Common Data Services), and then analyze the retail sales in Power BI.

Check out https://www.focusemea.com/locations/london as there are many other very interesting sessions.


See you in London!


MSDYN365FO: Automate repetitive tasks – the easy way

Here the other day, I got the task of posting a few thousand Retail Kit orders / BOM-Journals because they failed at the first time. I started, and managed to manually post 50 journals before my fingers got cramps and I started to feel dizzy. I could not multiselect the journals and post them, so I had to manually click “post” on each journal.

I surely sent a SR to Microsoft explaining that this should be easier in standard, and that SR is in process. But it will probably end up as a “As-Designed” state, or “post it to ideas.microsoft.com”.

But there is an easier low-tech way to solving this. Just install a Mouse-ghost app, and it will repeat the task for you. So I used the app “Mouse Recorder Premium” to post all the 1300 journals, and it went smoothly. Just record the clicks and then repeat for a 1000 times.

To make sure I did not “lock” my PC while this was performing, I started the task in a Hyper-V VM, and then it can run in the background.

That’s today’s small trick to get rid of repetitive tasks

Measure sales per Retail Category in Power BI

Drill down on sales per category, employee, and department is key essentials for Retailers. Doing this gives a more specific view of what’s generating sales and what isn’t. Having insights into top categories or departments might help make decisions about purchasing and marketing. A good point of sale comes with reporting and analytics, so you can quickly get the data you need, whenever you need it — without manual calculations.

Power BI is a must have for all retailers, and this blogpost is about creating a retail category hierarchy in power BI.

If you have worked with Retail Categories, you know that there exists a “parent-child” relationship between the categories as illustrated from the following data in the Contoso demodata set.

In power BI it is possible to also create such hierarchies, but it requires some minor changes to reflect this. My inspiration came from Power BI Tutorial: Flatten Parent Child Hierarchy. I will not go through how I build a retail power BI analysis, but I can share that I use ODATA entities, and here is the entities I’m using:

More information on the data model is available in DOCS her.

The “trick” is to create a new column named “Path“, and a column named CategoryL[X] for each level in the hierarchy, that for the RetailProductHierarchyCategories looks like this:

Here are the column formulas

Path = PATH(RetailProductHierarchyCategories[CategoryName];RetailProductHierarchyCategories[ParentCategoryName])

CategoryL2 = PATHITEM(RetailProductHierarchyCategories[Path];2)

CategoryL3 = PATHITEM(RetailProductHierarchyCategories[Path];3)

CategoryL4 = PATHITEM(RetailProductHierarchyCategories[Path];4)

CategoryL5 = PATHITEM(RetailProductHierarchyCategories[Path];5)

…etc

Then I create a new hierarchy column for, where I specify

And I use the Hierarchy Slicer that is available in the power BI marketplace.

In power BI I then get a Retail Category slicer, and can filter and measure sales per category in power BI

Microsoft are in process of aligning ourselves with future of Power BI and create the new version of Retail Channel Performance with New Common Data Service for Analytics capability coming to Power BI https://powerbi.microsoft.com/en-us/cds-analytics/

Keep on rocking #MSDYN365FO!

A Practical Guide for Dynamics 365 Iterative Implementation

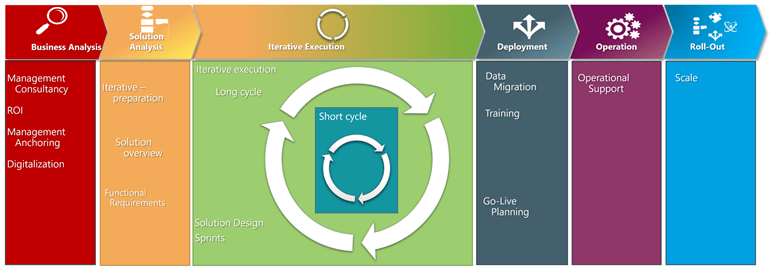
With the introduction of Dynamics 365 and cloud enabled tools like Office and VSTS(Visual Studio Team Services) we have accelerators towards iterative ways of performing an implementation.

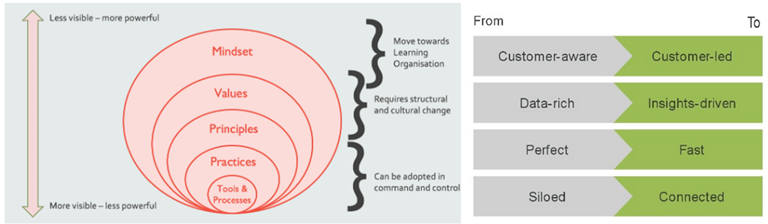
Digitalization also enables the ability to go from a document and template approach to a committed task driven implementation with a sprint based sub-deliveries, where all parties are involved. This also increases visibility, removes lead-times and results in faster deliveries. Adapting digitalization and going iterative in a project it not only about using new tools and processes like VSTS, but also covering Practices, Principles, Values and Mindsets of the project participants.

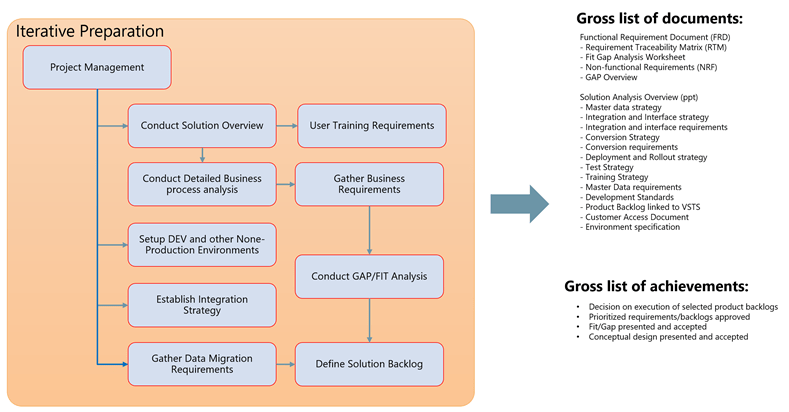
The iterative preparation

As described in earlier blogposts it is vital to have a clear concept of process modeling where processes are broken down to sub-processes and requirements. Having WBS (Work-Breakdown-Structures) is the tool to plan and execute on deliverables. The traditionally solution analysis is transforming into a iterative preparation phase that can let us define clear work packages that can be solved in sprint executions.

The Iterative preparation should have a formalized set of workshops, and the main purpose is to generate an approved solution backlog. It is normally recommended to complete the preparation phase before going into the execution phase. But in larger projects the preparation phase could be a parallel phase to the execution phase, and where customer approved solution backlogs can be planned into sprints and started upon before the phase is ended.

Please remember that iterative implementation models do not give a detailed picture of scope or costs! The actual deliveries are defined by the customer approved solution backlog.

The following flow chart shows the main activities in the preparation phase.

The granularity and level of details needed in the deliverable documents is agreed on in the project. A middle and practical way is to create the deliverable documents with a minimum set of information and a final conclusion, and then URL link the content in documents towards a VSTS site for further information and process.

The preparation phase is highly customer intensive and require a detailed plan, invitations, workshops and time to document the findings. Before is participating in preparation workshops it is recommended that the participants have completed a “Learn, Try, Buy” phase. An example project plan for the preparation phase can look like this for a retail customer.

As seen in the example plan, the preparation can have dedicated tracks for the functional areas, and these will vary based on the vertical models that is being used. The level of granularity of the sub topics is recommended to be according to the first and second level in the process models.

Use process models to define scope and topics.

The contents of the preparation workshops should be organized based on the process models. This makes sure that best practices are discussed and taken into account for the execution phase. The value chain shown here is the divided into 3 main epic tracks; Management processes, Operational processes and Support processes. There are different models for each vertical. As seen in the following figure I typical use to illustrate the EG retail value chain model.

ProcessModels

For each of the “boxes” in the model represents a topic, where business processes is discussed and defined. The model will provide:

  • Workshop Agenda’s templates
  • UAT test scripts templates and recommended process recordings
  • Stack/technology recommendations
  • Process flows (visio or BPM in LCS)
  • Solution Backlog templates.
  • KPI assessment recommendations (APQC)

From Model to solution backlog

Based on the findings from the preparation phase a solution backlog is created. The most efficient tool to do this in, is the VSTS (Visual Studio Team Services), setup using the CMMI definitions. Here all backlogs are organized in a hierarchy of Epic’s, Features, Backlogs, tasks and Impediments.

The general consensus of these definitions are:

Level Description
Epics Something that transcends projects/releases/versions.
Features Something that cannot be delivered in a single sprint, but can be delivered in a single release.
Requirement(CMMI)
Product Backlog (SCRUM)
Something that can be delivered in a sprint, and have an estimation.
Bug Something that that is not working and can be solved in a sprint, and have an estimation.
Task Assigned work elements with remaining effort.

To relate the structures to CMMI, the following guideline can also be followed.

More details in how to create a backlog in VSTS can be found here. Best practice is that the VSTS site is located on the customers tendant, and that external project participants are invited. The VSTS backlog can also be regarded as a WBS (Work Breakdown Structure). In the following example you can see how the backlog is structured according to a business process model.

The VSTS will also provide dashboards where a complete status can be seen and monitored. Setting up these Dashboards is based on defined queries towards tasks and backlogs, and are easy to tailor to the needs.

How to fill in a backlog item

The product backlog (and other elements) contains a small set of fields needed.

What should be regarded as a minimum set of information defined on a backlog is:

  • Name
  • Description
  • Acceptance Criteria
  • Effort estimated.

If additional fields are needed, they are quite easy to add and also easy to extend with new statuses.

If additional fields are needed, like APQC ID, planning dates, additional names etc, they can very easily be added to the form. See https://www.visualstudio.com/en-us/docs/work/customize/customize-work for more information.

In the preparation phase perform these activities:

  • Right-size backlog items by splitting larger items into smaller items. No backlog item should be larger than it will take to complete in a single sprint.
  • Identify and fill in gaps in the product backlog. Capture new ideas and stories, architecture and design requirements, and other spikes.
  • Reorder the backlog to represent today’s priorities and business value focus.
  • Ensure well defined acceptance criteria has been added to each item.
  • Revisit estimates made to backlog items and adjust upwards or downwards based on recent understanding about scope and acceptance criteria.
  • Review all potential backlog items to consider for the upcoming sprint to make sure they are well understood and that any additional work required to support their development is well understood by both product owner and the team.

Mapping a VSTS product backlog to the functional requirement documentation

Most often it is mandatory to also deliver a Functional Requirement Document. This document is delivered as in the end of the preparation phase. The reason why this document is important, is that it explicitly defines all requirements, and is a commercial document. But instead of writing a hundreds of page document, try to link the requirements using URL-links to the document. Then the FRD only contains the vital and important information that regulates responsibilities and commercial conditions.

The preparation phase ends when the deliverables from the phase is approved and signed by the customer. After the phase is approved, all information on the VSTS site can be copied into Excel backup sheets, that represents a snapshot of the status at the end of the prep phase.

Roles involved in an iterative preparation phase

The roles running an iterative preparation phase depends on project size and complexity. As a minimum, it is recommended that the following defined roles are present in this phase:

  • Project manager (Planning and facilitating)
  • Solution architect (Overall approval of solution)
  • Technical lead (Integrations and migration)
  • Functional Consultants (Covering training, functional area’s)
  • Junior Business consultants (Assisting writing and maintaining the solution backlog)

Customer project participants need to match this roles.

Iterative Execution phase

As the solution backlog is filled, sprints may be filled with approved backlog items. The overall process of the sprint is to deliver at set of backlog items, that have been broken down to specific tasks. The duration of a sprint is determined by the scrum master, the team’s facilitator. Once the team reaches a consensus for how many days a sprint should last, all future sprints should be the same. Normally, a sprint lasts between 2 to 4 weeks. During the sprint, the team holds daily stand up meeting to discuss progress and brainstorm solutions to challenges. The customer may not make requests for changes during a sprint and only the scrum master or project manager has the power to interrupt or stop the sprint. At the end of the sprint, the team presents its completed work to the customer and the customer uses the criteria established at the sprint planning meeting to either accept or reject the work.

The following diagram shows the activities involved, and the expected deliverables from a sprint.

Define the Sprint log

To solve a backlog, then several resources may be required to be involved. When defining the sprint log, each backlog is split into tasks, that defines the sequence, remaining work and the assigned to. This means having tasks for analysis and design of the backlog, creating scripts for testing, tasks for developing and tasks for performing the test of the backlog item. As seen in the following figure a backlog is divided into tasks, and each task is must have a clear description and a “remaining work” estimate. If essential resources are needed to solve the task, then the task also should be assigned to this person.

When a task have been assigned to a person the person is committing to the task, and agrees on delivering the task within the defined sprint.

Conducting a sprint planning meeting

The customer, project manager and the Scrum Master will start a sprint by selecting the backlogs that should be solved in the current print. This is done in VSTS, and the backlogs are “dragged-and-dropped” to the selected sprint, or marked to specific iteration.

When planning a sprint, also identify what resources are needed in the sprint. In the sprint overview, then define the capacity and the resources required in the sprint. This makes planning easier and resource/capacity constraints can be identified by project manager/scrum master.

The daily sprint meeting

This meeting is the most important meeting each day. It should only last for 15 minutes, starts at the same time every day and is located on the same place every day. The SCRUM master is responsible to make sure that the meeting is as efficient as possible. It is a team meeting, where each team member explains what he is working on, and if there are any issues. Do NOT use the sprint meeting to try to solve issues. Just identify and share. Use other meetings to solve and to go deeper into each topic. Any notes that is important and identified in the CMMI can be described in the discussion field on the task/backlog.

Also use the “Add Tag” to mark tasks and backlogs that need special attention and follow-up.

Reporting status and completion

All backlog items have a state. The meaning of these states can be seen in the following flow charts:

Teams can use the Kanban board to update the status of backlogs, and the sprint task board to update the status of tasks. Dragging items to a new state column updates both the State and Reason fields. If additional intermediate steps and stages are needed, this can be customized in the settings of the VSTS.

Documentation

One of the disadvantages of an iterative implementations is that there are no clear and sharp end-phases, and this often does not fit good with commercial contracts. It is therefore important to make sure the deliverable documents are created/updated according to the progress. But remember to be active in documenting as much as possible in VSTS, and define the creation of deliverable documents as defined backlogs in the sprint. Expect to use at least 10% of you time in VSTS to give visibility to others.

Conduct Solution testing

Quality is a vital aspect of and everybody in the team owns quality – including developers, managers, product owners, user experience advocates, and customer project members. It is vital that the solution testing is a customer responsibility and that the testing is structures and planned accordingly.

VSTS provide rich and powerful tools everyone in the team can use to drive quality and collaboration throughout the implementation process. The easy-to-use, browser-based test management solution provides all the capabilities required for planned manual testing, user acceptance testing, exploratory testing, and gathering feedback from stakeholders.

Creating test plans and performing test are one of the most vital elements in the iterative implementation. Please read the following URL for UAT testing https://www.visualstudio.com/en-us/docs/test/manual-exploratory-testing/getting-started/user-acceptance-testing . Building a test plan is therefore a mandatory step and this ensures that defined accept criteria have been met.

The following documents are the input to the solution testing:

Flow Test Script
UAT Test Script by Function
UAT Test Script by Role
UAT Test Script Details

Test & Feedback

Visual Studio Team Services Marketplace contains a ton of jewels, and one add-in that can accelerate testing and feedback is the Test & Feedback extension to VSTS.

When installing it, you get a small icon in Chrome, where test and feedback can be given.

When setting it up, you just point to the VSTS site. And then you are ready to start giving feedback, and to collect backorders, bugs or tests, just click on the play button.

While navigating and taking screenshots, notes and video, it all gets recorded, with URL, time etc.

When done with the recording then create a bug, test or create a test case:

After saving the bug. I see that a bug have been created in VSTS:

I now have a complete bug report in VSTS, that the consultants can start to process and to identify if this is a bug or an “as designed” feature.

Microsoft Tools available for a Dynamics 365 project.

When working in a project, it is important to know that Microsoft tools and services are tightly connected and that each tool can simplify and enrich the user experience and efficiency. In the following figure the different most common tools can be seen. Also pay attention to that there are powerful integrations between these tools, and this section will provide some small tips on how to make these tools work together.

Having a clear understanding of the tools available can speed up implementations, and also give better visibility to all stakeholders. In the following topics, some of these benefits are discussed.

Microsoft VSTS: Visual Studio Team Services

Create a VSTS site at http://VisualStudio.com. For internal projects, create using your domain account. For customer project, it is recommended to create the site on a customer controlled domain, and then add the domain users as guest users. Other elements in relation to VSTS have been covered earlier in this document.

Who uses it? All implementation project members both from EG, Customer and 3’rd party vendors.
When to use it? Everyday and in all SCUM meetings.
Pricing 5 users free, stakeholders free. Paid user is 6$/month.
Members with Visual Studio subscriptions don’t need licenses. https://www.visualstudio.com/team-services/pricing/

Microsoft Excel: Upload and Maintain

Microsoft Excel can be used to import and publish the structure into VSTS, when the Visual Studio Community edition is locally installed on your PC. This makes it possible to extract all fields and values by using VSTS defined query.

Then a process model may be imported and a best practice product backlog is ready to be processed. Step-by-Step instruction on how to use Excel with VSTS, take a look at https://www.visualstudio.com/en-us/docs/work/office/bulk-add-modify-work-items-excel

Who uses it? Solution Architects and vertical responsible.
When to use it? In the start, when uploading process models and WBS’s as a start.
When mass updating backlog items and tasks.
Pricing Office 365 prices. https://products.office.com/en-us/compare-all-microsoft-office-products
Visual Studio Community edition is free.

Microsoft Project: Plan and Breakdown

Microsoft Project is a vital tool for streamlining quotations, WBS and resource planning. Built-in vertical templates, familiar scheduling tools, and access across devices help project managers and teams stay productive and on target. Microsoft Project is also directly integrated with VSTS, and exporting created backlogs and tasks/activities to Dynamics 365 for Operations can be done, and create a complete end-to-end process covering “from quote to cash”.

“Plan-the-work”, and “Work-the-plan” are essential activities and where all stakeholders can participate and cooperate, and that we deliver what is planned, and the invoice the customer receives corresponds to the agreement and contract. Having predefined WBS structures in Microsoft Project simplifies project planning, and the VSTS is auto updated accordingly to how the planning is performed.


Who uses it? Presales, Sales and Project management.
When to use it? Microsoft Project is excellent to handle WBS structures when planning and quoting a project. Microsoft Project is also used for planning resources, and to reach project deadlines. For more information on how connect VSTS and Microsoft Project, take a look at https://www.youtube.com/watch?v=GjYu5WmcQXo
Pricing 30$/user/month for Project Online Professional
https://products.office.com/en-us/project/compare-microsoft-project-management-software?tab=tabs-1

Microsoft Outlook: Inform and Alert

Some stakeholders do not want to go deep into VSTS, or to extract information from Excel/Projects. Also when tasks are being assigned they want to be informed and when issues are resolved, they want to notified. Setting up notifications in VSTS solves this requirement, and will keep project participants informed of any changes. The email also contains a URL directly to the task/backlog.

Setting up notifications are done in VSTS, and individual filtering can be defined.

Who uses it? All project participants receive assigned notifications. Project managers and solution architect receive all notifications.
When to use it? When Outlook is used to keep participants informed.
Pricing Outlook included with Office 365 prices. No additional costs.

Microsoft Teams: Discuss and Involve

Informal communications are vital for any project. Tools like Skype for Business will take care of meetings and screen sharing, but Microsoft Teams gives flexible communication on all platforms and keep everyone in the loop. The users can see content and chat history anytime, including team chats with Skype that are visible to the whole team. Private group chats are available for smaller group conversations. The Microsoft teams can also function as the center point, with direct tabpages towards VSTS, Home Dynamics 365, LCS, Sharepoint etc. Since this September the Microsoft teams support guest users, and since these sites normally is on the customers tendents, we consultants are logging in with our company email addresses.

The VSTS Kanban board are easily accessible from the Microsoft teams.

Who uses it? Project participants involved in a project, that needs to have informal communication and the ability to work asynchrony with a discussion history.
When to use it? When more direct communication is needed, and especially for developers.
Pricing Teams normally included with Office 365 prices. No additional costs.

Microsoft SharePoint online: Documents and Archive

Even in a highly interactive and iterative environment, there is a need for documents. And then especially for deliverable documents. For this, SharePoint Online is used to store, track and develop the documentation. The internal folder structure is optimized for the sales process, and contains commercial binding documents. The SharePoint online site in mention here, is the SharePoint online site that is the customer property. The following document structure can be recommended.

After the project is delivered, the SharePoint site will remain as the documentation together with the VSTS site.

Who uses it? Project participants involved in a project, that needs to create or use formal documentation and deliverable.
When to use it? When having specific deliverable that.
Pricing SharePoint is included with recommended Office 365 E3 prices.

Microsoft Flow and PowerApps: Workflow and Apps

Microsoft Flow and PowerApps are quite new technologies in the Microsoft office family. The idea of bringing these tools into the scope, is to be able to have process and workflow automation in the implementations. PowerApps is also a great tool for data collection in testing and for getting feedback.

Some examples of Microsoft Flow:

Streamline approvals by sending files with approval requests

  • I’m sick button
    à Inform colleagues and block calendar.

Some examples of powerApps:

Who uses it? Superusers and Architects
When to use it? Used for automating tasks and to create fast simple prototype apps that can assist in the implementation
Pricing Flow and PowerApps are included in a Dynamics 365 Plan 2 license.

I hope this blogpost gives an insight into the digitalization process partners now are using in Dynamics 365 implementations. The Microsoft sites contains tons of more information and I recommend to explore more of the Microsoft technology stack that is available for Dynamics implementations.

Disclaimer: The opinions and views expressed in this blog are those of the author and do not necessarily state or reflect those of Microsoft, my employer EG or other parties.


Dynamics 365, PowerApps, Flow and Common Data Model

This summer at WPC Microsoft unveiled the Dynamics cloud strategy by explaining their new initiative named Dynamics 365. Let me say it very short; IT ROCKS !

A good Q&A blog explaining it is this blog post from James Crowter. The essence is that the Dynamics 365 will be available in 2 editions; Business (cloud based NAV-edition) and Enterprise (new Dynamics AX, aka AX’7′). In addition, Microsoft have also launched the AppSource that can help finding the right business apps available from other ISV/VAR’s. This is a great offer to customers, where 3rd party apps and extensions can be previewed.

As the new name implies ‘Dynamics 365’, there will be a tight connection to the Office 365 package. Is there something Microsoft is good at, it is cross-selling and building strong dependency though the entire stack of Microsoft technology. This will further strengthen the offering. Some concerns are that the total offering could be regarded as an increase in costs. Very often we see customers comparing their offer based on the wrong assumptions, and where on-premises offers are compared with cloud and SaaS offerings. This will give the wrong perspective, because often in on-premises solutions don’t include all costs related to implementation and running the systems. What looks as cheap today may in the longer run actually result in higher costs and the build-up of a technological debt. When making the classic tradeoff decisions in technology, make sure you understand the implications.

Dynamics 365 is more than just a rebranding, and the introduction of the new Common Data Model(CDM) is the glue(database) that will stick all pieces/entities together. We can expect that in future, all the components will be working together across the ordinary product lines as we know it today. Customers will download a app, and don’t care if they have a business or enterprise edition of Dynamics.

CDM will over time make sure that Microsoft PowerApps enables users to create applications for Windows, iOS, and Android mobile devices. Using these apps, you can create connections to common SaaS services, including Twitter, Office 365, Dynamics 365, Dropbox, and Excel. Making all kinds of apps will easier, and in many cases not even involve any coding.

My Dynamics friends, please try out the Microsoft PowerApps because this a central element in the future of Dynamics 365, and also check out Microsoft Flow, to understand how the CDM in the future will enable the flow of data and processes between all components in the Dynamics 365 and Office 365 landscape.

Again we have a lot of learning, and I’m amazed how fast the transition to a cloud and mobile first business environment is going. This change will also make ripple effects on the entire ecosystem. New technologies require new organizational approaches and new workforce skills and knowledge. I assume that we again will see consolidations and mergers among the traditional ERP vendors, where the traditional WEB and .NET consultancy is being consolidated under the Dynamics 365 umbrella. We can also assume that smaller ERP vendors are just too small to master all these new technologies, and will slowly fade away. Soon, most of our business processes is handled on your mobile phone, backed by the cloud.

And remember, your best bet is to learn!

DAX 2012 end-to-end processes and APQC

With LCS (Life cycle Services), Microsoft have taken steps to introduced the APQC (American Productivity & Quality Center) Process Classification Framework as one of the business modelers.

Microsoft have also created some flowcharts to visualize the APQC processes in dynamics AX.

In some Dynamics AX implementation projects it have been decided to use the APQC model, and the participants(including me) was struggling connecting the APQC model to actual tasks and activities performed in DAX. So I started on a small mental journey to better understand how to use APQC model, and to be able to connect the dots from the classification framework into dynamics AX swim lane process maps.

First I thought that is was possible to take some level 4 APQC try to draw them. It is possible to draw the small and simple activities, but I was struggling drawing an end-to-end processes. Like order-to-cash. I quickly realized that I cannot use the LCS-APQC model to explain end-to-end DAX processes, since end-to-end processes often will involve many different departments, functions and processes.

To visualize a complex processes in an end-to-end process like order-to-cash using APQC classification model I could imagine looking something like this.

Here we see the involved processes visualized with the APQC classification. And it makes sense. But it does not tell you how to use AX in in this process, because that is described using the level 4 (or 5) in APQC. Like in 8.2.2 Invoice customers, would be a specific process, that we can visualize in Dynamics AX/LCS.

The other thing I realized was that APQC is not about implementing a ERP system, like DAX, but it’s about improving the processes you have(regardless of what systems and applications you have). Some of the activities may be handled in DAX, but many is just how to improve the actual steps the company actually does. Very often it can be the working procedure, involving many systems and internal working processes. So you don’t ask “How does this APQC process look in DAX ?”. You should rather ask “What APQC processes is involved in the selected DAX processes (like order-to-pay).

The APQC model will therefore not tell you how to use and setup Dynamics AX. It will just help you to have a common language to classify your processes and to improve them. When it comes to visualizing Dynamics AX processes in swim lane flowcharts it can be a good idea to use the APQC identifiers as process identification.

My tip when using LCS, is to understand the APQC process identification model, and use it as a repository and building blocks when you create your own processes.

By referring to APQC on your own business model you can start on process improvement project for that specific process. You will can also evaluate to implement the benchmark indicators as APQC exemplifies.

My quick summary is therefore;

1. Do I like LCS, and will use it à Yes, and I will use it for implementation and DAX process visualizations.

2. Do I like APQC à Yes, and I will use it for classification, benchmarking and process improvements.

3. Do I think that the LCS APQC processes reflect what we see at customers à No

4. What would be nice to have in LCS business modeler à More end-to-end processes, where the APQC process identifiers is used would be nice.

Happy DAX’ing !!


DAX 2012 R3 – Kick-back, Bonus and marked support

We often see that vendor’s use loyalty marketing in hopes of nurturing customers to be even better customers. Introducing new products in a marked can be costly, and success is often rewarded based on performance.

We often encounter requirements where vendors is compensating with kick-back, bonuses and marked support on specific products. The agreements can be formulated like; If you sell more than 1000 units per quarter, we will give you a 10% discount on purchased products for that quarter. But the transactions and invoices then may be that the original invoice is on the exact amount, and each quarter a credit note with the bonus is received. The idea behind kick-backs can be controversial, but this is not the topic her.

Having the cost price on the products determined on the actual purchase price give a very good foundation for a healthy business model, and also gives a much better insight to revenues and margins . But this “delay” in the transactions and payments introduces some issues for customers that relies on using inventory models as FIFO, FEFO etc.

  • What is the actual cost price in a scenario with kickbacks?
  • How can we calculate the actual revenue and margins?
  • Does my system support this feature?

If you have Dynamics AX 2012 R3, then you are lucky. There is a very nice way to handle kickbacks effect on product cost prices, and making sure that the cost prices is affected accordingly.

The name of the feature is charges. With charges we make adjustments of the cost prices on the right dates, and on the right transactions. The inventory closing will make sure that the cost prices are settled to the sales orders/issue inventory transactions.

The first step is to create a new charge, that will adjust the cost price on specific invoices, and also post on a selected ledger account.

Then let’s say the following received invoice from 2013 of 200 Surface Pro 128:

I see on the inventory transactions that the cost amount is 179.800 USD.

The vendor now want to give me a kick-back for my effort of managing to sell these old notepads. When they send us a credit note of 50% of the amount, and I want to post this so that the cost price changes on the inventory transactions.

When this is posted it will adjust the cost of the inventory transaction on the selected posting date:

The voucher transactions looks like this.

In AX 2012 R3 the inventory transactions will make the necessary adjustments on the issue transaction.

The next step is to receive and post the invoice from the vendor post it against the selected ledger account on the charge code, and eventually also run the inventory closing procedure.

Conclusion;

There are no need to credit post the purchase order for adding kickbacks, bonuses and marked support etc. It is supported in Dynamics AX 2012 R3.

Happy DAX’ing


Sneak preview of the WMS E&E

Last week I had the first preview of some of the new features in WMS E&E.  The development is going forward and at current stage we are 30% finished.  We are currently 11 people working on the solution, so this is a major investment for us.  We have been so lucky to get 4 developers from Russia and Ukraine. We are using Skype and Live Meeting, together with Citrix/Terminal Server and I really works out. 

The Inventory II module from FSB-development is paying off, and secures that this new solution gets its performance and scalability.

The first clients have looked at the solution and are so far happy with the progress.   

Here is some pictures from the presentation:

Gantt Scheduling of Input port

Here is one of the cool features we are woring on.  A gantt based schedulingtool for inbound logistics.  This is the process of directing trucks and containers to spesific input ports.  The user interface is simple and allows for moving the containers between ports and in time.  The gantt will also include a scheduling program, so that the user can recalculate the real ETA-date/time.  When moving a container in thime, the expected deliverydate for that shipment will update the rest of the system and the receive process will be visible for the user.


 There is a requirement to schedule the receive of containers. Each container can be placed at a specific input port, and is also allocated a timeslot for emptying the container. 

Each port as attached a working calender and a capacity . The capacity can be expressed in cartons/hour. 

In the gantt view, there must be possible to reschedule containers and also to move them between ports.

The scheculing engine must first allocate a container to a free port, and then find the apropriate timeslot for the container. As soon as the container has been given a port, the receive can start.    
When dobble clicking on a container, the container form must be brought up to front.   
At the botton the planned capacity must be shown, displaying number of cartons expected per hour.

E&E WMS extended with licensepalate

Yesterday we extended the system with a new storage dimension, called LicenseplateID.  This is a unique ID of a carton, that is barcodeded, can can be used anyware in the warehosue system both on put-away and on picking.  The ID is also used in the integration with the conveyor and miniload systems.  The process for extending the system to include a new dimension was quite easy.  Just search in the AOT of the Dynamics AX for the macro "inventdimdevelop", and all places that needed to be extended came up.  The hole process was done in under 3 hours.  Now the tricky part is starting, and that is to build all the funtionallity on to.  I included a small picture to the license plate.
 

Module to be included in E&E WMS II

The original guys behind the inventory transactionsystem (FSB – Flemming, Søren and Benny) is now out with a new module called Inventory II.  This module eliminates the need for large periodic inventory closing timeslots, and will also introduce some new technology called Watermark and SnapShot.  The module also clams to have fixed one of the major drawbacks in the current system, and that is the reservation mechanism.  In Inventory II It is possible to do a reservation on a higher dimensionlevel.  Here you can reserve against the total warehouse, and still be able to move the goods around within the Warehouse.  The exact location or serialnumber can be specified at a latertime, lets say when the items arrives in the pickingarea.  Today I will take a close look on this new module, that I know Microsoft also have evaluated.  My plan is to have this module as the Backbone in the E&E WMS module.  Here is some details that FSB has officially announsed:

Watermark technology

The architecture of Inventory II is based on the new revolutionary Watermark database technology. This technology ensures that even large and complex inquiries can be addressed by the database without performance slow down, even on growing databases.
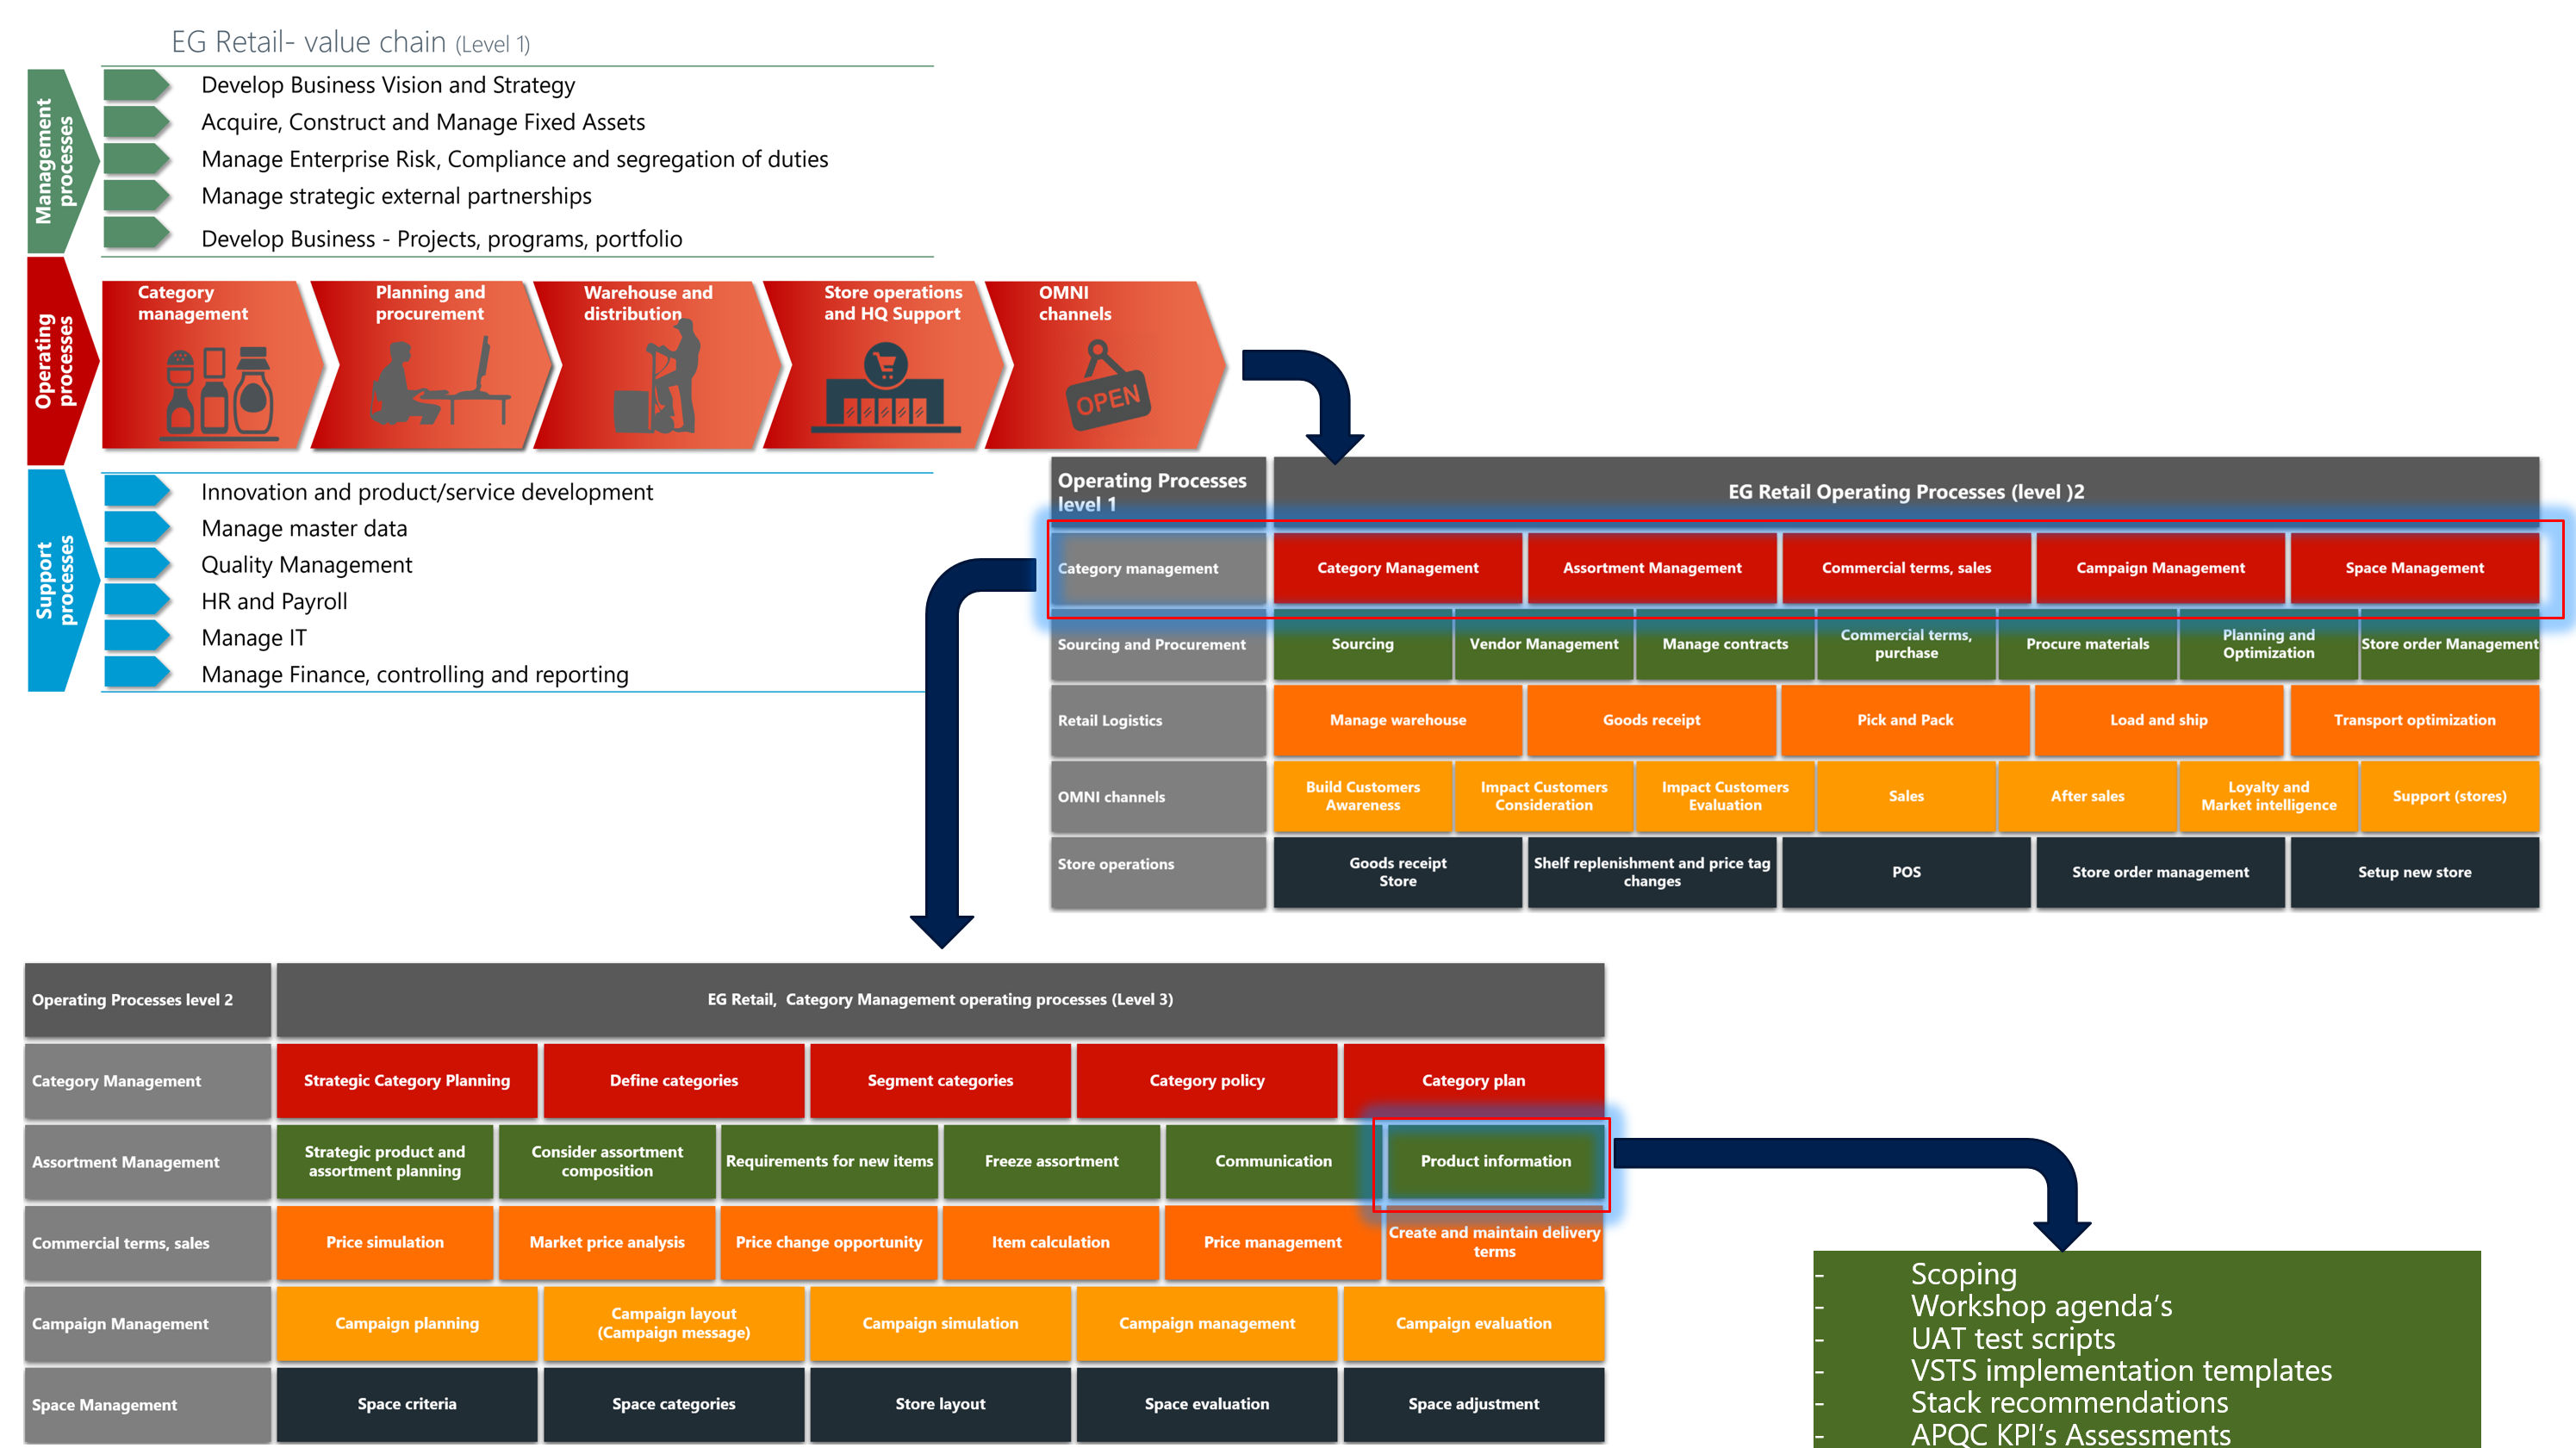
All database inquiries will target a very small amount of data, as transactions are divided into relevant and non-relevant data in a very effi cient way without use of complex index keys, resulting in a second to none performance.

What is the impact of this technology?

Having the Inventory II architecture built on this technology gives significant advantages in the daily operation. These include:
Cost prices are calculated real-time
Master scheduling during daily operation
True 24/7 capabilities
No traditional inventory closing

Real-time reliable cost prices

The Inventory II module is monitoring all inventory movements,resulting in immediate action upon arrival of new or changed cost prices. Cost prices are real-time calculated, adjusted and updated throughout item transfers and bills of materials.

No inventory closing function

Adjustment of item consumption is calculated and posted immediately, whenever identifi ed, eliminating the traditional inventory closing function.

Cost price deviation monitor

Cost price deviations are identifi ed and presented real-time in the deviation monitor, giving the finance department a unique tool to act on. Cost price deviation alerts can be defi ned, reducing the risk for simple errors, like key-in errors in the purchase department or from suppliers that may reside in the system for a longer period, resulting in complicated cleanup tasks.

Physical cost valuation

Inventory valuation can be fi xed on packing slip prices instead of on delayed invoice prices. Upon receipt of invoices, deviations are posted on dedicated General ledger accounts.

New model for weighted average cost

A new simplifi ed periodic average cost price model is introduced.  Average cost prices are always calculated as clean weighted average prices for individual periods. Issues related to uncontrollable number of settlements are eliminated, as settlements are not created anymore.

Intelligent reservation

Rule based reservation levels

With the introduction of reservation levels a new degree of fl exibility is applied to the inventory. This will allow for reservation at less detailed levels, e.g. reservation at a warehouse without determination of location or batch at the time of order intake. Reservation levels can automatically be further specified prior to the time of picking to include e.g. what specific location to pick from. The process of picking is now a matter of reporting what specific items were picked: e.g. batch number, serial number, etc.

Transferring reserved items
Reserved inventory items can now be transferred. The warehouse staff is now free to manage the warehouse in an efficient way not having to struggle with restrictions on reserved items.

FIFO/LIFO reservation and picking order

Inventory II allows for controlling and optimizing the order in which items are reserved. A FIFO or LIFO reservation order can ensure that the oldest or newest items are picked fi rst, while a location reservation order can ensure that the physical process of picking is more optimal according to physical locations.

Lot reservation

Reservations directly on specifi c incoming lots leading to full traceability and transparency on reserved items.

24/7 capability

Run your Master scheduling any time
The Master scheduling can be executed at any time in daily operation and still delivers a consistent profi le even though new transactions are created concurrently.

Open slots for Inventory closing not necessary

The traditional Inventory closing function is not relevant any more as cost prices are calculated real- time. Because of that there are no needs for allocating exclusive time slots for this task during weekends or nights.

No worries regarding blocking locks

Neither Inventory closing (which is now just a matter of changing a date) nor Master scheduling causes blocking locks preventing daily operation to take place.
Simply run your operation 24/7 if you prefer

Performance and scalability

The foundation and architecture of the Inventory II solution has been designed with specifi c regards to high performance and scalability. The unique design patterns such as the Watermark and Snapshot technologies have been chosen out of performance reasons.

The result of this architecture is revolutionary:
Blocking lock issues in inventory are nonexistent. The improved concurrency will set new standards for scalability.

Inventory inquiries execute incredibly fast, independent of transaction volume, even on historical data.

Real cost prices

are calculated real-time, but the individual users are not affected by this processing since it is handled by a smart background process.


Main components in E&E WMS

The WMS E&E will cover most major components, and here is a list/overview of what lies ahead of us. 

The solution will be wide and deep.  As some has commented, many of theese solutions already exists, but not with the extensions we plan to include. 

One of the major elements is integrations to coveyor and storage systems, like univeyor.

Evaluation of the new Rapid Configuration Tool

I have been using the RCT tool for Axapta 3.0, and it was not the time to look at the RCTY tool for Dynamics Ax 4.0.  That was a disepointment. Much has been removed from the tool.  To remove the checklist and the helpfile was a bad decision.  The checklist’s is very user-friendly and give a much easier overview of the progress.  Keep also in mind that not all will be using MS Project, or have it installed.  I know about the hard work in coding the checklists, but my guess is that without it, the use of the tool will be marginalized.  Trust me.  The concept of having a nice graphical view of the implementation is important.  My belief is that this tool will not be used without it, because the concept of a checklist gives an impression of a best practice way of implementing Dynamic AX.  The tool was also used, and nice to have in the background to follow the progress of an implementation.  People also returned to the checklists to double check the setup date, and to get access to video, powerpoint presentations and documents. 


Our clients said “WOW!” when they understood and saw the easy visual GUI of the RCT.  Now we only have the boring normal presentation with tree’s, grids, tabs and buttons.


I’m also missing the nice help file that was included and integrated into the RCT of Axapta 3.0.

I feel that the RCT in Ax 4.0 is only a shadow of the solution that was available in Ax 3.0.  Please include a decent Helpfile and a checklist.


Take a look at the following screens, and tell me which is the most user-friendly :

Sorting on the “Release sales order picking”

It seams that the sorting and filtering of the "release salesorder picking" doesn’t work.
Thats to sad, because often you want to filter and sort based on date/salesordernumber or customer.
 
When you now are trying to sort, nothing happens.  I think the reason for this is that there is a innerjoin between the salesline table an a temperary table.
 
I’ll digg into it an check if it’s easy to change.
.
.
.
Actually the sorting query are set when you open the window, and it cannot de resetted, before you go out and inn again.  I had great expectations to the new functionallity, but I see now that it’s too shallow.  More advanced companies can have 20.000 + different items, and more then 20.000 open orders.  Then it’s impossible to do a manual item allocation.  Even the form will be extreemly slow, because it will take very long time to traverse though the 20.000 orders, and placing them in the temporary table.  This means that it’s still need to create a lot of addons regarding the advanced distribution and picking. 
 
I also see that this form actually are working orderline by orderline, but often a customer primary wants to see the allocation order by order.  When a orderline is physical reserved on another warehouse then the need for allocation should be cleared.  
 
Often there is a need to create some kind of "Wave"-solution, where you also take into account the movement of items from a warehouse/location to another.  Often the picking area is to small to handle items for all the orders, so there is a need to create a limit.  Tehrefor often the customer desides for that they should be able to deliver 3000 orders the next day, and the system should create transfer orders to supply the right items.  It is important to remember that you need to more the right items, or you will get a large backlog of orders waiting for only a few items.
 
I personally would like to add a lot more functionality here.
 

My first located error in Ax 4.0

It’s isn’t my intension to talk negative about the new Ax 4.0 version, but I will use the blog to find and document bugs in Ax 4.0.   Later I will send in a Service Request to Microsoft, so that all can benefit to improved software quality.
 
Here is my first bug :
 
A new nive feature in Ax 4.0 is the price simulation in sales and project.  The tool aid sales personel in calculating and saving various scenarios for sales orders.  but if you choose to the the new contribution ration to 100, you will get a dived by Zero error, as follows :
 
Error:
Error executing code: Division by zero.
Stack trace
(C)\Forms\SalesQuotationPriceSimulation\Data Sources\SalesQuotationPriceSimTable\Fields\ContributionRatio\Methods\modified
(C)\Classes\FormRealControl\modified
(C)\Classes\FormRealControl\leave
(C)\Classes\FormRun\task
(C)\Classes\SysSetupFormRun\task – line 20
 
I expect that it’s an easy thing to correct in future versions.

First hands on Dynamics Ax 4.0

Well…..Finally I managed to get Ax 4.0 up and running on my windows XP portable.  Actually it was quite easy and strait forward.  Just run the installation and you are up and running.  The only thing that needs to be presence was a connection to AD (Active Directory).  After that, you can take the PC with you anywhere.  Now I will start digging into the application….